Under Monitor Indicators
Overview
The Under Monitor Indicators section helps you continuously track the most important health values of a patient in a visual and structured way.
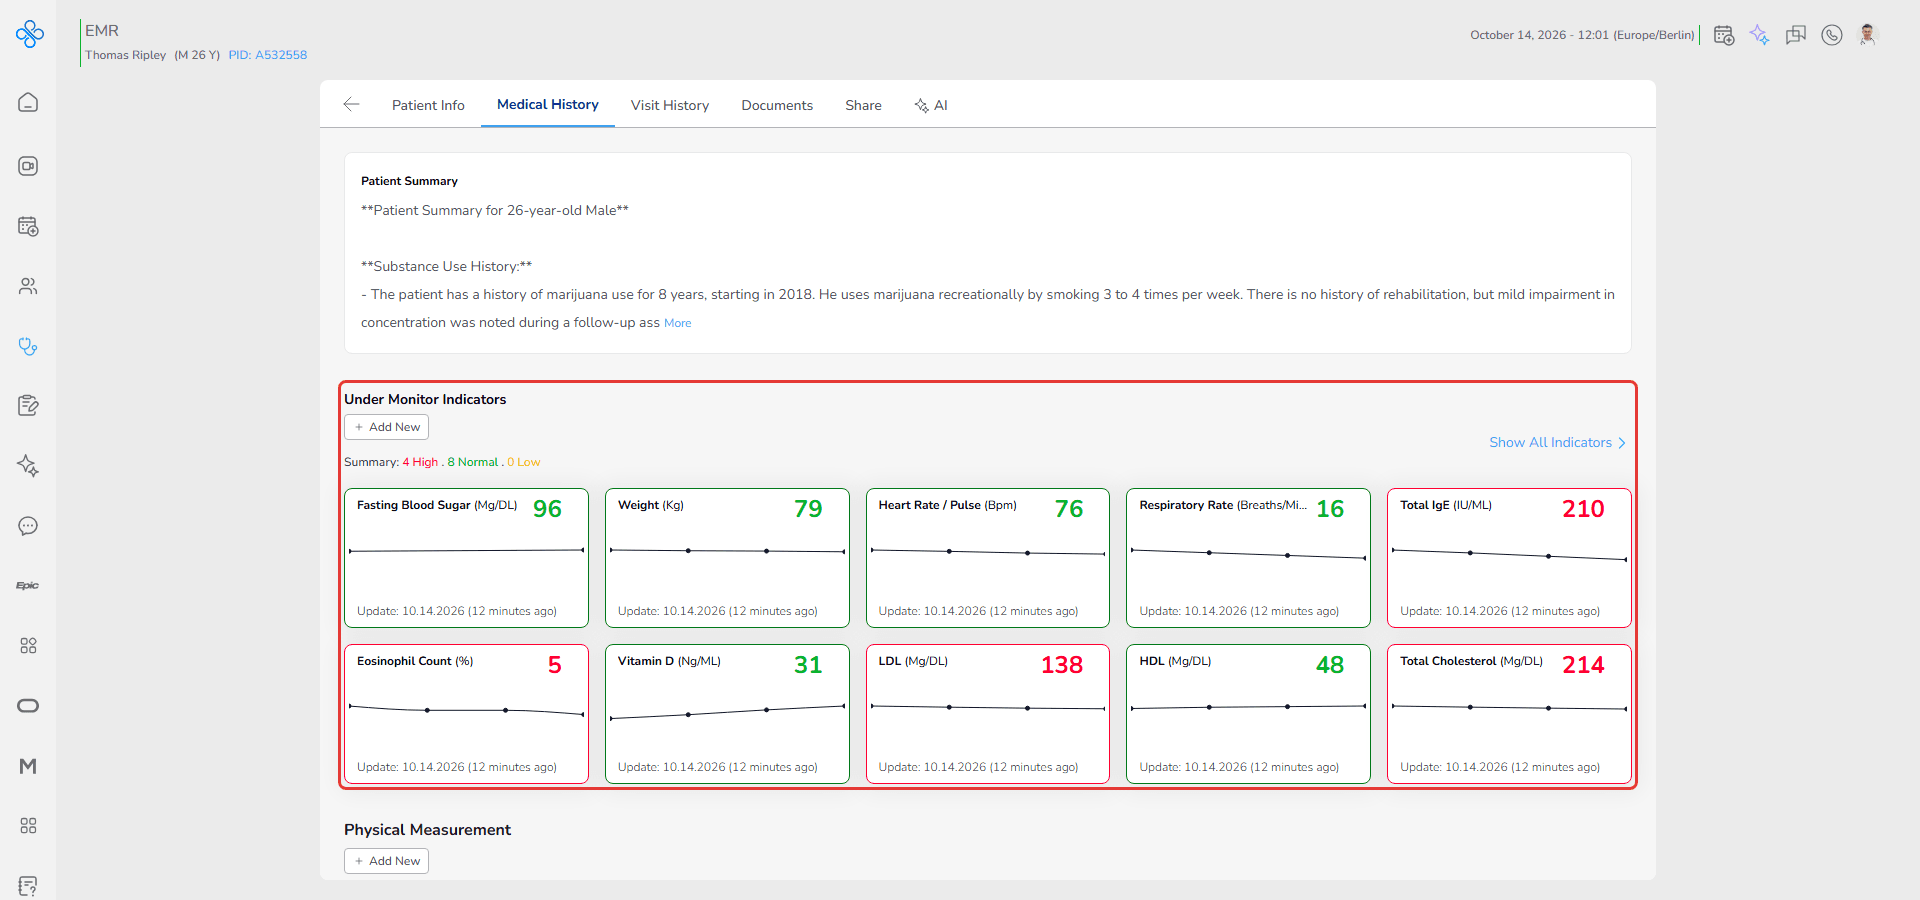
Instead of reviewing long lists of clinical records, this section highlights selected investigations as indicator cards so you can quickly review:
• The latest recorded value
• Whether the value is within the expected range or requires attention
• How the value changes over time through trend charts
Indicators can be created from existing patient data recorded in:
• Biomarkers
• Vital Signs
• Physical Measurements
Examples of commonly monitored indicators include:
• Total IgE
• Vitamin D
• Blood Pressure
• BMI
Each indicator card provides a quick clinical overview without opening the detailed record.
The Medical History page displays up to 10 monitored indicators at a time for easier review.
If more than 10 indicators are being monitored, select Show All Indicators to view and manage the complete list of available indicators.
A Summary line above the cards shows how many indicators are currently High, Normal and Low.
This section is designed to support continuous monitoring and help you quickly identify important changes in the patient's health status.
Access
To access Under Monitor Indicators:
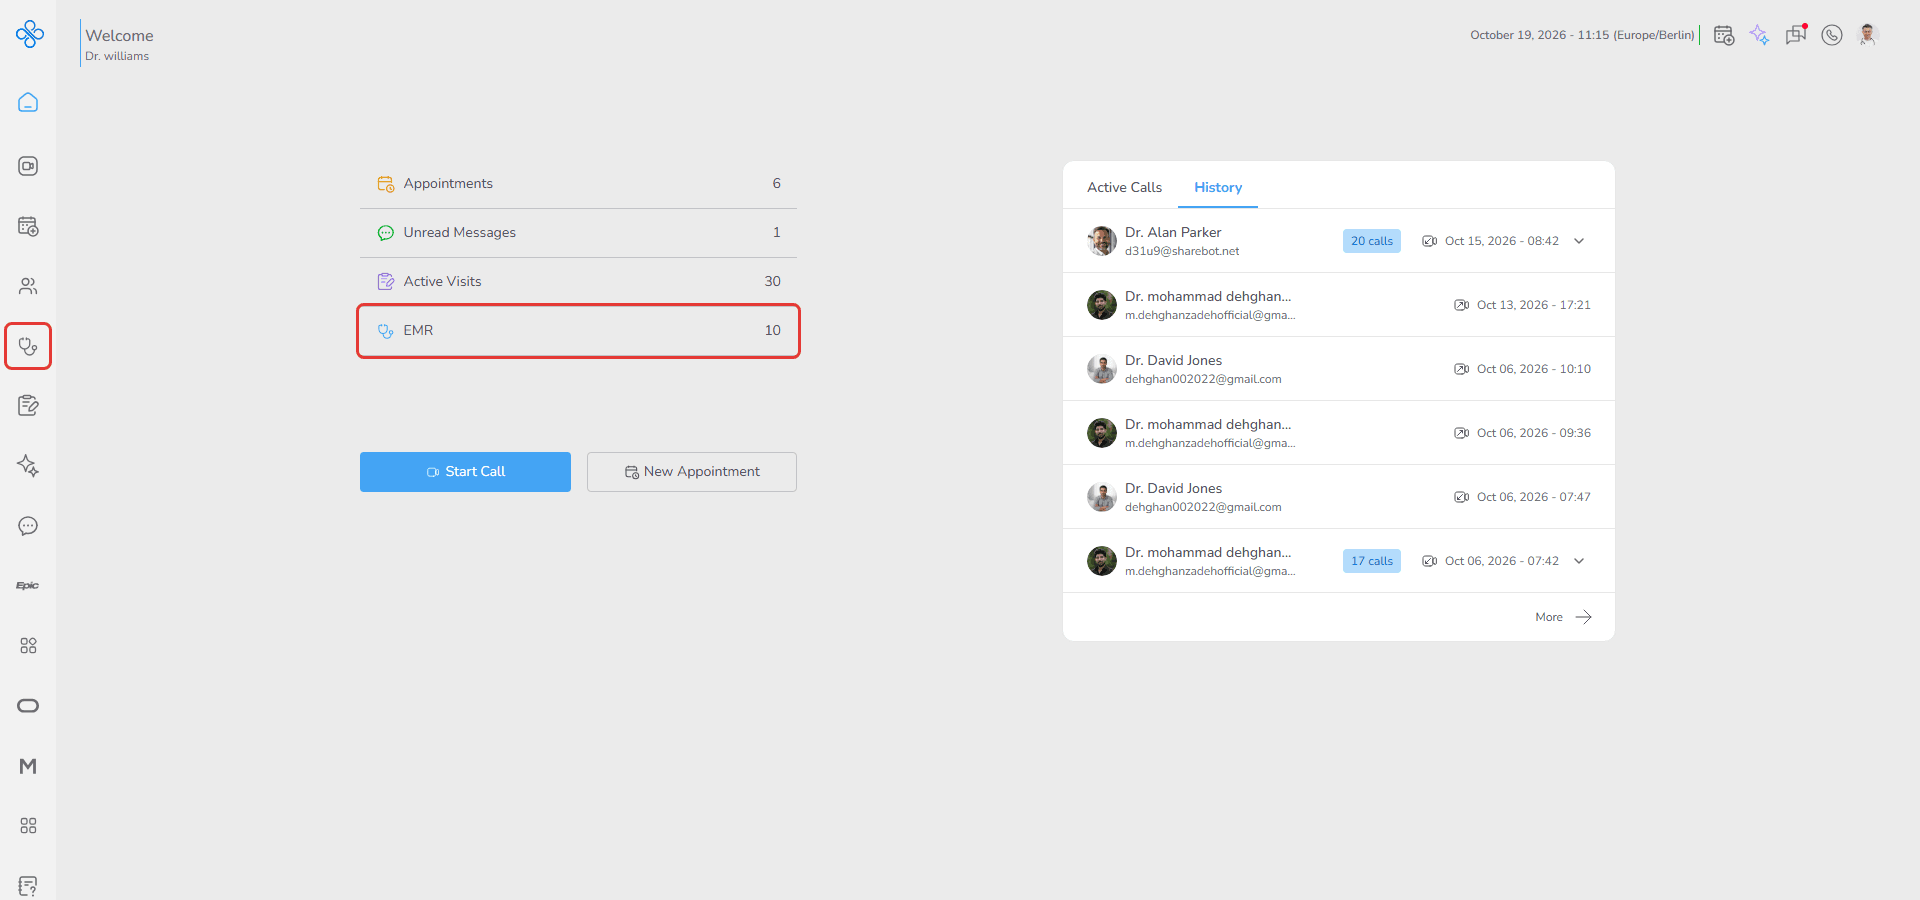
1. Open EMR from the Sidebar or Dashboard shortcut
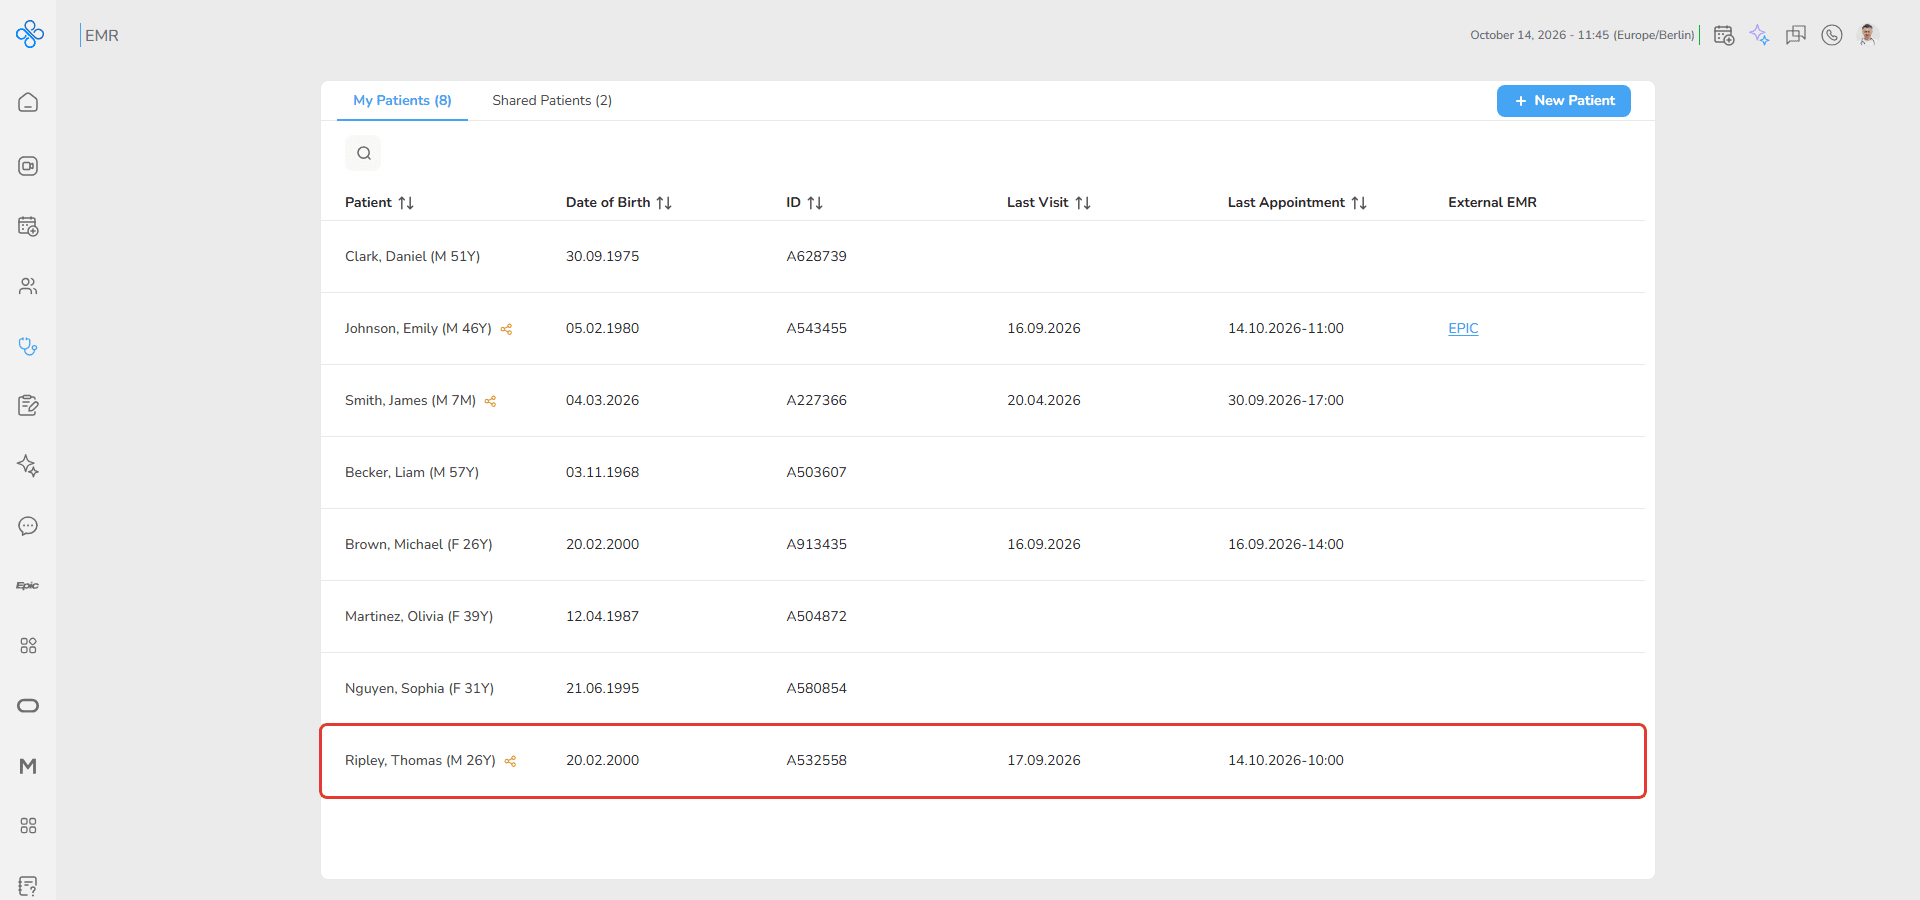
2. Select a patient from the list
3. Open the Medical History tab
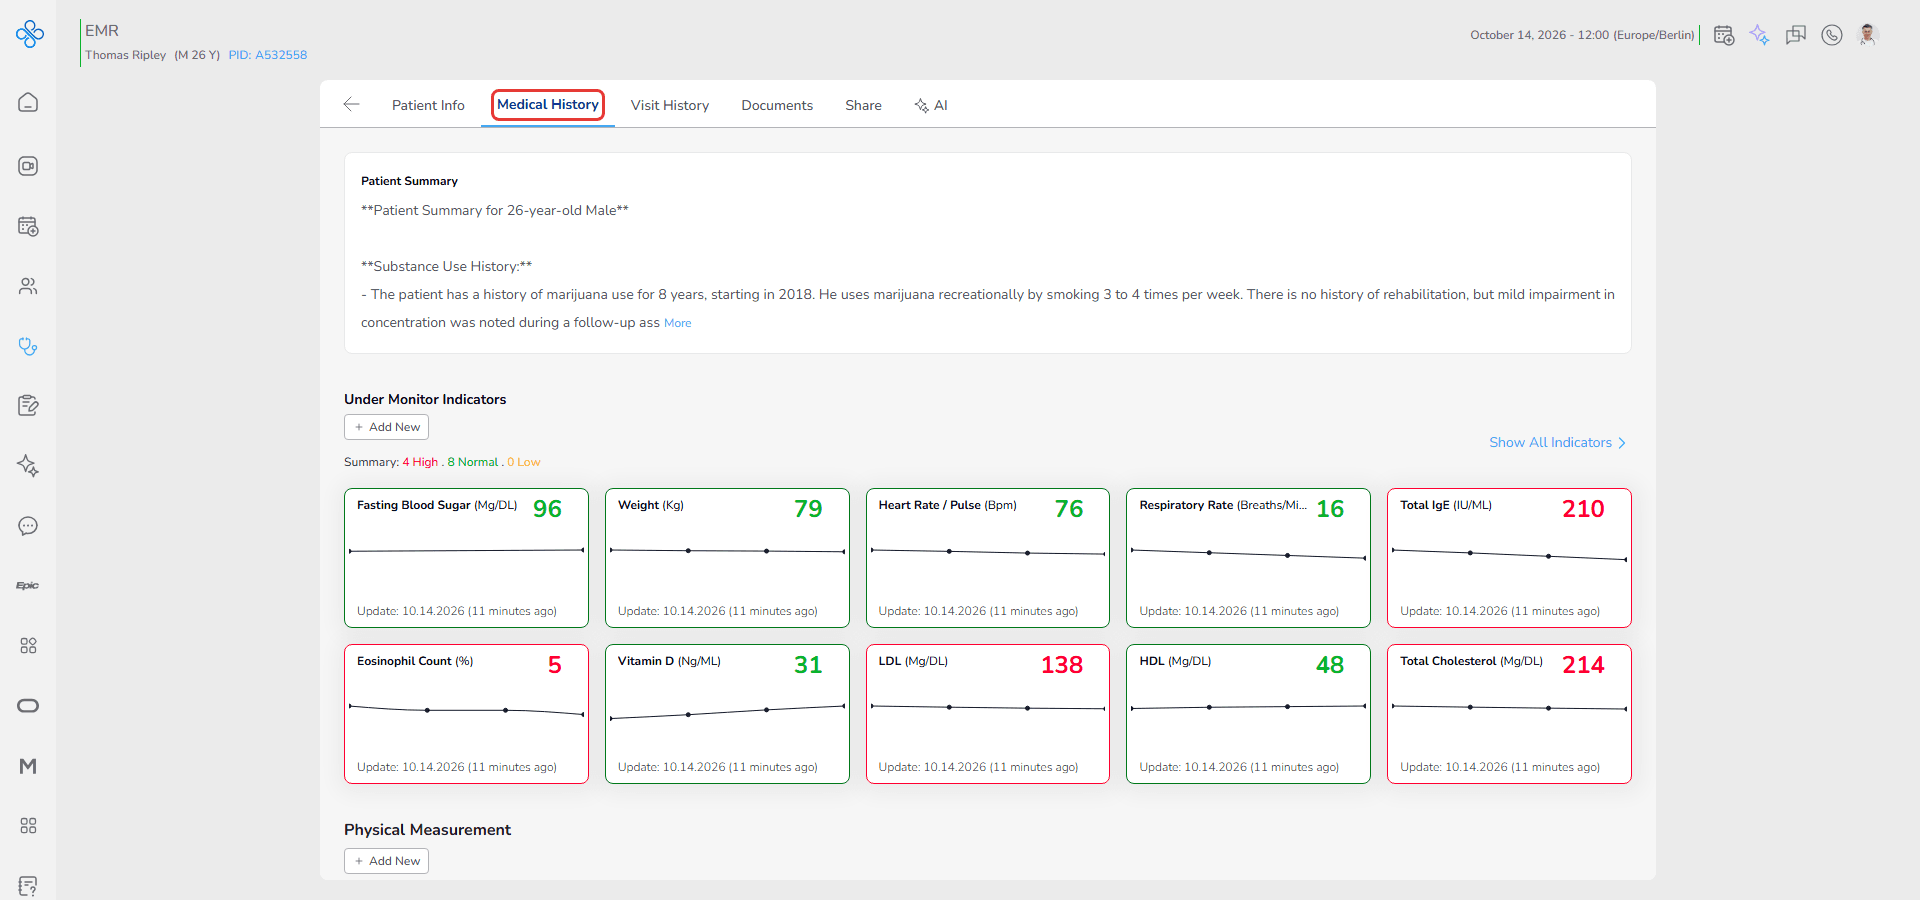
4. Scroll to the Under Monitor Indicators section
If you do not have View permission for Medical History, this section will not be accessible.
If you do not have Edit permission, the Add and edit options will be disabled. (Access is explained in the Share guide.)
Steps to Add a New Indicator
1. Open Add New Indicator
- Go to the Medical History tab
- Scroll to the Under Monitor Indicators section
- Click + Add New
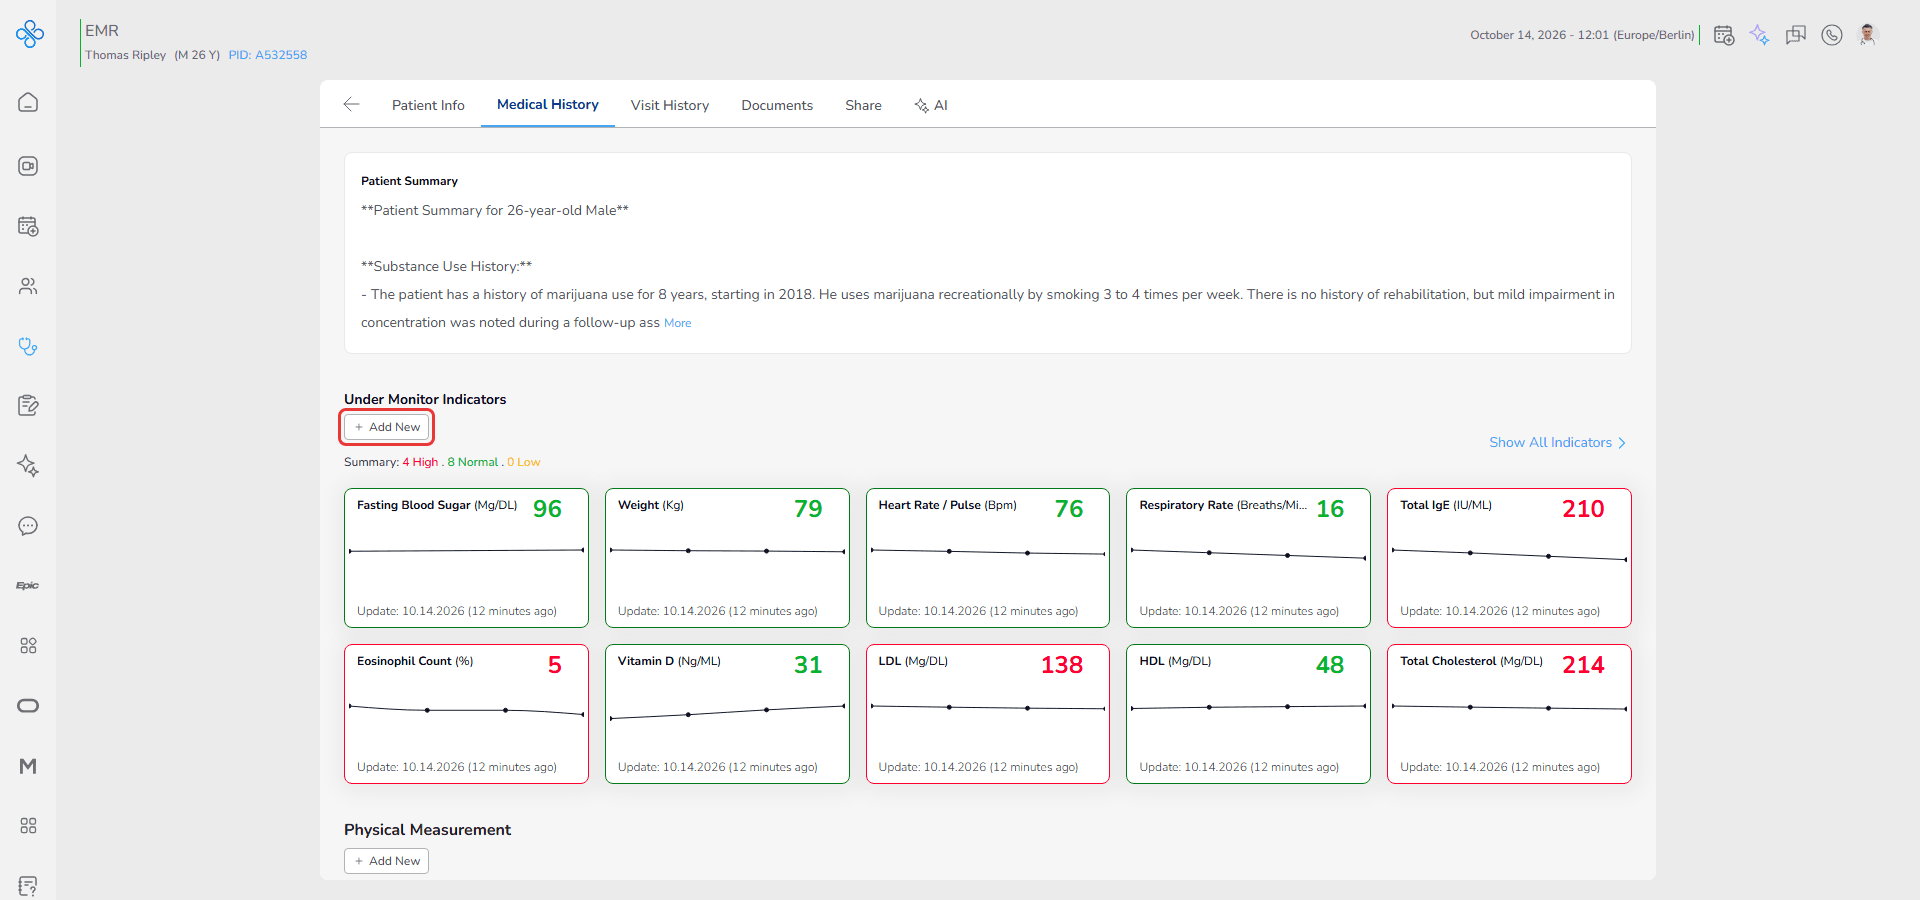
The Add New Indicator modal will open.
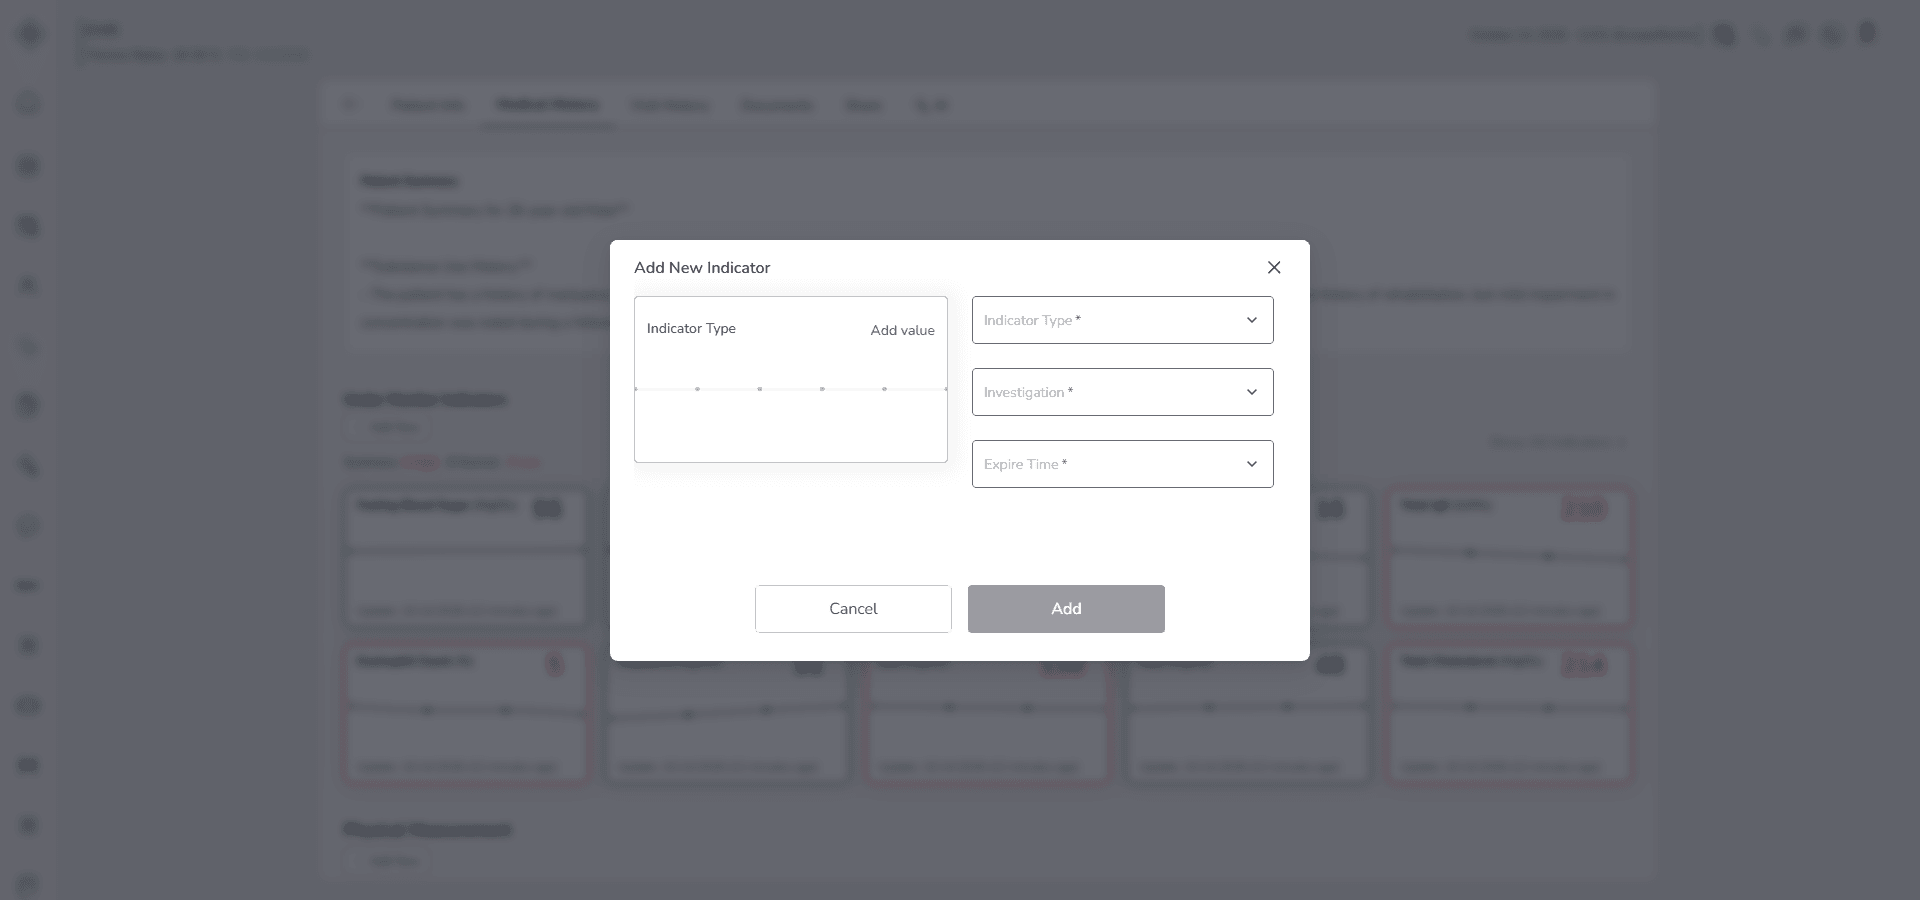
This modal allows you to select an existing patient measurement and add it to the monitored indicators list.
2. Fill in the Indicator Form
Inside the New Indicator modal, complete the fields in the following order:
Select Indicator Type
This field defines the source of the indicator. Available options:
• Physical Measurements
• Vital Signs
• Biomarkers
The available options depend on existing patient records.
Behavior:
• If a category contains saved records, it becomes available for selection.
• If no records exist under a category, that option cannot be selected.
• At least one existing clinical record is required before creating an indicator.
Select Investigation
This field remains disabled until an Indicator Type is selected.
Behavior:
- After selecting an Indicator Type, the Investigation dropdown becomes active
- The list displays only the investigations available under the selected section
- The available options are dynamically generated based on existing patient records
Example behavior:
If Vital Signs is selected as Indicator Type
Only saved Vital Sign investigations such as Blood Pressure or Heart Rate will appear
If Biomarkers is selected
Only recorded biomarkers such as Fasting Blood Sugar or LDL will appear
If no investigation exists under the selected type
No indicator can be created for that category
Select Expire Time
This field defines how long the indicator remains active in the Under Monitor section.
Available options:
- 1 Day
- 1 Week
- 1 Month
- 3 Months
- 1 Year
Behavior:
- The selected time determines automatic expiration of the indicator
- After expiration, the indicator will no longer remain active in the monitoring list
Make sure all required fields are selected before proceeding.
3. Save the Indicator
Click Add.
After saving:
- The new indicator appears immediately as a card in the Under Monitor Indicators section
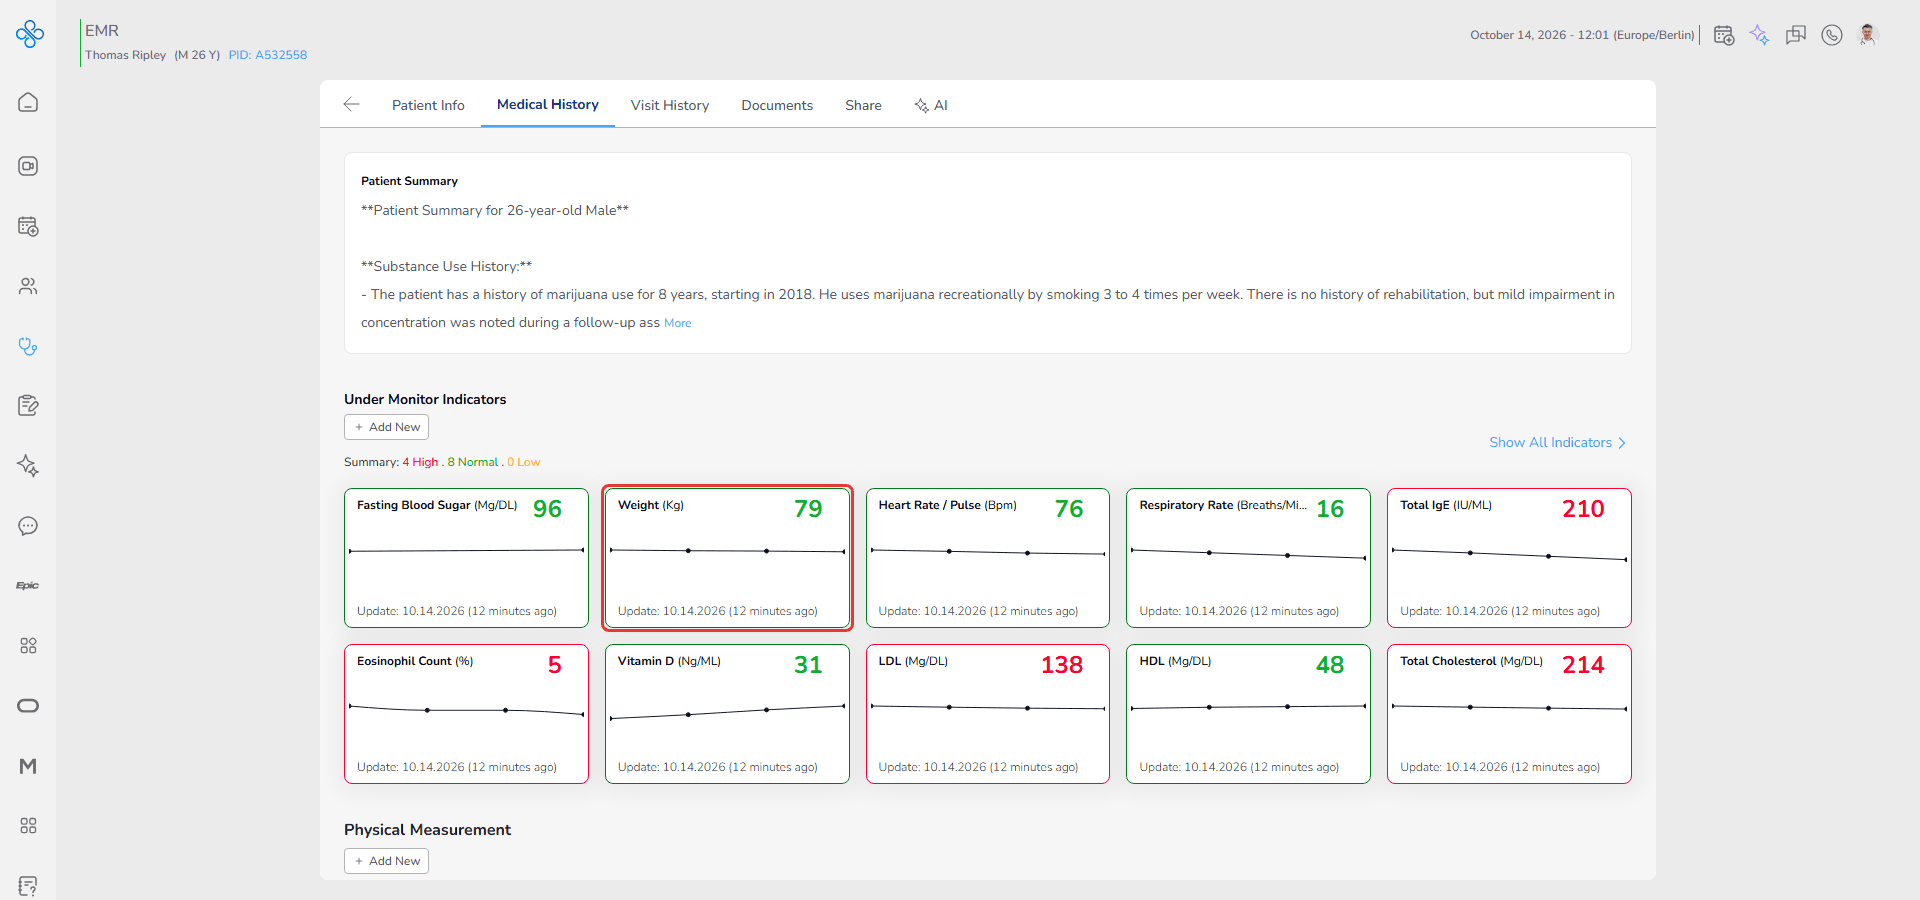
- The indicator is linked to the selected investigation
- Monitoring begins based on the selected expiration period
If required fields are incomplete, the Add button remains inactive.
Understanding Indicator Cards
Each monitored investigation is displayed as an individual indicator card.
The card provides a quick overview of the latest recorded value together with its monitoring status and recent trend.
Each card contains:
- Indicator name
- Latest recorded value
- Measurement unit when available
- Trend chart showing historical values
- A color status
- A More Actions menu
- Expiration status when applicable
The trend chart is automatically updated whenever a new record is added for the monitored investigation.
Selecting an indicator card opens a larger trend chart, allowing you to review historical changes over time.
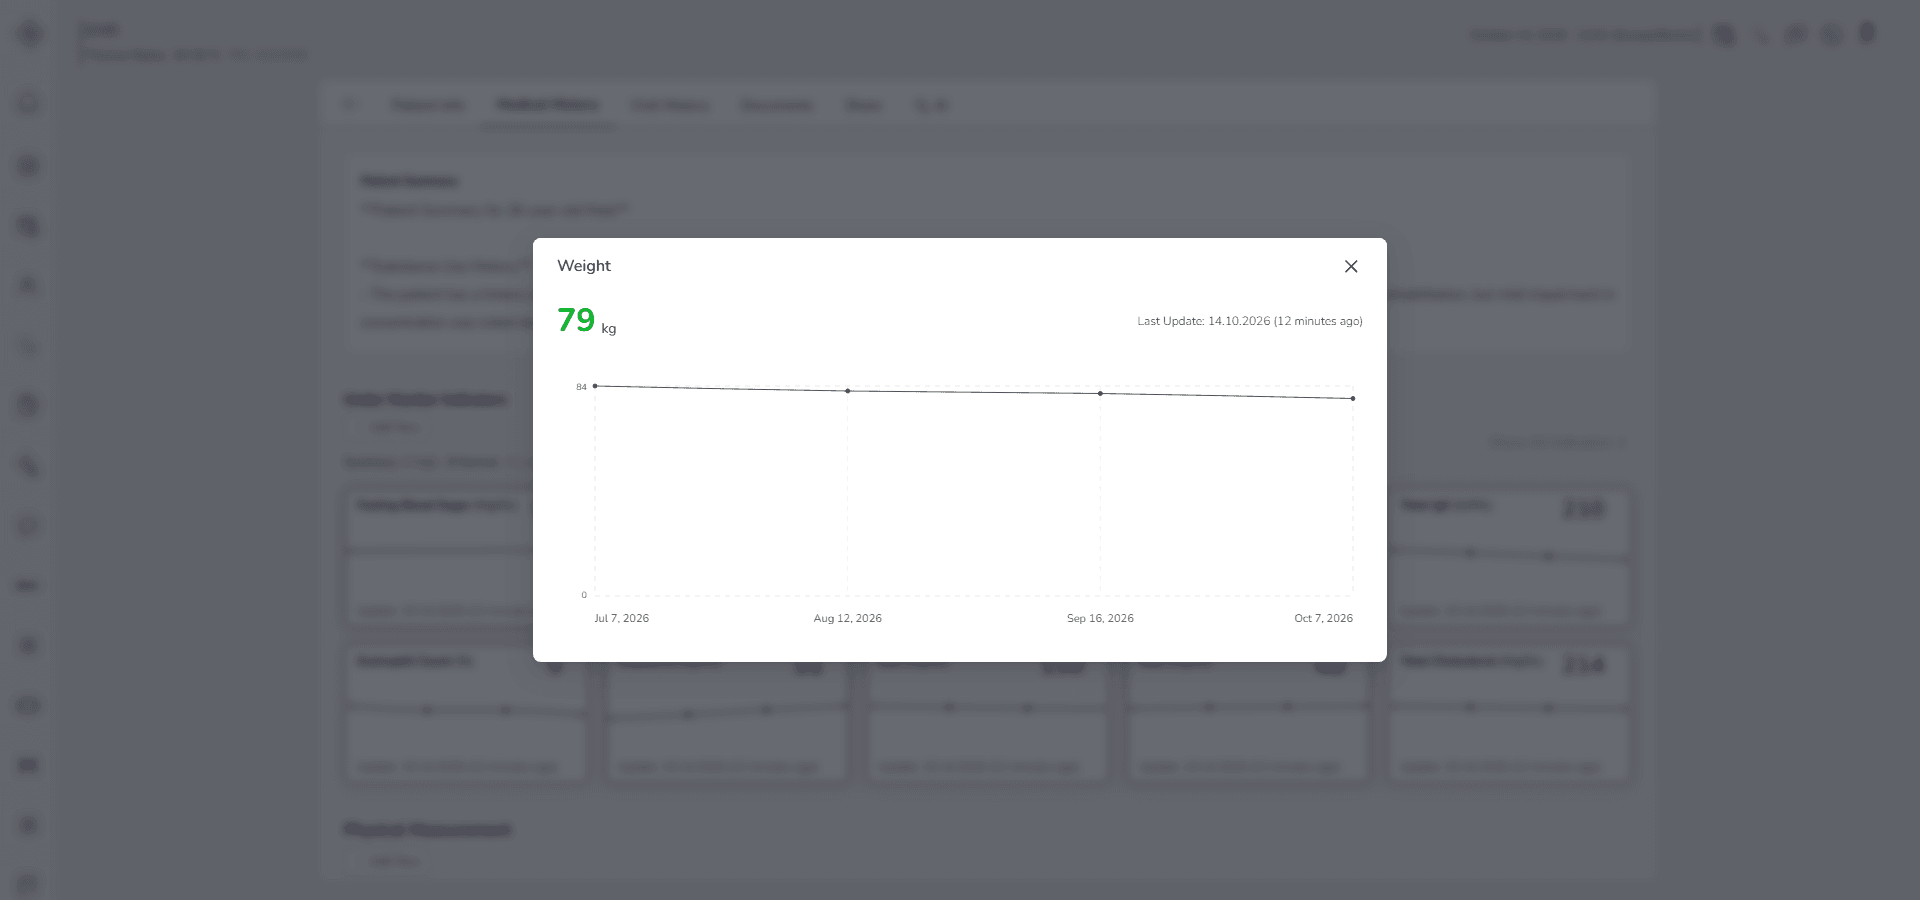
This makes it easier to evaluate whether the patient's condition is improving, remaining stable or worsening.
Card Status Colors
Each indicator card uses a border color to quickly communicate the current clinical status.
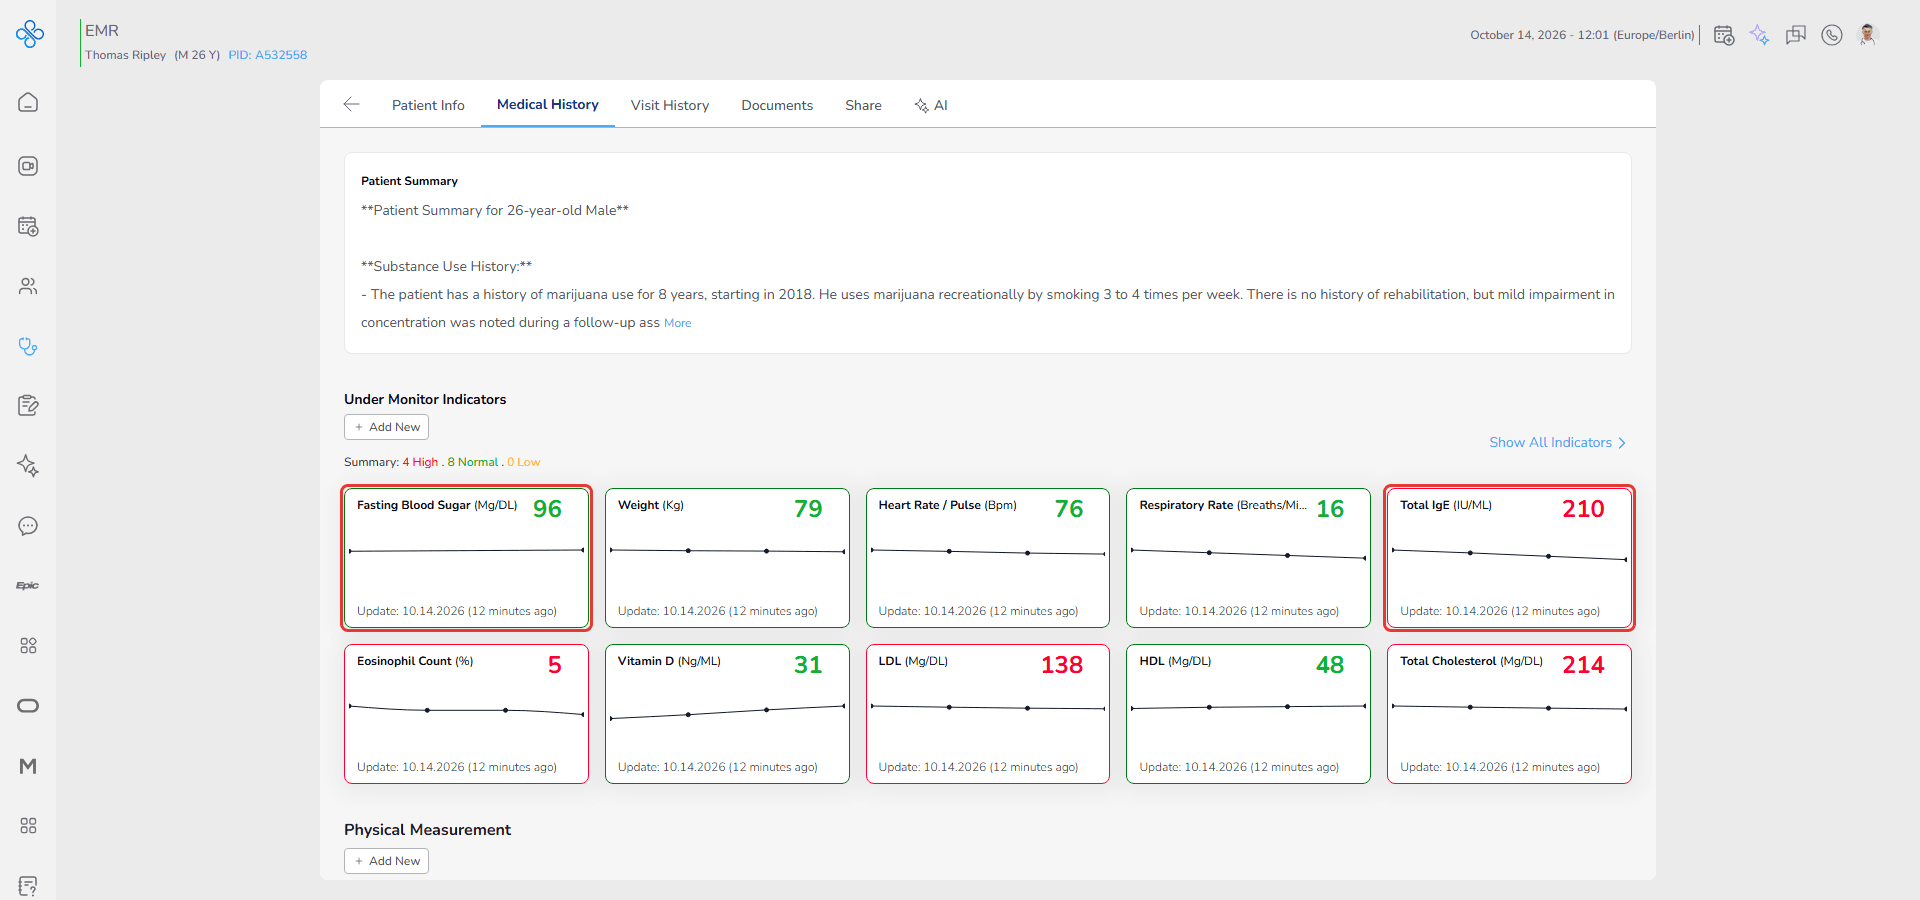
- Green → Latest value is within the normal reference range
- Yellow → Latest value is outside the reference range but does not require immediate attention
- Red → Latest value requires clinical attention
- Gray → No value has been recorded yet or no reference range has been defined for the investigation
These colors are updated automatically whenever a new measurement is recorded.
View All Indicators
When more than 10 indicators are being monitored, the Show All Indicators button appears in the Under Monitor Indicators section.
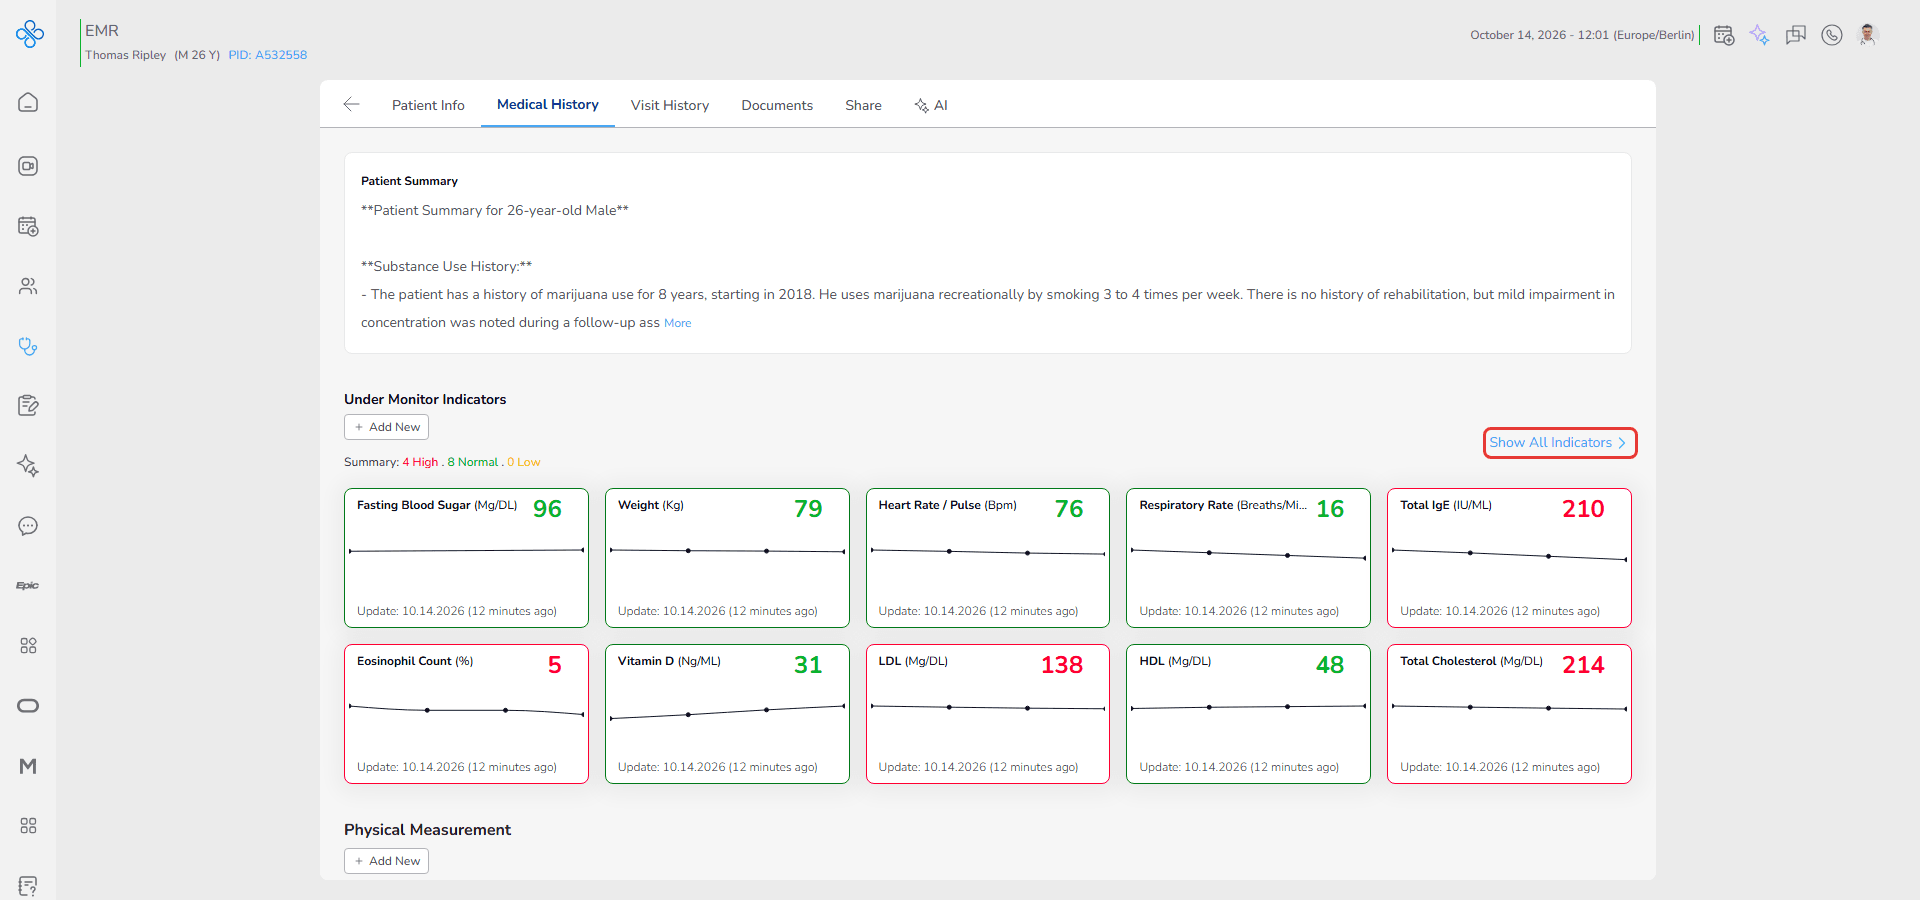
Click Show All Indicators to open the All Indicators modal.
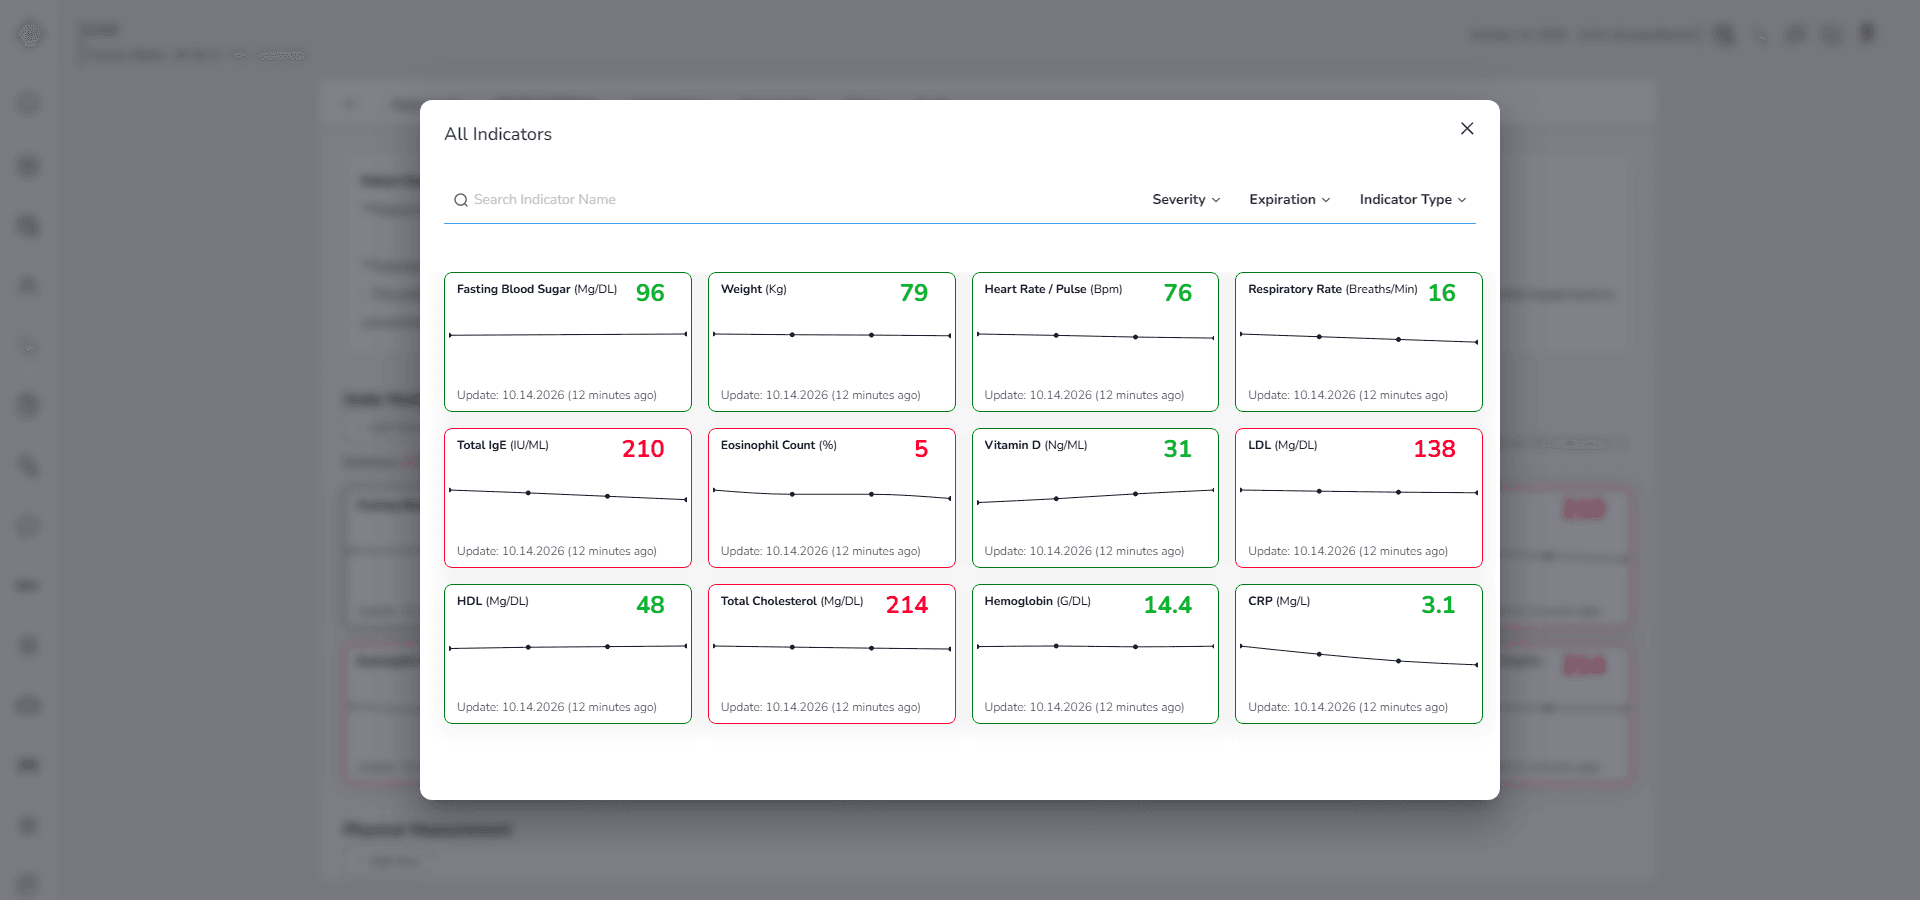
This modal allows you to view all monitored indicators and quickly find specific indicators using search and filters.
Search Indicator
Use the search bar at the top of the modal.
Enter the indicator name to find a specific indicator.
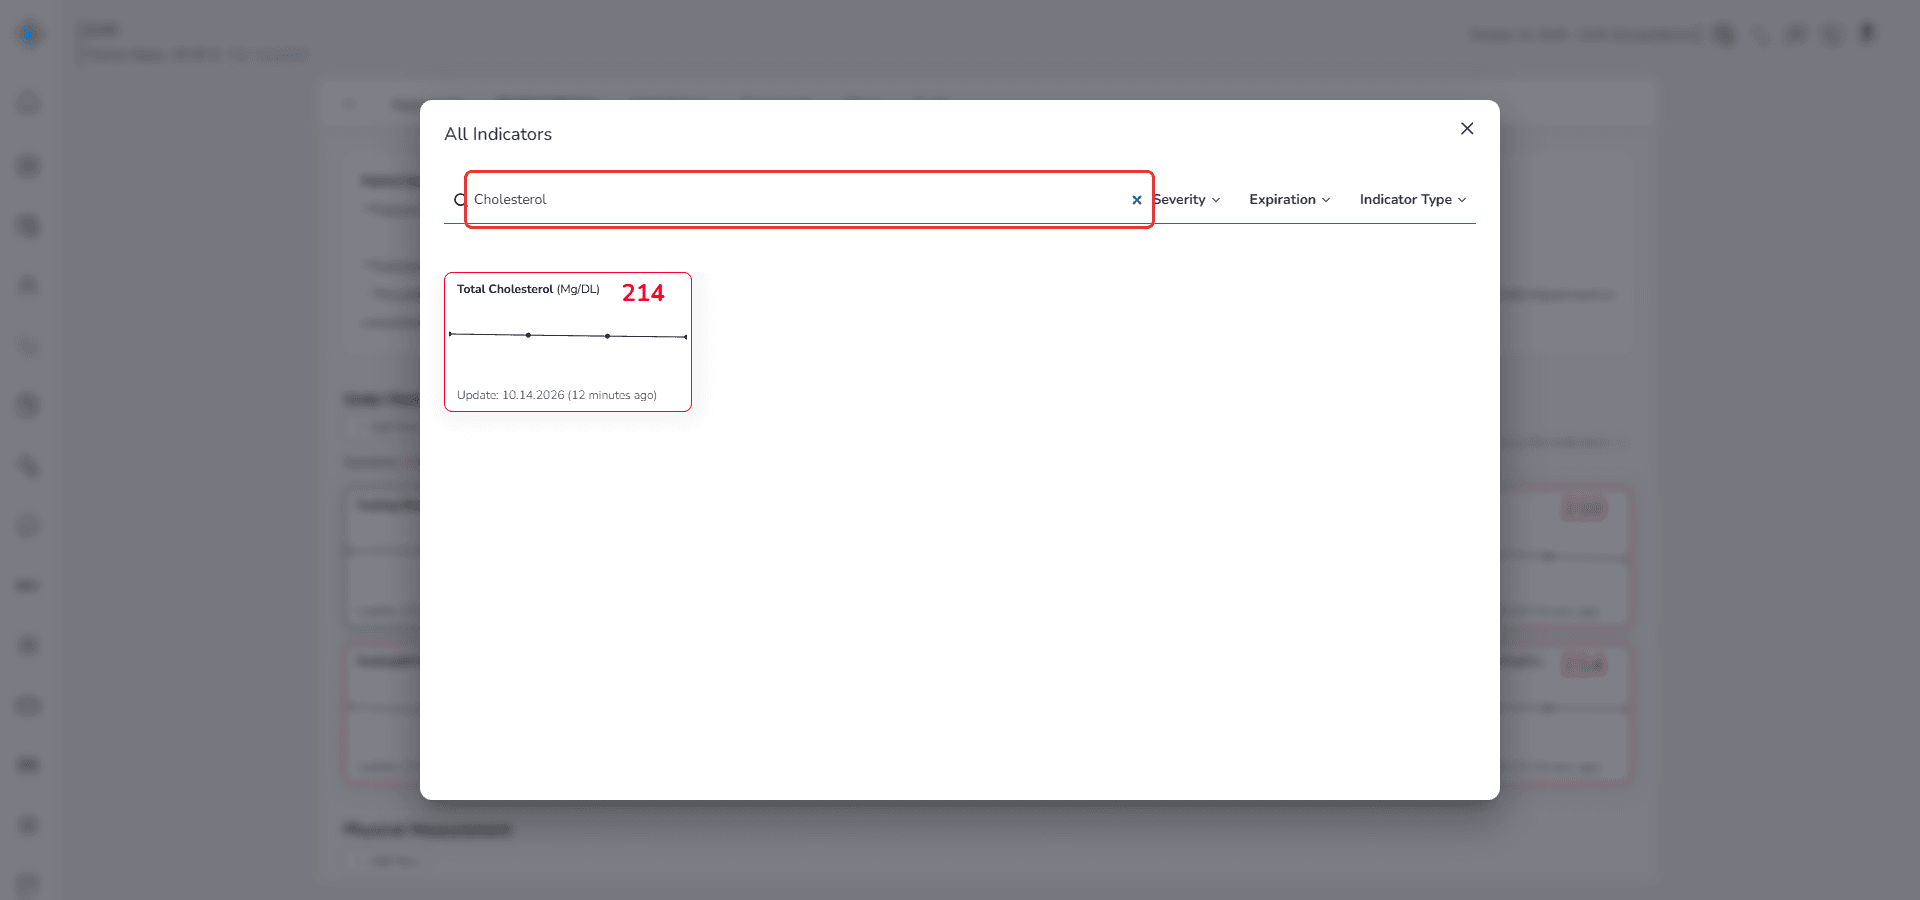
The list updates based on the entered keyword.
Filter Indicators
You can filter indicators using the available filters.
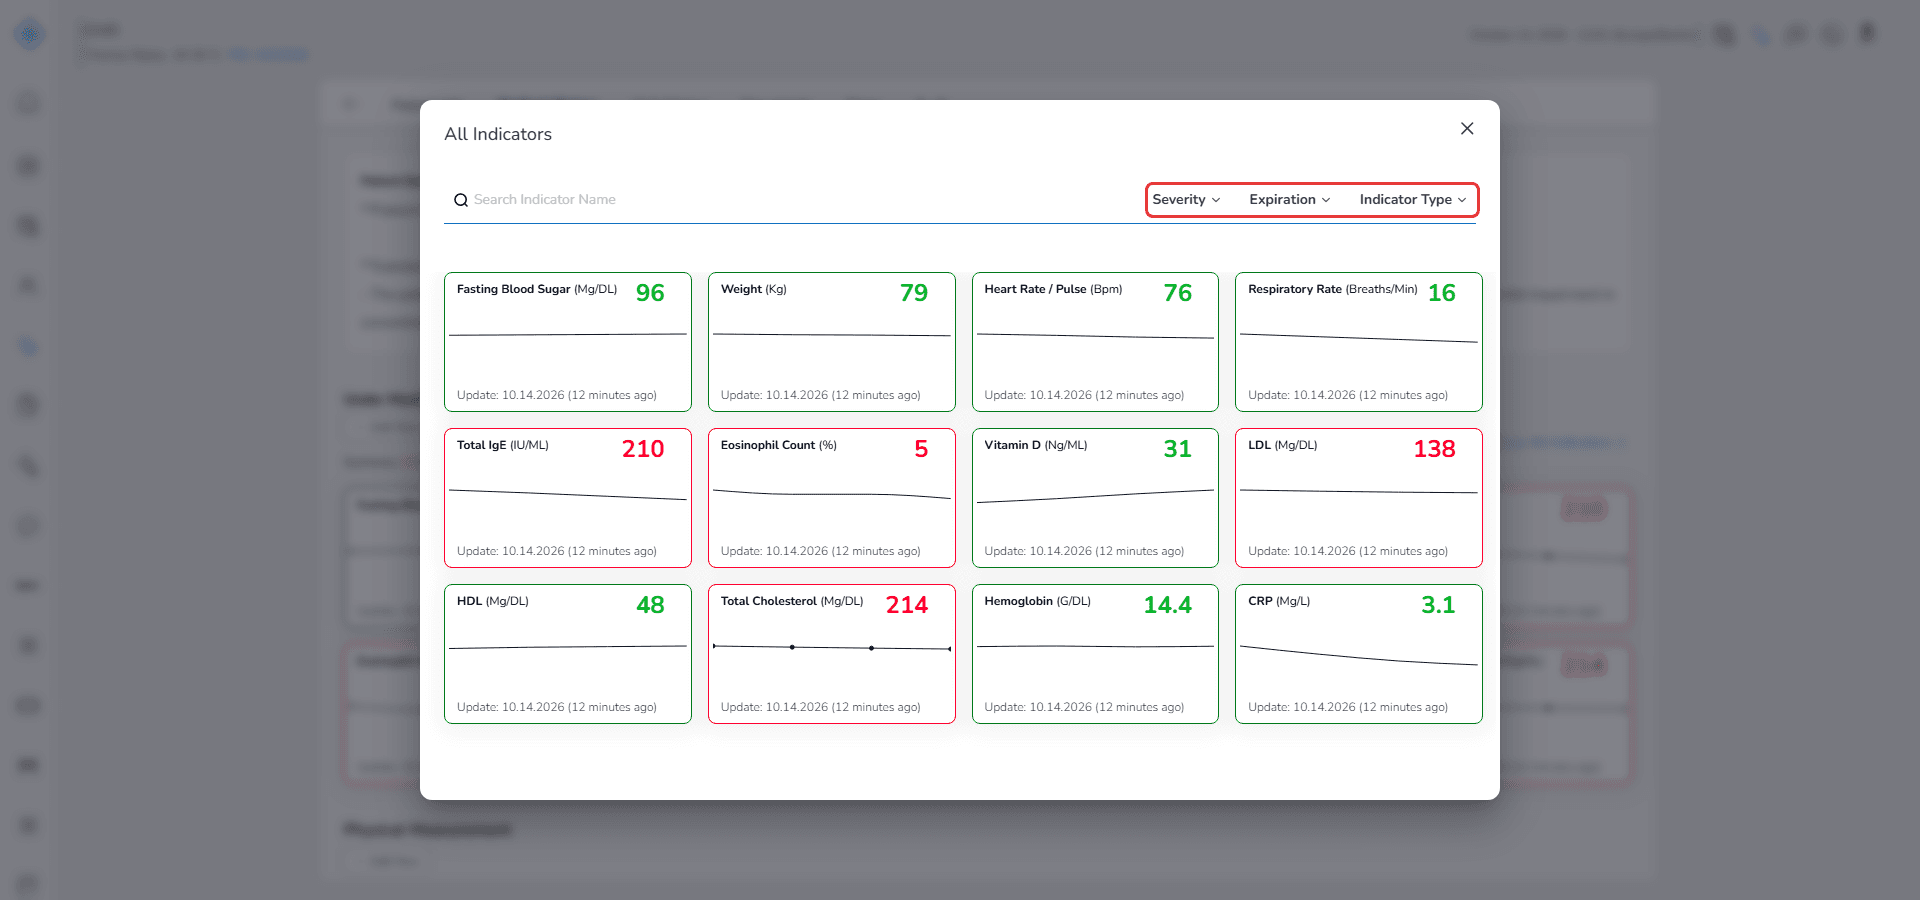
Filters can be combined and multiple values can be selected at the same time.
Severity Filter
Filters indicators based on their current status.
Available options:
• All
• High
• Normal
• Low
• No Range
Expiration Filter
Filters indicators based on monitoring status.
Available options:
• All
• Active
• Expired
Indicator Type Filter
Filters indicators based on their source category.
Available options:
• All
• Biomarkers
• Vital Signs
• Physical Measurements
Filter and Search Behavior
• Search and filters can be used together.
• Applying filters updates the displayed indicator cards immediately.
• Selected filters remain visible while browsing the results.
Manage an Existing Indicator
Each card includes a More Actions menu shown as ⋮
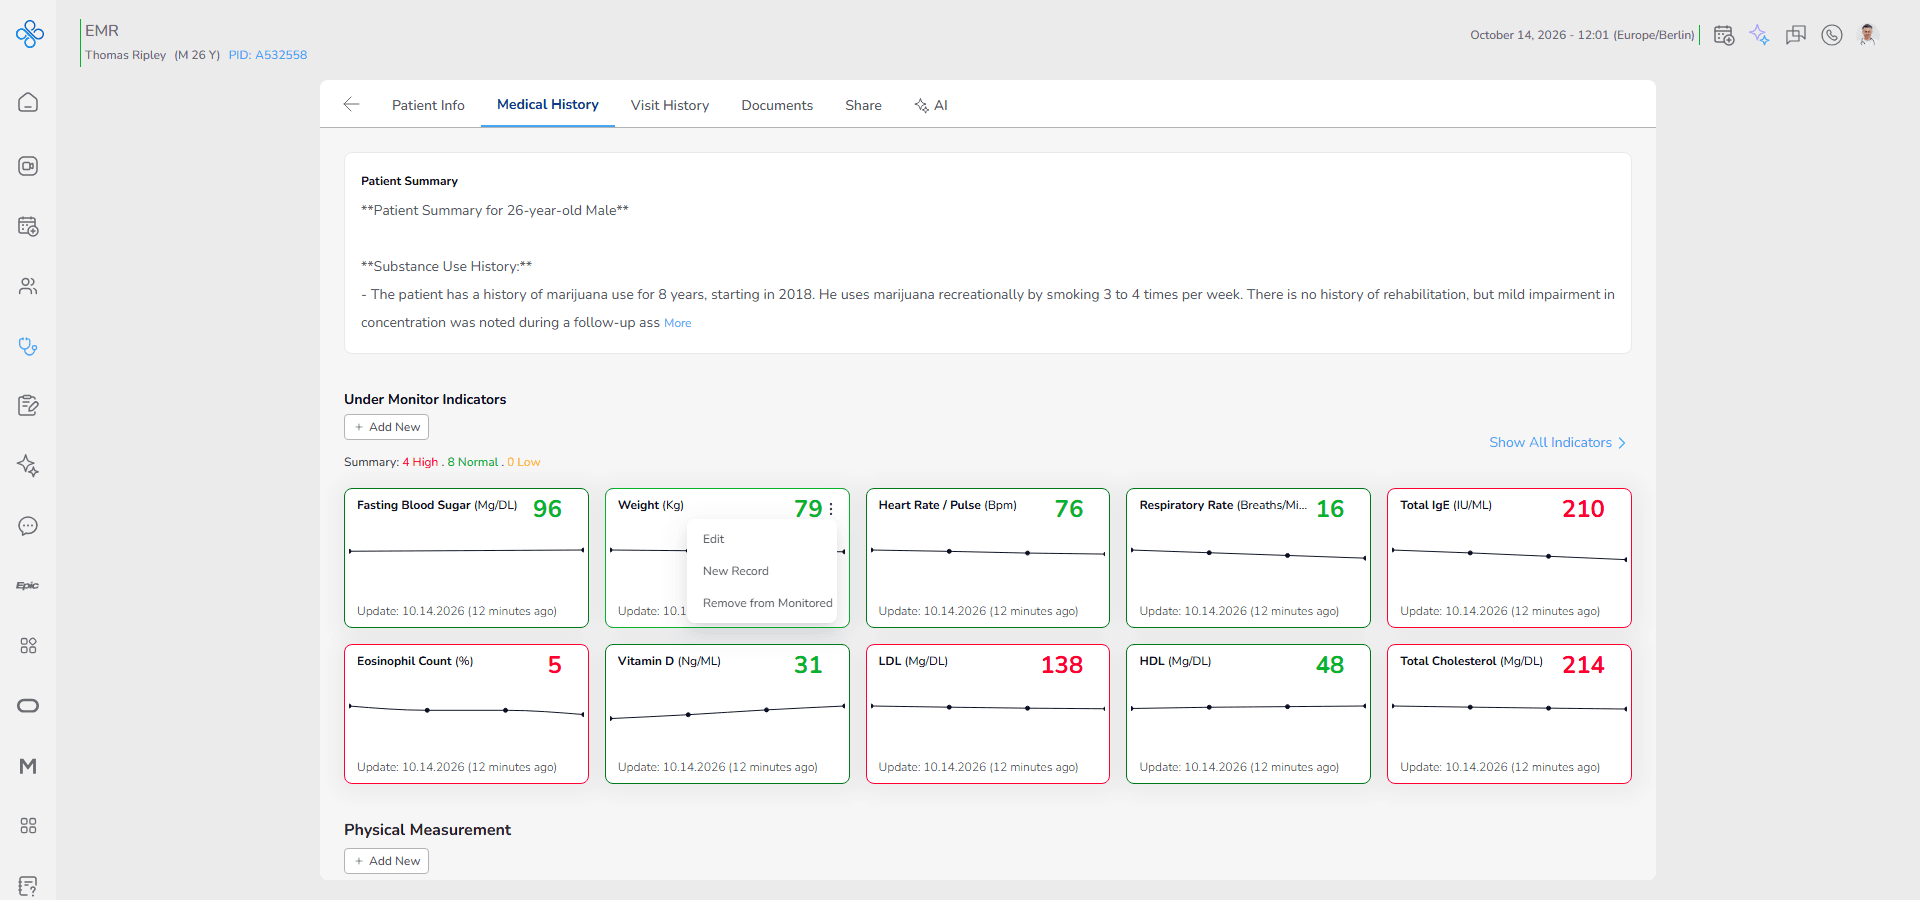
From this menu you can:
- Edit → Update indicator settings or configuration
This option allows you to modify the indicator configuration without affecting the original clinical records.
You can update the expiration time or adjust related monitoring settings. The linked investigation and previously recorded measurements remain unchanged.
Changes are applied immediately after saving and the indicator card is updated accordingly.
- New Record → Enter a new measurement to update the trend
This option allows you to directly add a new value for the same investigation from within the indicator card, without navigating back to its original section.
If an investigation already has an active indicator, you can continuously add new measurements from the indicator itself. The new value is automatically linked to the same clinical record and updates the monitoring trend in real time.
This ensures faster follow up documentation and continuous tracking of high risk or monitored parameters.
- Remove from Monitored → Remove the indicator if it is no longer needed
This option removes the indicator from the Under Monitor Indicators section.
Deleting an indicator does not delete the related investigation or its recorded measurements. It only stops active monitoring for that parameter.
A confirmation step is required before deletion. Once confirmed, the indicator is permanently removed from the monitoring list.
You can enable monitoring again later if needed.
When you add a new record, the trend chart updates automatically.
Fields (Field Descriptions)
| Field | Description | Notes / Example |
|---|---|---|
| Indicator Type | Selects the source of the indicator. | Available options include Physical Measurements, Vital Signs and Biomarkers. Only categories containing existing patient records can be selected. |
| Investigation | Selects the investigation to monitor. | Available investigations depend on the selected Indicator Type and include only existing patient records. |
| Expiration Time | Defines how long the indicator remains active before being marked as expired. | Available options are 1 Day, 1 Week, 1 Month, 3 Months and 1 Year. |
Behavior & Expected Outcome
After creating an indicator:
- A new indicator card appears immediately in the Under Monitor Indicators section.
- The indicator is linked to the selected investigation.
- The latest recorded value is displayed on the card.
- The trend chart reflects all available historical measurements for that investigation.
- Up to 10 indicator cards are displayed directly in the Medical History page.
- When more than 10 indicators exist, the Show All Indicators button appears.
- Selecting Show All Indicators opens the complete indicator list inside the All Indicators modal.
- Search and filters help you quickly locate specific indicators.
- Multiple filters can be applied at the same time.
- Clicking an indicator card opens a larger trend chart showing the complete measurement history.
- Selecting Edit updates the monitoring configuration without affecting historical records.
- Selecting New Record adds another measurement to the existing investigation and updates the indicator automatically.
- Selecting Remove from Monitored removes only the indicator card. The original Physical Measurement, Vital Sign or Biomarker records remain available in Medical History.
- Indicator colors update automatically according to the latest recorded value and its reference range.
- Indicators marked as expired remain available until they are removed from monitoring or updated.
- Without proper access rights, the Medical History tab remains inaccessible (Access is explained in the Share guide.)
This section ensures that critical health parameters are always visible and easy to monitor during clinical review.
Common Errors + Fixes
| Issue | Cause | Fix |
|---|---|---|
| Unable to create an indicator | No clinical records exist for the selected category | Add a Physical Measurement, Vital Sign or Biomarker record first |
| Investigation list is unavailable | Indicator Type has not been selected | Select an Indicator Type first |
| Add button is inactive | Required fields are incomplete | Complete all required fields |
| Expected investigation is not listed | No records exist for that investigation | Create the investigation record before adding it to monitoring |
| Indicator does not appear in Medical History | More than 10 indicators are being monitored | Click Show All Indicators to view the complete list |
| Search returns no results | No indicator matches the entered keyword or applied filters | Clear or adjust the search text and filters |
| Indicator is marked as Expired | The selected expiration period has elapsed | Edit the indicator and update its expiration time if monitoring should continue |
| Indicator disappeared after Remove from Monitored | Monitoring was intentionally removed | Create a new indicator for the investigation if monitoring is needed again |