Past Medical History
Overview
The Past Medical History section allows you to systematically record and organize a patient’s medical background in a structured way.
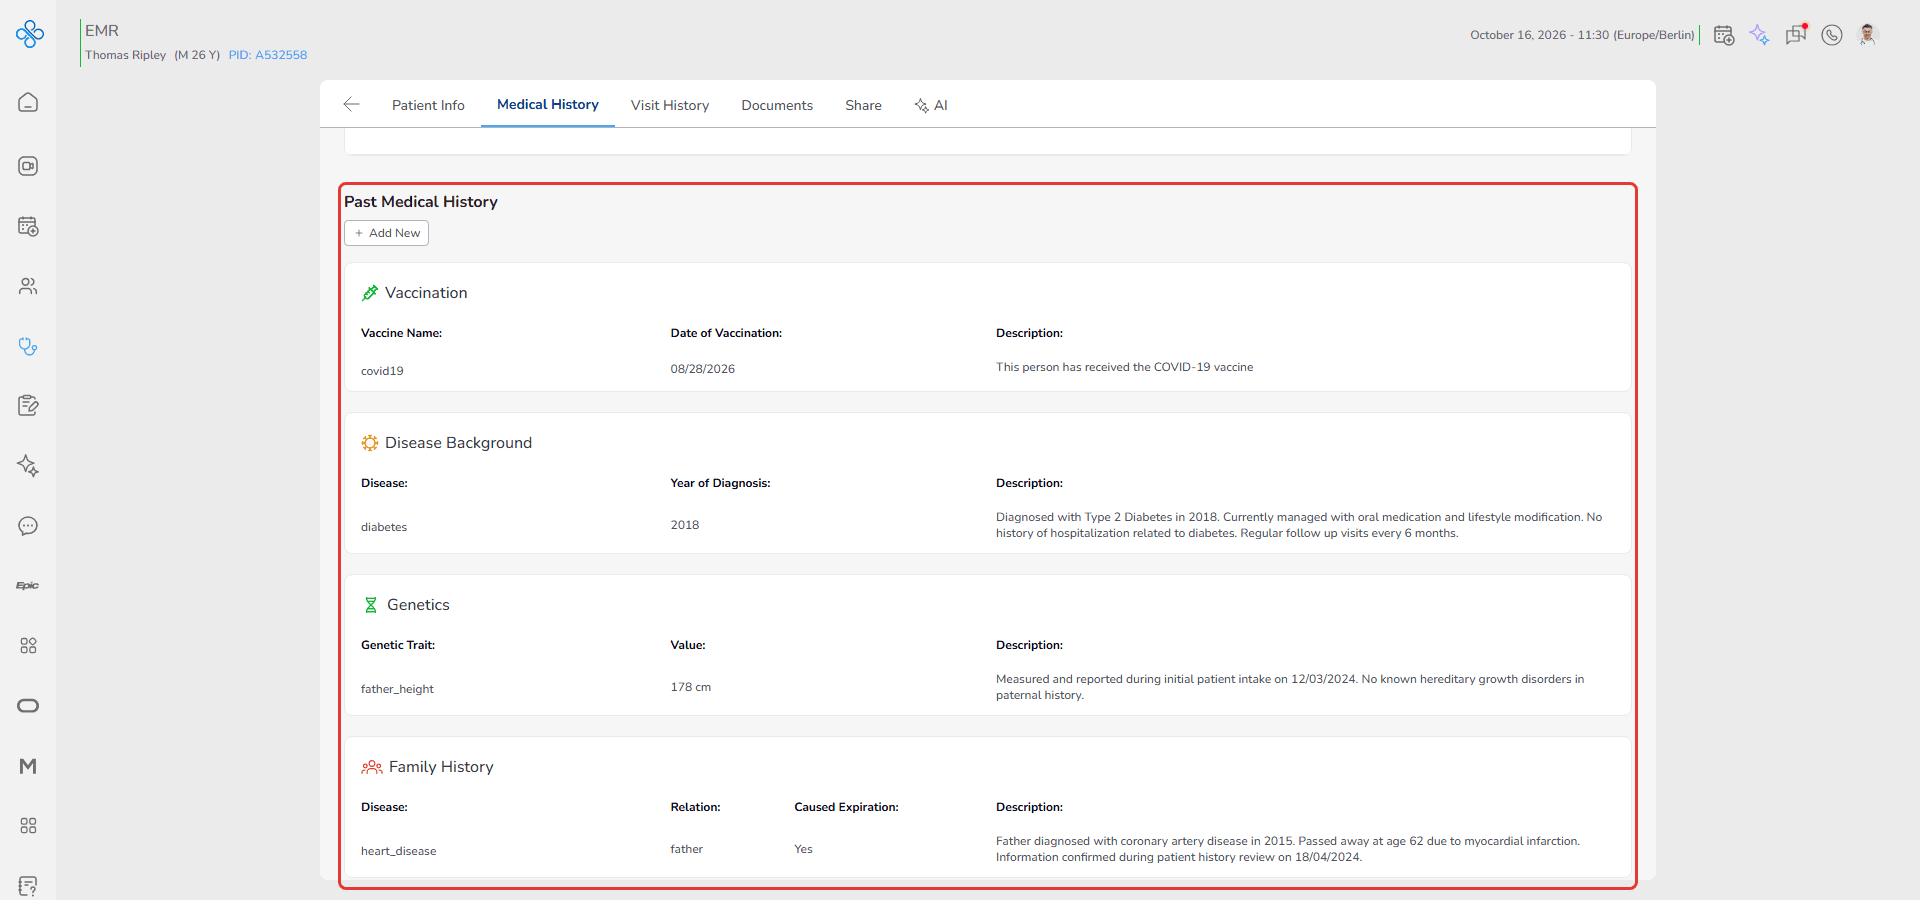
Instead of entering scattered notes, you document each type of history under a specific category. This helps you keep clinical information clear, consistent and easy to review later.
In this section, you can record different aspects of a patient’s background, including:
- Vaccinations
- Past and chronic diseases
- Genetic traits
- Family medical history
- Surgical history
- Food and medicine allergies
- Lifestyle habits
- Substance use
- Medication usage
Each medical history type has its own dedicated form. These forms are dynamic. This means fields appear, activate or become required based on what you select. For example, if you choose Other in a dropdown, a custom input field will appear. If you activate a toggle such as Cured or Currently Use, related fields will automatically become editable or disabled.
This structure ensures that:
- Required clinical data is not missed
- Entries follow a consistent format
- Important historical details are easy to find
- Risk factors are clearly documented
All saved records are automatically grouped under their respective category headings. This allows you to quickly scan one specific history type without reviewing unrelated data.
You should use this section to build a complete background profile of the patient before making treatment decisions. A well documented Past Medical History supports accurate diagnosis, safer prescribing and better long term care planning.
Access
To access Past Medical History:
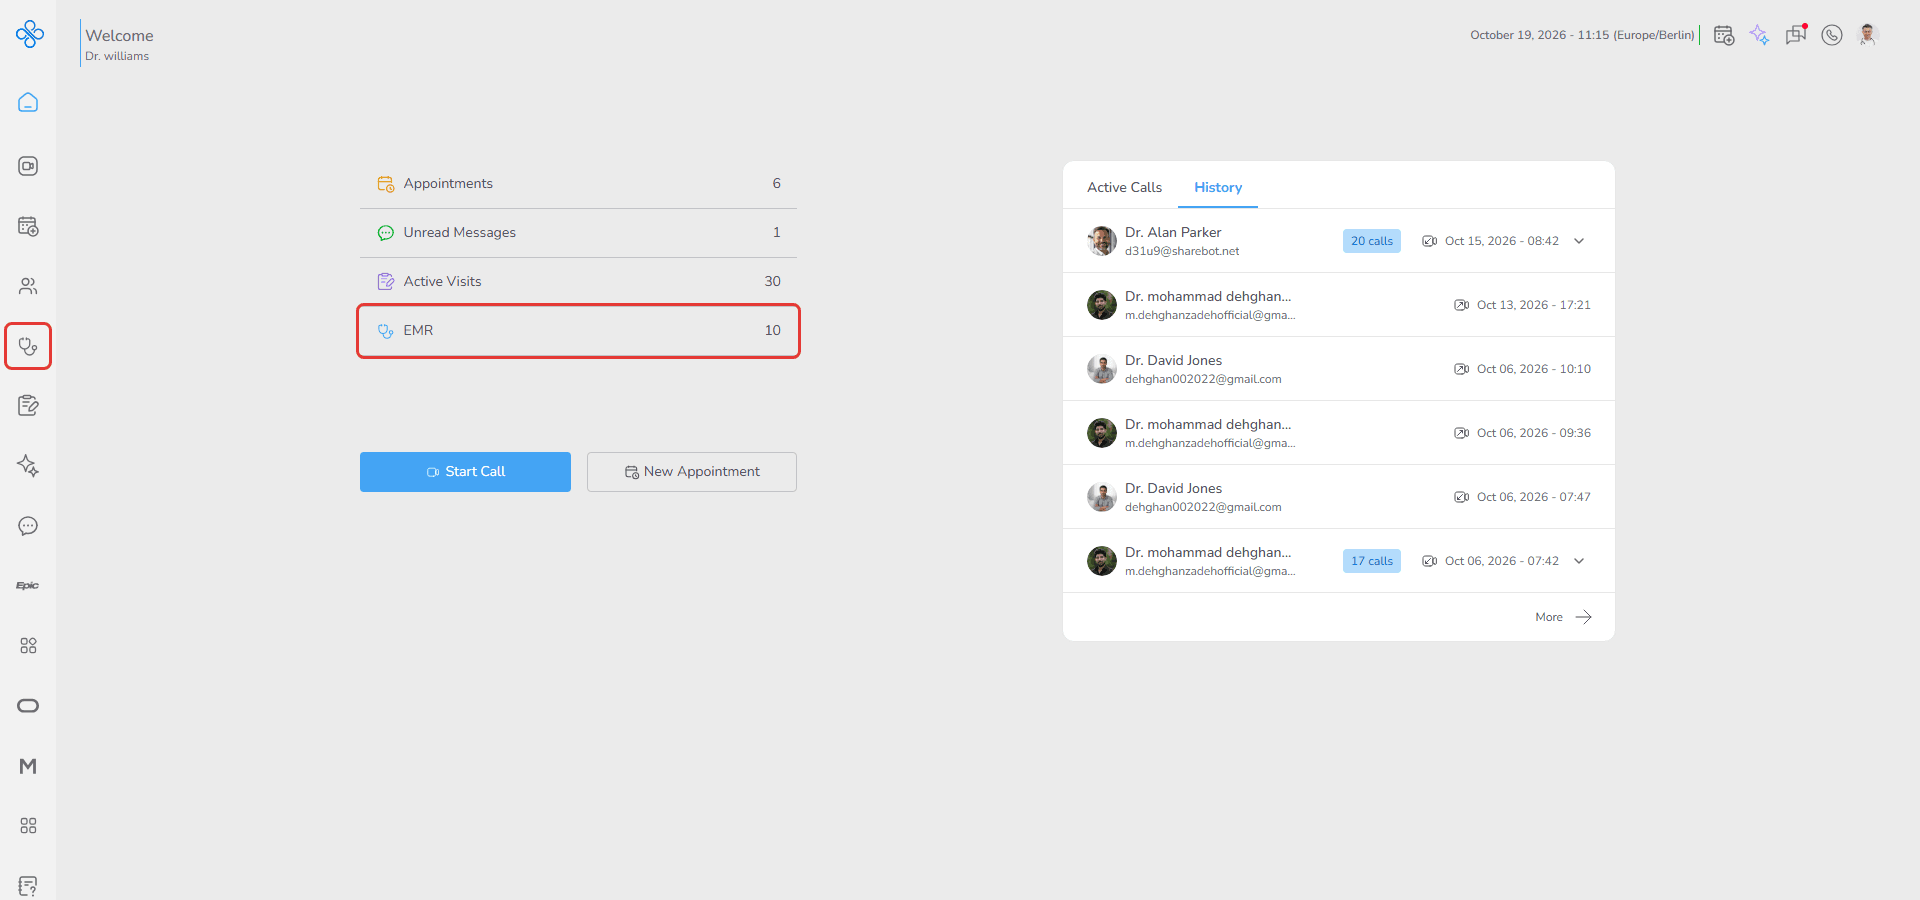
1. Open EMR from the Sidebar or Dashboard shortcut
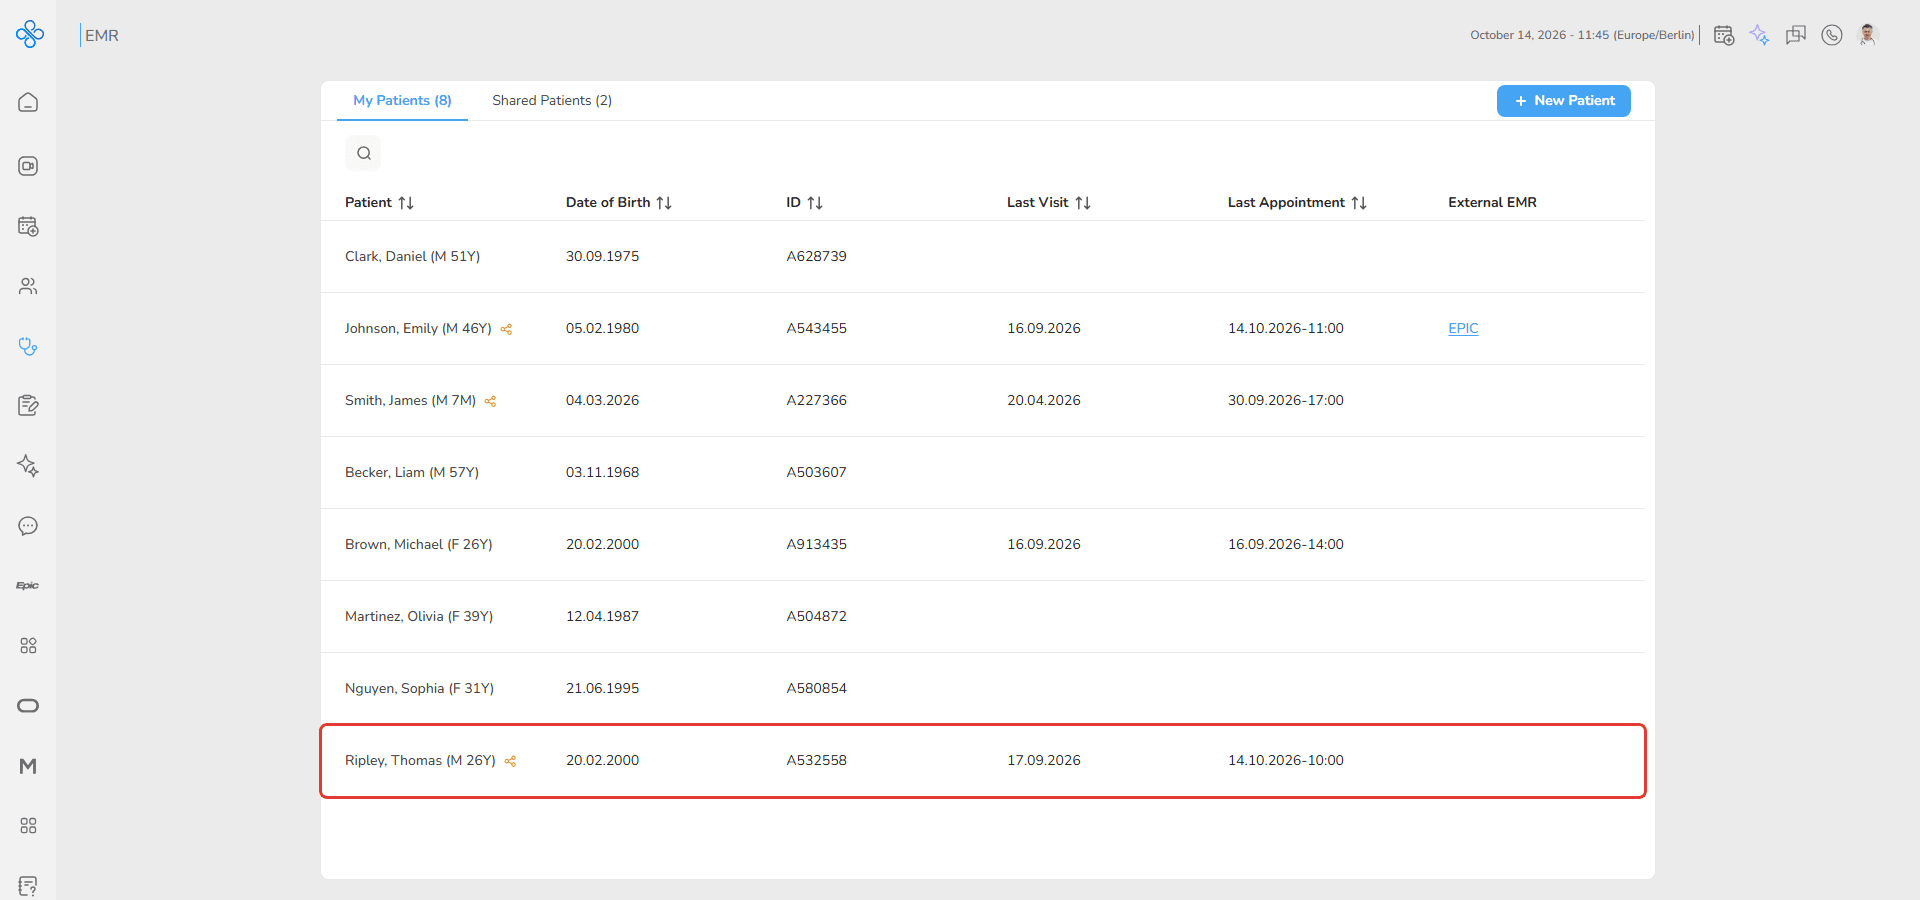
2. Select a patient from the list
3. Open the Medical History tab
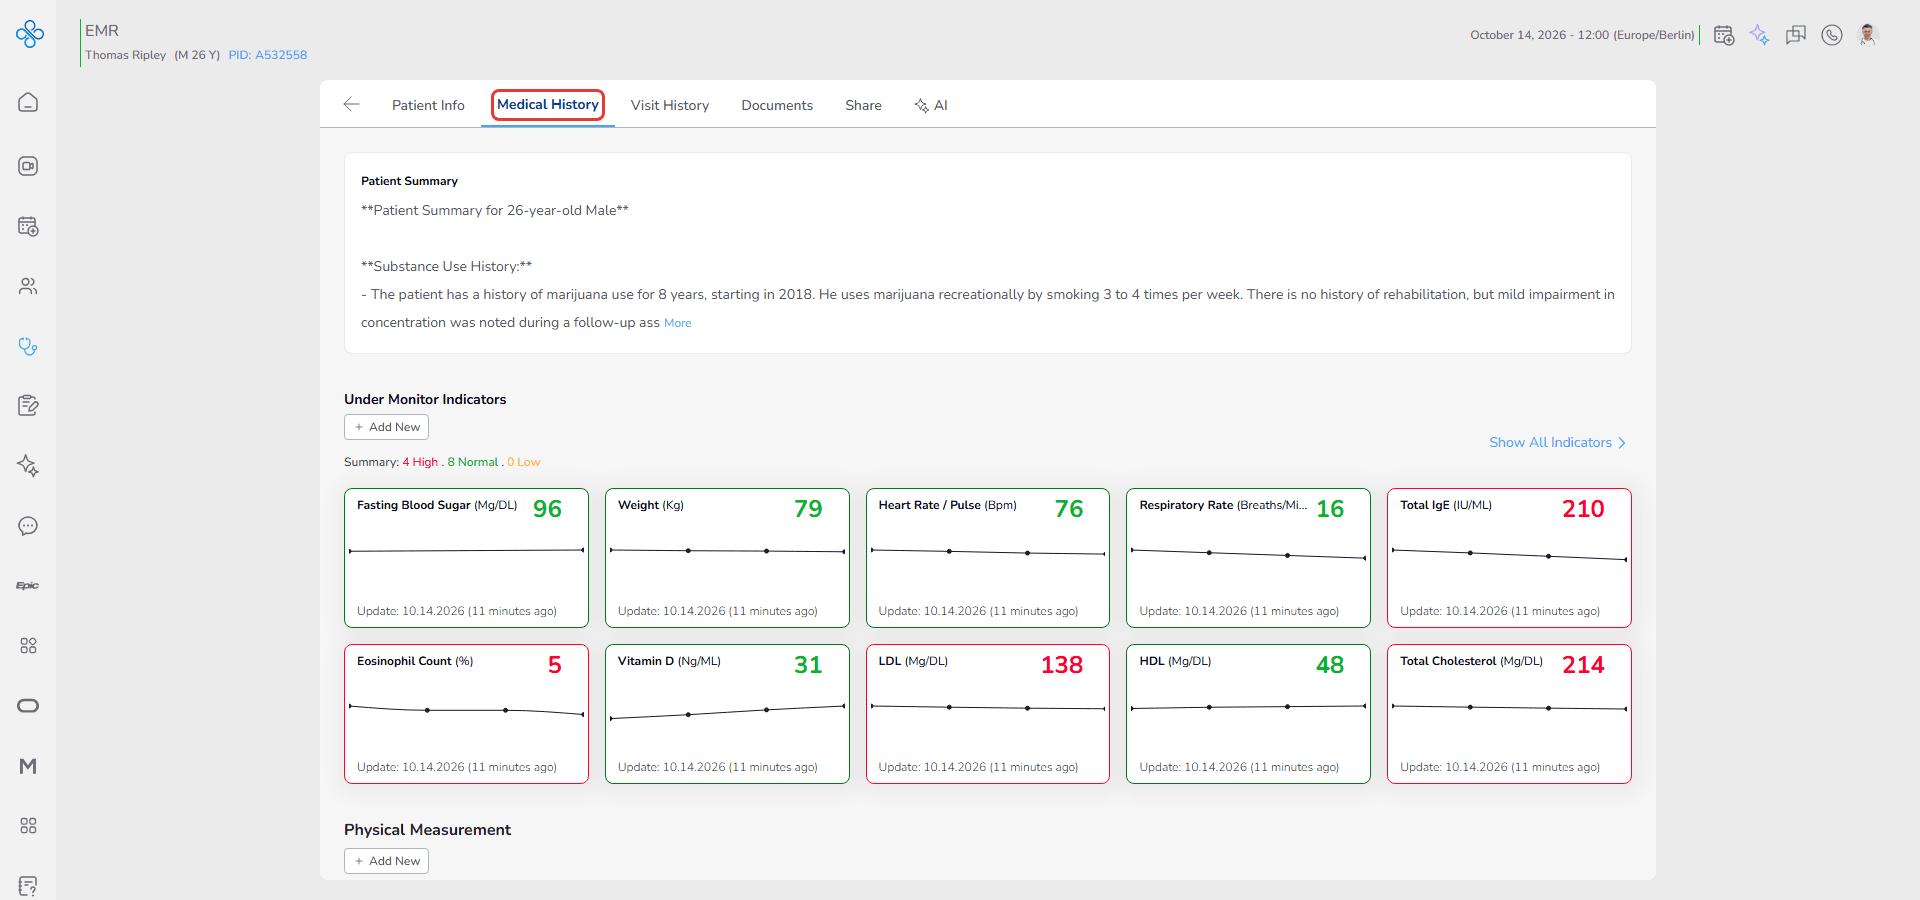
4. Scroll to the Past Medical History section
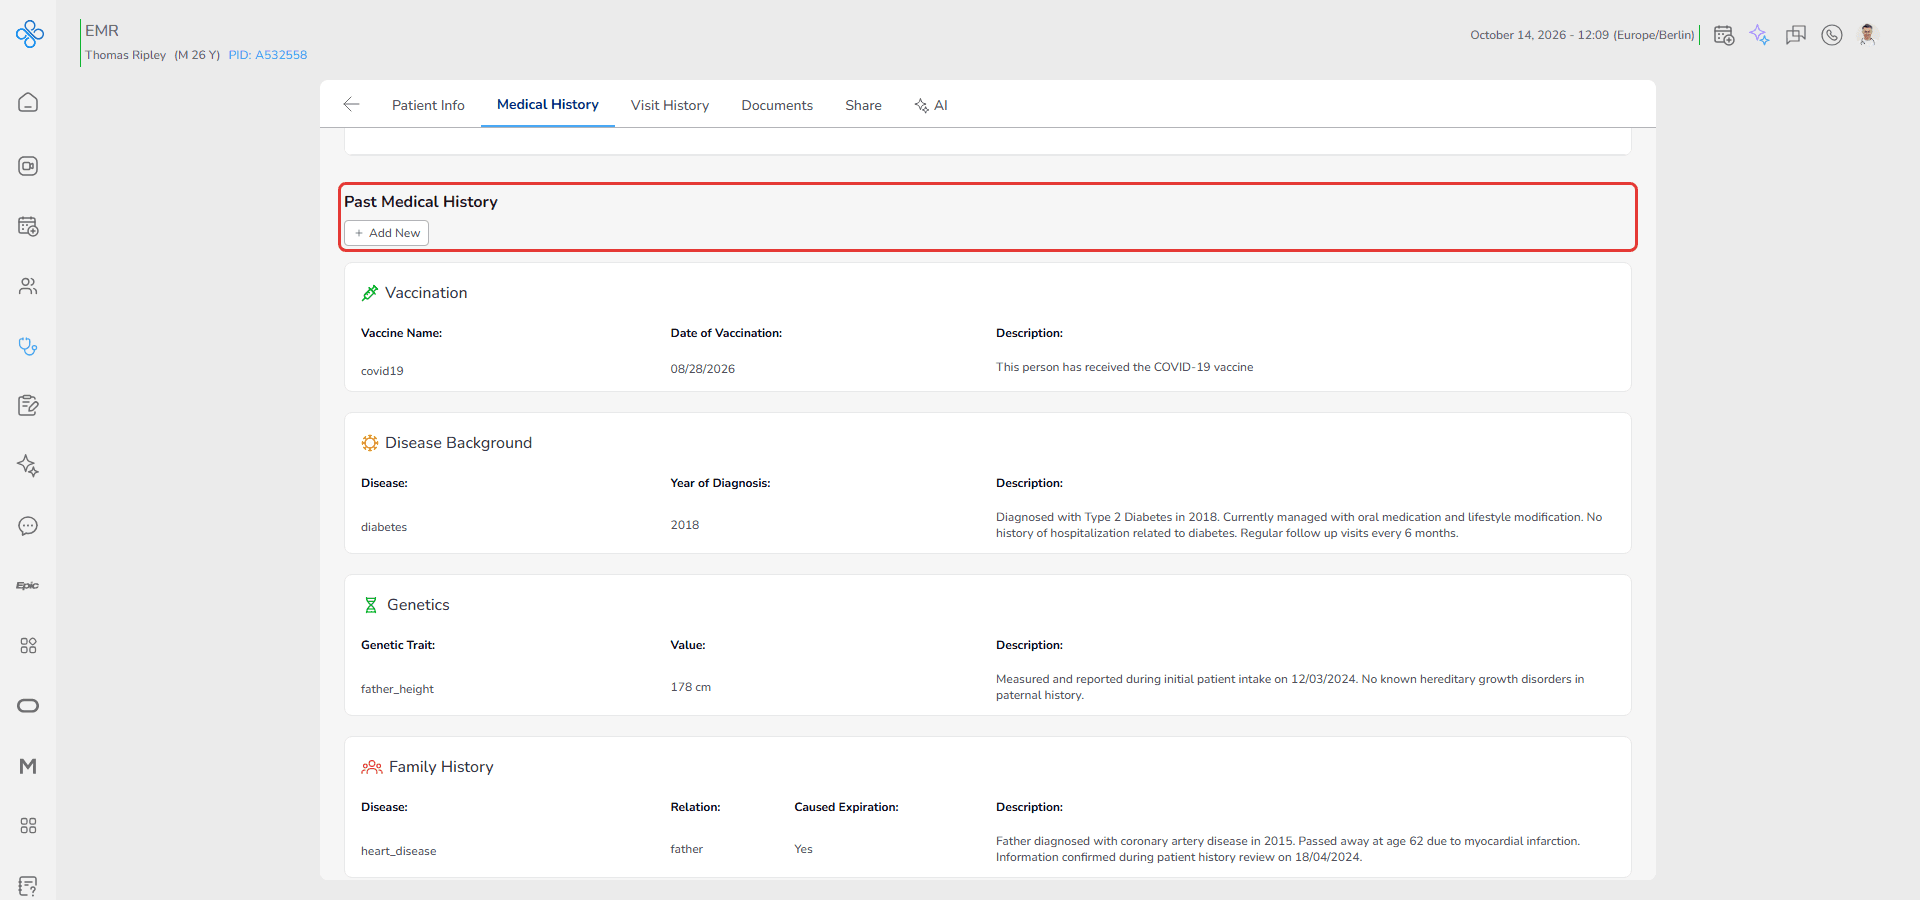
If you do not have View permission for Medical History, this section will not be accessible.
If you do not have Edit permission, the Add and edit options will be disabled. (Access is explained in the Share guide.)
Steps to Create or Manage the Past Medical History
Steps:
Step 1: Open Past Medical History Modal
- Click + Add New in the Past Medical History section
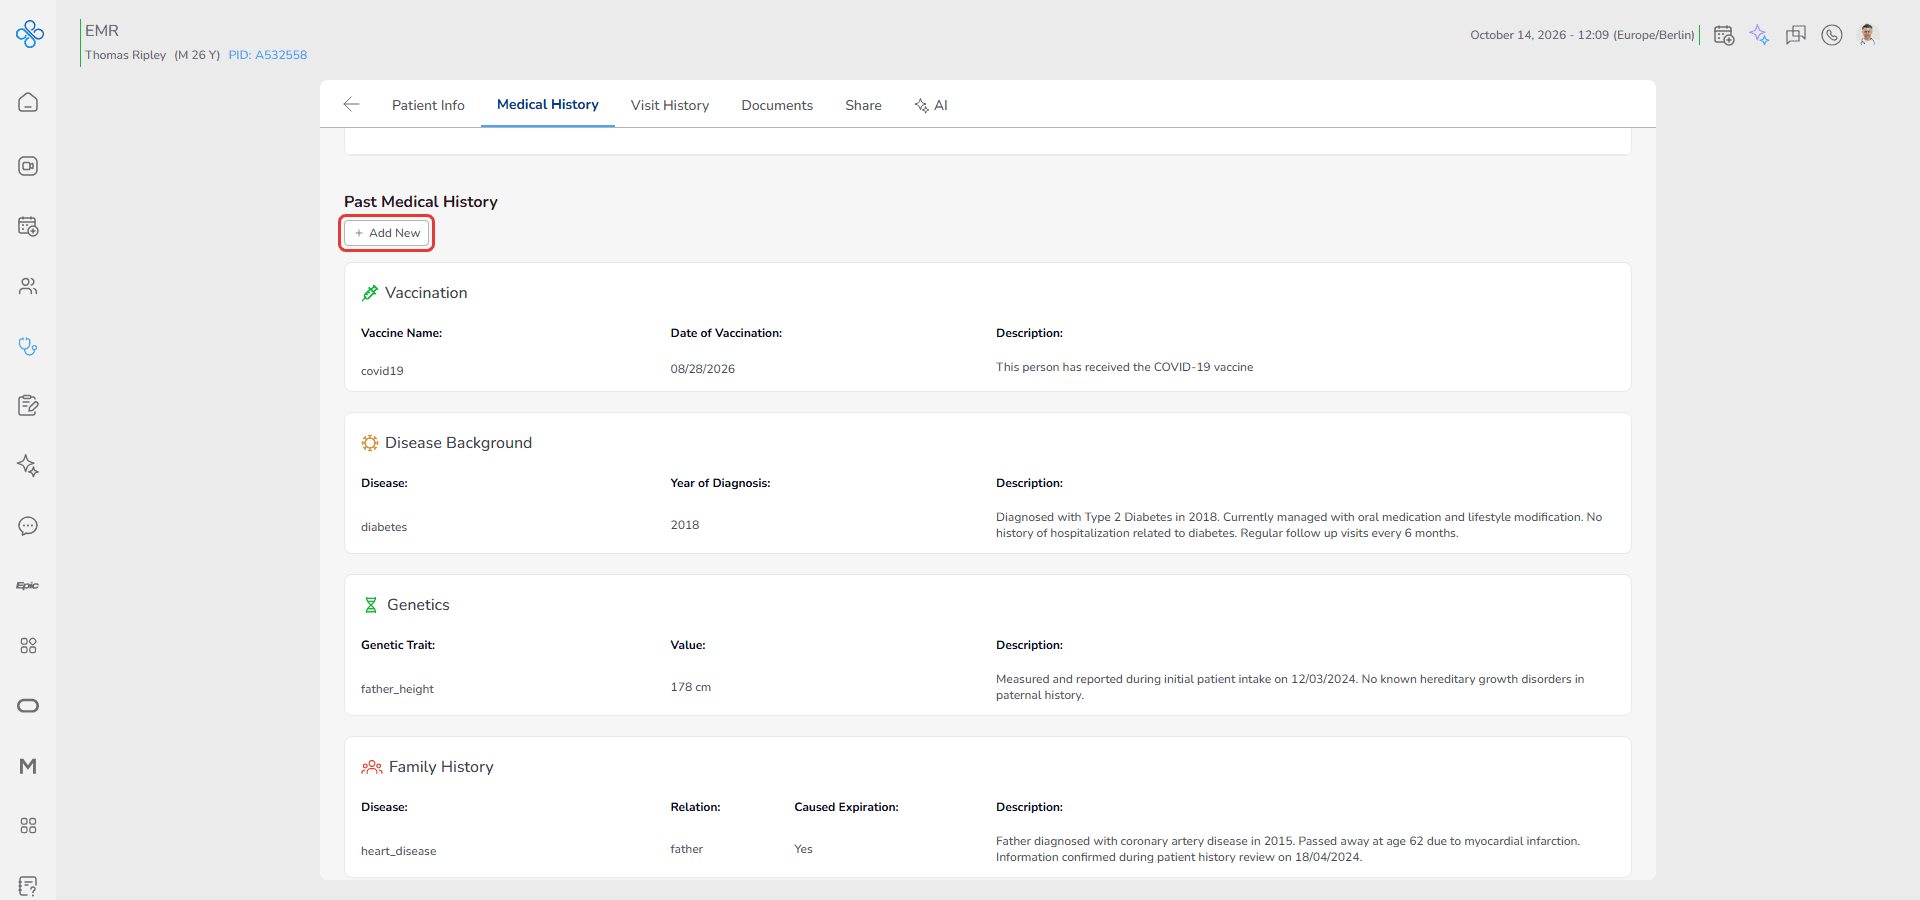
The Past Medical History modal opens.
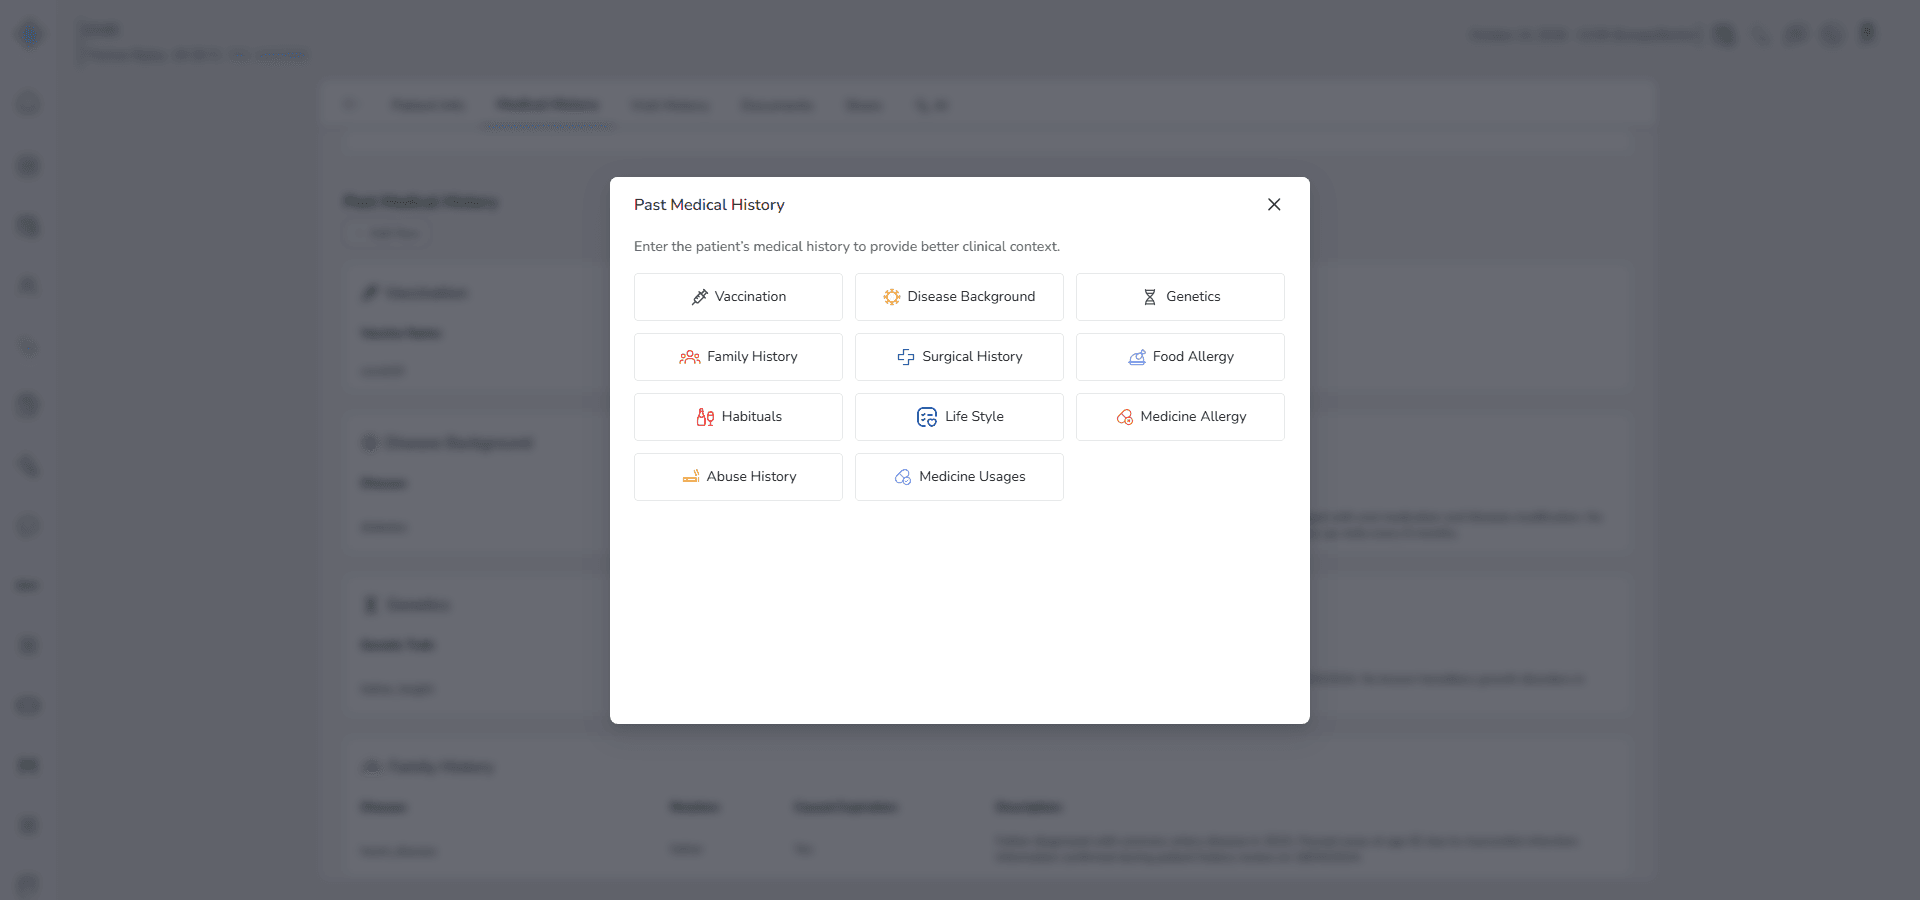
Step 2: Select a Medical History Type
Inside the modal, select one of the available categories.
Each category opens a dedicated dynamic form.
Step 3: Available Medical History Types
Below is the structured explanation of all 11 categories.
3-1. Vaccination
Use this category to record every vaccine the patient has received. This helps you clearly understand the patient’s immunization status before making clinical decisions such as prescribing medication, planning procedures or assessing infection risk.
When you open Past Medical History and choose Vaccination, the Vaccination form will appear.
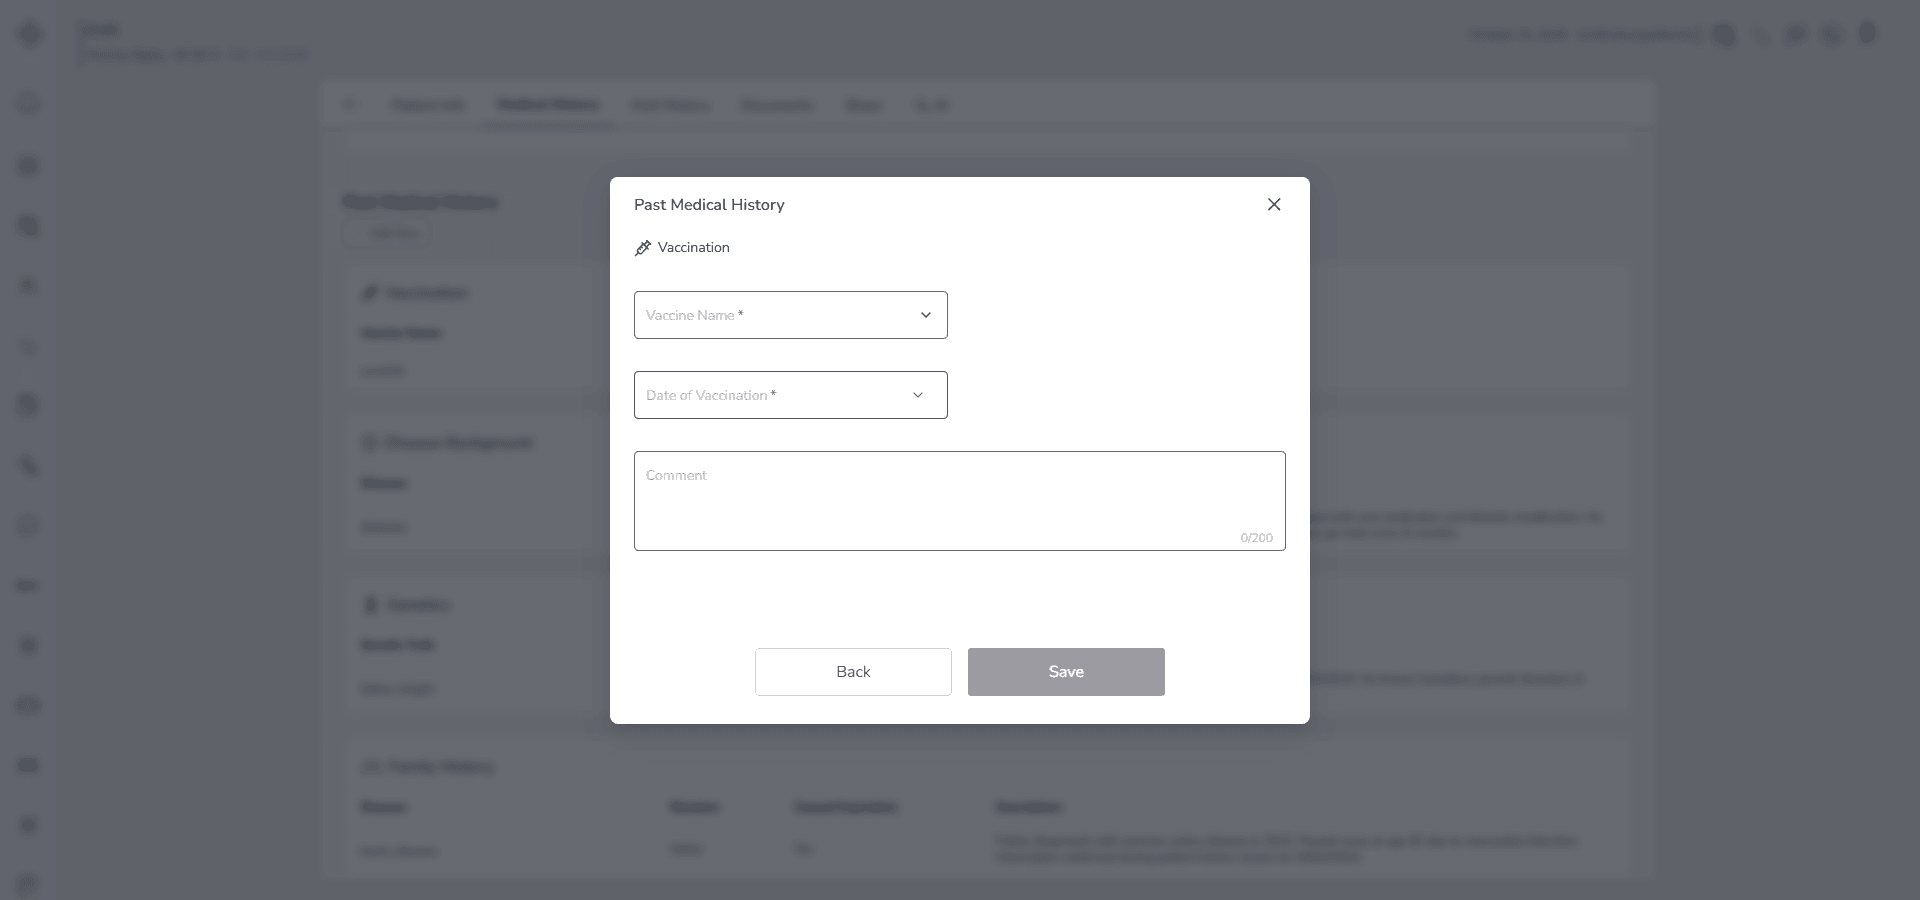
Fill in the Form
Start with Vaccine Name.
You must select one option from the dropdown list. The list includes common vaccines such as:
- COVID-19
- Pfizer-BioNTech COVID-19 vaccine
- Moderna COVID-19 vaccine
- AstraZeneca COVID-19 vaccine
- Sinopharm COVID-19 vaccine
- Influenza
- Hepatitis A
- Hepatitis B
- MMR
- Tdap
- Chickenpox
- Pneumococcal
- HPV
- Anfolanza
If the vaccine you need is not listed, select Other.
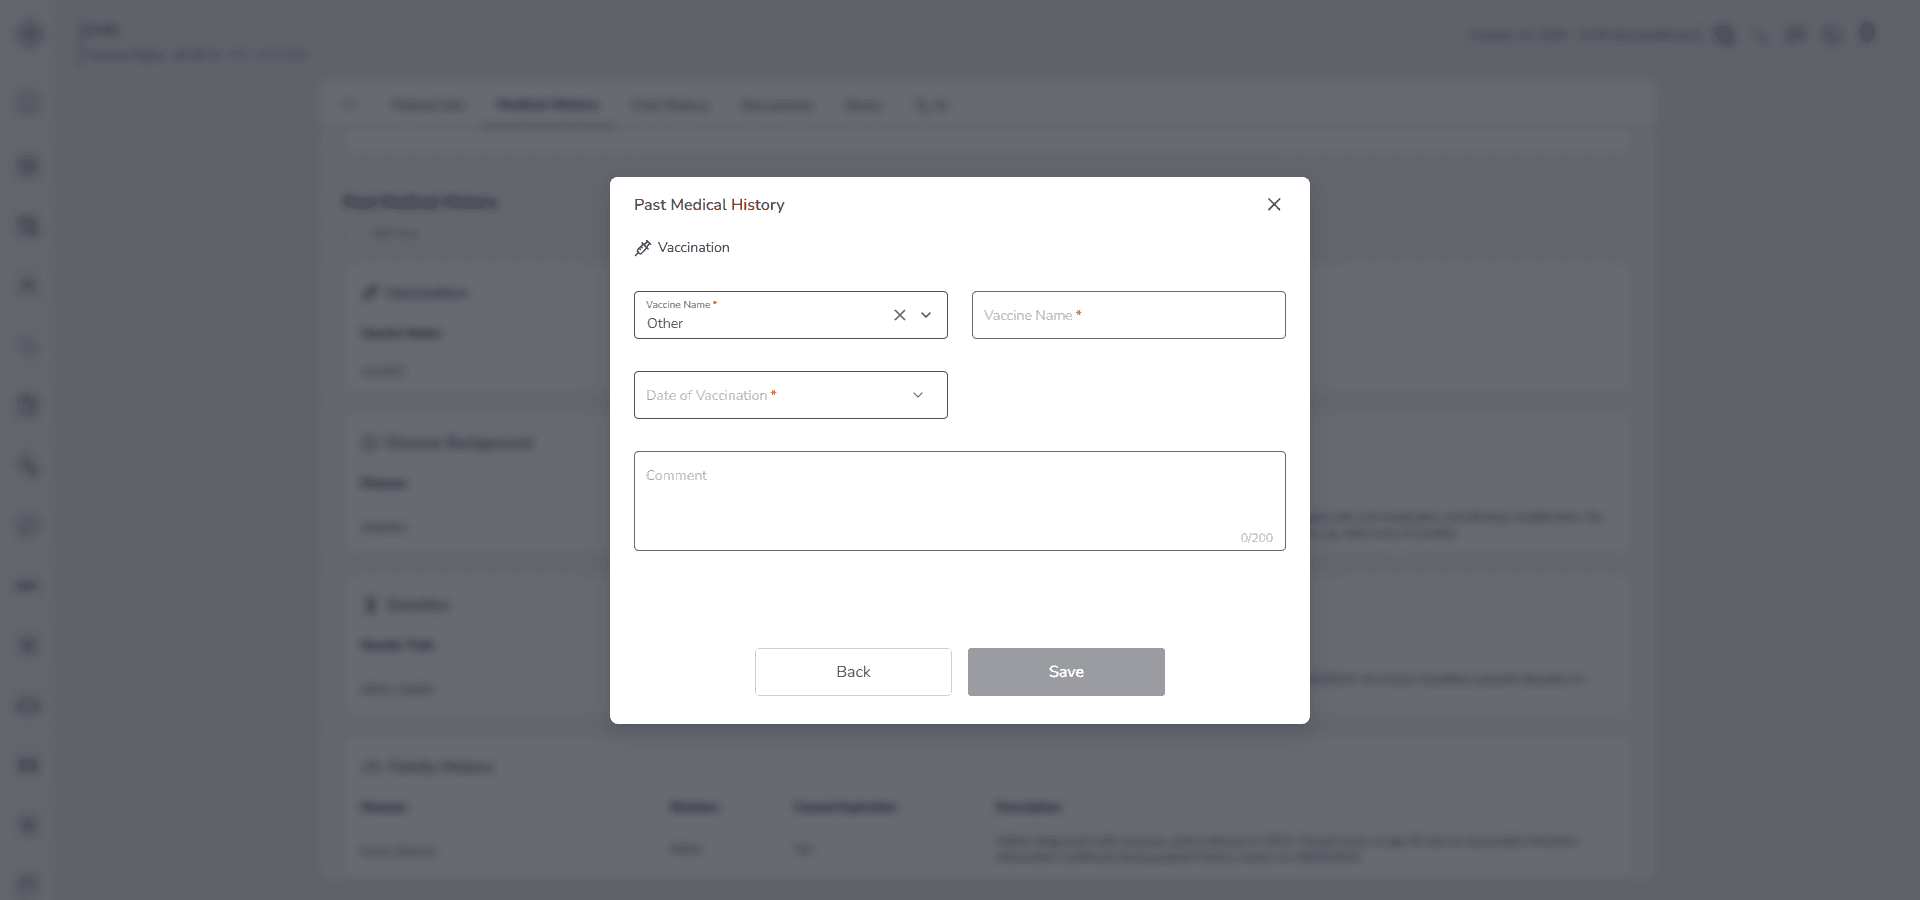
When you select Other, a new text field appears. You must manually type the exact vaccine name in that field. If you select Other but do not enter a name, the system will not allow you to save.
Next, complete Date of Vaccination.
Complete Date of Vaccination by selecting the date from the calendar picker.
Click on the date field to open the calendar.
Choose the correct vaccination date from the date picker.
The system automatically formats the selected date and stores it correctly.
This field must be selected before saving the record.
Use the Description field if you need to add clinical context. For example:
- Booster dose
- Mild post vaccination reaction
- Administered at external clinic
- Patient reported delayed dose
The description is optional but recommended when additional clarification is needed.
Save the Record
• Click Save to store the vaccination record
• Click Cancel to exit without saving
The record cannot be saved if required fields such as Vaccine Name or Date of Vaccination are incomplete.
Behavior and Expected Outcome
• Selecting Other activates the manual Vaccine Name field
• After saving, the record appears under Past Medical History → Vaccination
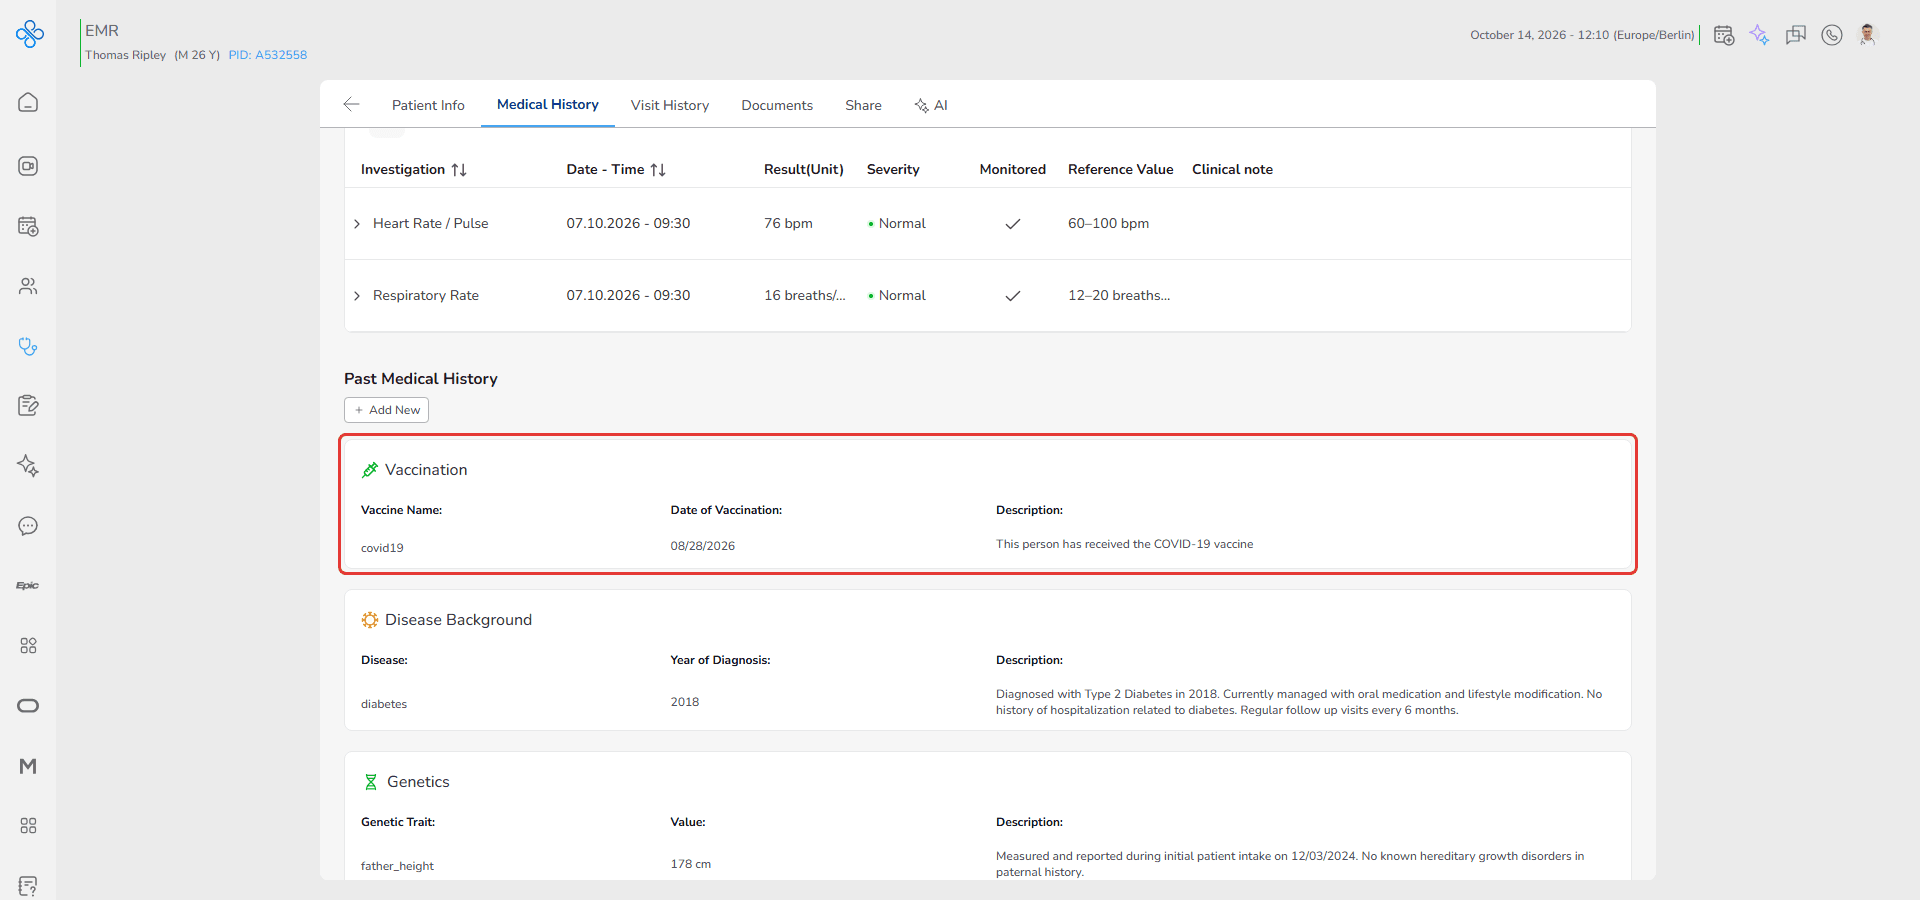
• All vaccination records are grouped together for structured review
This ensures the immunization timeline is clearly documented and easily accessible.
Managing a Saved Vaccination Record
After saving a vaccination, you can manage it directly from the vaccination list.
Each saved record includes a More Actions menu shown as ⋮ located between the values of the Vaccine name and Date of vaccination.
Follow these steps:
1. Open More Actions
*   Locate the vaccination record in the list
*   Click the ⋮ icon
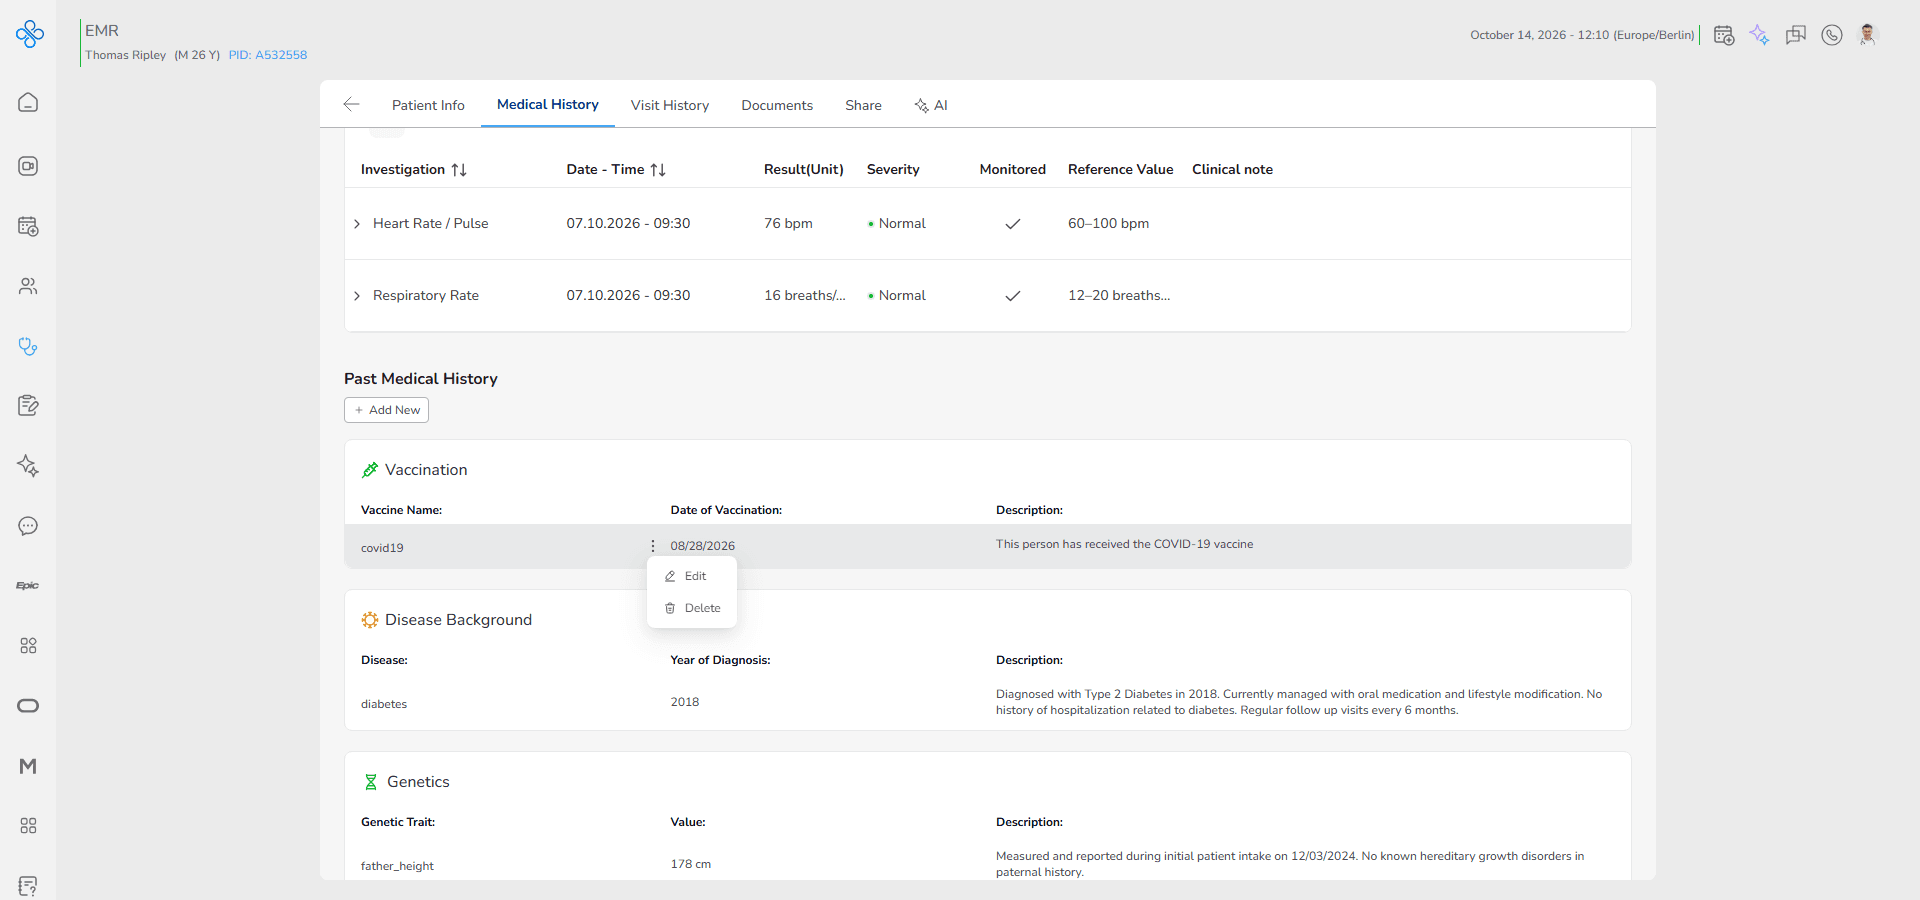
A dropdown menu will appear with available options.
2. Edit a Record
Use this option when you need to correct or update an existing entry.
- Click Edit from the More Actions menu
- The same Vaccination modal will open
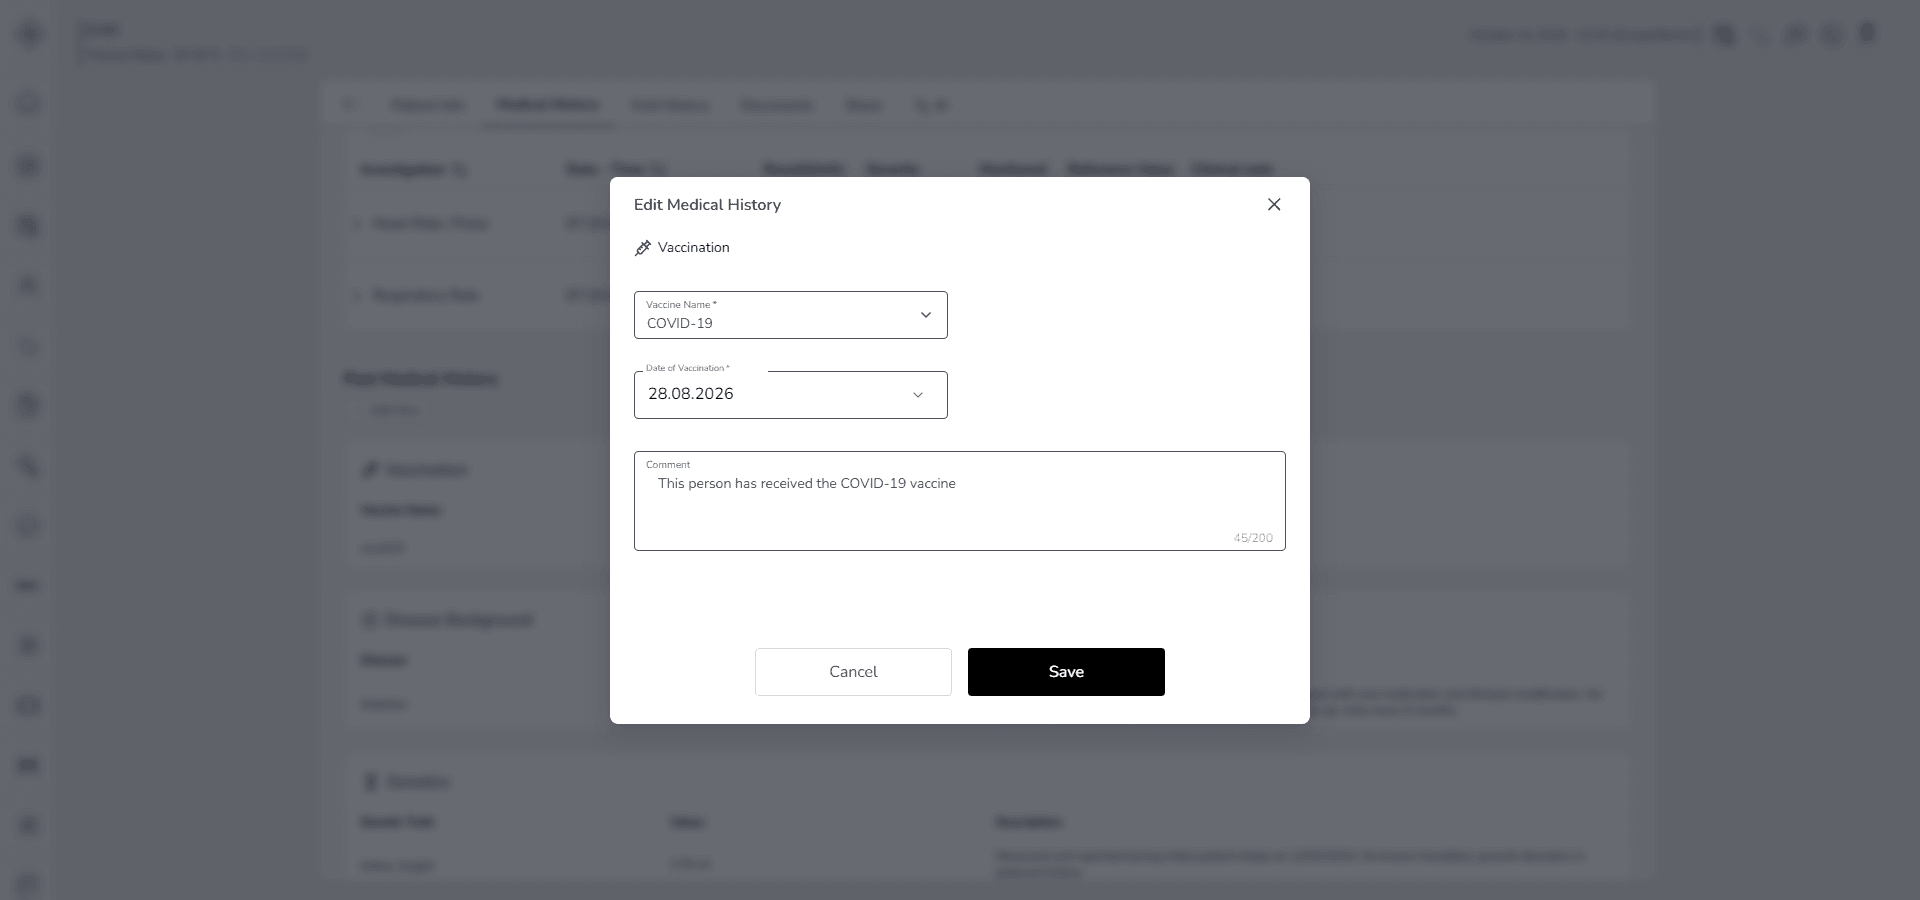
- All previously entered data will be prefilled in the form
You can now:
- change the vaccine name
- change the vaccination date
- edit the comment
After making changes:
- Click Save to apply updates
- Click Cancel to discard changes
Once saved, the updated values appear immediately in the list.
3. Delete a Record
Use this option when a measurement was entered by mistake or is no longer valid.
- Click Delete from the More Actions menu
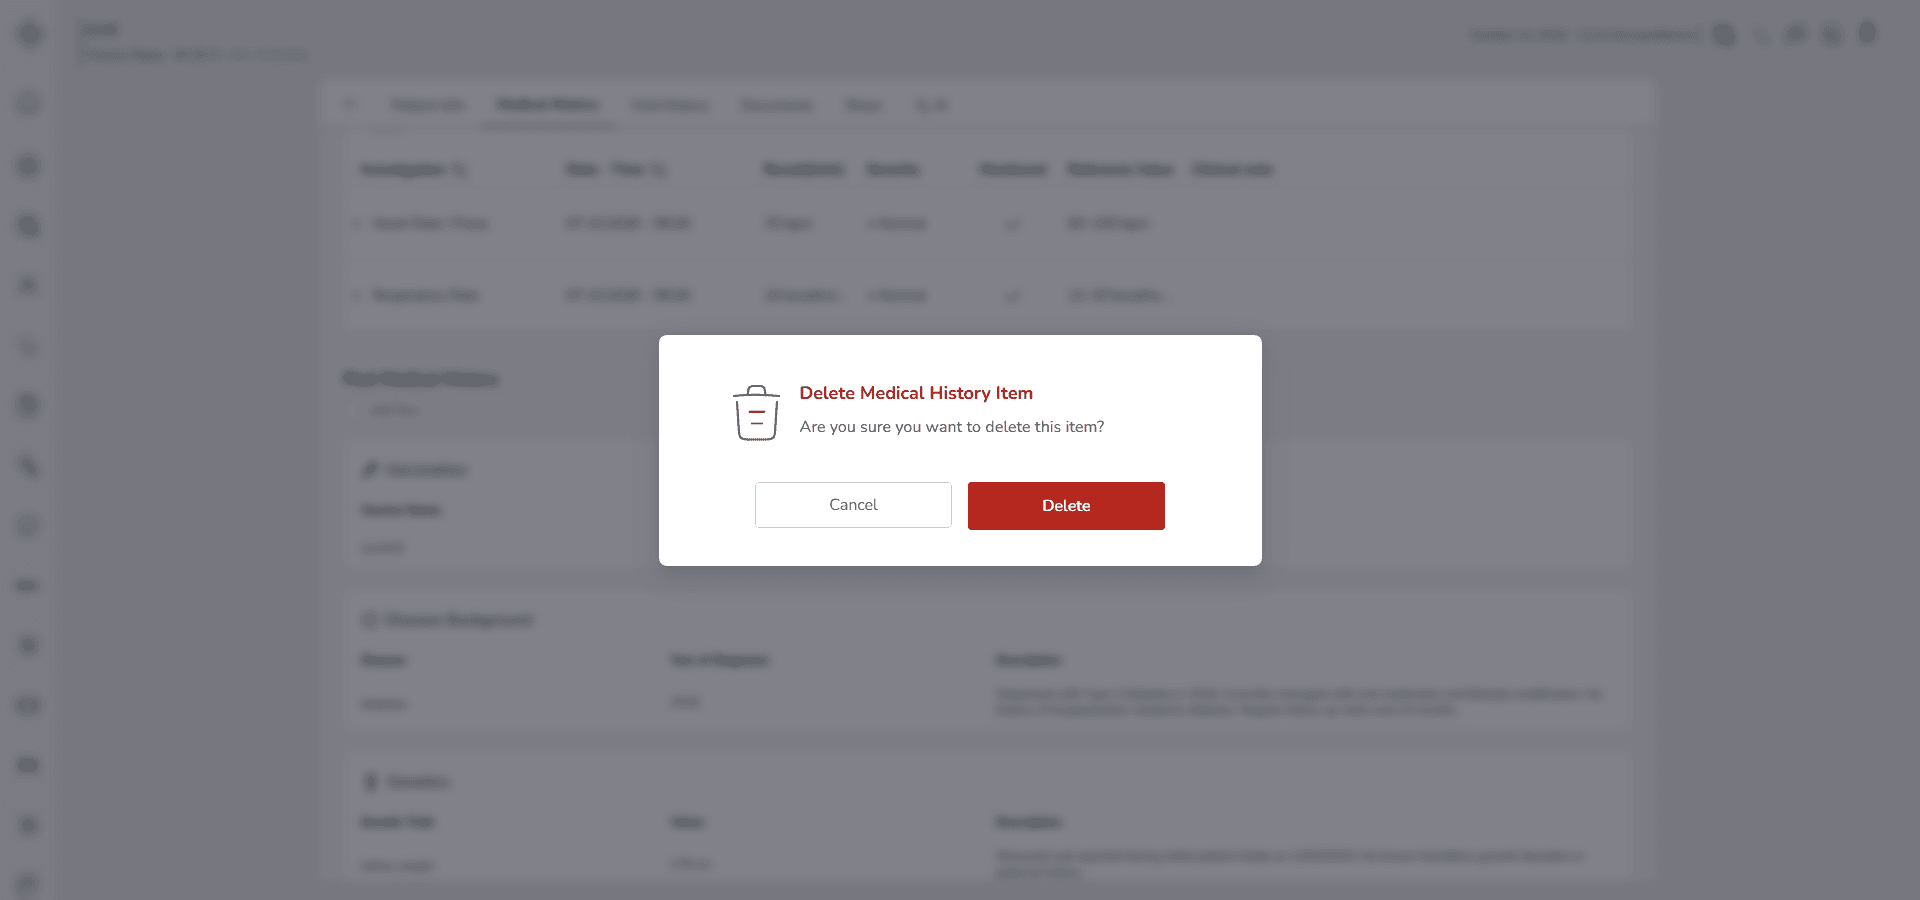
- A confirmation prompt will appear
- Confirm the deletion
After confirmation:
- The record is permanently removed from the list
- The data will no longer appear in the Past medical history section
Deletion cannot be undone.
Make sure the record is not clinically required before confirming removal.
If any required field is missing, the system will prevent saving and display an error message.
Always ensure the vaccine name and date are accurate. This section directly impacts preventive care decisions and infection risk evaluation.
3-2. Disease Background
Use this section to record the patient’s history of chronic or significant diseases.
This information gives you a clear clinical overview and supports accurate diagnosis, follow up and long term care planning.
When you open Past Medical History and select Disease Background, the Disease Background modal will appear.
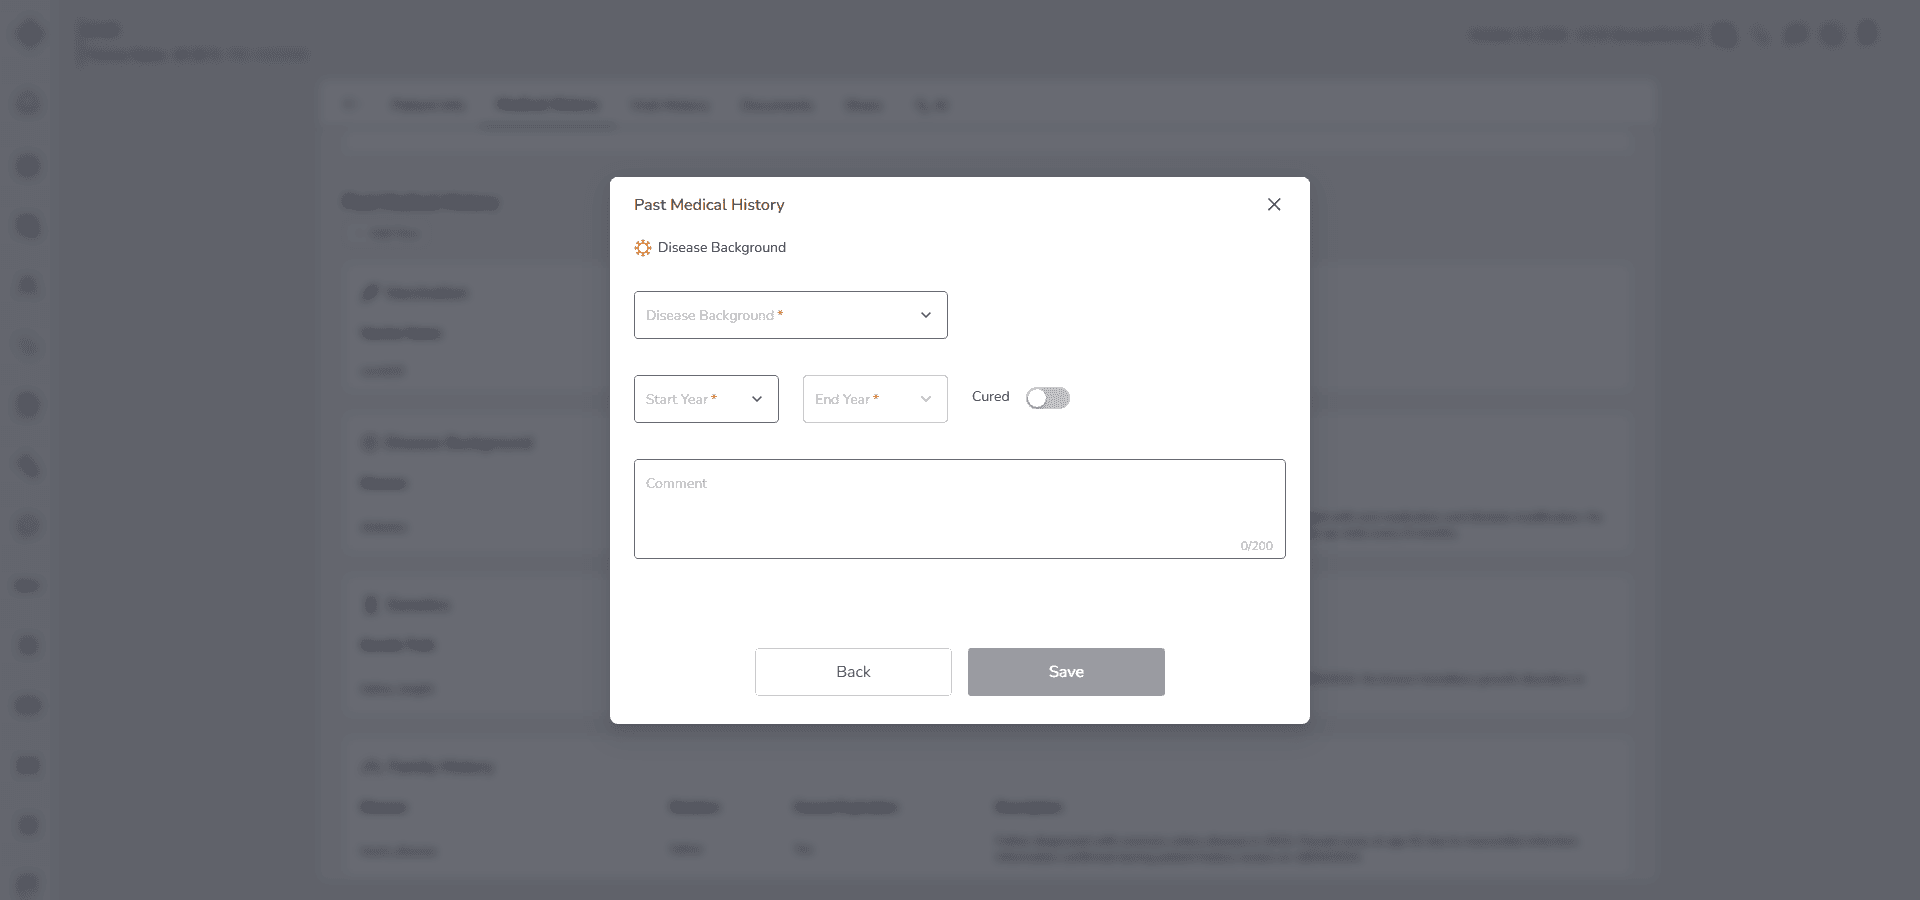
Fill in the Form
Start with Disease Background.
Select the disease from the predefined dropdown list:
Hypertension
Diabetes
High Cholesterol
Heart Disease
Stroke
Kidney Disease
Cancer
If the disease is not listed, select Other.
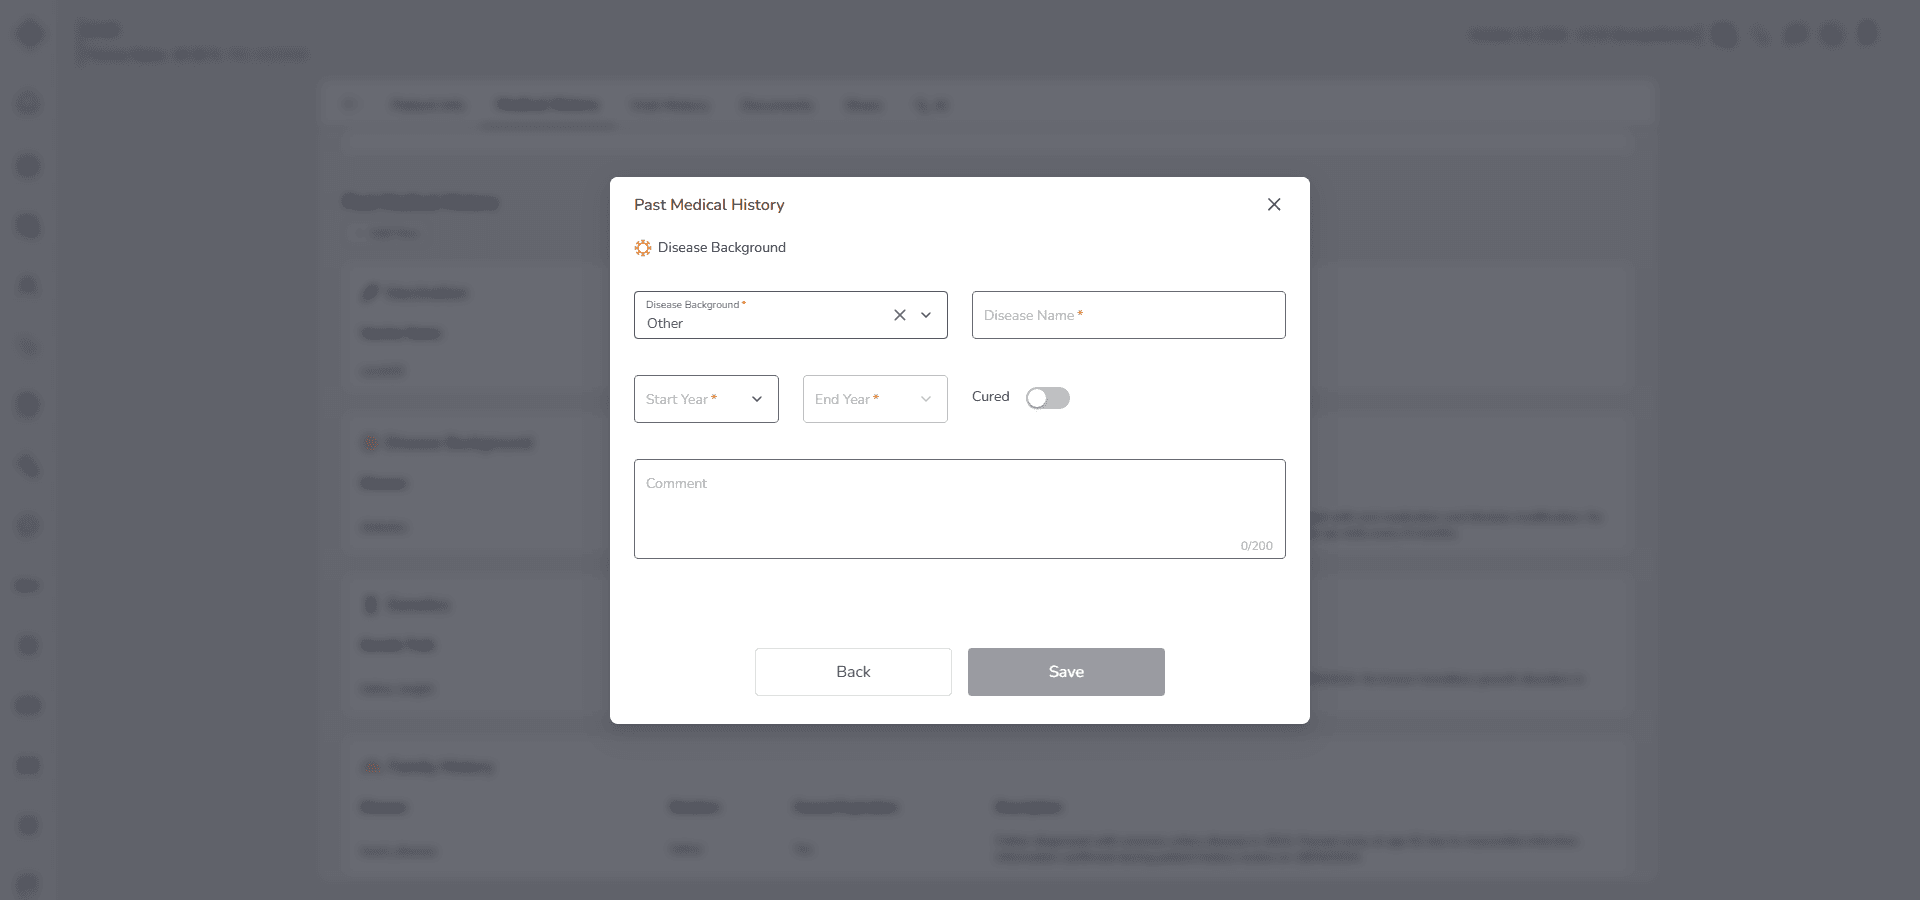
When you choose Other, a Disease Name field becomes active. Enter the exact medical condition clearly and accurately.
Next, enter the Year of Diagnosis.
This field is required.
Enter the year when the disease was first diagnosed. Make sure it reflects the confirmed diagnosis date.
Then review the Cured toggle.
Activate this option if the disease has been completely treated or resolved.
When Cured is activated:
• The Year of Cured field becomes editable
• You must enter the year when the disease was considered cured
If the disease is ongoing, leave the Cured toggle inactive.
In this case, the Year of Cured field remains disabled.
Use the Description field to add clinically relevant details when necessary. For example:
• severity or stage of the disease
• type of treatment received
• surgical history related to the disease
• complications
• current management plan
The description is optional but recommended for complex or long term conditions.
Save the Record
• Click Save to store the disease background record
• Click Cancel to exit without saving
The record cannot be saved if:
• Year of Diagnosis is missing
• Cured is activated but Year of Cured is not entered
Behavior and Expected Outcome
• Selecting Other activates the manual Disease Name field
• Activating Cured dynamically enables the Year of Cured field
• Deactivating Cured disables the Year of Cured field
• After saving, the record appears under Past Medical History → Disease Background
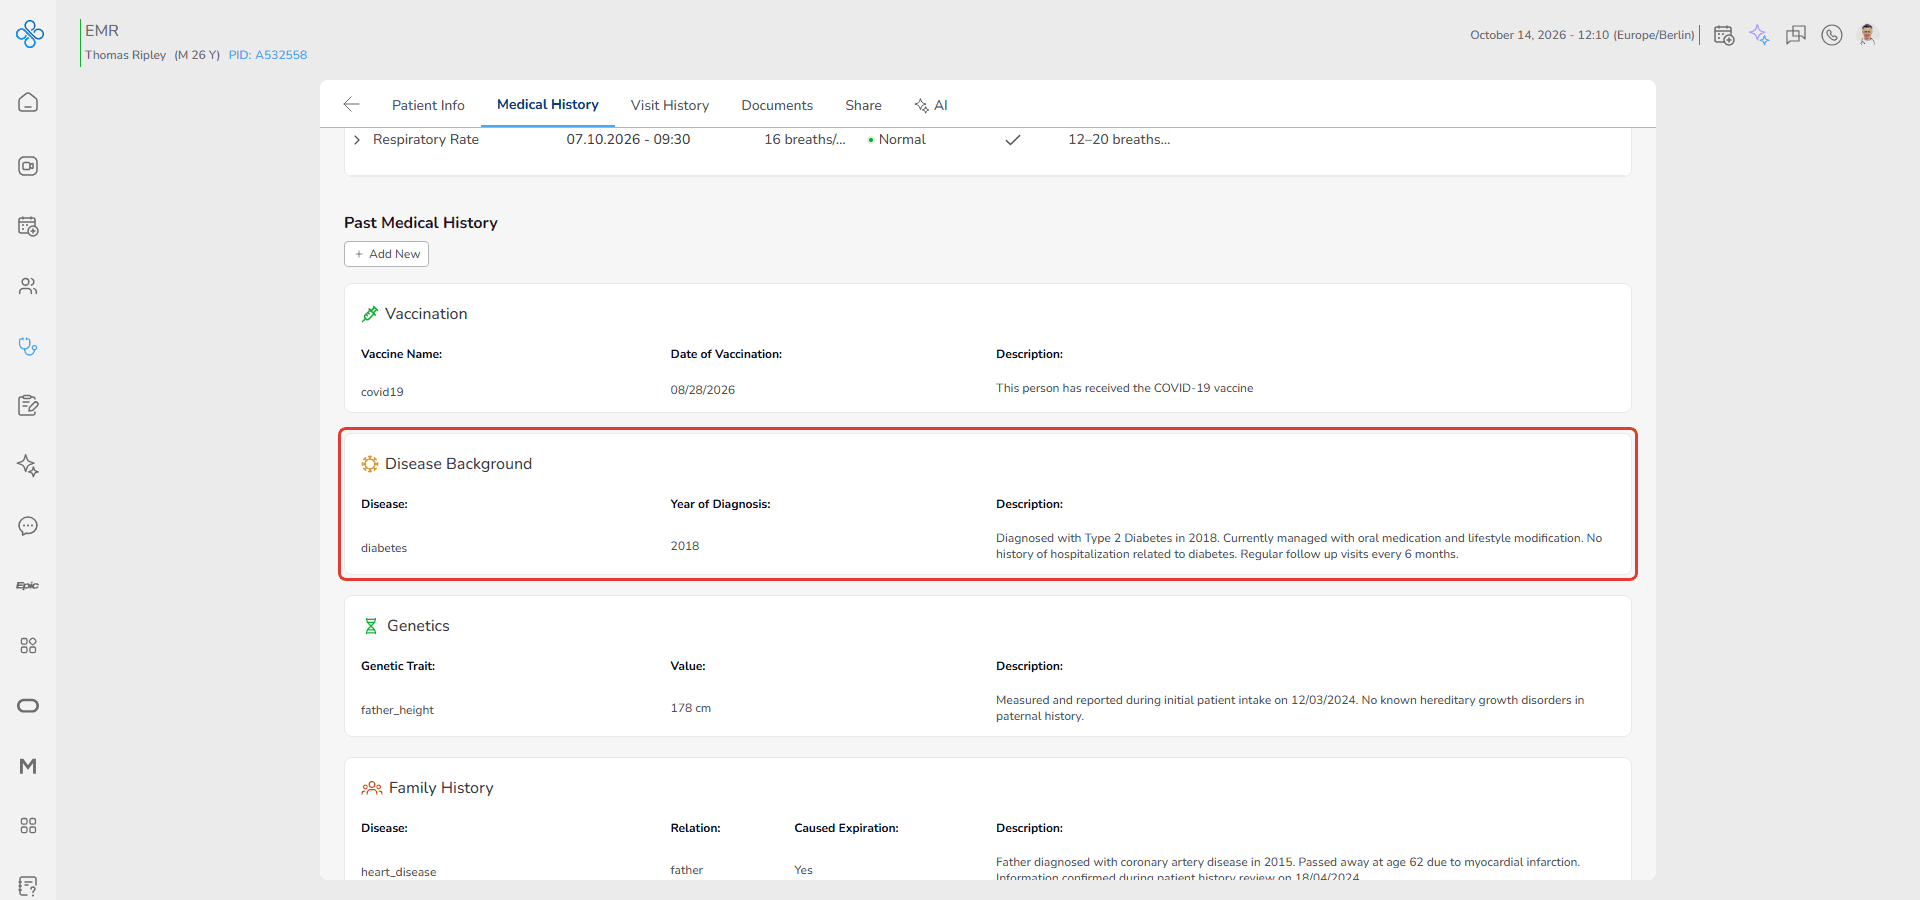
• All disease records are grouped together for structured review
This structure allows you to quickly assess active and resolved conditions.
Managing a Saved Disease Background Record
After saving a disease record, you can manage it directly from the Disease Background list.
Each saved record includes a More Actions menu shown as ⋮ located between the values of the Disease Name and Year of Diagnosis.
Follow these steps:
1. Open More Actions
• Locate the disease record in the list
• Click the ⋮ icon
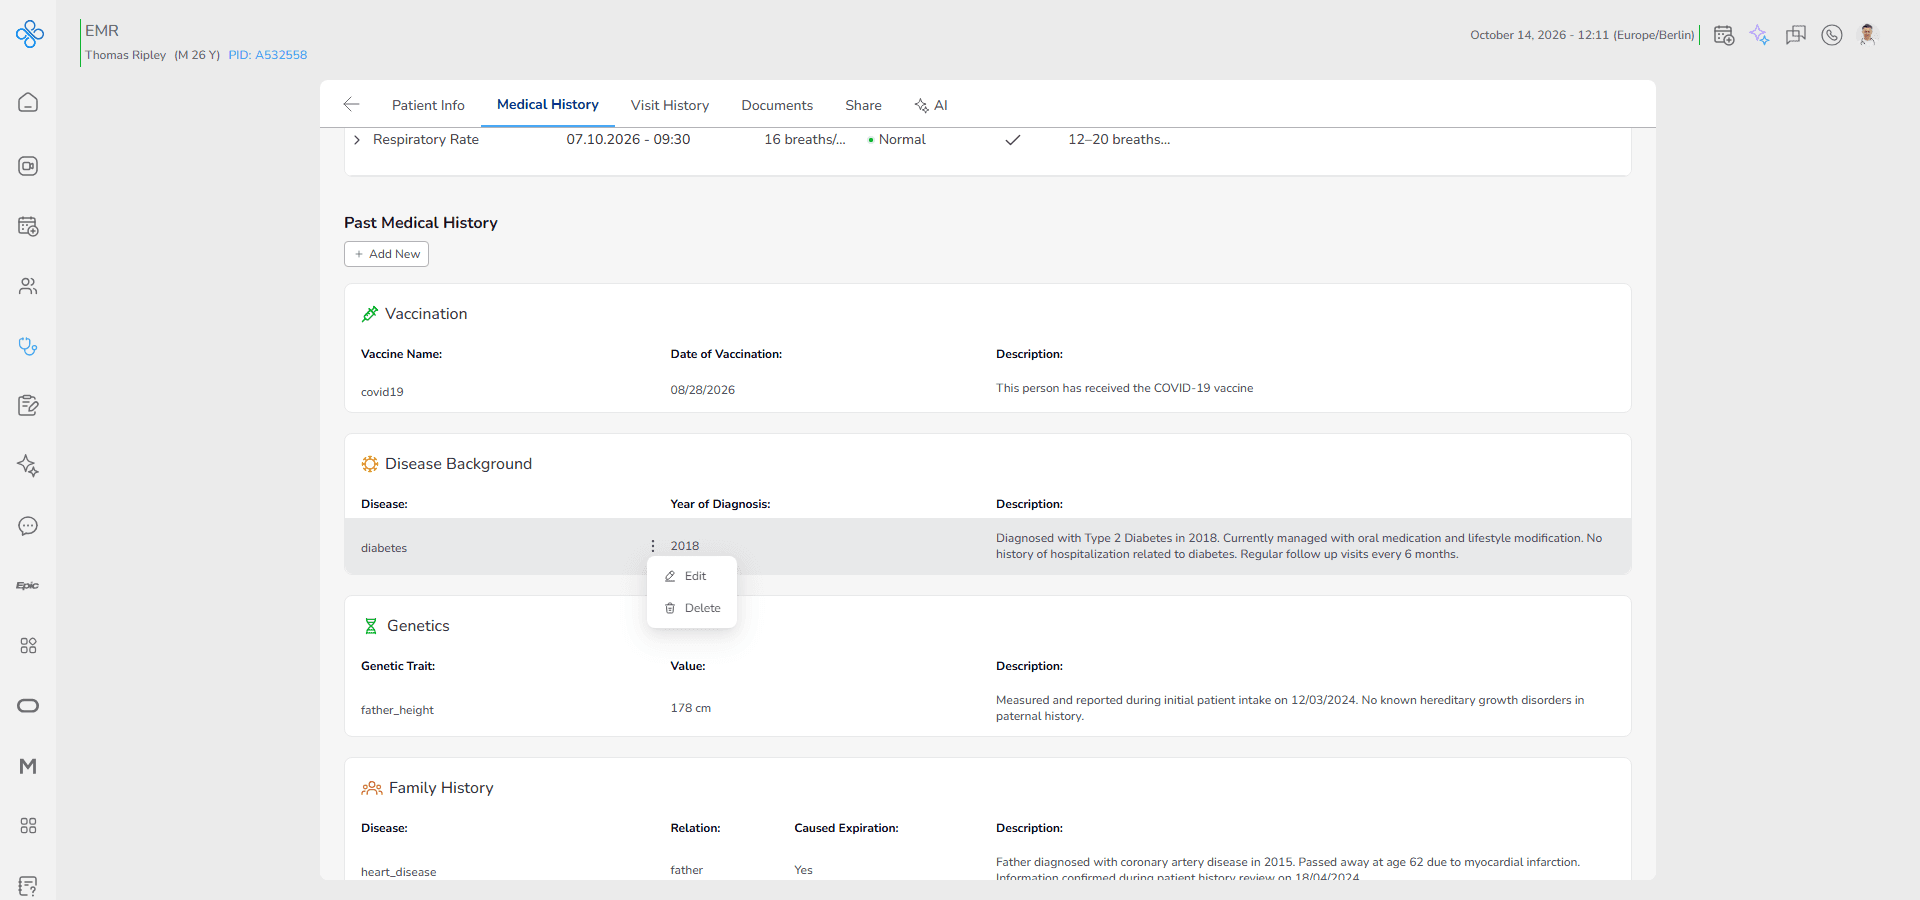
• A dropdown menu will appear with available options
2. Edit a Record
Use this option when you need to correct or update an existing entry.
• Click Edit from the More Actions menu
• The same Disease Background modal will open
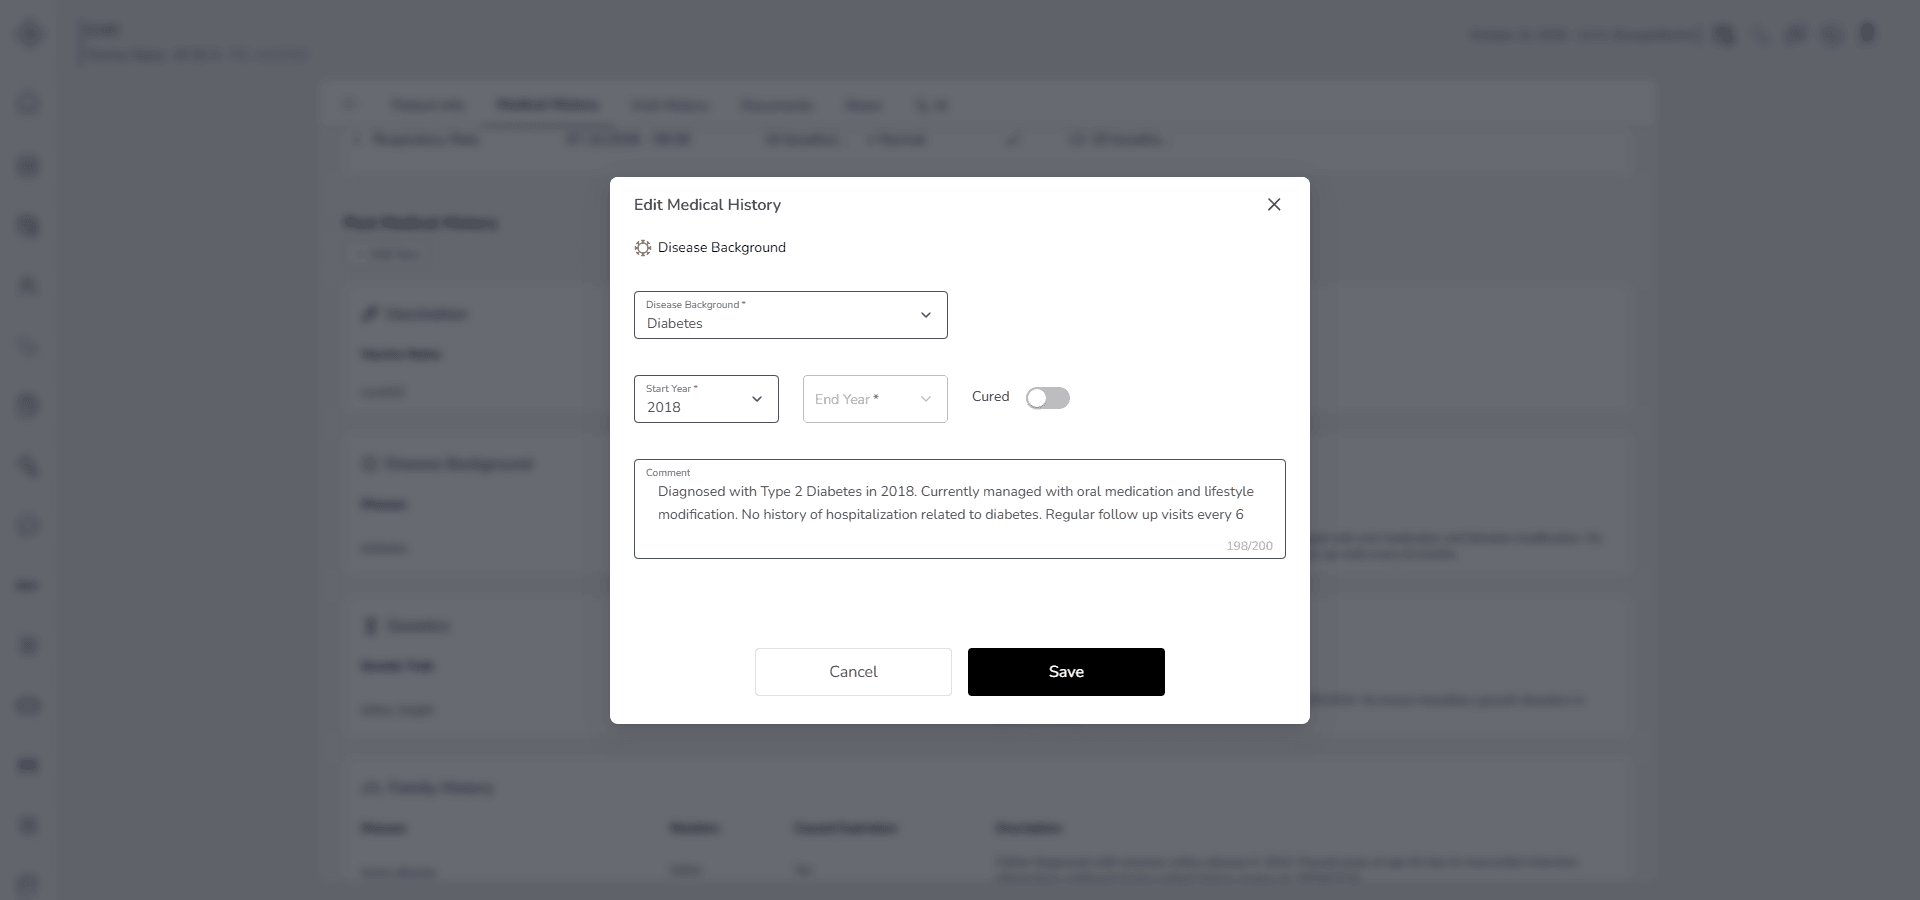
• All previously entered data will be prefilled in the form
You can now:
• change the selected disease
• update the custom disease name if Other was used
• modify the Year of Diagnosis
• activate or deactivate the Cured toggle
• update the Year of Cured if applicable
• edit the description
After making changes:
• Click Save to apply updates
• Click Cancel to discard changes
Once saved, the updated values appear immediately in the list.
If you activate Cured during editing, you must enter Year of Cured before saving.
3. Delete a Record
Use this option when a disease entry was added by mistake or is no longer clinically relevant.
• Click Delete from the More Actions menu
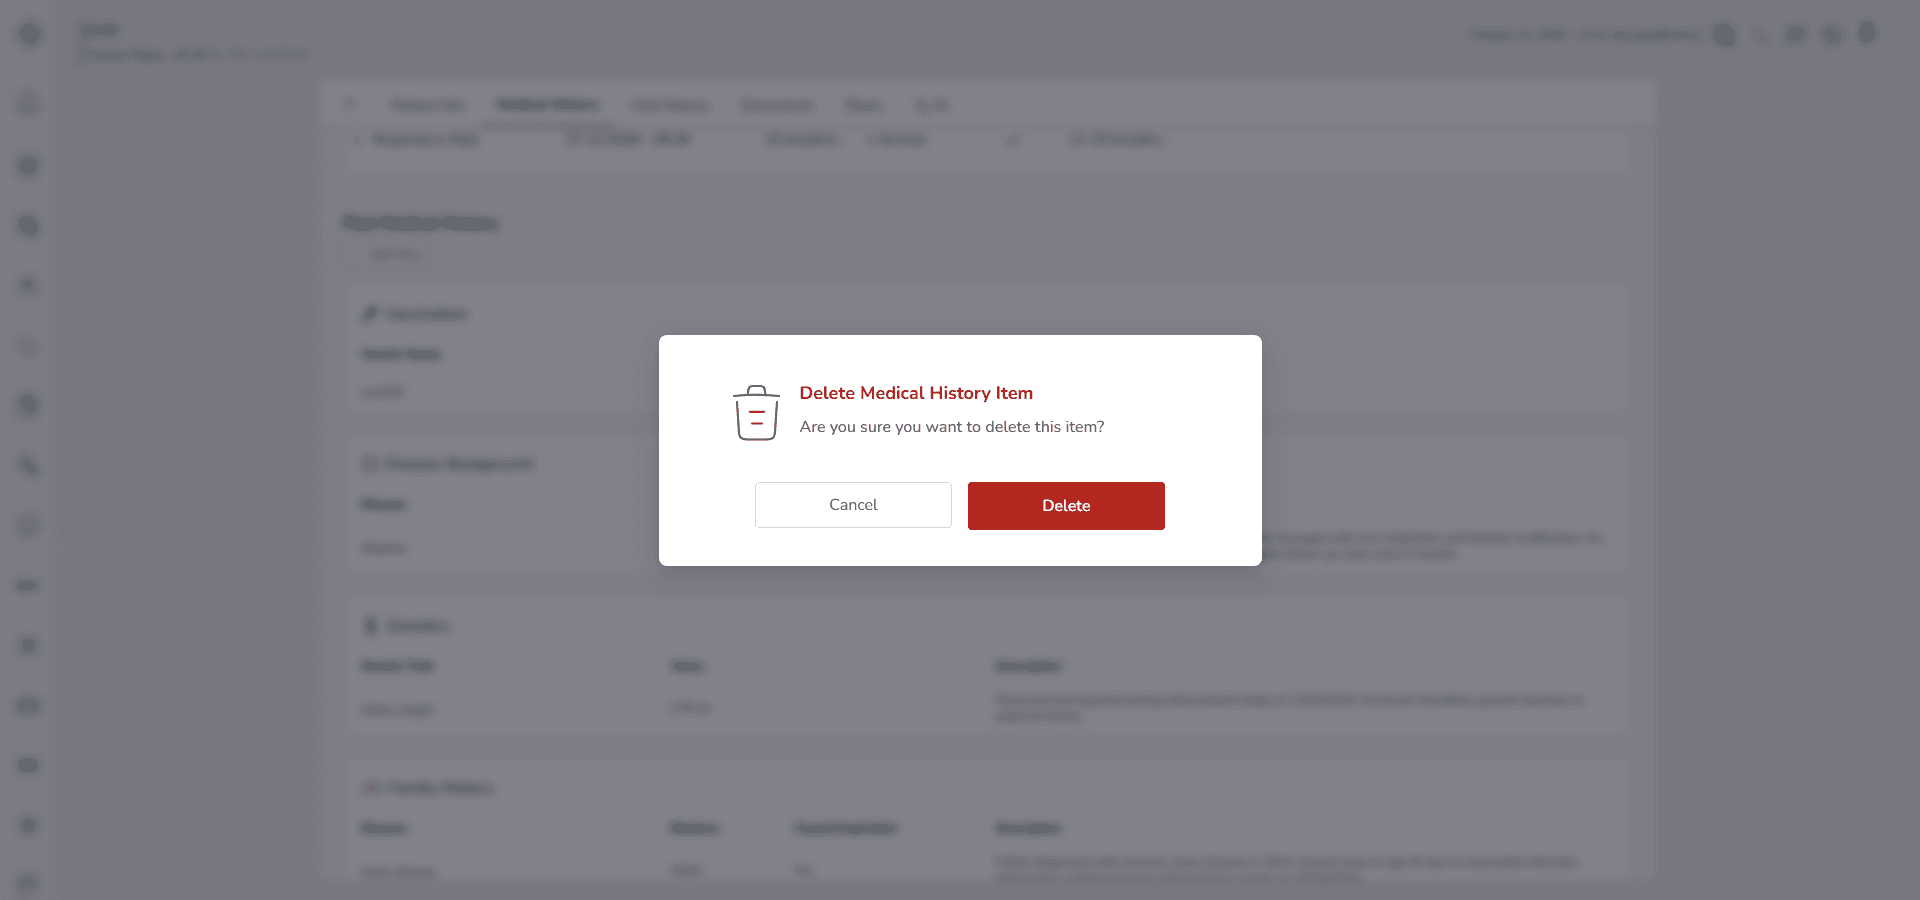
• A confirmation prompt will appear
• Confirm the deletion
After confirmation:
• The record is permanently removed from the Disease Background list
• The data will no longer appear in the Past Medical History section
Deletion cannot be undone.
Make sure the disease information is not required for ongoing clinical evaluation before confirming removal.
3-3. Genetics
Use this section to document hereditary traits related to the patient’s immediate family.
Genetic information helps you understand inherited patterns that may influence growth, metabolism, risk factors or demographic background.
When you open Past Medical History and select Genetics, the Genetics modal will appear.
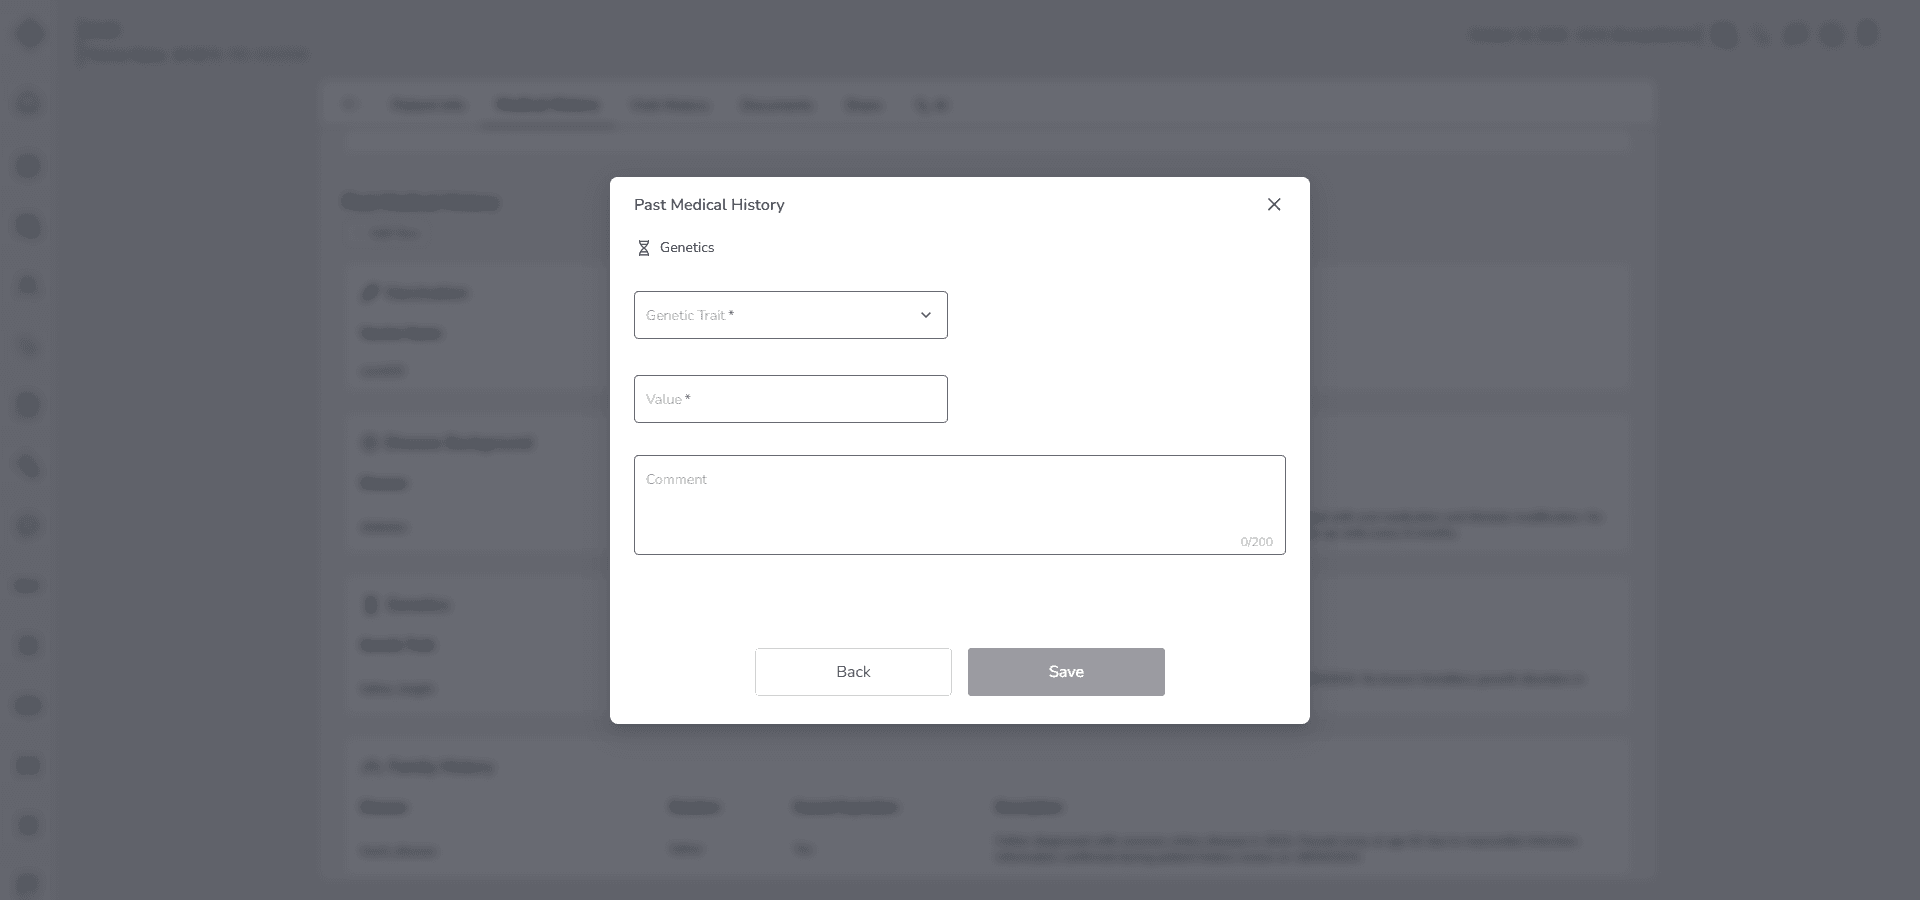
Fill in the Form
Start with Genetic Trait.
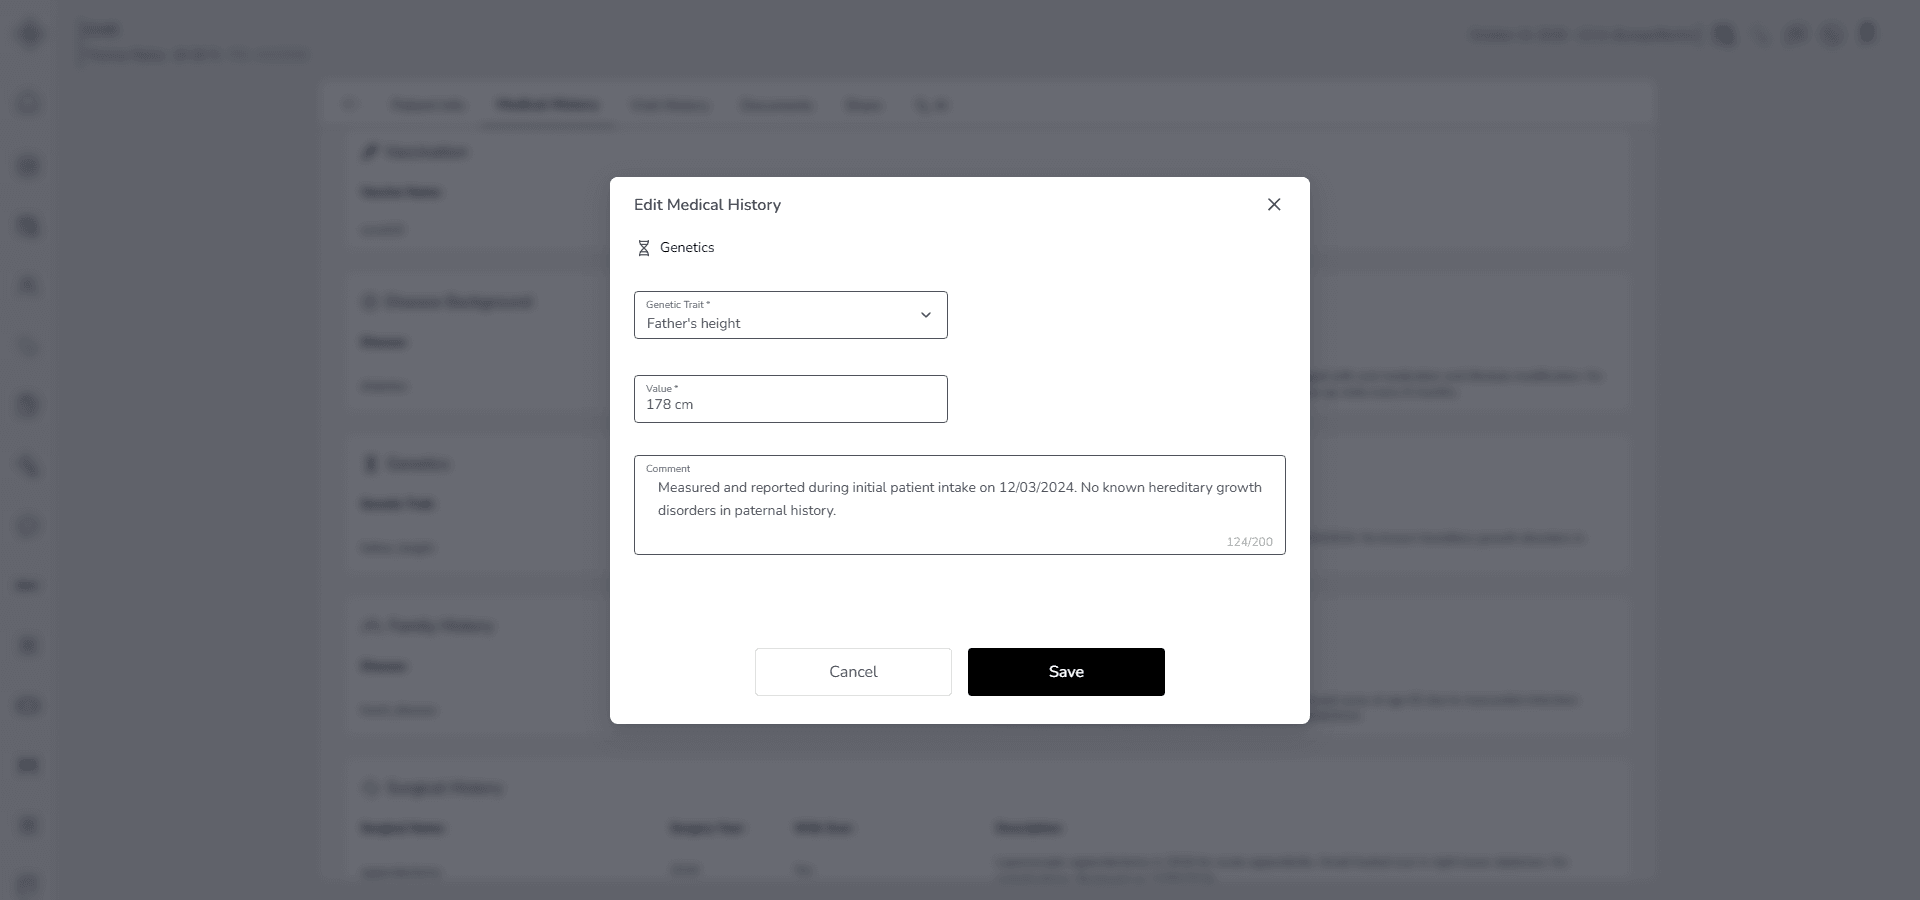
Select a trait from the dropdown list:
Father’s height
Father’s weight
Mother’s height
Mother’s weight
Father’s nationality
Mother’s nationality
Each trait determines the expected format of the Value field.
For example:
• Height usually expects a numeric value
• Weight expects a numeric value
• Nationality expects a text value
After selecting the trait, enter the Value.
This field is required.
Enter the correct value according to the selected trait. Make sure the information is accurate and clearly written.
Then complete the Description field if additional clarification is needed.
You may include details such as:
• unit of measurement if relevant
• known genetic conditions in the family
• clarifications about biological or adoptive parents
• any clinically important hereditary notes
The description is optional but useful when additional context supports clinical interpretation.
Save the Record
• Click Save to store the genetics record
• Click Cancel to exit without saving
The record cannot be saved if:
• Genetic Trait is not selected
• Value is not entered
Behavior and Expected Outcome
• The selected trait determines the expected value format
• Each saved entry is grouped under Past Medical History → Genetics
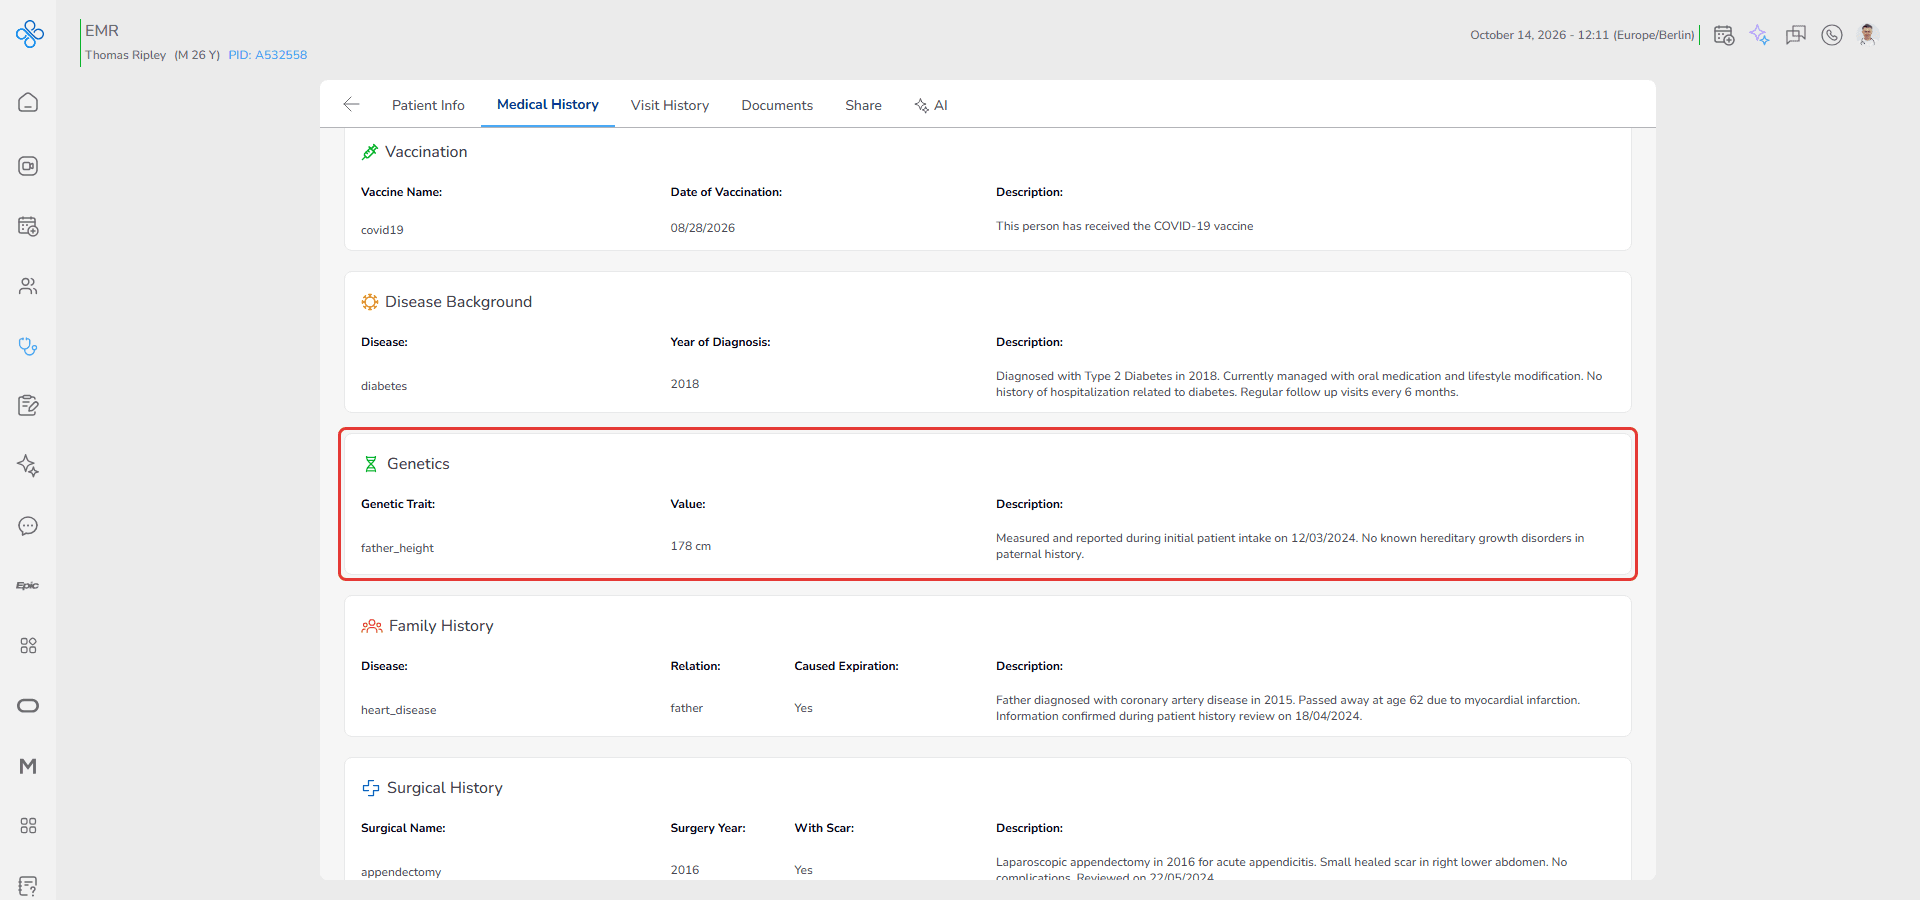
• All genetic traits are displayed together for structured review
This organization allows quick evaluation of hereditary and family related factors.
Managing a Saved Genetics Record
After saving a genetics entry, you can manage it directly from the Genetics list.
Each saved record includes a More Actions menu shown as ⋮ located between the values of the Genetic Trait and Value columns.
Follow these steps:
1. Open More Actions
• Locate the genetics record in the list
• Click the ⋮ icon
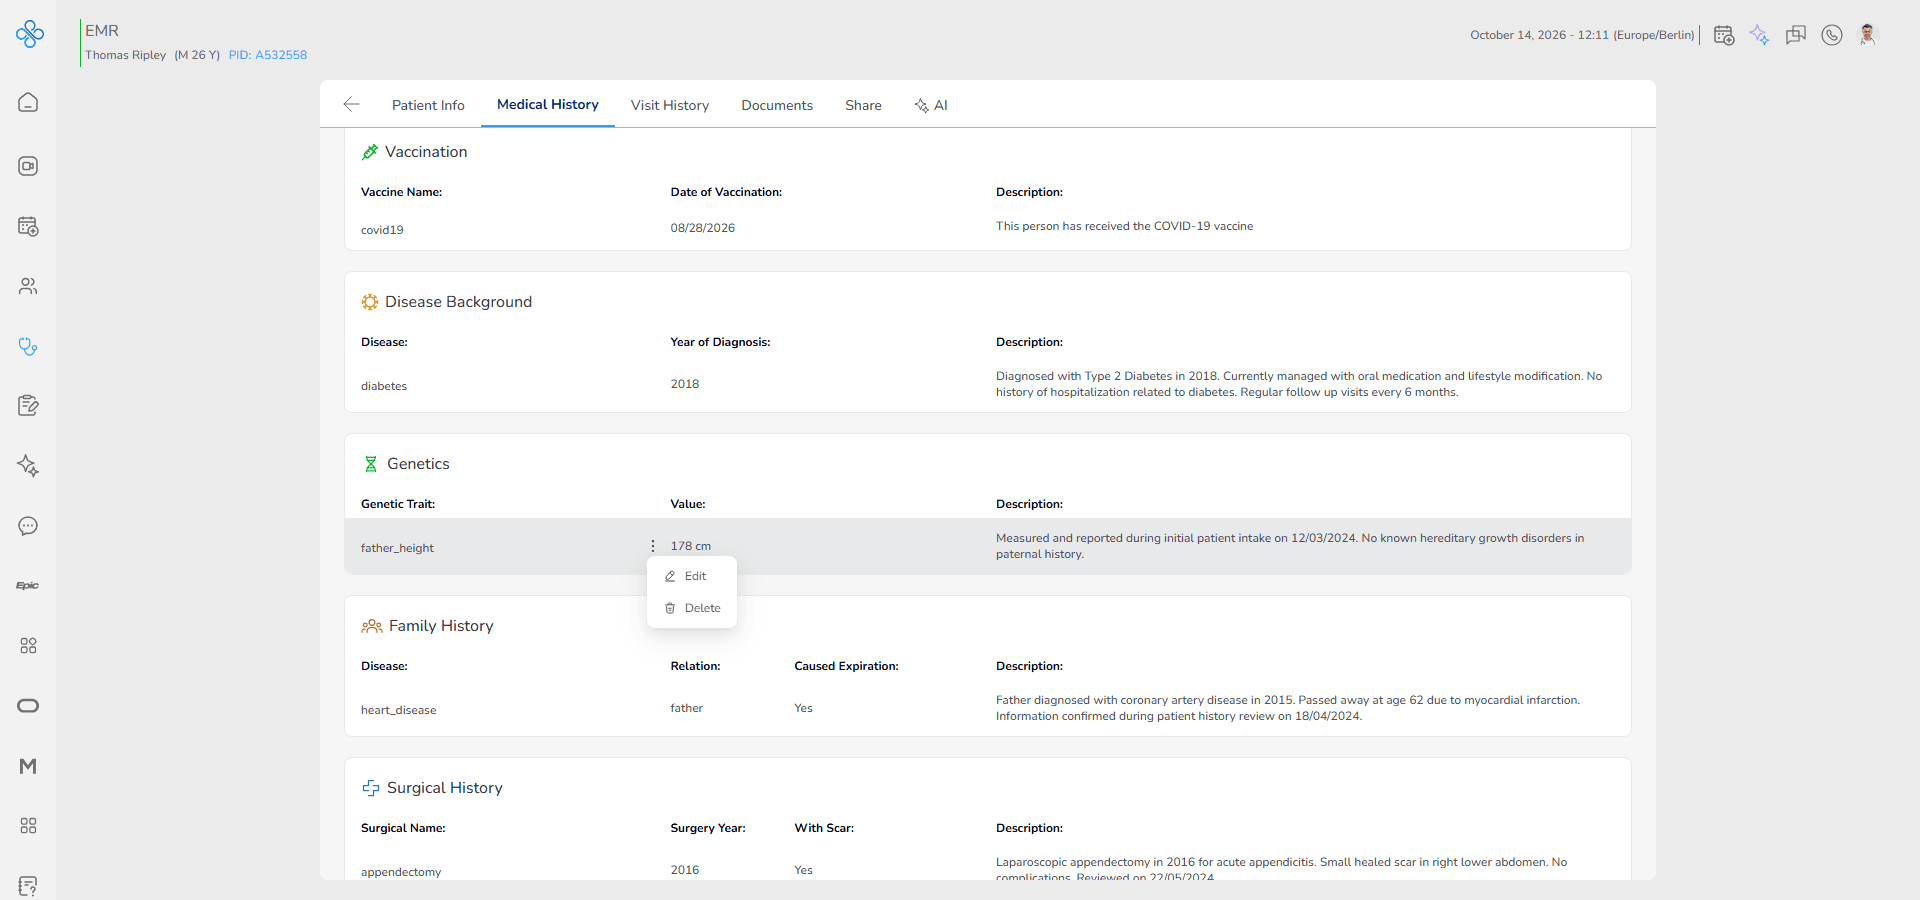
• A dropdown menu will appear with available options
2. Edit a Record
Use this option when you need to correct or update an existing entry.
• Click Edit from the More Actions menu
• The same Genetics modal will open
• All previously entered data will be prefilled in the form
You can now:
• change the selected genetic trait
• modify the value
• edit the description
If you change the trait during editing, make sure the new value matches the expected format.
After making changes:
• Click Save to apply updates
• Click Cancel to discard changes
Once saved, the updated values appear immediately in the list.
3. Delete a Record
Use this option when a genetic entry was added by mistake or is no longer clinically required.
• Click Delete from the More Actions menu
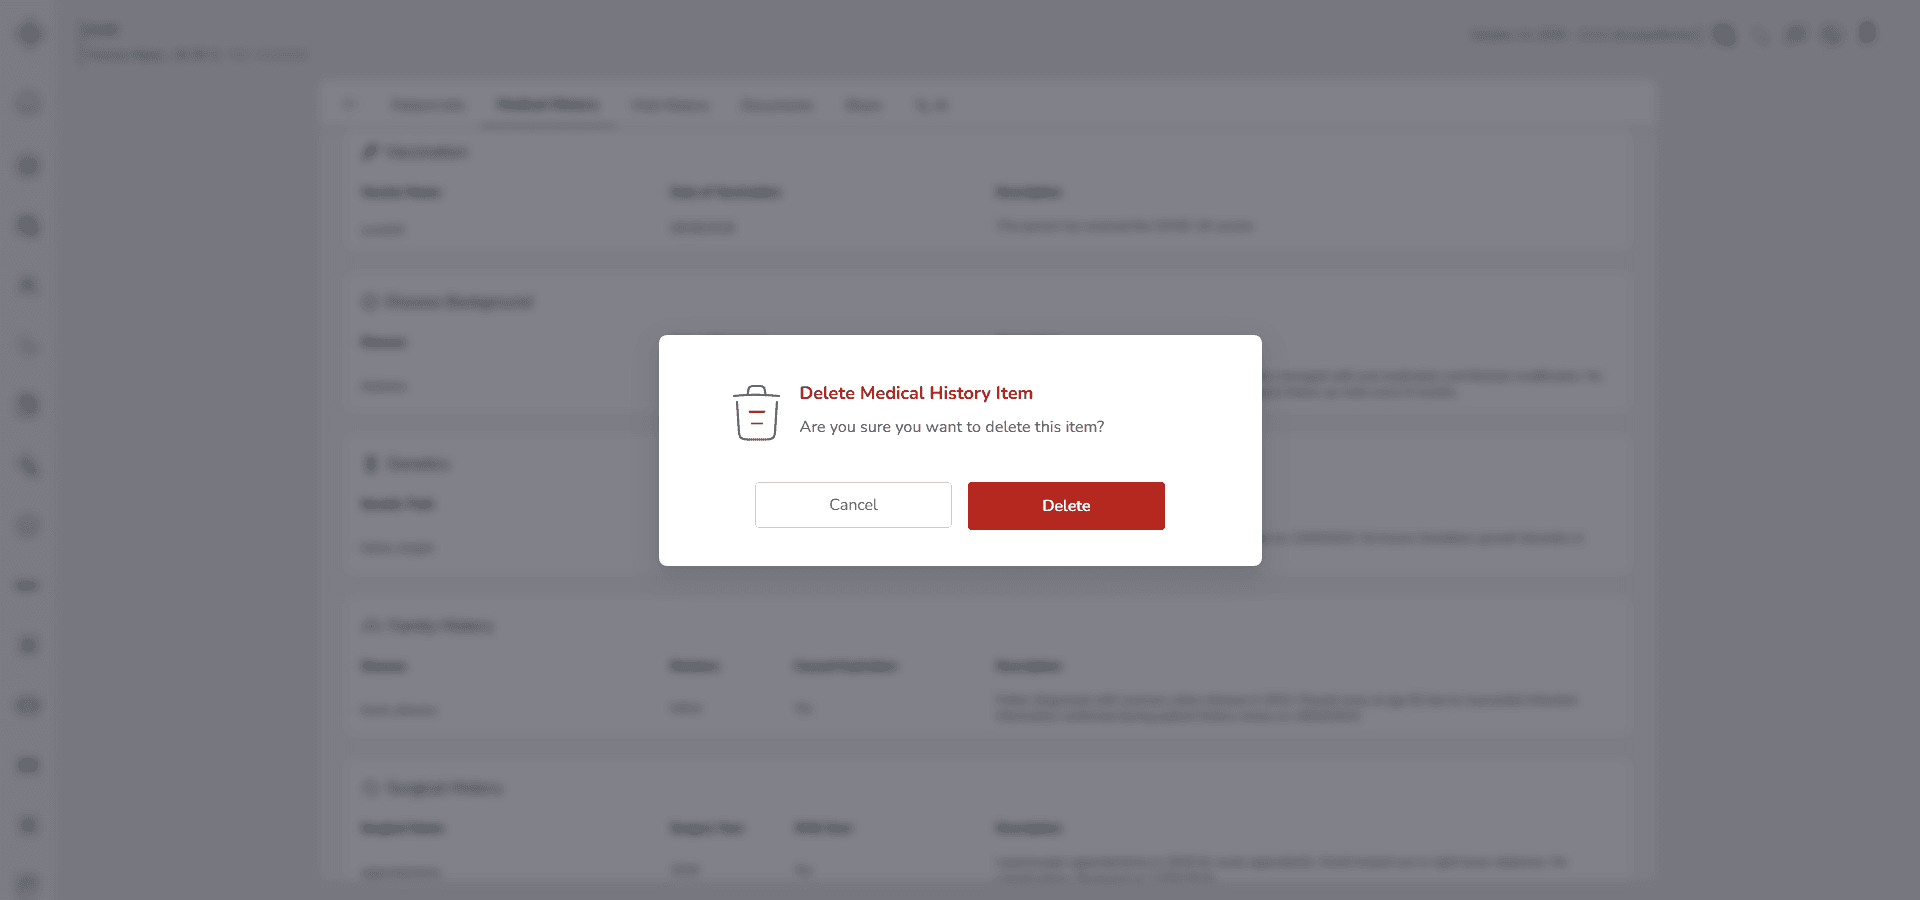
• A confirmation prompt will appear
• Confirm the deletion
After confirmation:
• The record is permanently removed from the Genetics list
• The data will no longer appear in the Past Medical History section
Deletion cannot be undone.
Make sure the genetic information is not required for clinical evaluation before confirming removal.
3-4. Family History
Use this section to record significant diseases that have occurred in the patient’s family.
Family history helps you identify hereditary risk factors and patterns that may affect screening, prevention and treatment decisions.
When you open Past Medical History and select Family History, the Family History modal will appear.
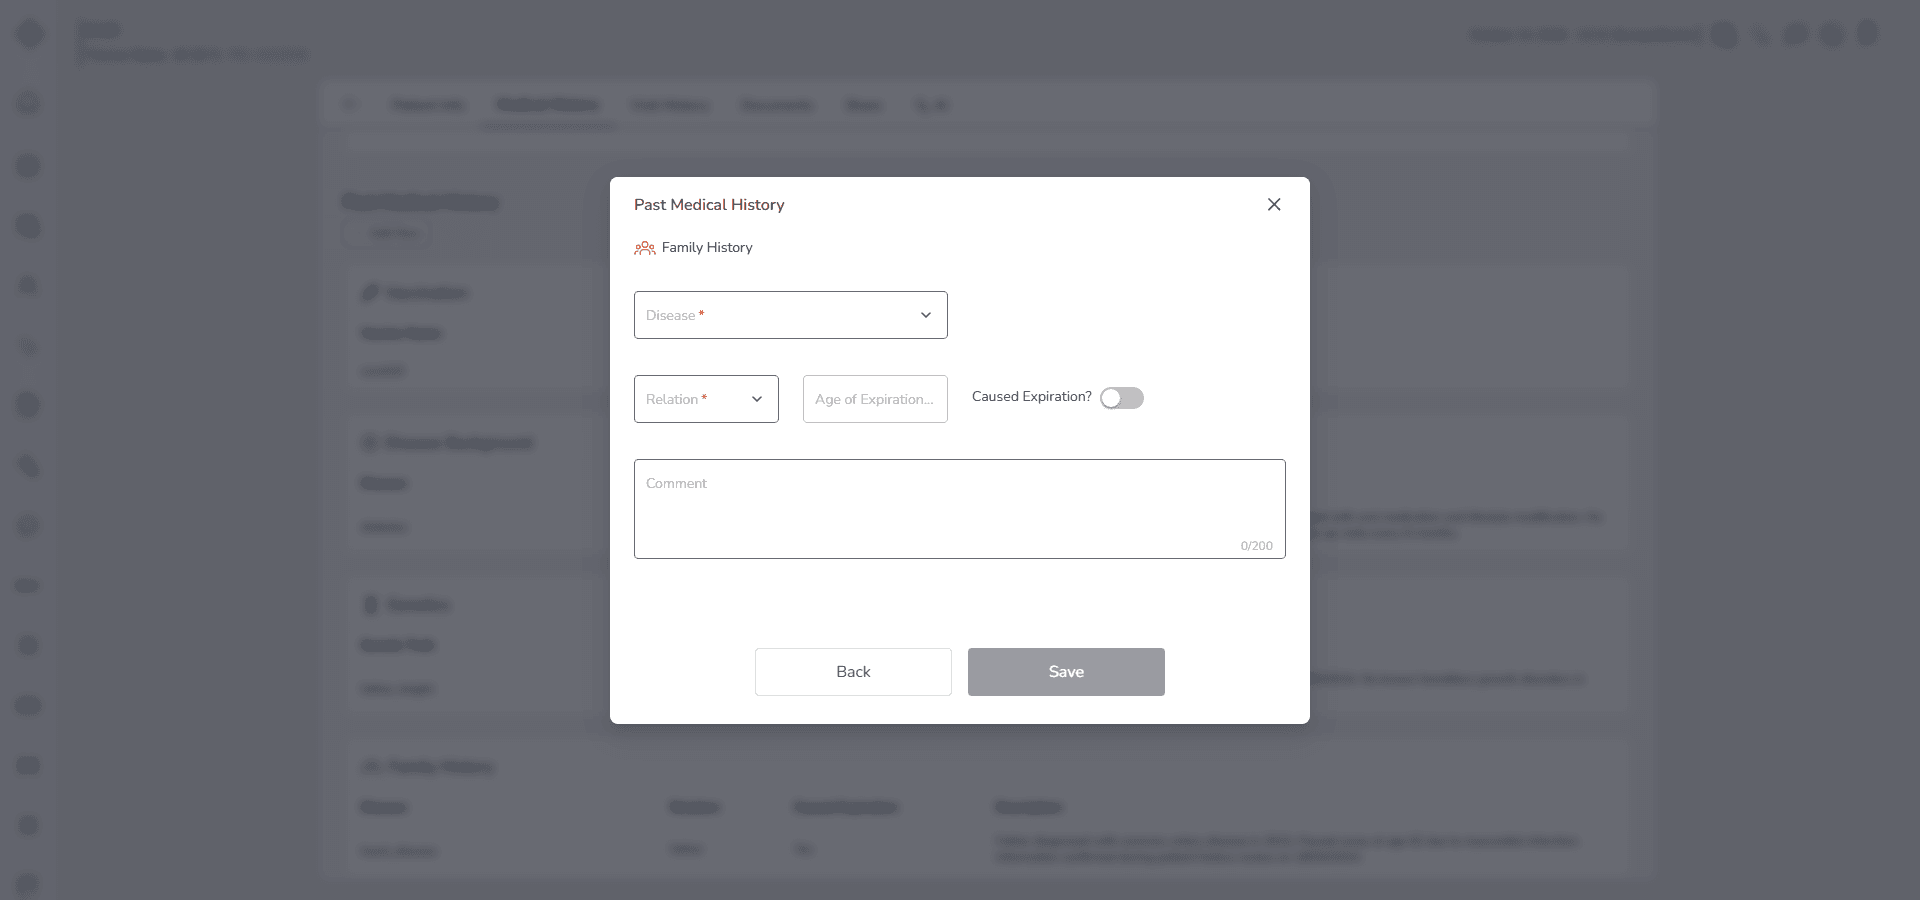
Fill in the Form
Start with Disease.
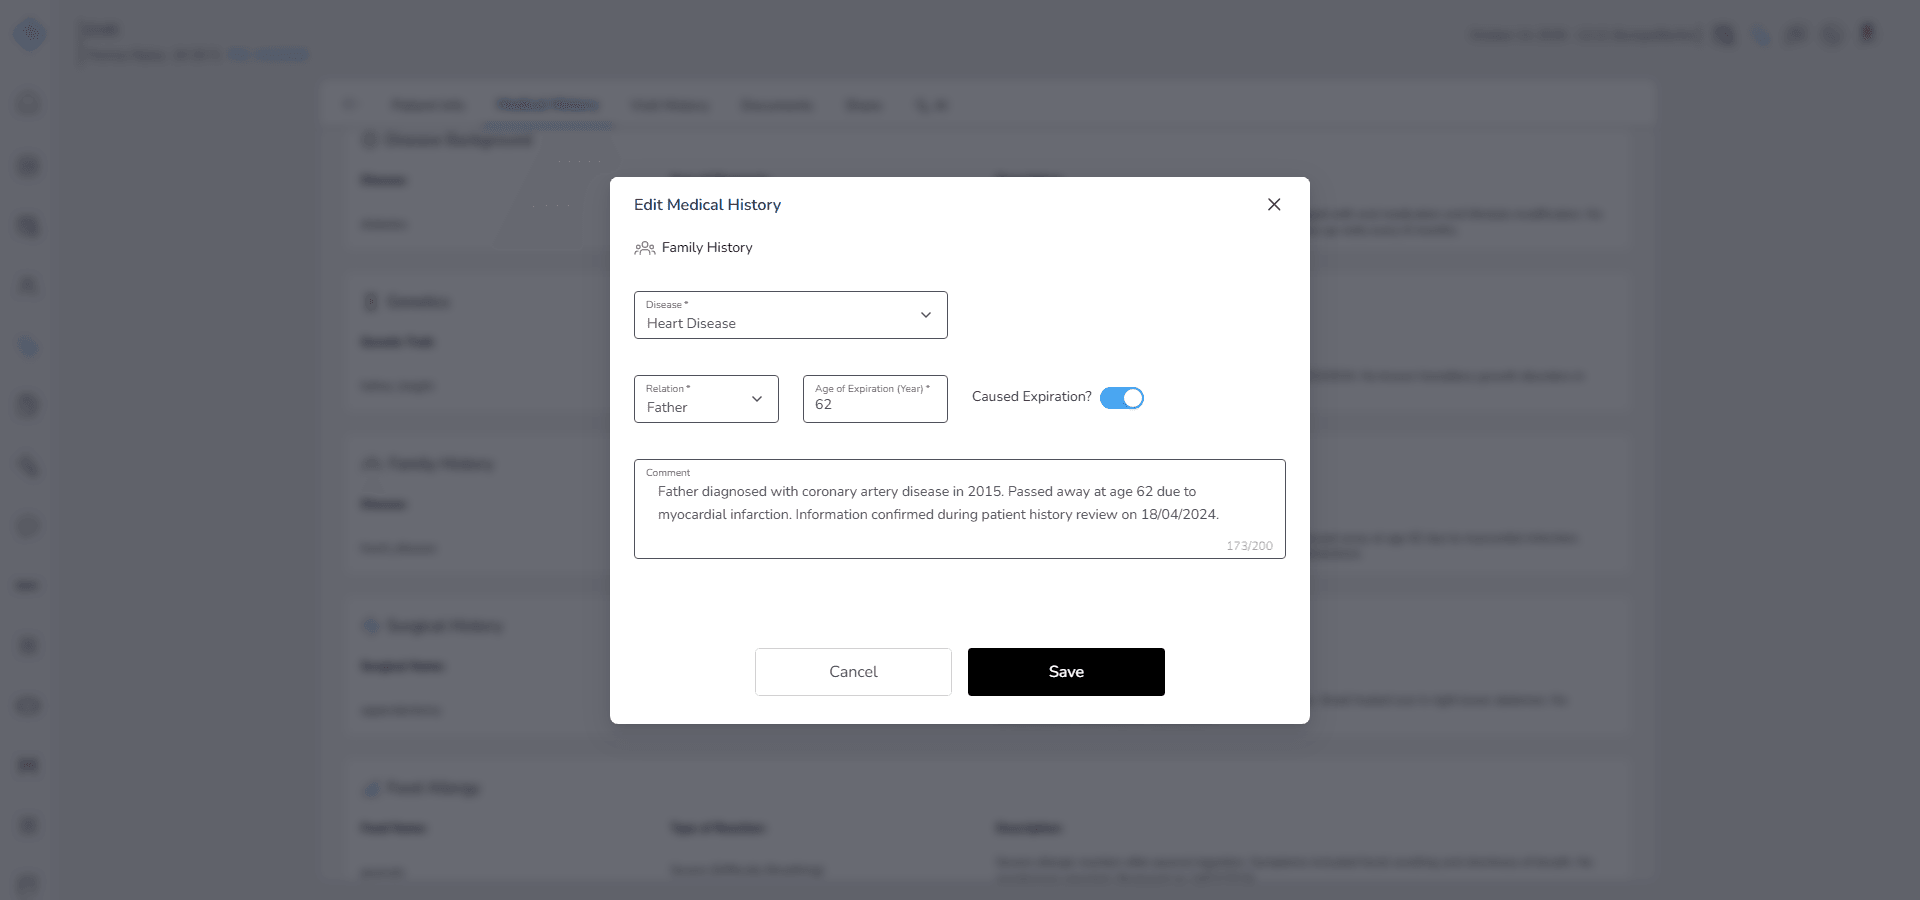
Select the condition from the dropdown list:
Diabetes
Heart Disease
Hypertension
Cancer
Asthma
Arthritis
Mental Health Conditions
Thyroid Disease
If the disease is not listed, select Other.
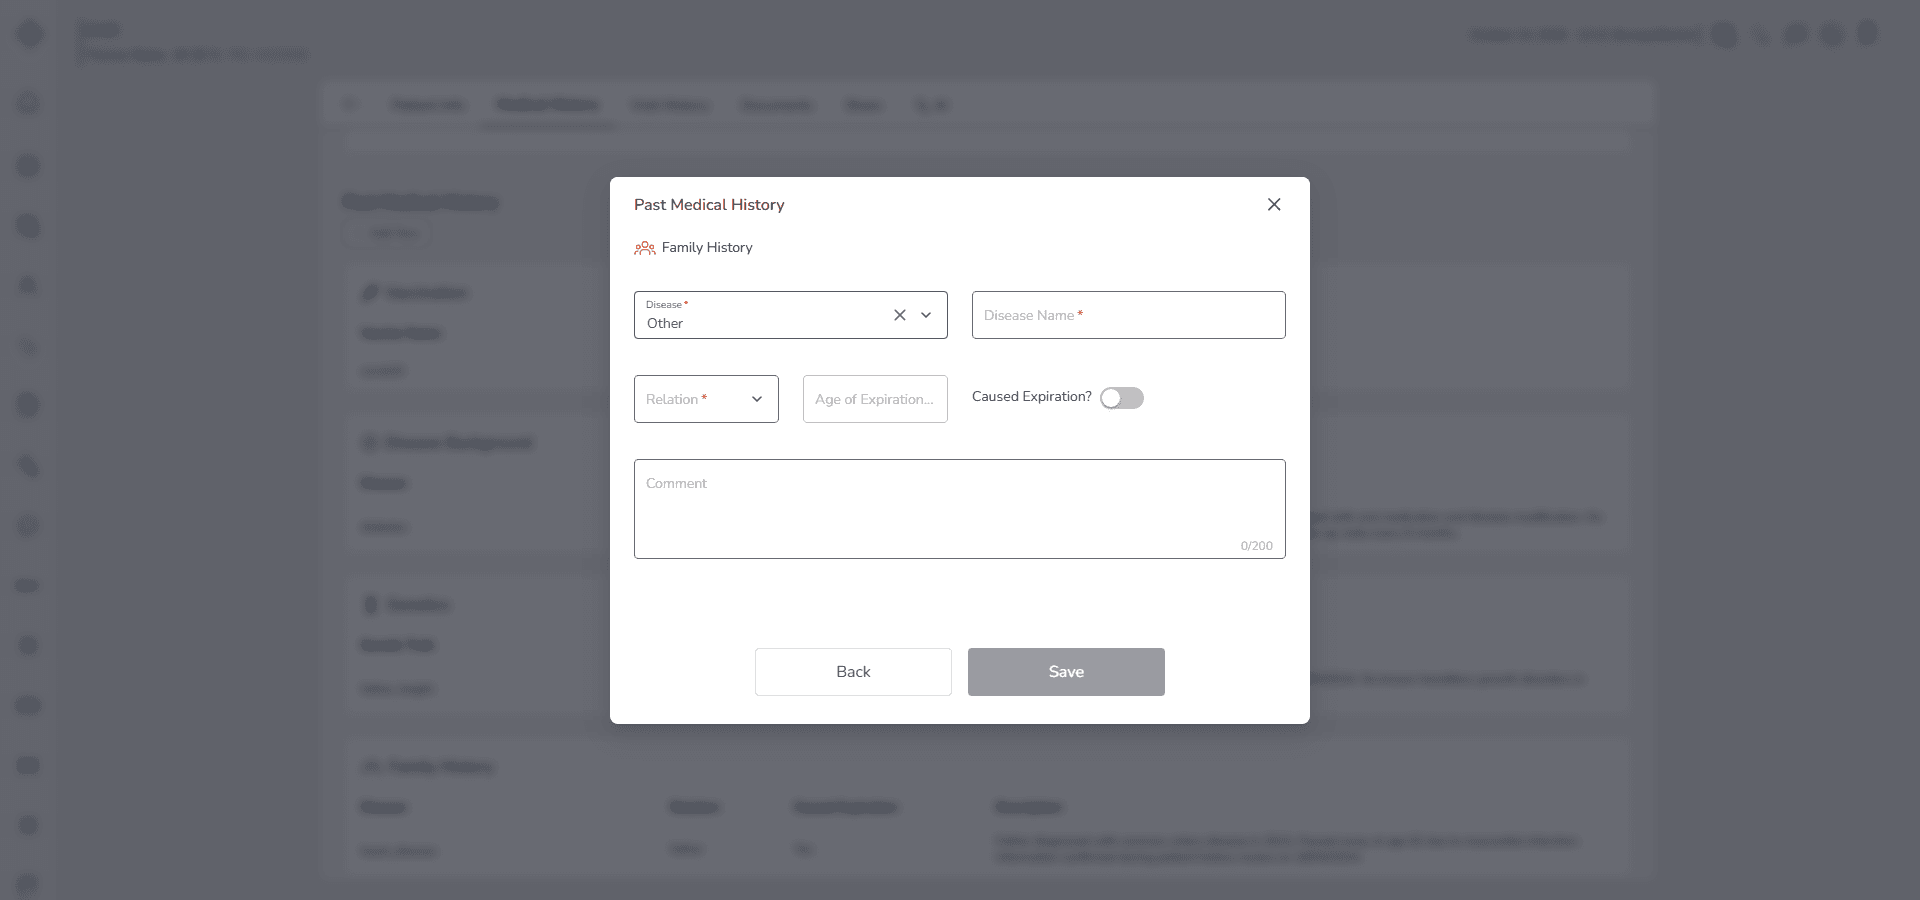
When you choose Other, a Disease Name field becomes active. Enter the exact condition clearly and accurately.
Next, select the Relation.
Choose the affected family member:
Father
Mother
Sister
Brother
Sibling
Grandparent
Grandmother
Son
Daughter
Aunt or Uncle
Cousin
This field is required. You must specify the relationship to properly assess hereditary risk.
Then review the Caused Expiration toggle.
Activate this option if the disease caused the family member’s death.
When Caused Expiration is activated:
• The Age of Expiration Year field becomes editable
• You must enter the age at which the family member passed away
If the disease did not cause death, leave the toggle inactive.
In this case, the Age of Expiration Year field remains disabled.
Use the Description field to provide additional clinical context when necessary. For example:
• age at diagnosis
• severity of disease
• recurrence patterns in the family
• genetic testing results
• relevant lifestyle factors
The description is optional but recommended when the disease has strong hereditary implications.
Save the Record
• Click Save to store the family history record
• Click Cancel to exit without saving
The record cannot be saved if:
• Relation is not selected
• Caused Expiration is activated but Age of Expiration Year is not entered
Behavior and Expected Outcome
• Selecting Other activates the manual Disease Name field
• Activating Caused Expiration enables the Age of Expiration Year field
• Deactivating Caused Expiration disables the age field
• After saving, the record appears under Past Medical History → Family History
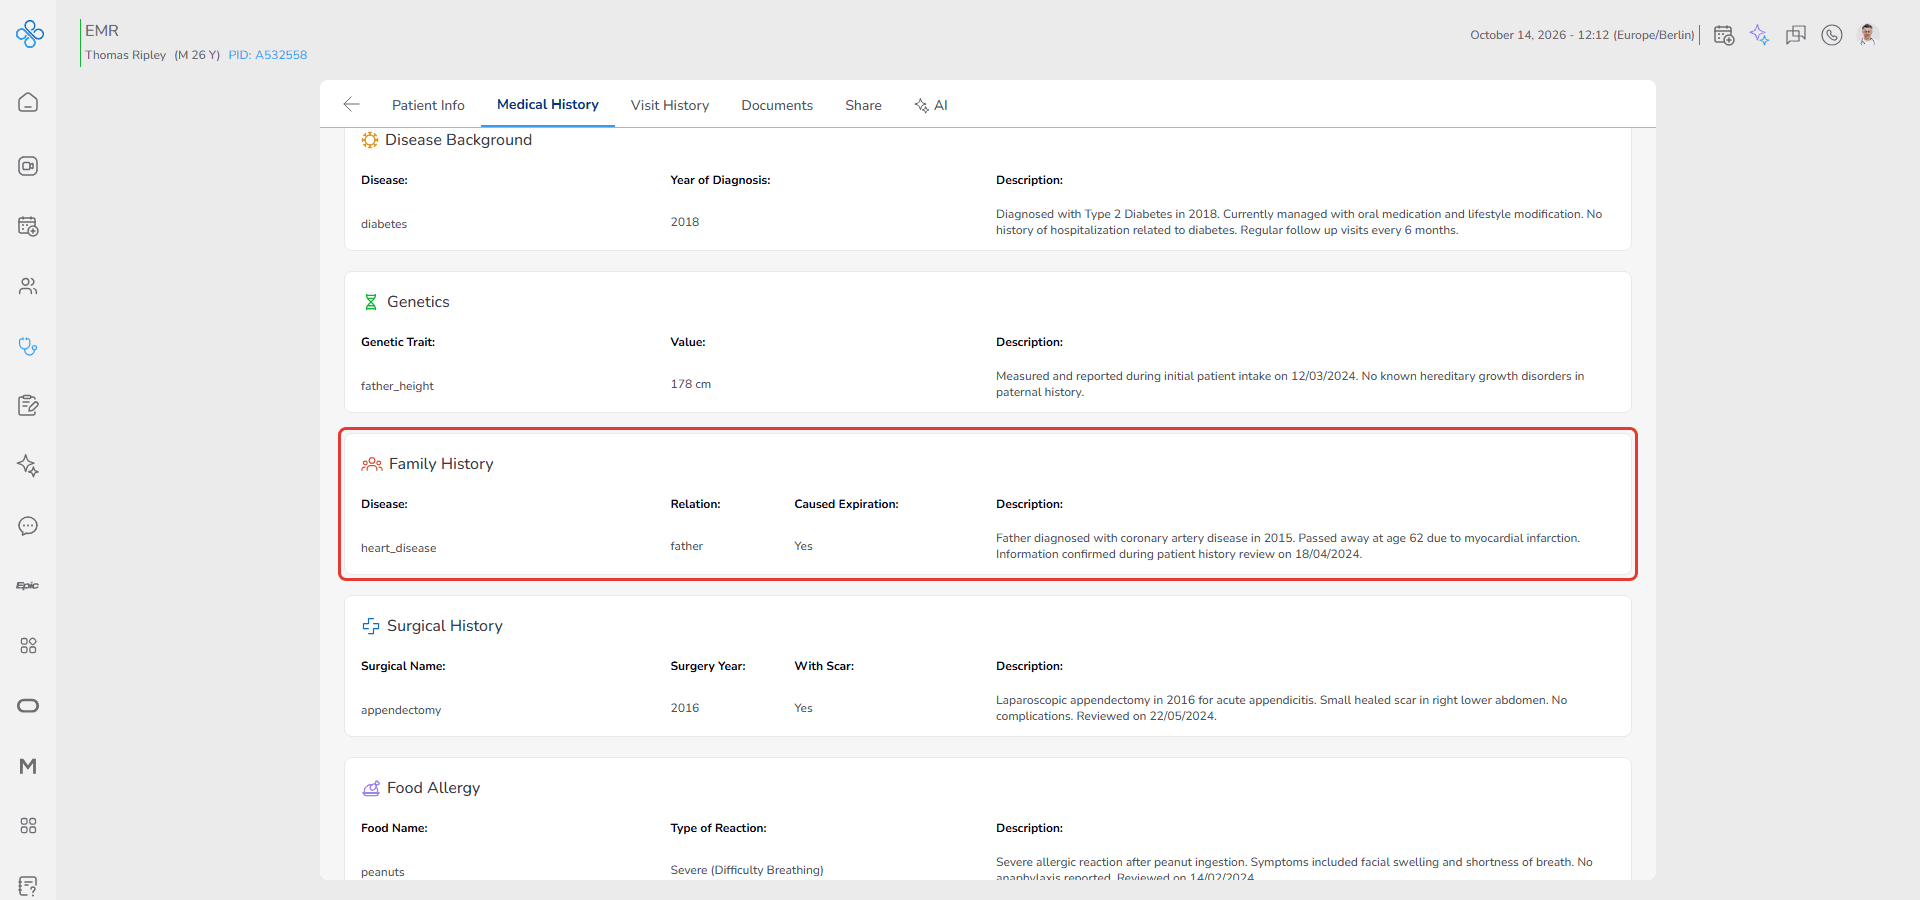
• All family history entries are grouped together for structured review
This structure allows you to quickly evaluate inherited disease risk.
Managing a Saved Family History Record
After saving a family history entry, you can manage it directly from the Family History list.
Each saved record includes a More Actions menu shown as ⋮ located between the values of the Disease and Relation columns.
Follow these steps:
1. Open More Actions
• Locate the family history record in the list
• Click the ⋮ icon
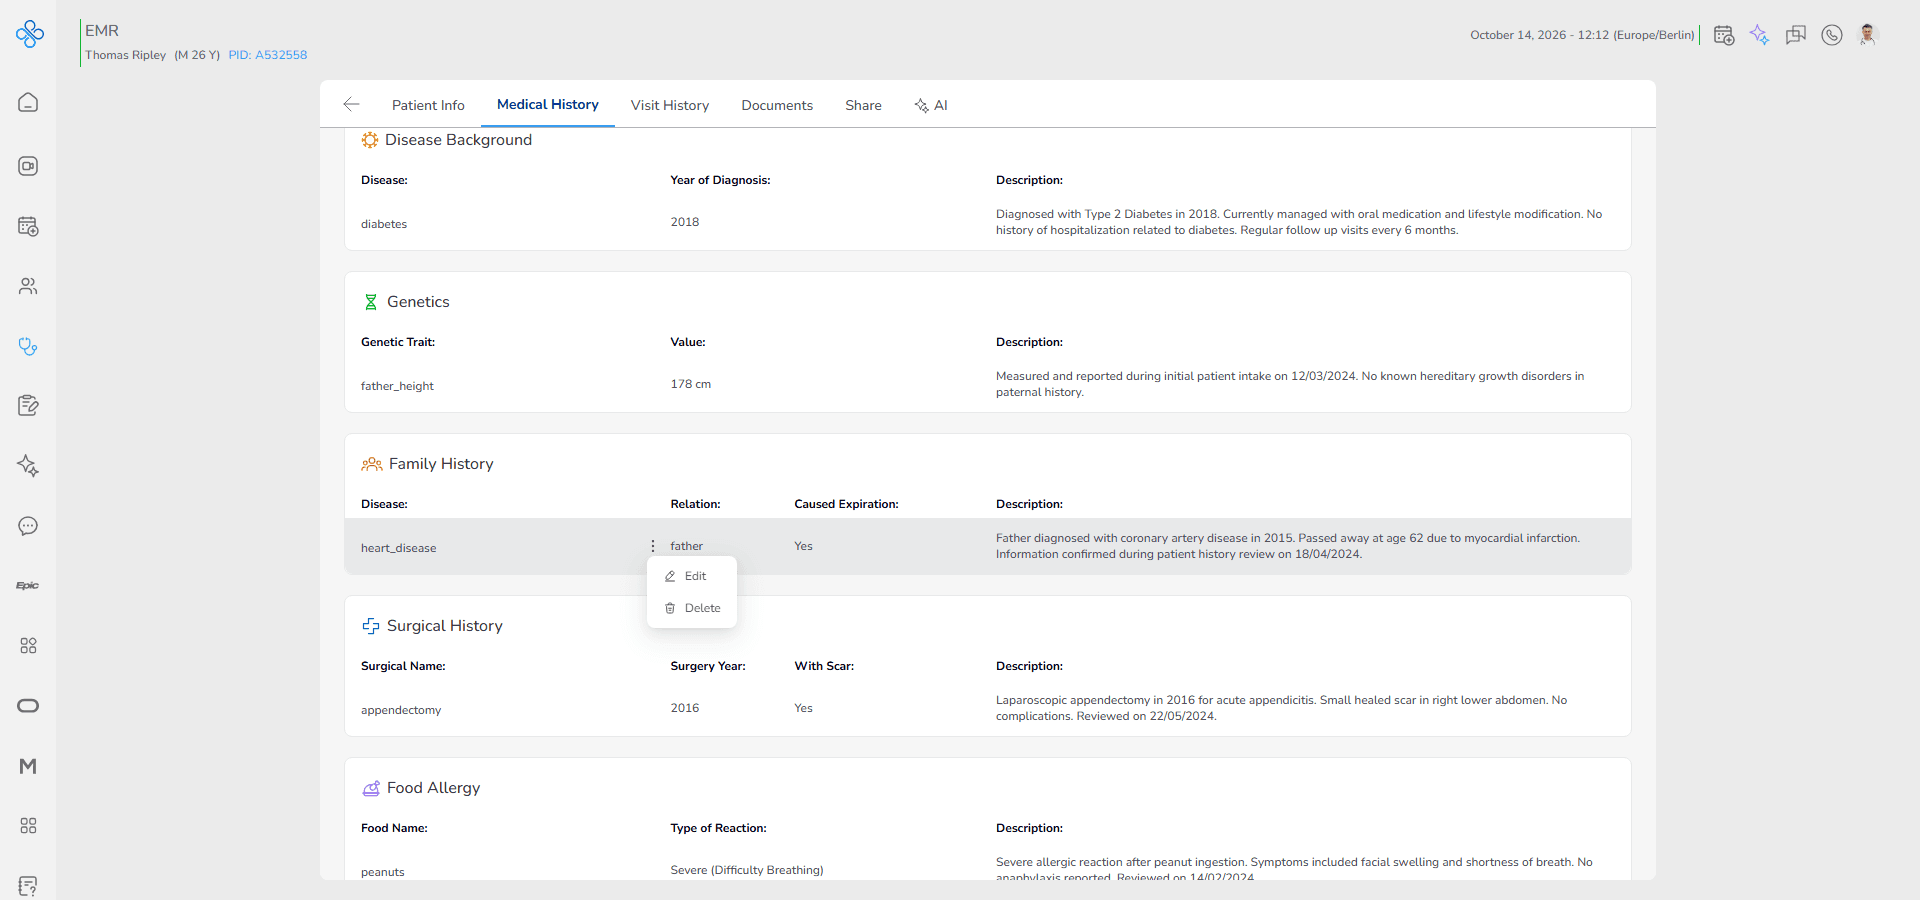
• A dropdown menu will appear with available options
2. Edit a Record
Use this option when you need to correct or update an existing entry.
• Click Edit from the More Actions menu
• The same Family History modal will open
• All previously entered data will be prefilled in the form
You can now:
• change the selected disease
• update the custom disease name if Other was used
• modify the relation
• activate or deactivate Caused Expiration
• update the Age of Expiration Year if applicable
• edit the description
After making changes:
• Click Save to apply updates
• Click Cancel to discard changes
Once saved, the updated values appear immediately in the list.
If you activate Caused Expiration during editing, you must enter the Age of Expiration Year before saving.
3. Delete a Record
Use this option when a family history entry was added by mistake or is no longer clinically required.
• Click Delete from the More Actions menu
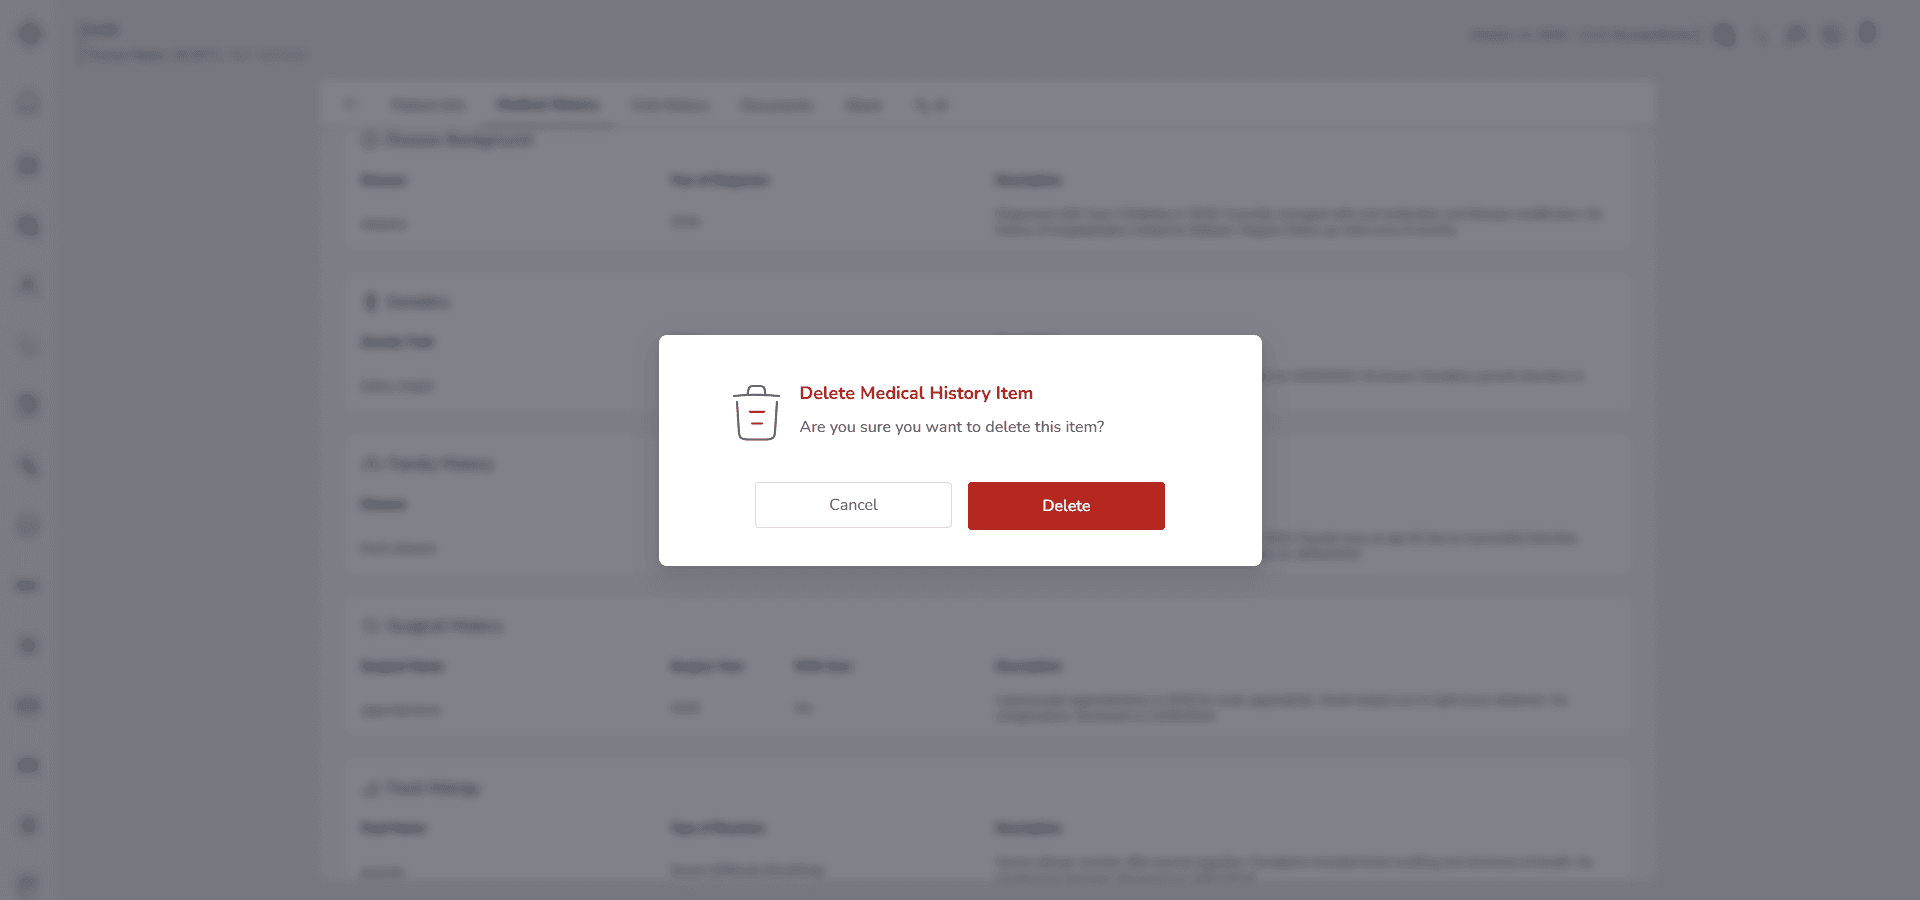
• A confirmation prompt will appear
• Confirm the deletion
After confirmation:
• The record is permanently removed from the Family History list
• The data will no longer appear in the Past Medical History section
Deletion cannot be undone.
Make sure the family history information is not required for clinical evaluation before confirming removal.
3-5. Surgical History
Use this section to document any previous surgical procedures the patient has undergone.
Recording surgical history helps you understand past interventions, possible complications, scar presence and considerations for future treatment planning.
When you open Past Medical History and select Surgical History, the Surgical History modal will appear.
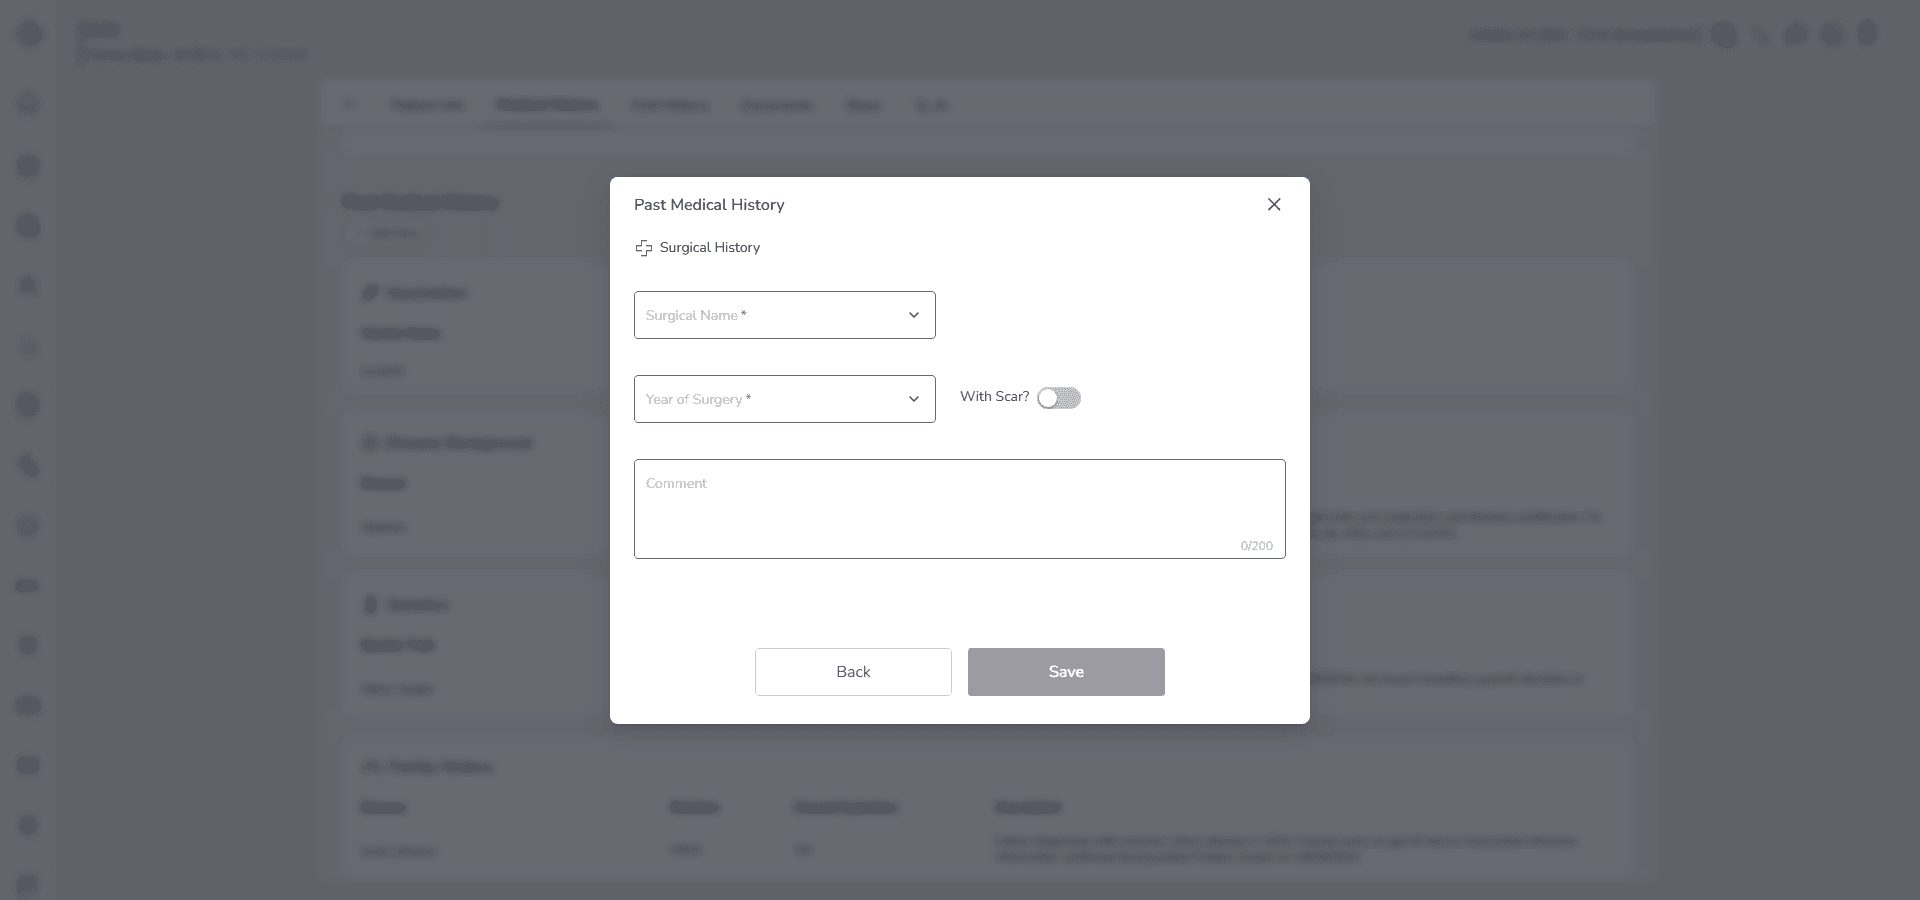
Fill in the Form
Start with Surgical Name.
Select the procedure from the dropdown list such as:
- Appendectomy
- Tonsillectomy
- Gallbladder Removal
- Hernia Repair
- Cesarean Section
- Knee Replacement
- Hip Replacement
- Cataract Surgery
- Cardiac Surgery
If the procedure is not listed, select Other.
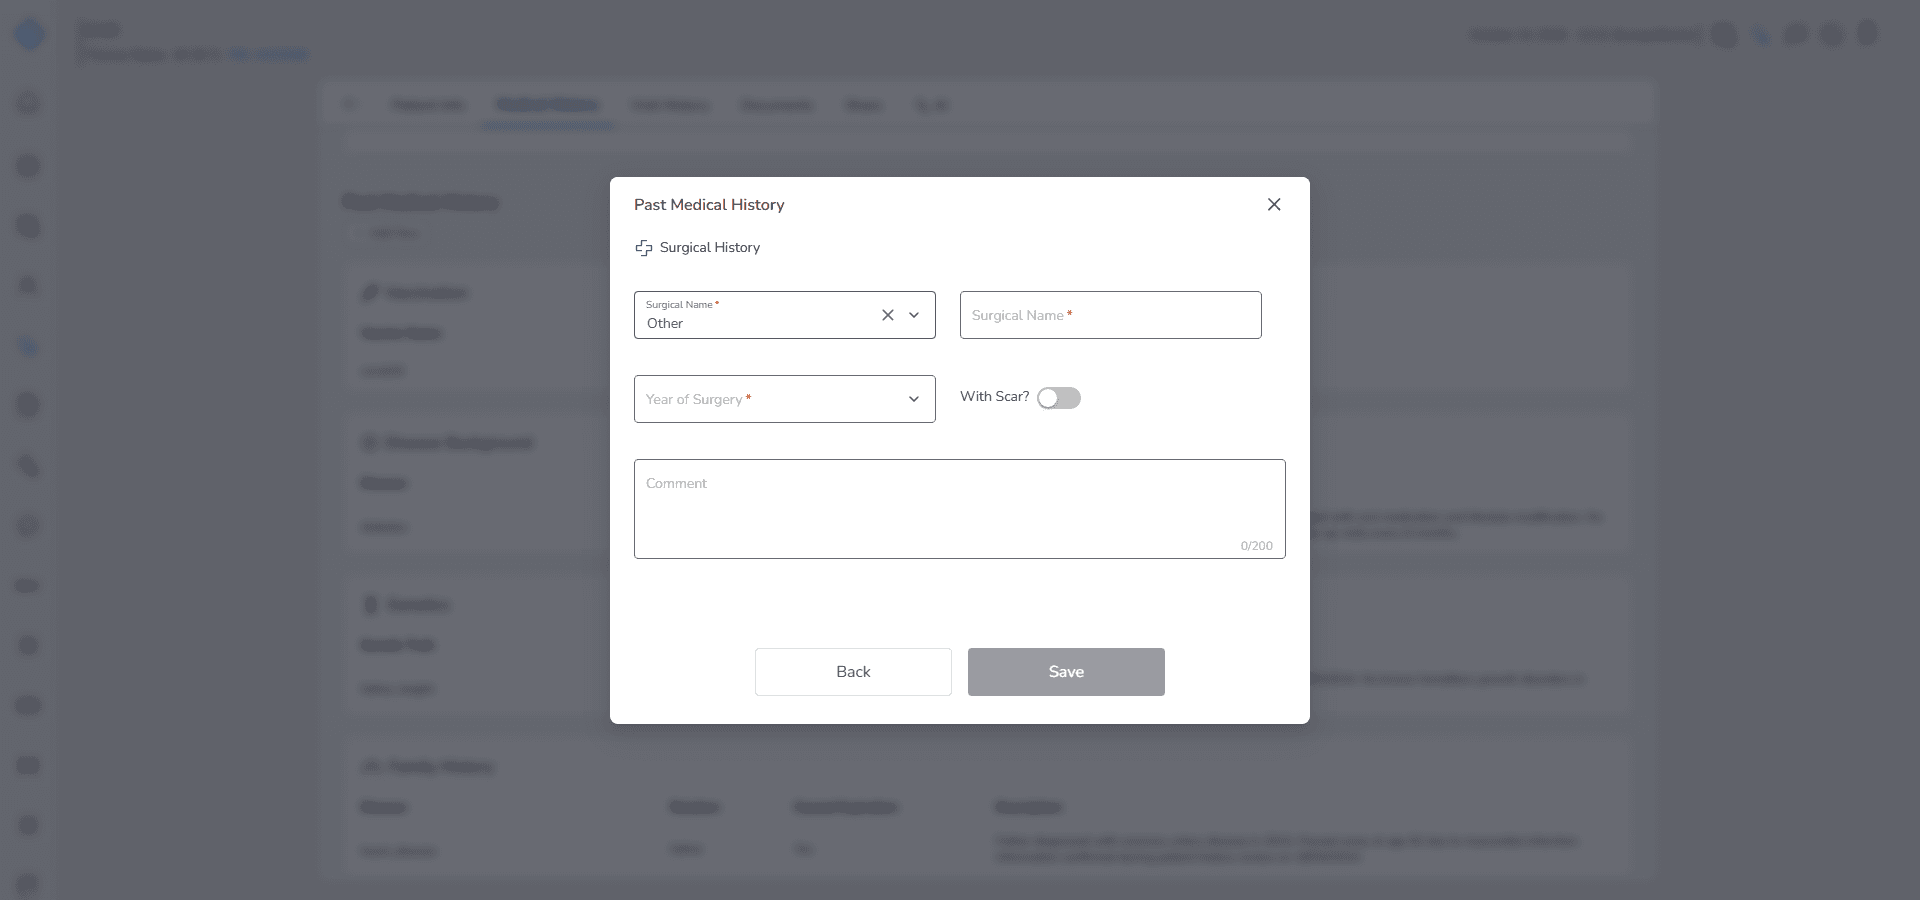
When you choose Other, a custom Surgical Name field becomes active. You must manually enter the exact name of the surgery. Use a clear and medically appropriate term.
Next, enter the Year of Surgery.
This field is required. Enter the year the procedure was performed. Make sure the year reflects the actual time of operation, not the diagnosis year.
Then review the With Scar toggle.
Activate this option if the surgery resulted in a visible or clinically relevant scar.
Leave it inactive if there is no scar or if the scar is not present anymore.
Use the Description field to provide additional context when needed. For example:
• Post operative complications
• Repeated surgery
• Side of the body involved
• Implant placement
• Recovery details
The description is optional but useful for clinical clarity.
Save the Record
• Click Save to store the surgical history record
• Click Cancel if you do not want to save
If Surgical Name or Year of Surgery is missing, the record cannot be saved.
Behavior and Expected Outcome
• If Other is selected, the manual Surgical Name field becomes editable
• Each saved entry is grouped under Past Medical History → Surgical History
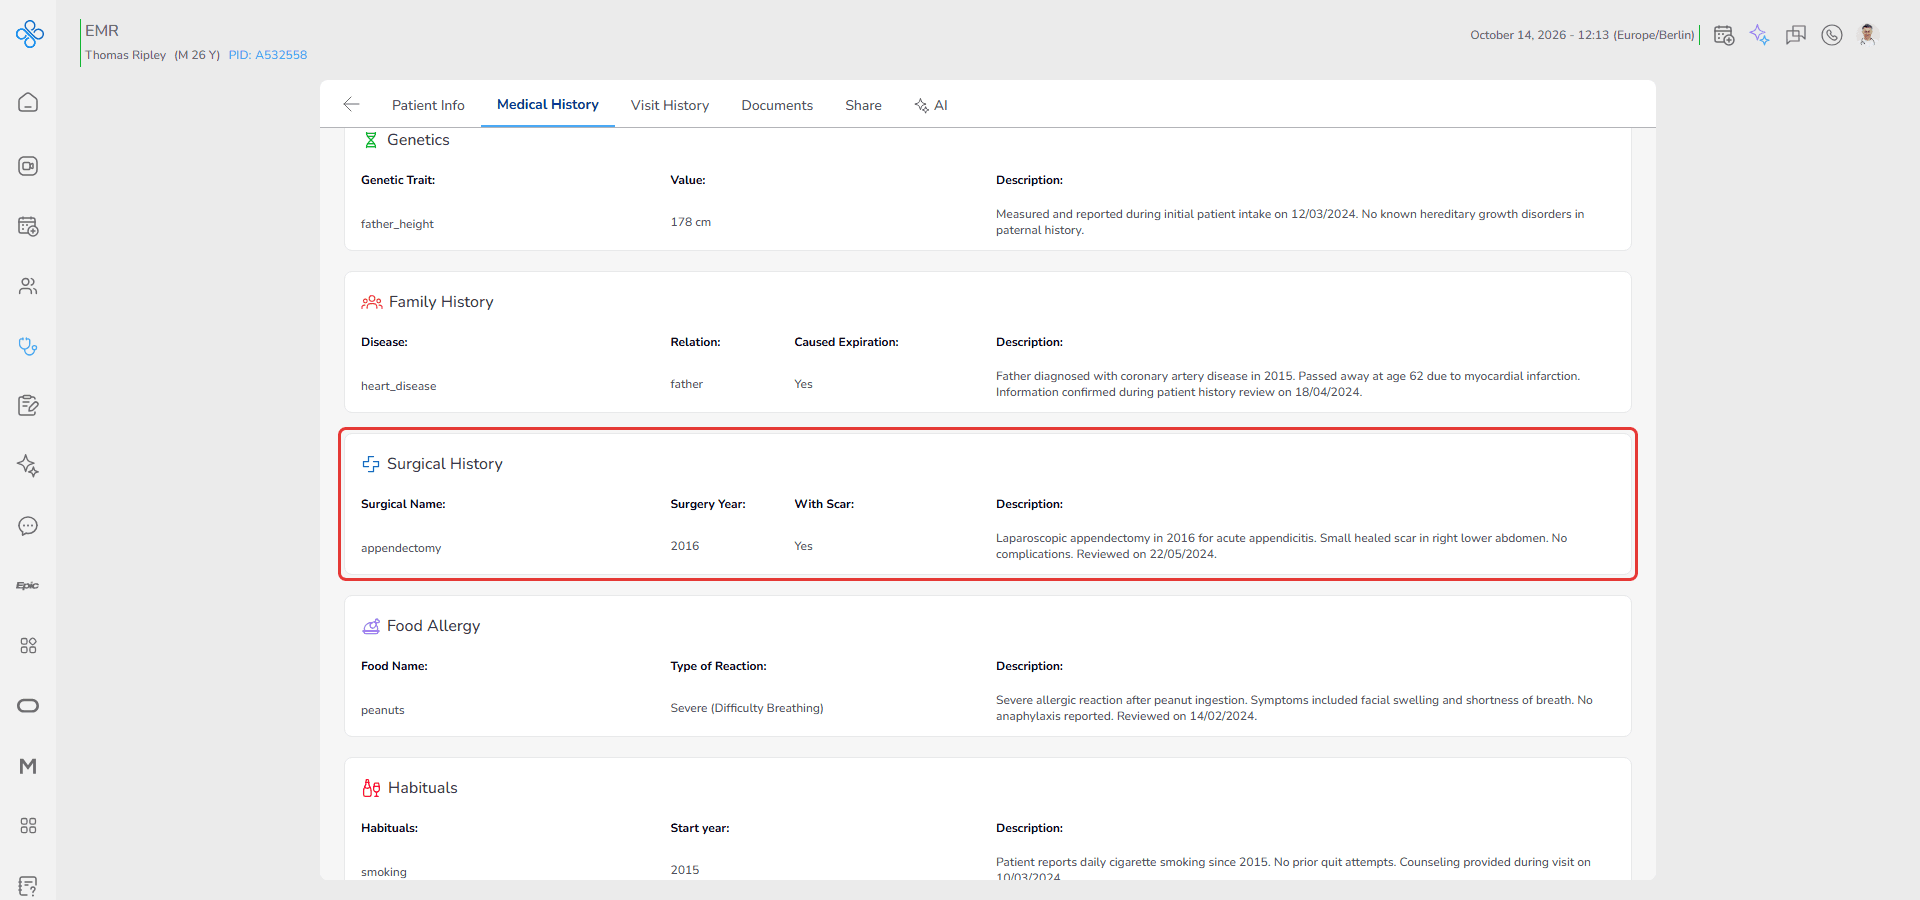
• All surgical procedures are displayed together for structured review
This ensures the patient’s operative background is clearly organized and easy to assess.
Managing a Saved Surgical History Record
After saving a surgical history entry, you can manage it directly from the Surgical History list.
Each saved record includes a More Actions menu shown as ⋮ located between the values of the Surgical Name and Year of Surgery columns.
Follow these steps:
1. Open More Actions
• Locate the surgical record in the list
• Click the ⋮ icon
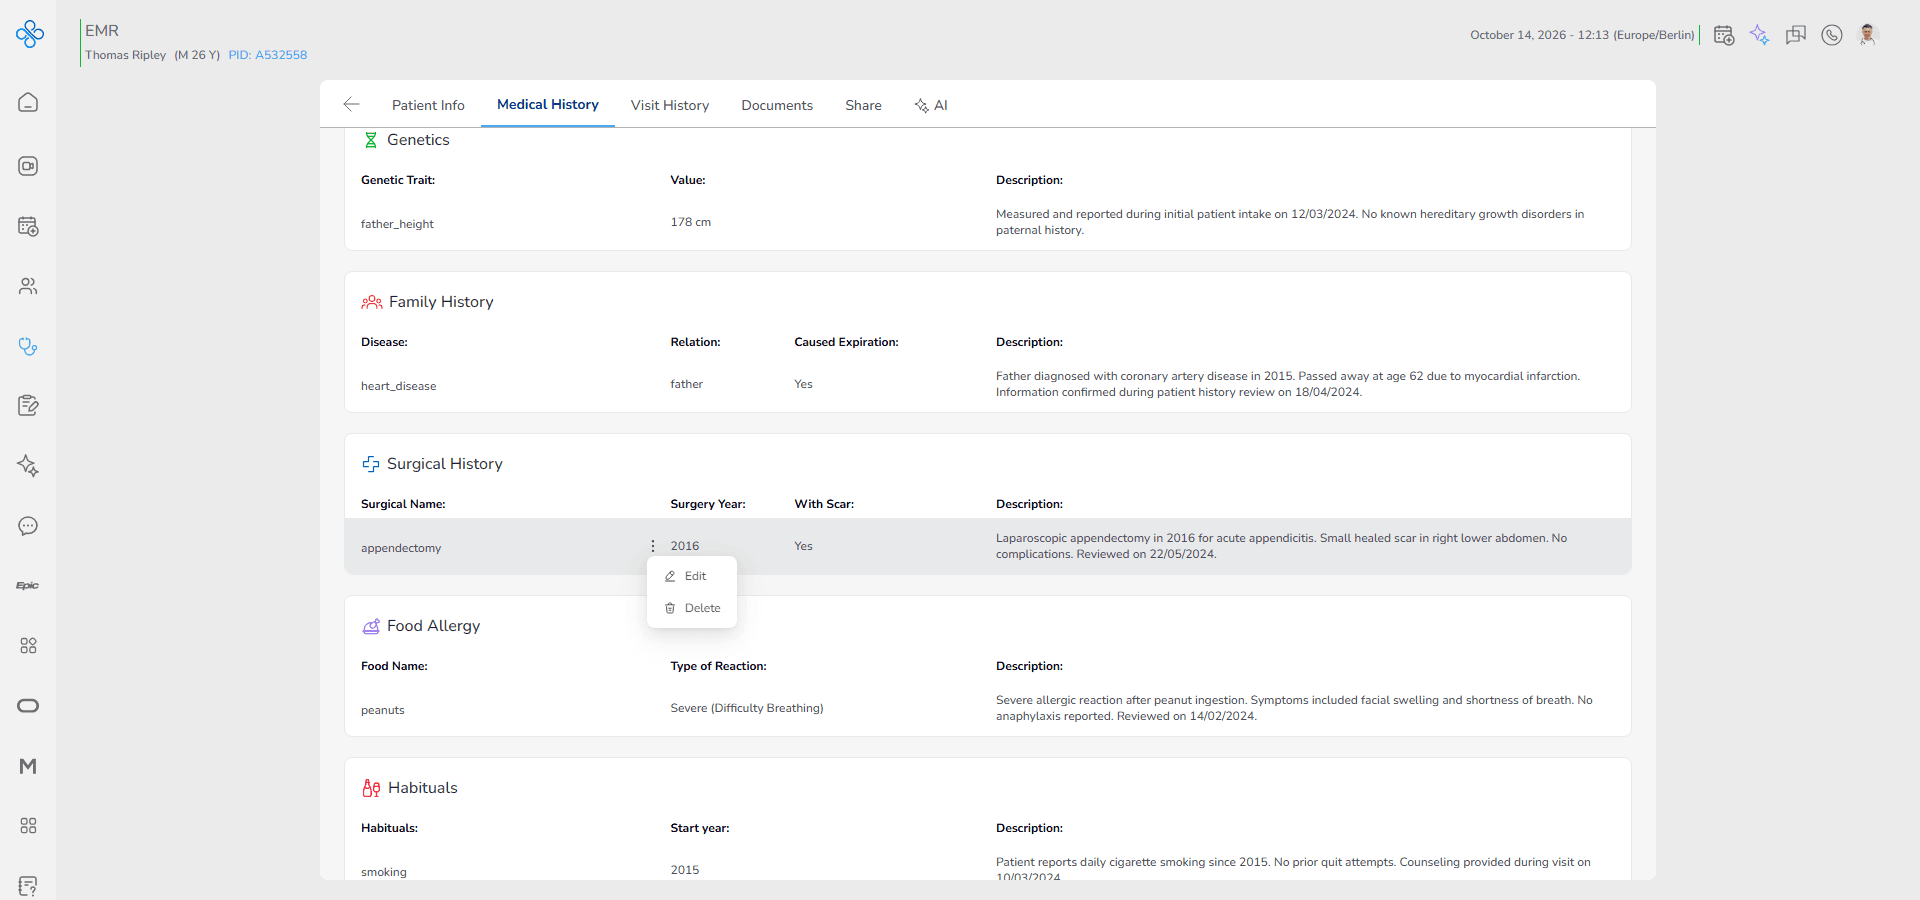
• A dropdown menu will appear with available options
2. Edit a Record
Use this option when you need to correct or update an existing entry.
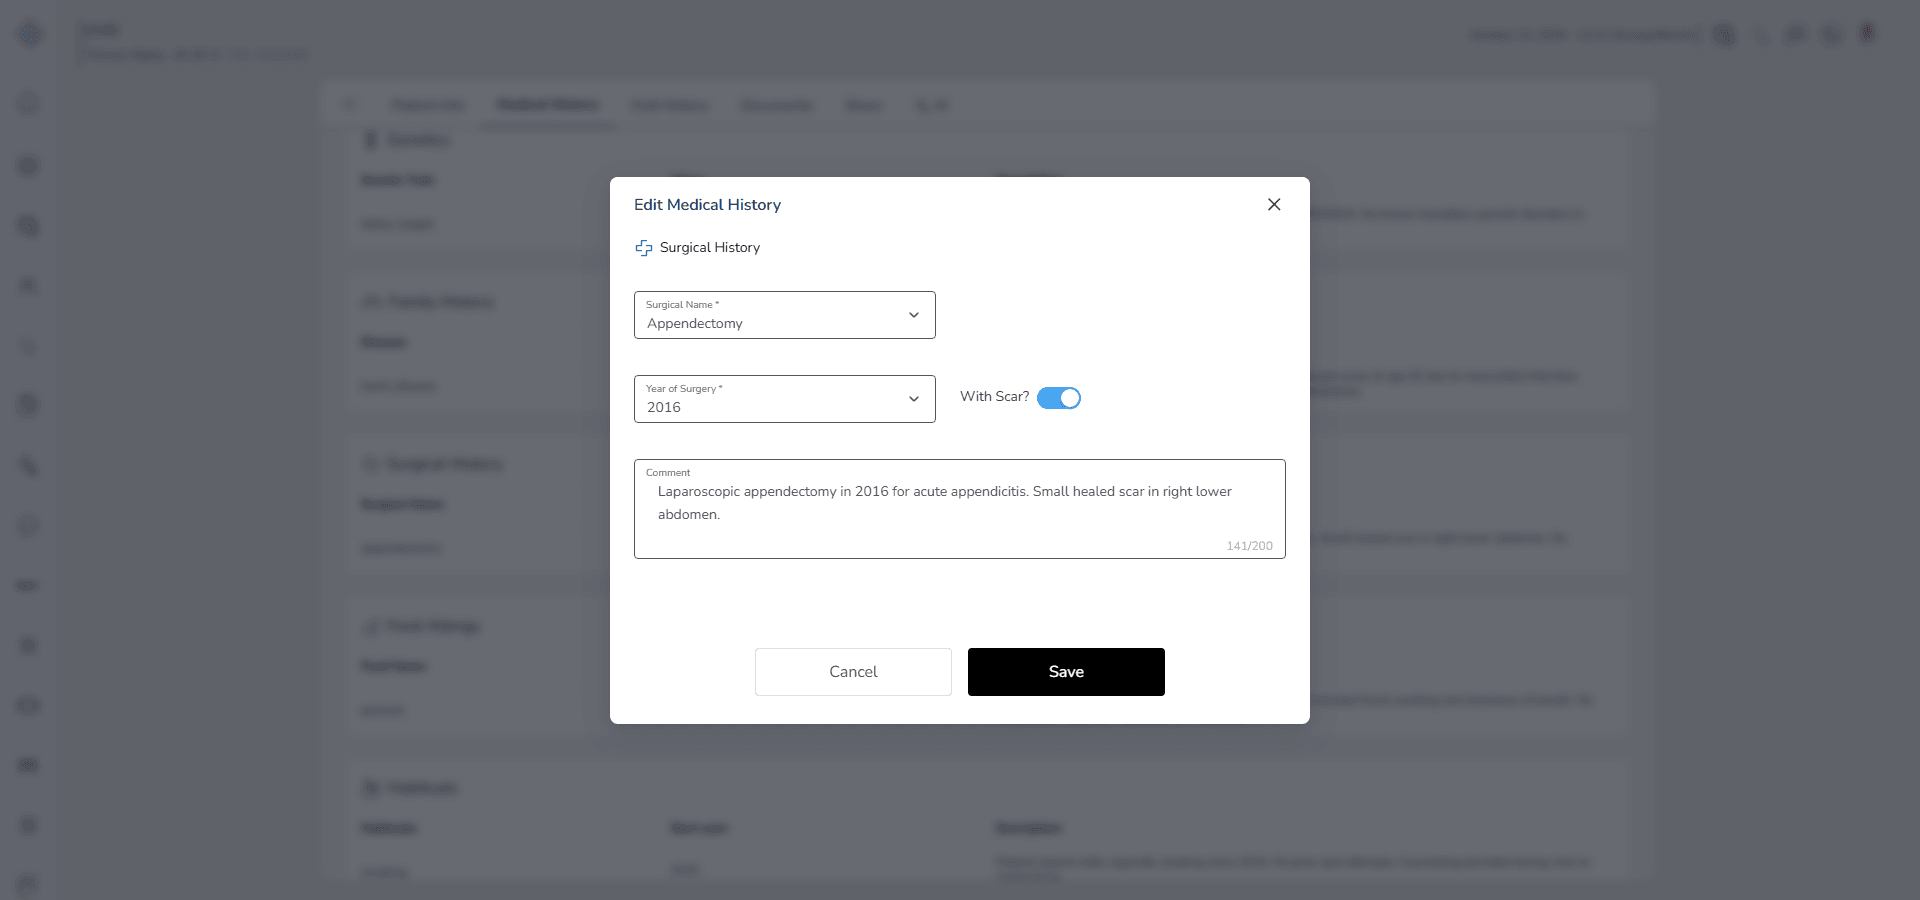
• Click Edit from the More Actions menu
• The same Surgical History modal will open
• All previously entered data will be prefilled in the form
You can now:
• change the selected surgery
• update the custom surgical name if Other was used
• modify the Year of Surgery
• activate or deactivate the With Scar toggle
• edit the description
After making changes:
• Click Save to apply updates
• Click Cancel to discard changes
Once saved, the updated information appears immediately in the list.
If you change the surgery type to Other during editing, you must enter a custom Surgical Name before saving.
3. Delete a Record
Use this option when a surgery entry was added by mistake or is not clinically relevant.
• Click Delete from the More Actions menu
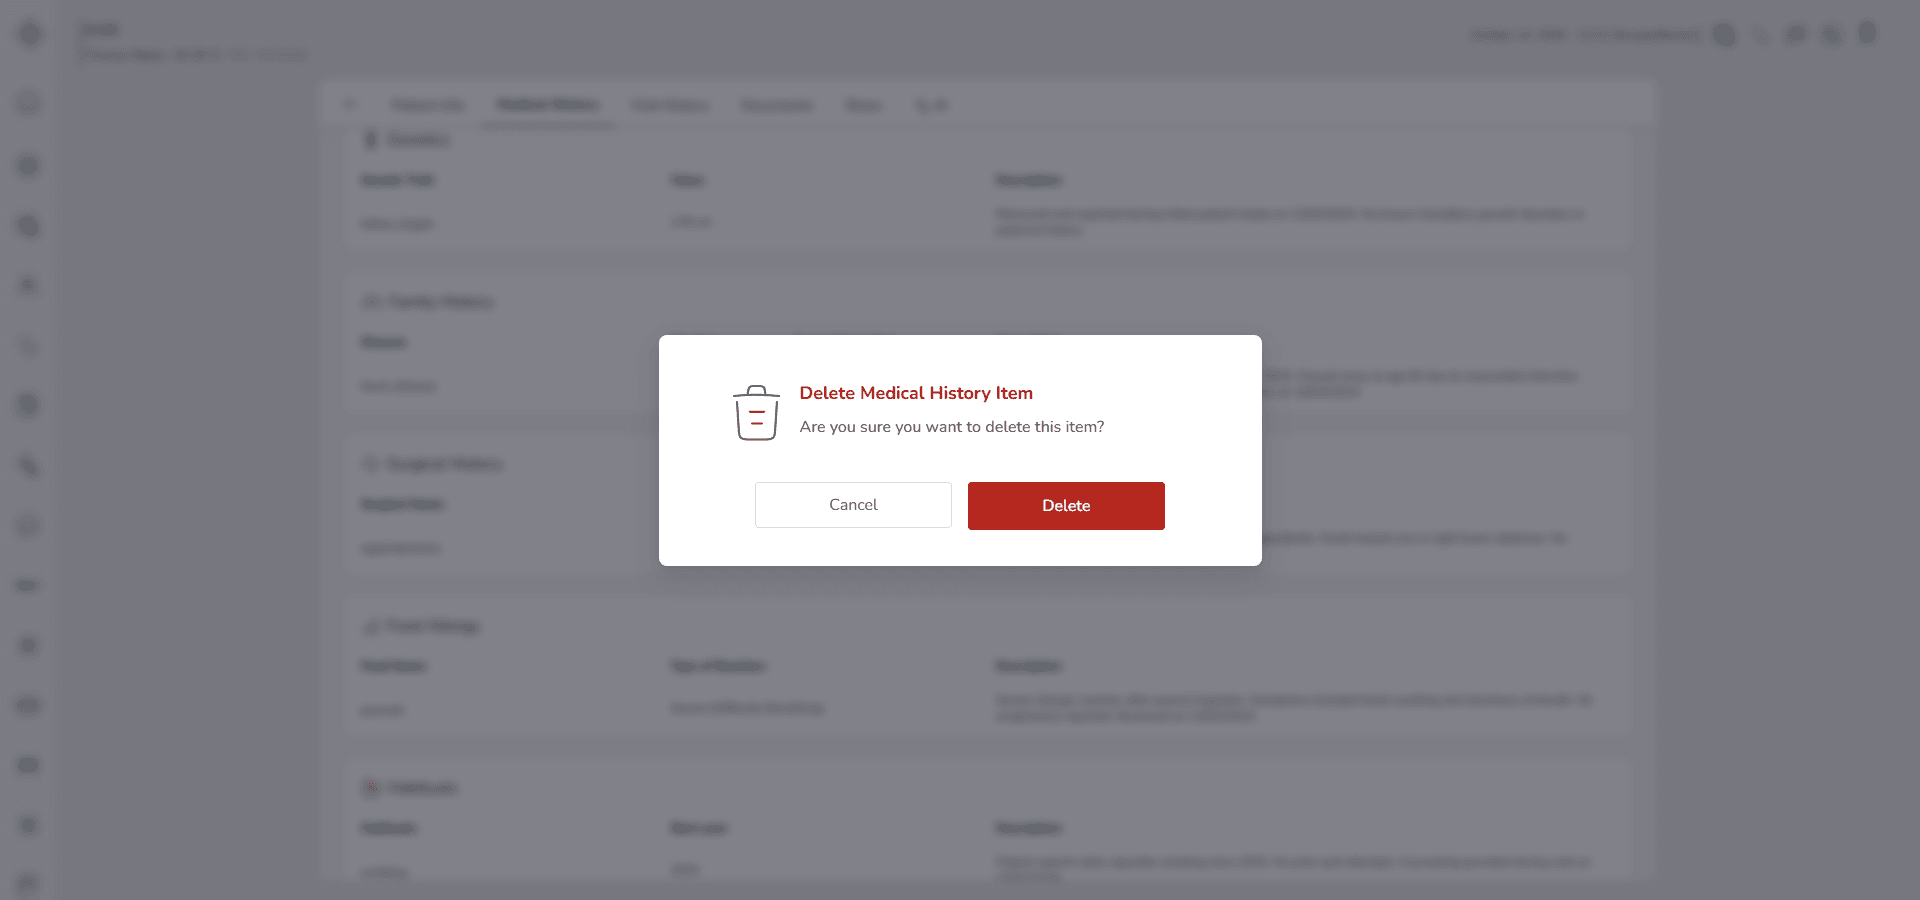
• A confirmation prompt will appear
• Confirm the deletion
After confirmation:
• The record is permanently removed from the Surgical History list
• The data will no longer appear in the Past Medical History section
Deletion cannot be undone.
Make sure the surgical information is not required for clinical evaluation before confirming removal.
3-6. Food Allergy
Use this section to document any confirmed or suspected food allergies.
Recording food allergies is essential to prevent exposure, avoid severe reactions and ensure safe clinical decision making.
When you open Past Medical History and select Food Allergy, the Food Allergy modal will appear.
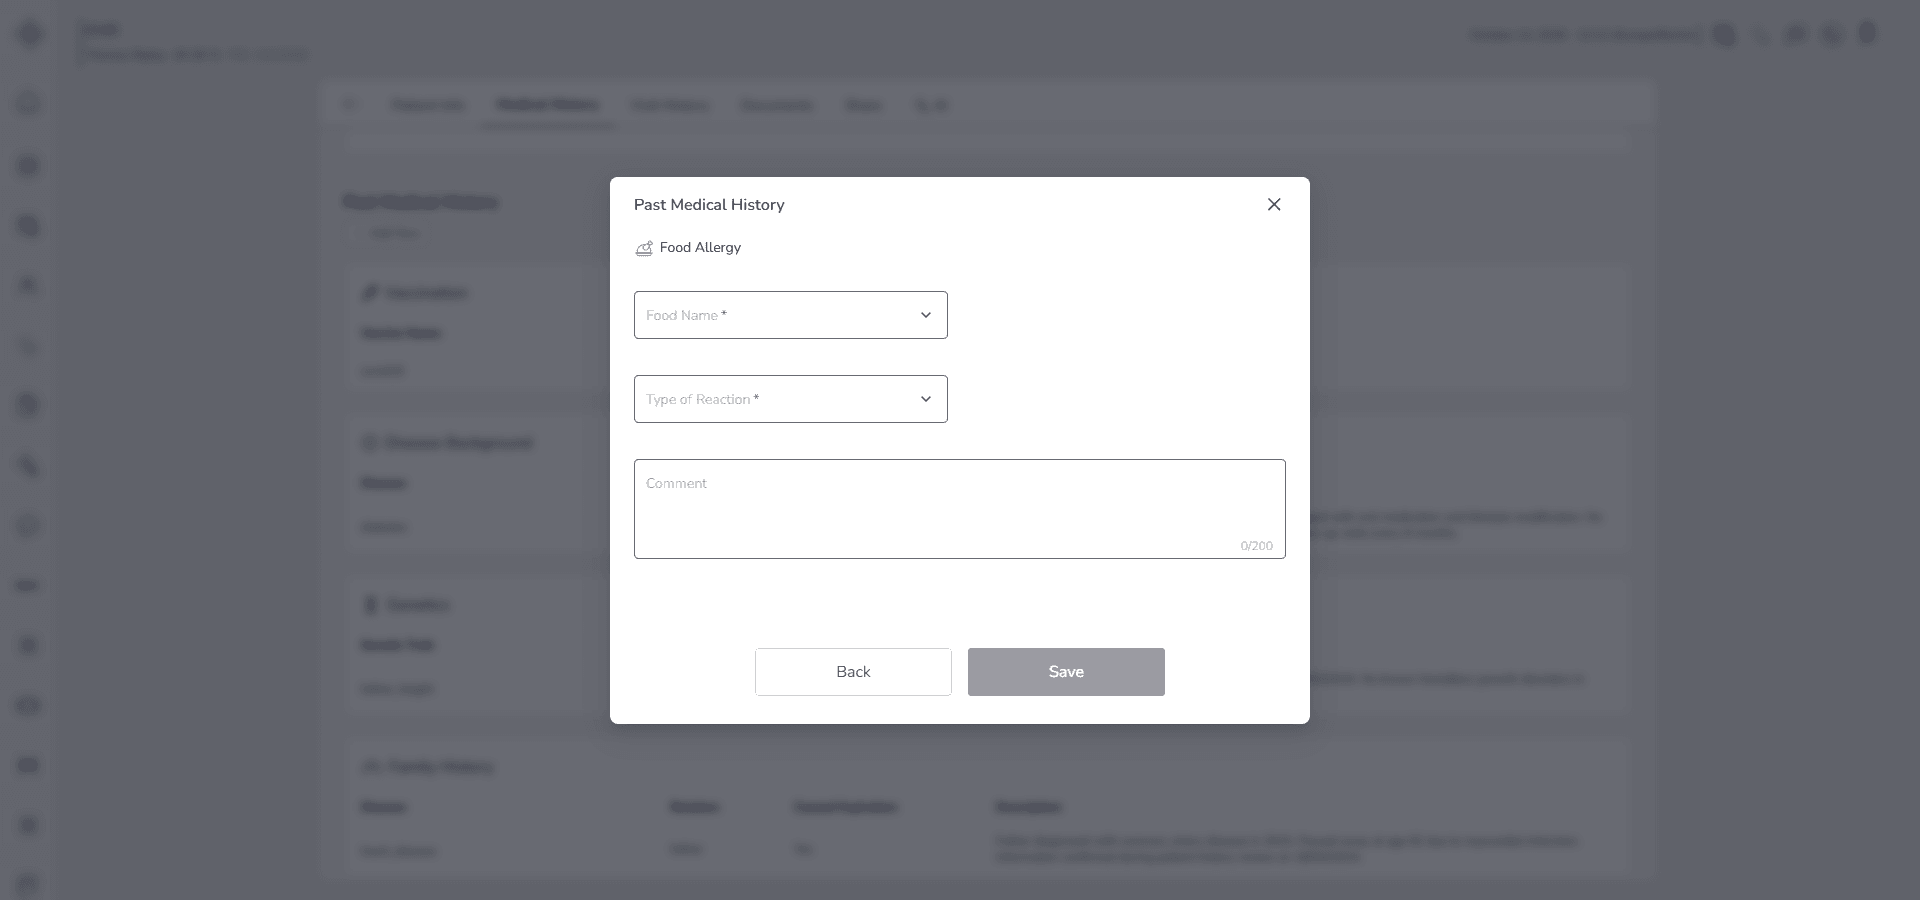
Fill in the Form
Start with Food Name.
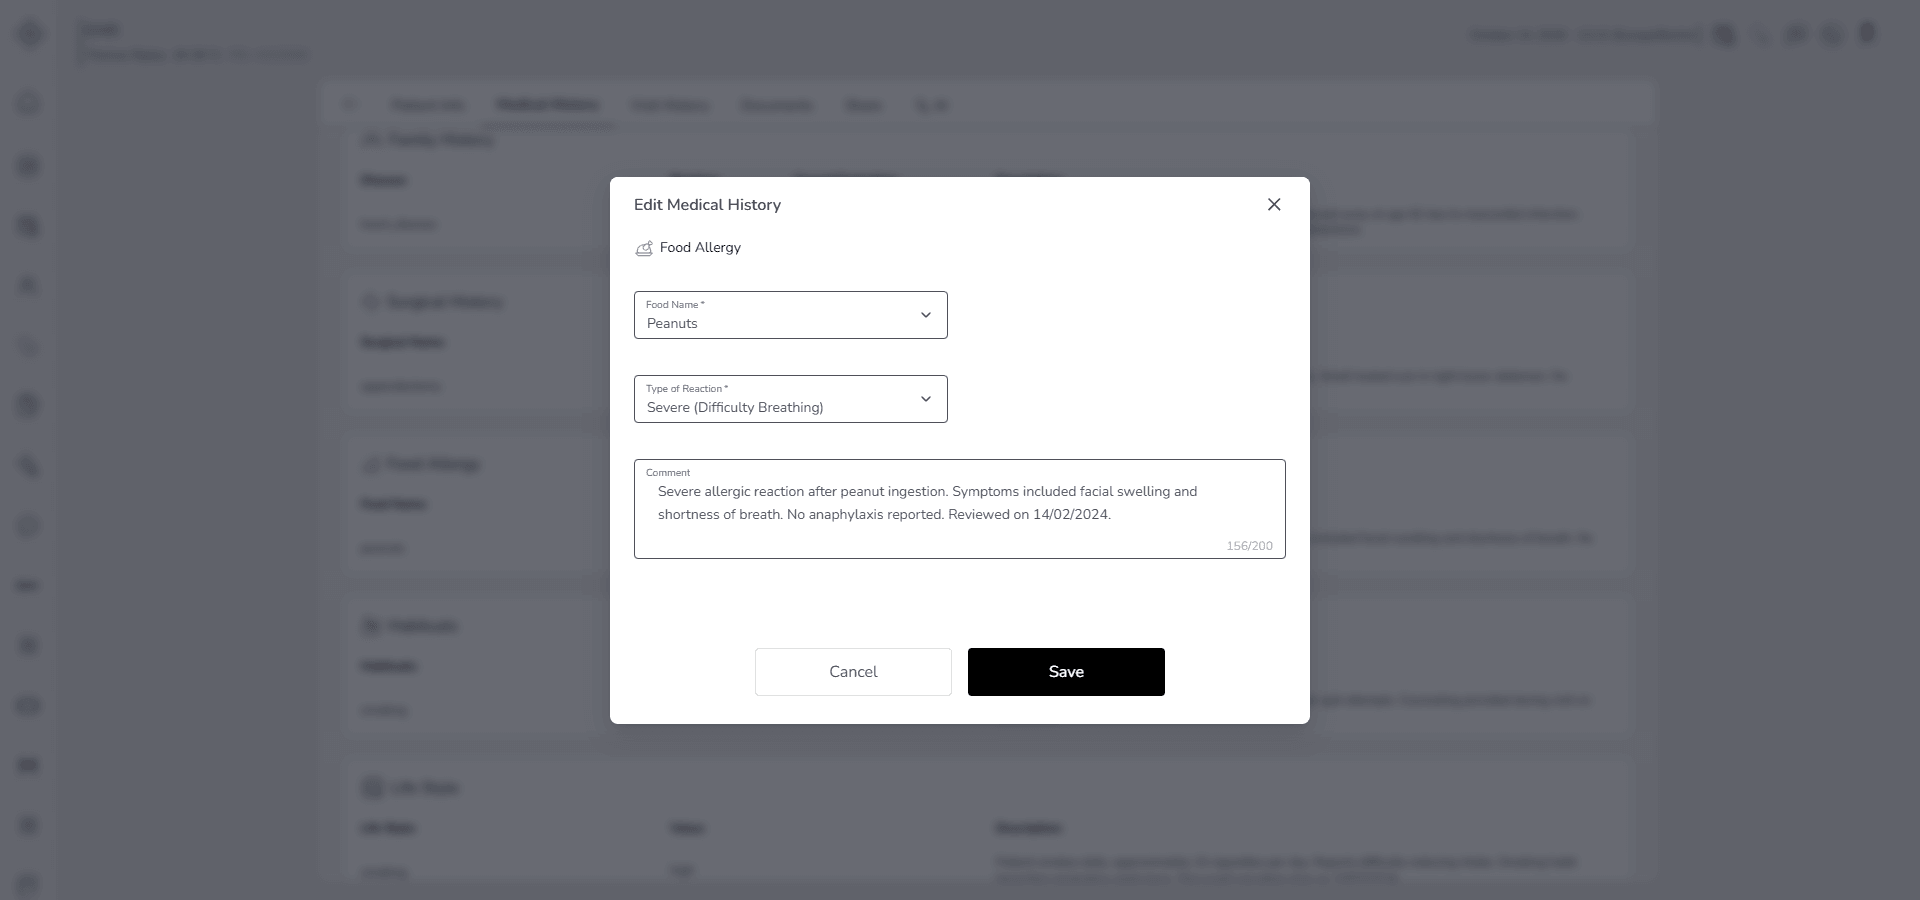
Select the allergen from the dropdown list such as:
Peanuts
Tree Nuts
Milk
Eggs
Fish
Shellfish
Wheat
Soy
Sesame
Gluten
Corn
If the allergen is not listed, select Other.
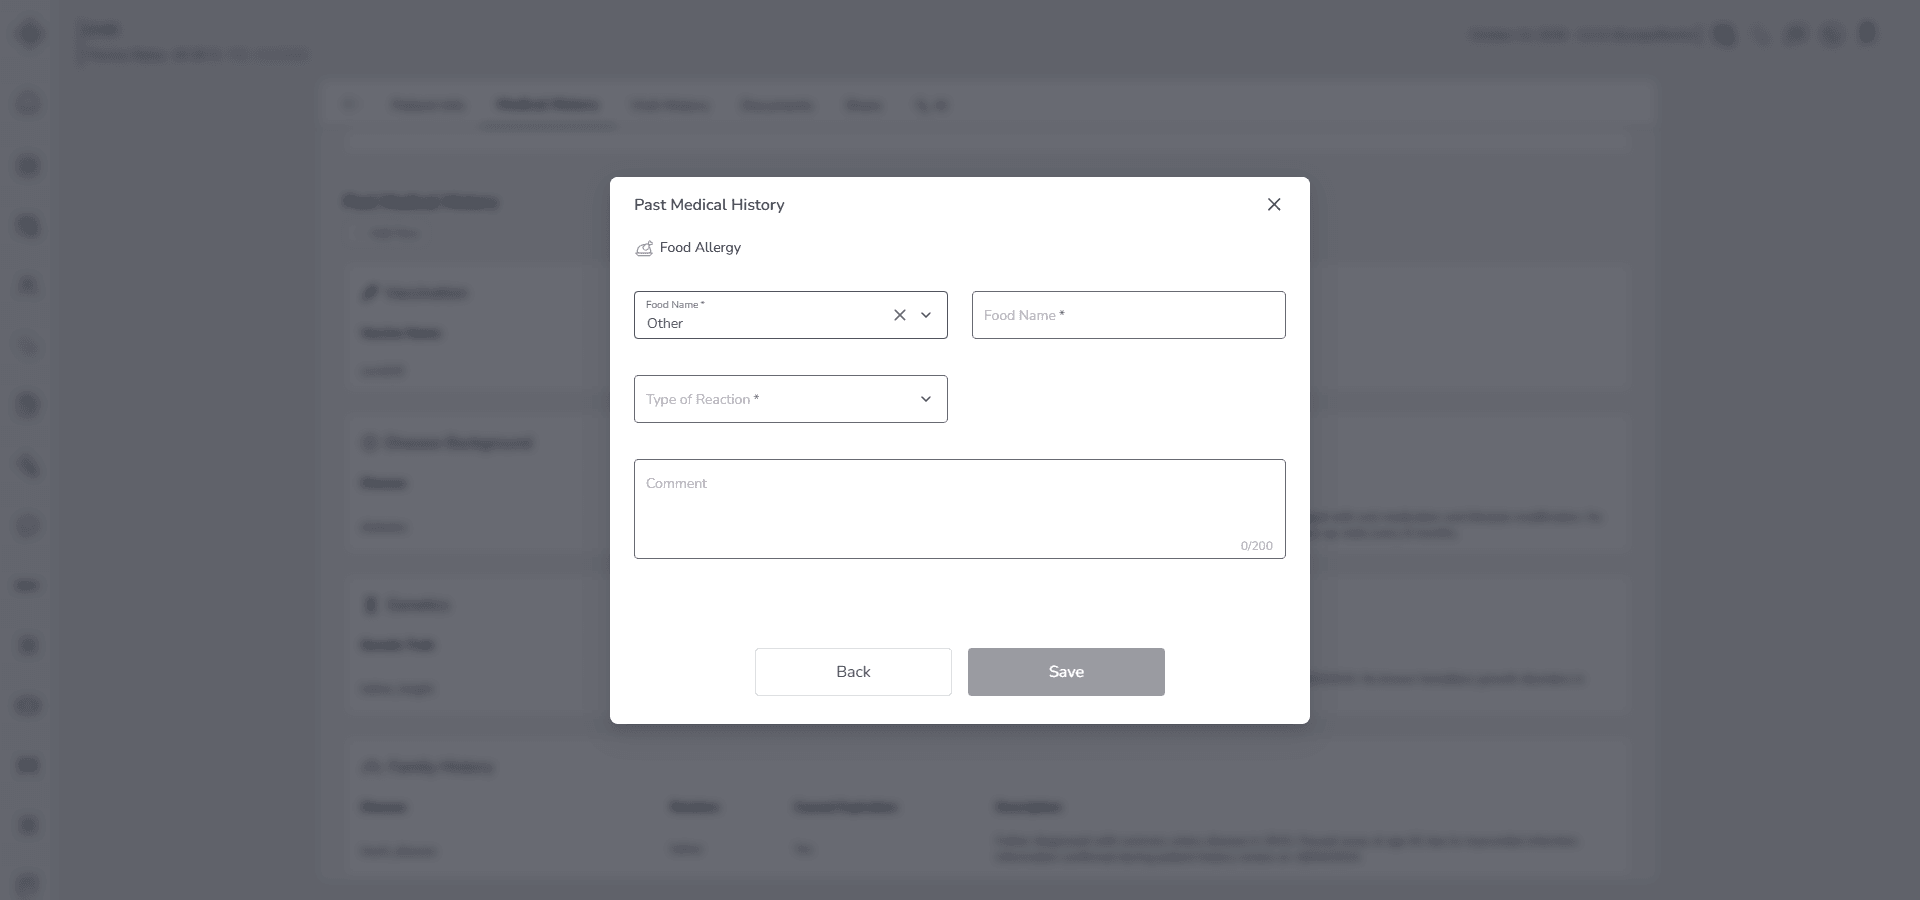
When you choose Other, a manual Food Name field becomes active. You must enter the exact food allergen. Use a specific and clinically accurate term.
Next, select Type of Reaction.
This field defines the severity of the allergic response and is required. Choose one of the following:
Mild
Examples may include rash or itching.
Moderate
Examples may include swelling or hives.
Severe
Examples may include difficulty breathing.
Anaphylaxis
Life threatening systemic reaction requiring immediate intervention.
Accurate severity selection is important for risk assessment and emergency preparedness.
Use the Description field to provide additional details when needed. For example:
• Time of onset after exposure
• History of emergency treatment
• Use of epinephrine
• Cross reactivity with other foods
• Frequency of reactions
The description is optional but strongly recommended when the reaction is severe or complex.
Save the Record
• Click Save to store the food allergy record
• Click Cancel if you do not want to save
If Food Name or Type of Reaction is not selected, the record cannot be saved.
Behavior and Expected Outcome
• If Other is selected, the custom Food Name field becomes editable
• Each saved entry is grouped under Past Medical History → Food Allergy
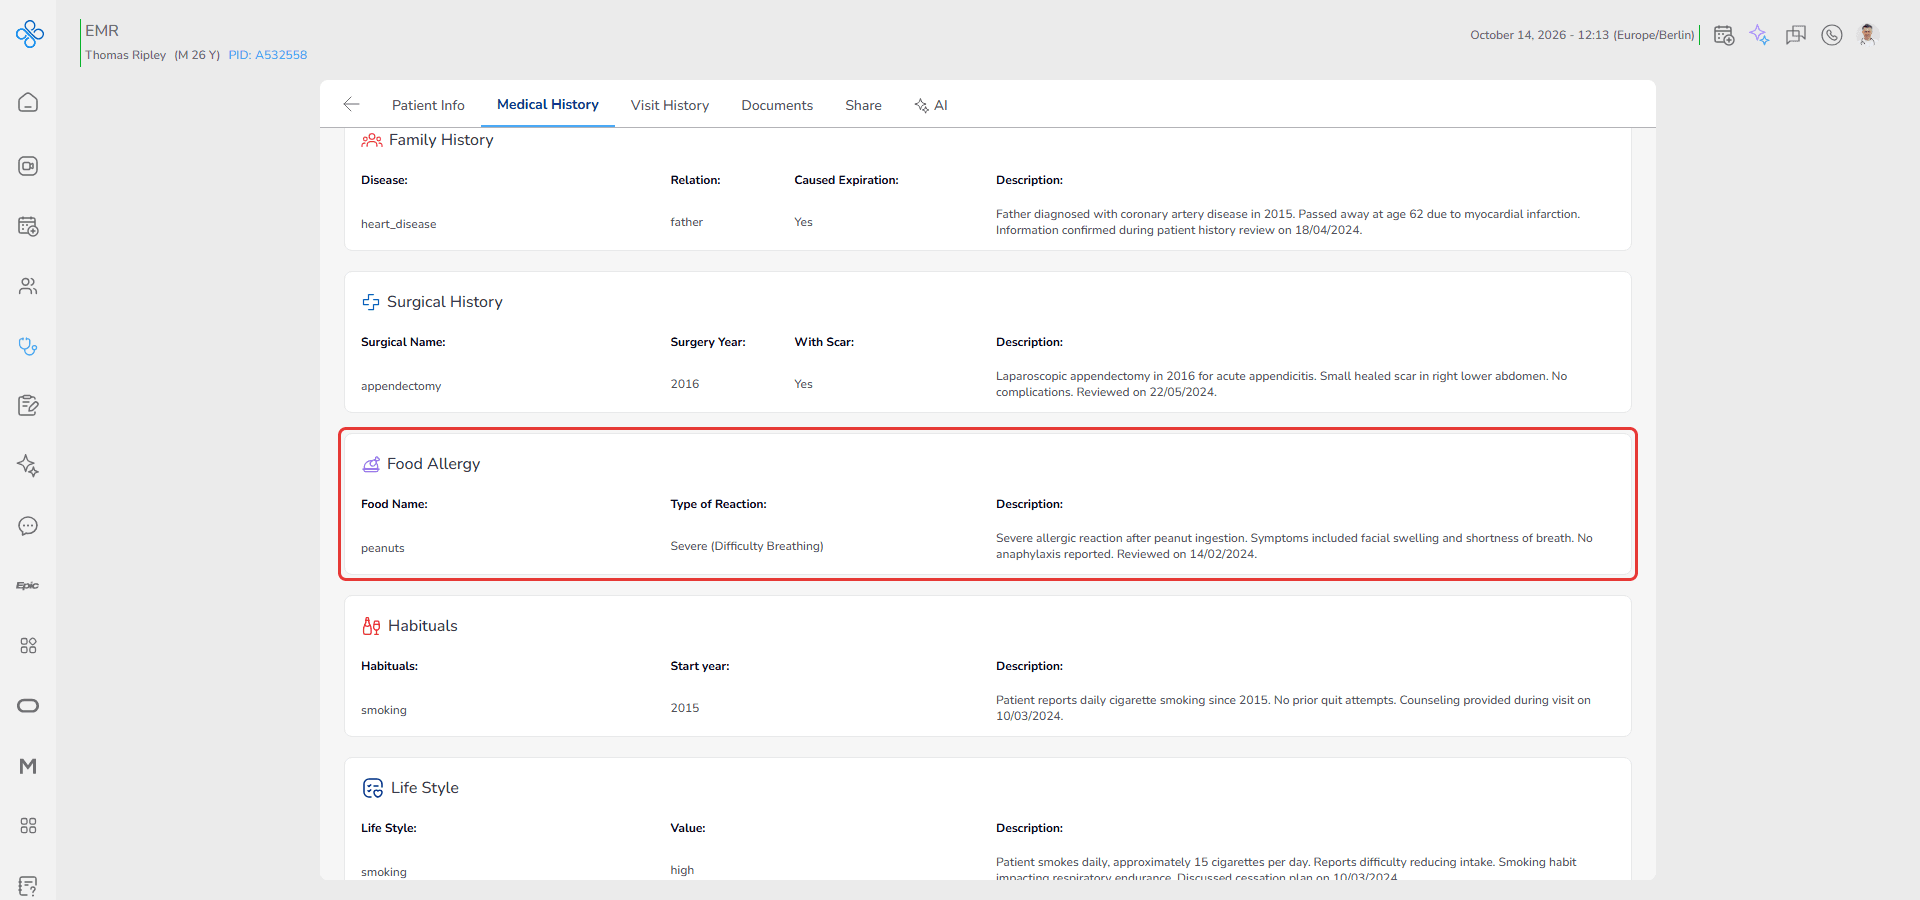
• All documented food allergies are displayed together for quick review
This structure allows clinicians to immediately identify dietary risks before prescribing medication or recommending nutrition plans.
Managing a Saved Food Allergy Record
After saving a food allergy entry, you can manage it directly from the Food Allergy list.
Each saved record includes a More Actions menu shown as ⋮ located between the values of the Food Name and Type of Reaction columns.
Follow these steps:
1. Open More Actions
• Locate the allergy record in the list
• Click the ⋮ icon
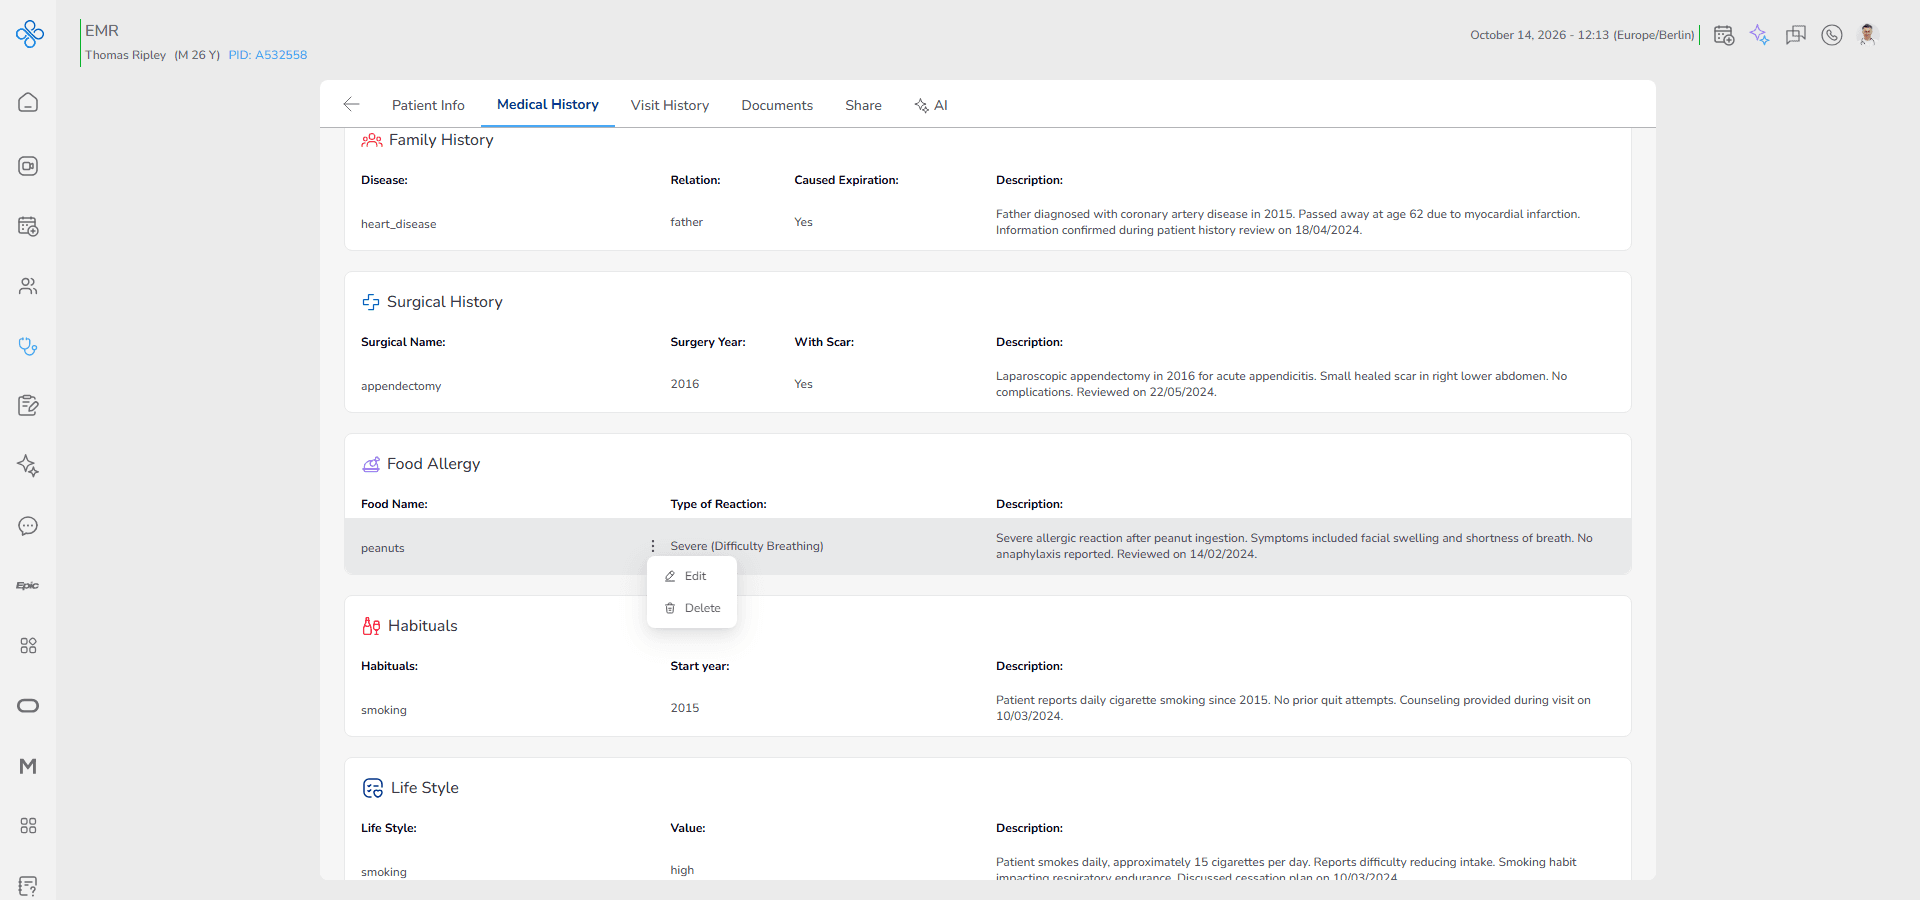
• A dropdown menu will appear with available options
2. Edit a Record
Use this option when you need to correct or update an existing entry.
• Click Edit from the More Actions menu
• The same Food Allergy modal will open
• All previously entered data will be prefilled in the form
You can now:
• change the selected food allergen
• update the custom food name if Other was used
• modify the Type of Reaction
• edit the description
After making changes:
• Click Save to apply updates
• Click Cancel to discard changes
Once saved, the updated information appears immediately in the list.
If you change the Food Name to Other during editing, you must enter a custom allergen before saving.
3. Delete a Record
Use this option when an allergy entry was added by mistake or is no longer clinically valid.
• Click Delete from the More Actions menu
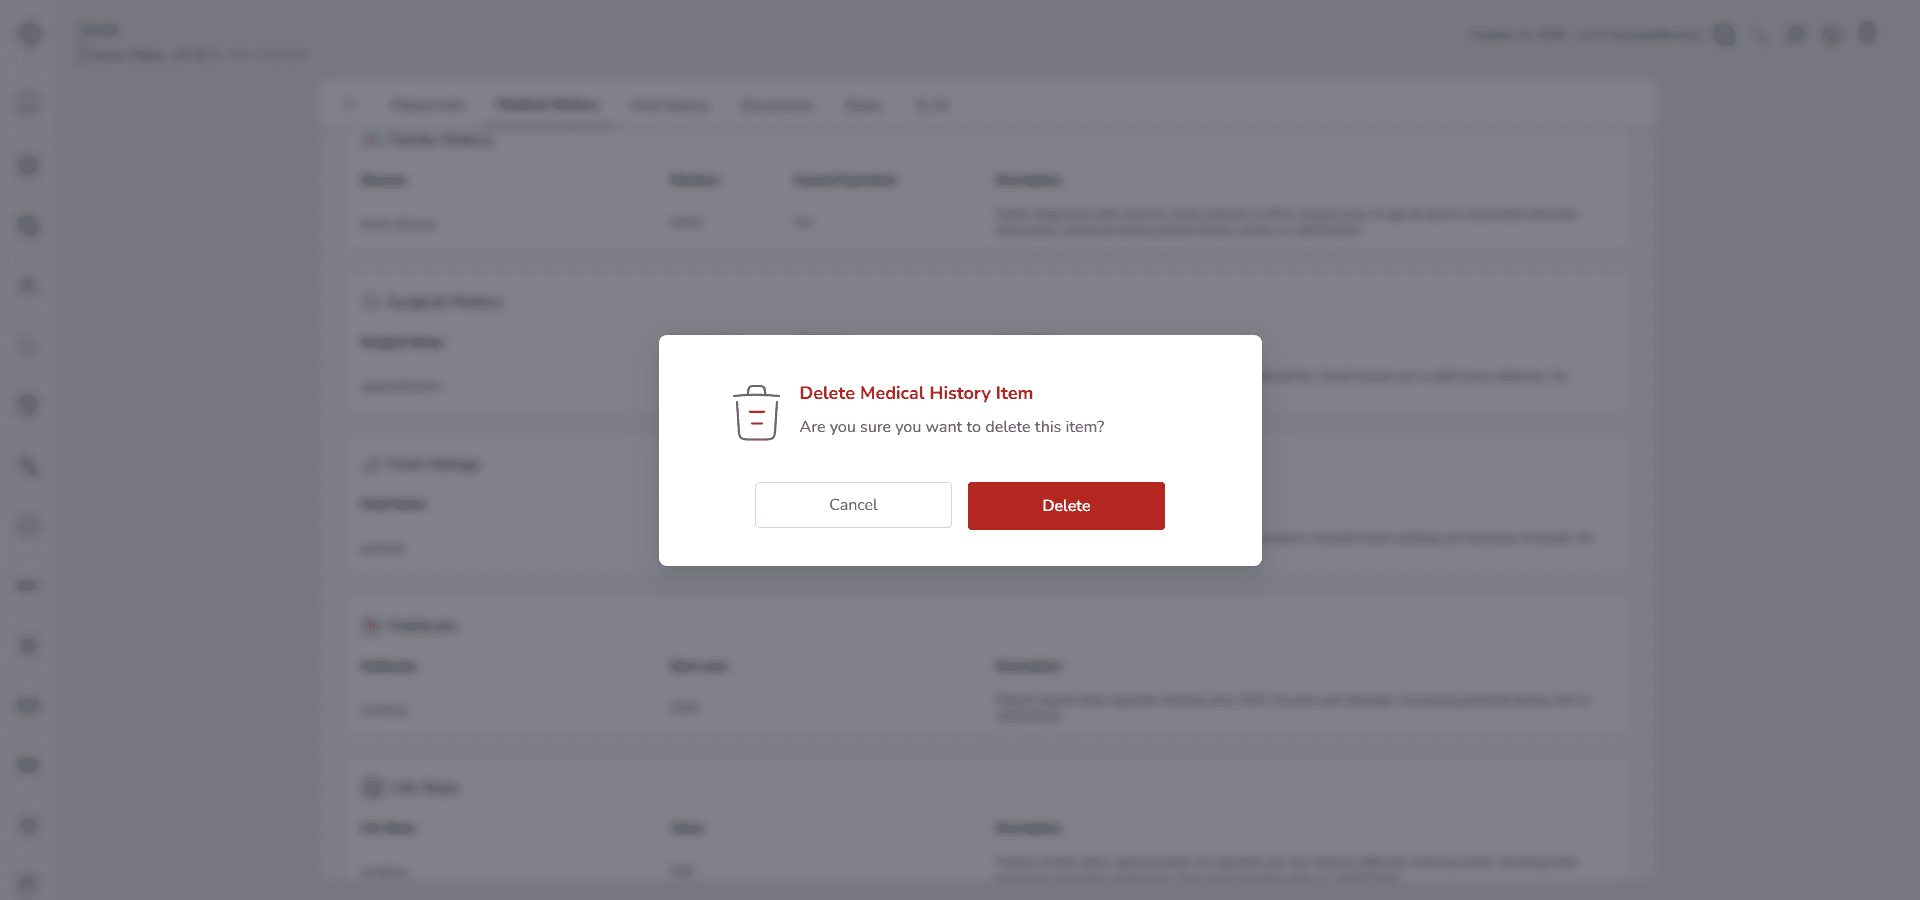
• A confirmation prompt will appear
• Confirm the deletion
After confirmation:
• The record is permanently removed from the Food Allergy list
• The data will no longer appear in the Past Medical History section
Deletion cannot be undone.
Ensure the allergy is not clinically relevant before confirming removal.
3-7. Habituals
Use this section to document lifestyle habits that may affect the patient’s health.
Habits such as smoking or alcohol use can directly influence diagnosis, treatment planning and long term risk assessment.
When you open Past Medical History and select Habituals, the Habituals modal will appear.
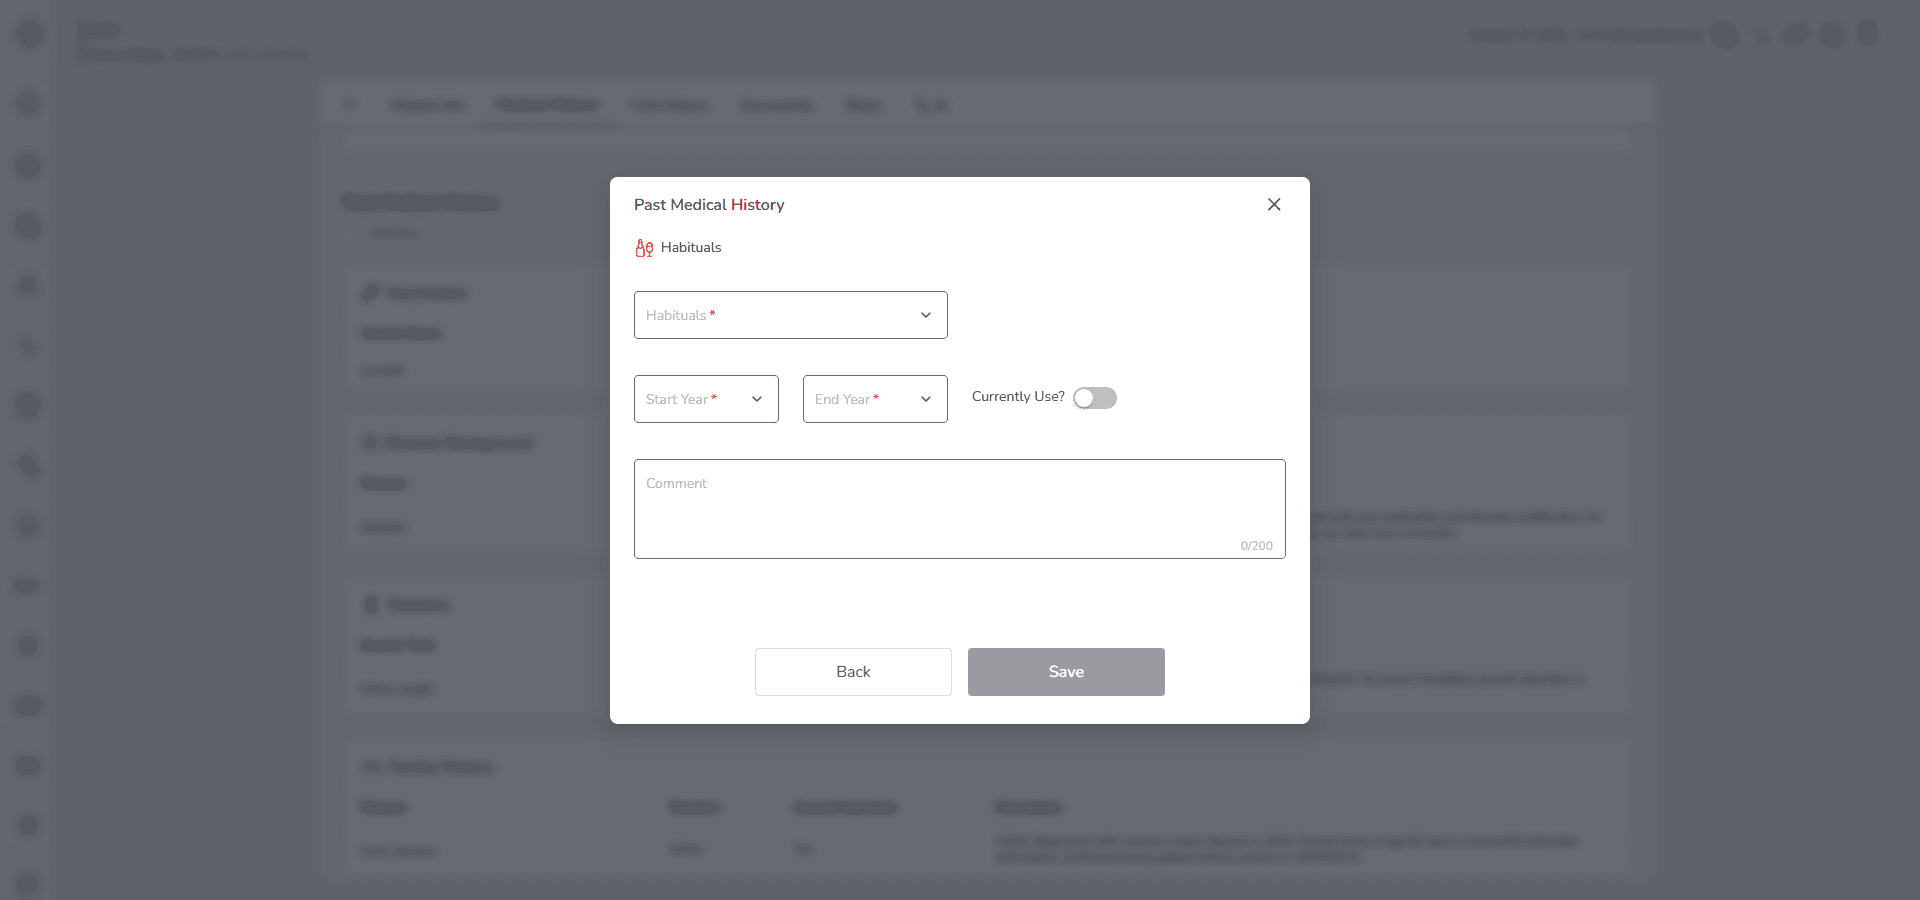
Fill in the Form
Start with Habituals.
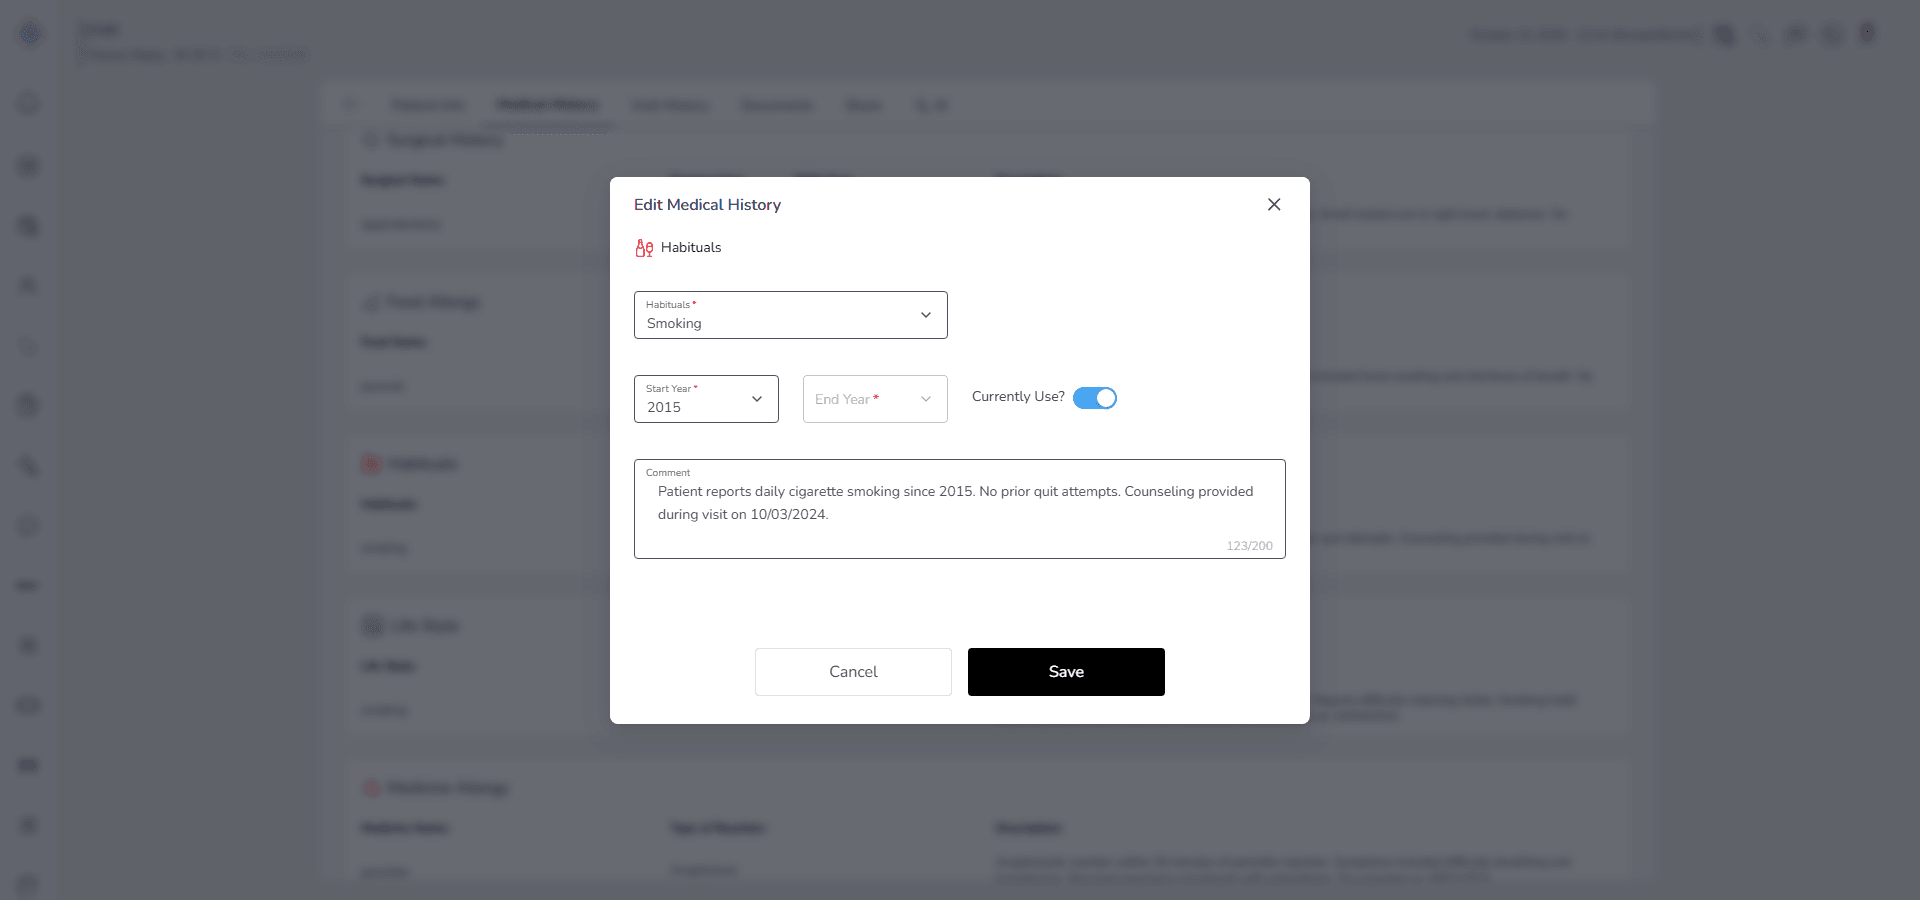
Select the habit type from the dropdown list:
Smoking
Drinking
Gambling
Overeating
If the habit is not listed, select Other.
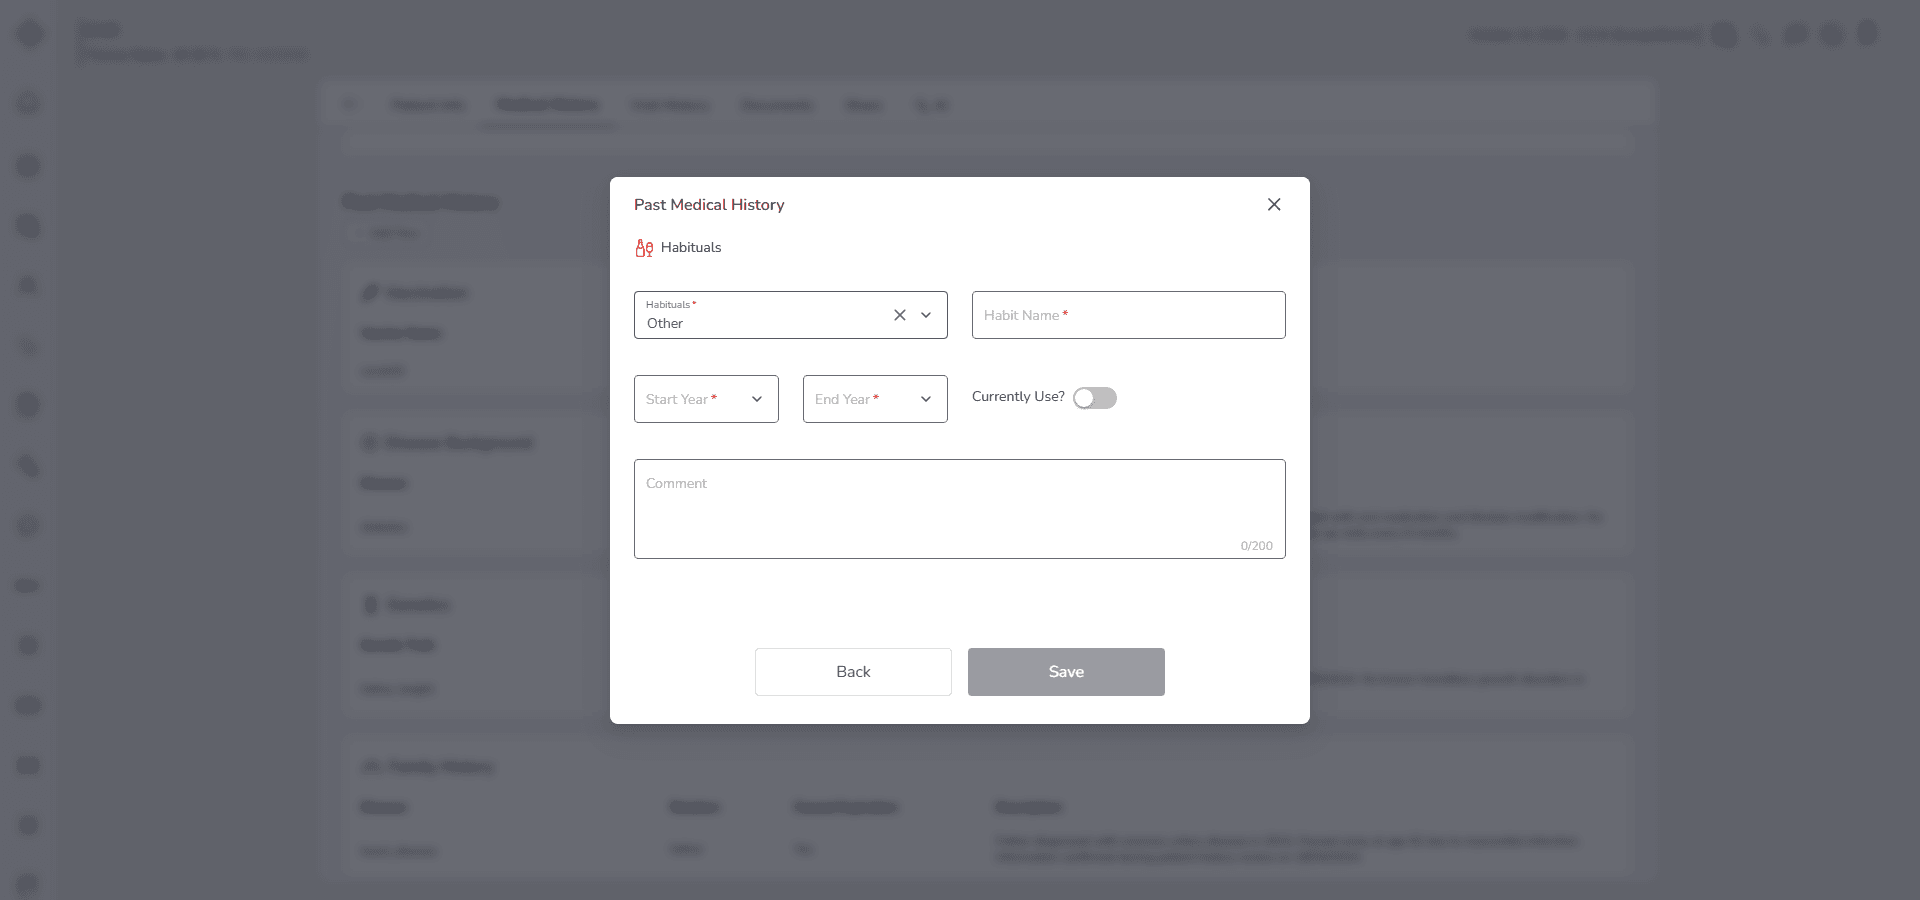
When you choose Other, a custom Habit Name field becomes active. You must manually enter the habit using a clear and specific description.
Next, enter the Start Year.
This field is required.
Enter the year when the habit began. Make sure the year reflects the actual start of the behavior.
Then review the Currently Use toggle.
Activate this option if the habit is ongoing.
When Currently Use is active, the End Year field becomes automatically disabled.
If the habit has stopped, leave Currently Use inactive and enter the End Year.
This field becomes required when the habit is not ongoing.
Use the Description field to provide additional context if needed. For example:
• Frequency of use
• Quantity per day or week
• Previous attempts to quit
• Related medical complications
• Social or environmental factors
The description is optional but recommended when the habit has clinical significance.
Save the Record
• Click Save to store the Habituals record
• Click Cancel if you do not want to save
The record cannot be saved if:
• Start Year is missing
• End Year is missing while Currently Use is not active
Behavior and Expected Outcome
• Selecting Other activates the manual Habit Name field
• Activating Currently Use disables the End Year field
• Each saved entry is grouped under Past Medical History → Habituals
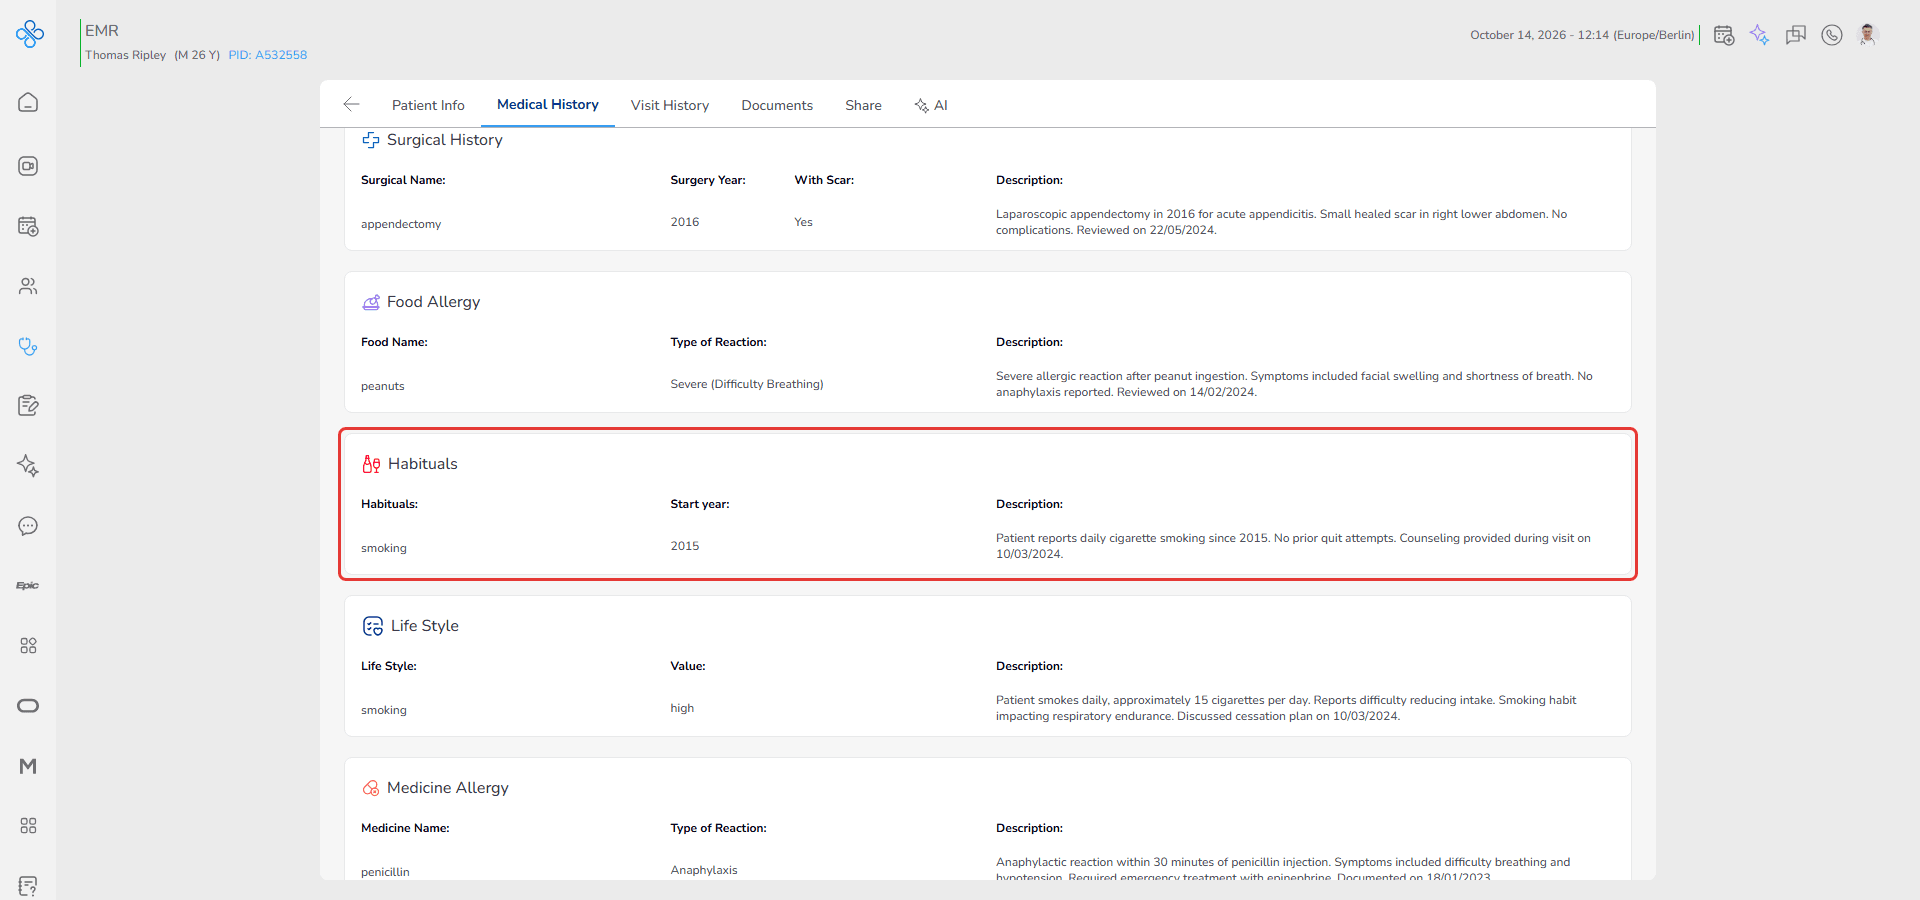
• All habits are displayed together for structured lifestyle assessment
This organization helps clinicians quickly evaluate behavioral risk factors and their duration.
Managing a Saved Habitual Record
After saving a habit entry, you can manage it directly from the Habituals list.
Each saved record includes a More Actions menu shown as ⋮ located between the values of the Habit Name and Start Year columns.
Follow these steps:
1. Open More Actions
• Locate the habit record in the list
• Click the ⋮ icon
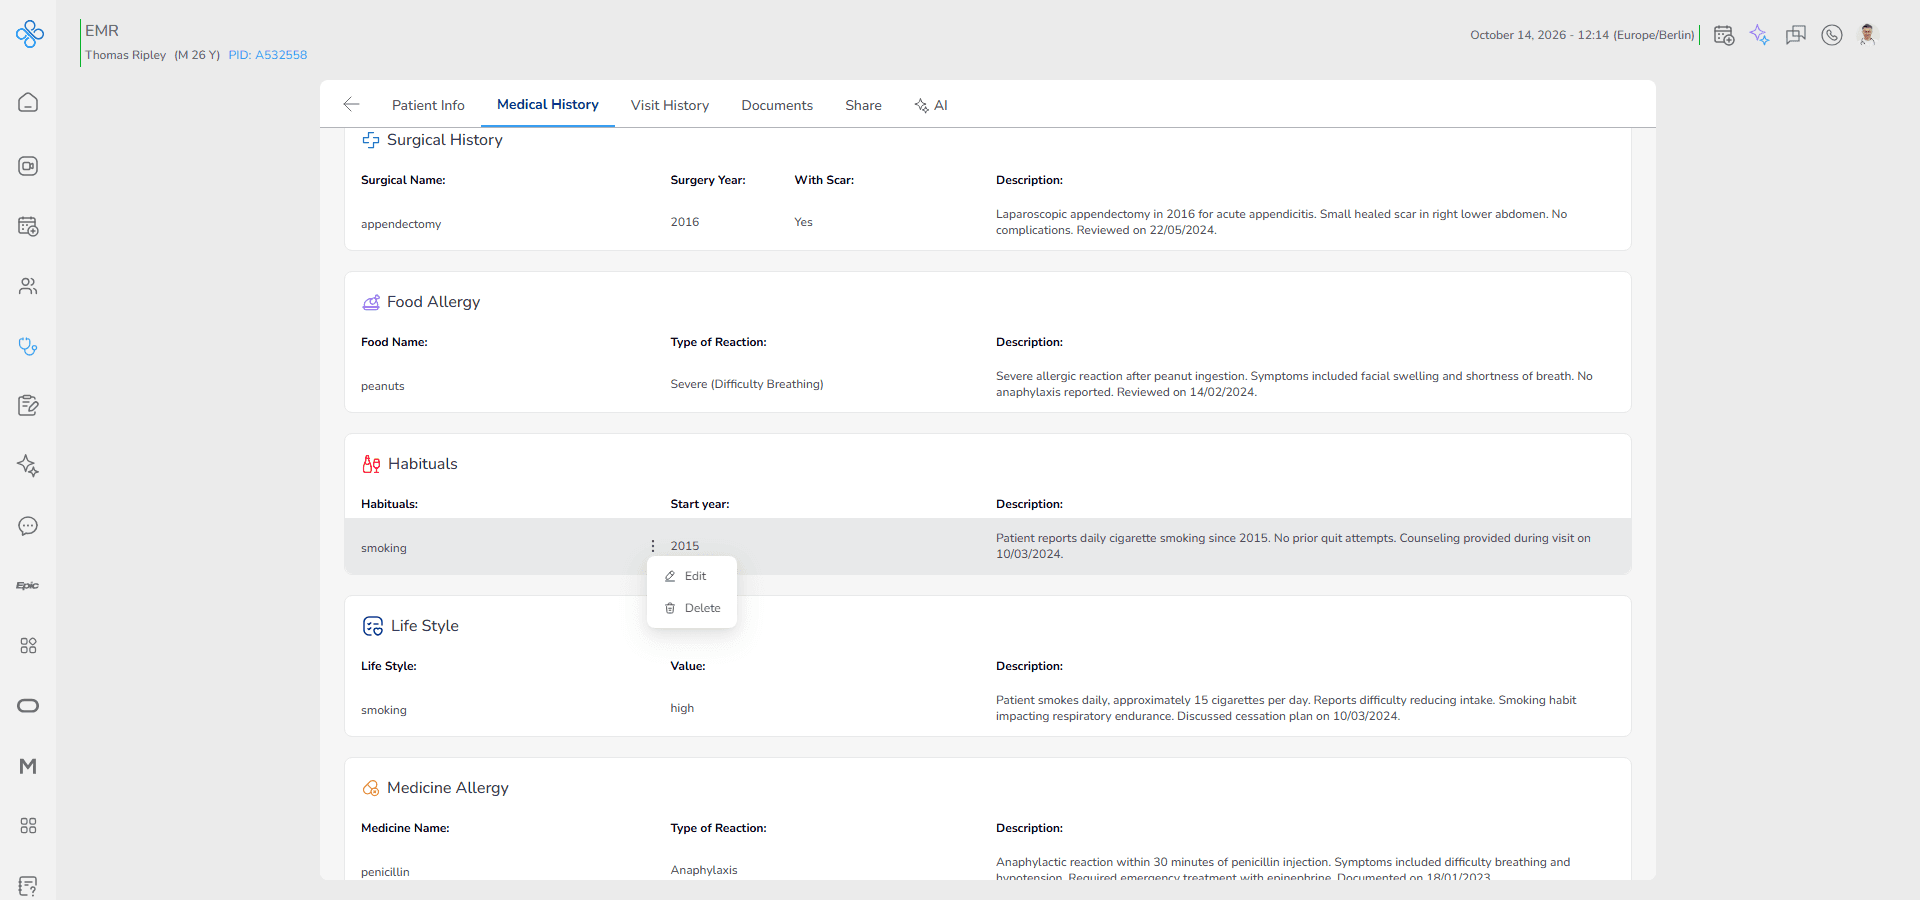
• A dropdown menu will appear with available options
2. Edit a Record
Use this option when you need to correct or update an existing entry.
• Click Edit from the More Actions menu
• The same Habituals modal will open
• All previously entered data will be prefilled in the form
You can now:
• change the selected habit
• update the custom habit name if Other was used
• modify the Start Year
• activate or deactivate Currently Use
• update the End Year if applicable
• edit the description
After making changes:
• Click Save to apply updates
• Click Cancel to discard changes
Once saved, the updated information appears immediately in the list.
If you deactivate Currently Use during editing, you must enter an End Year before saving.
3. Delete a Record
Use this option when a habit entry was added by mistake or is no longer clinically relevant.
• Click Delete from the More Actions menu
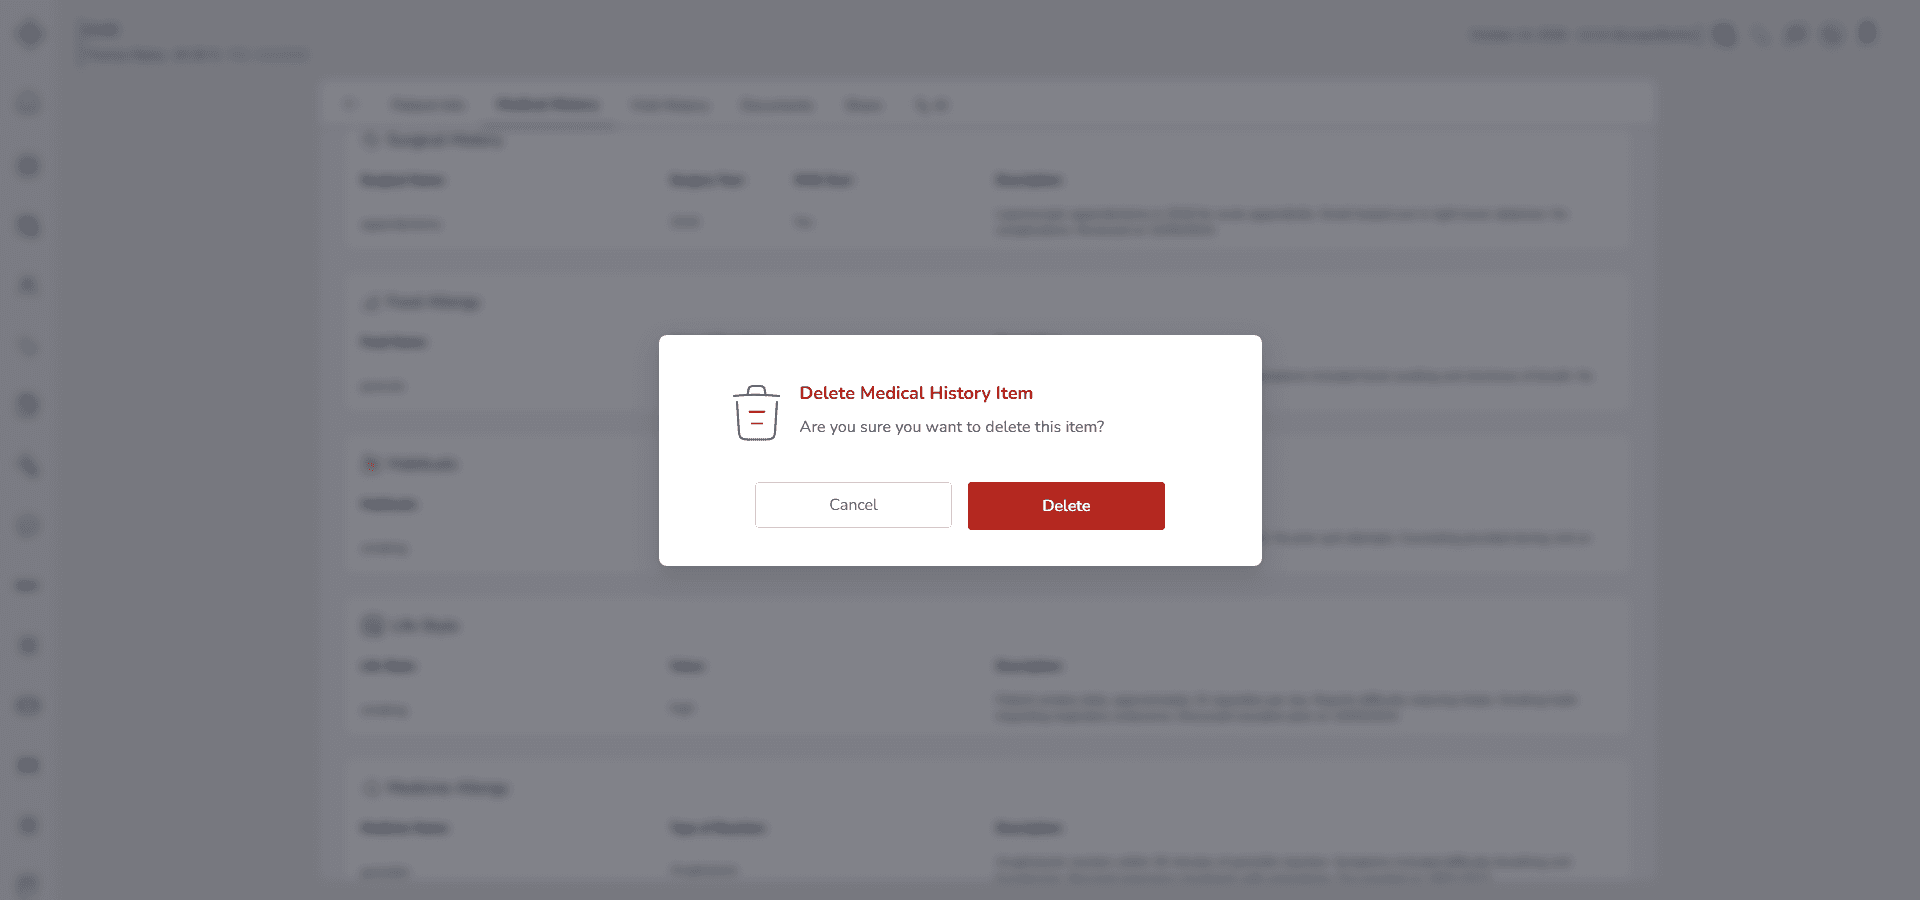
• A confirmation prompt will appear
• Confirm the deletion
After confirmation:
• The record is permanently removed from the Habituals list
• The data will no longer appear in the Past Medical History section
Deletion cannot be undone.
Make sure the habit information is not required for clinical evaluation before confirming removal.
3-8. Lifestyle
Use this section to record general lifestyle patterns that may influence the patient’s overall health.
Lifestyle intensity helps clinicians evaluate behavioral risk levels and adjust preventive or therapeutic plans accordingly.
When you open Past Medical History and select Lifestyle, the Lifestyle modal will appear.
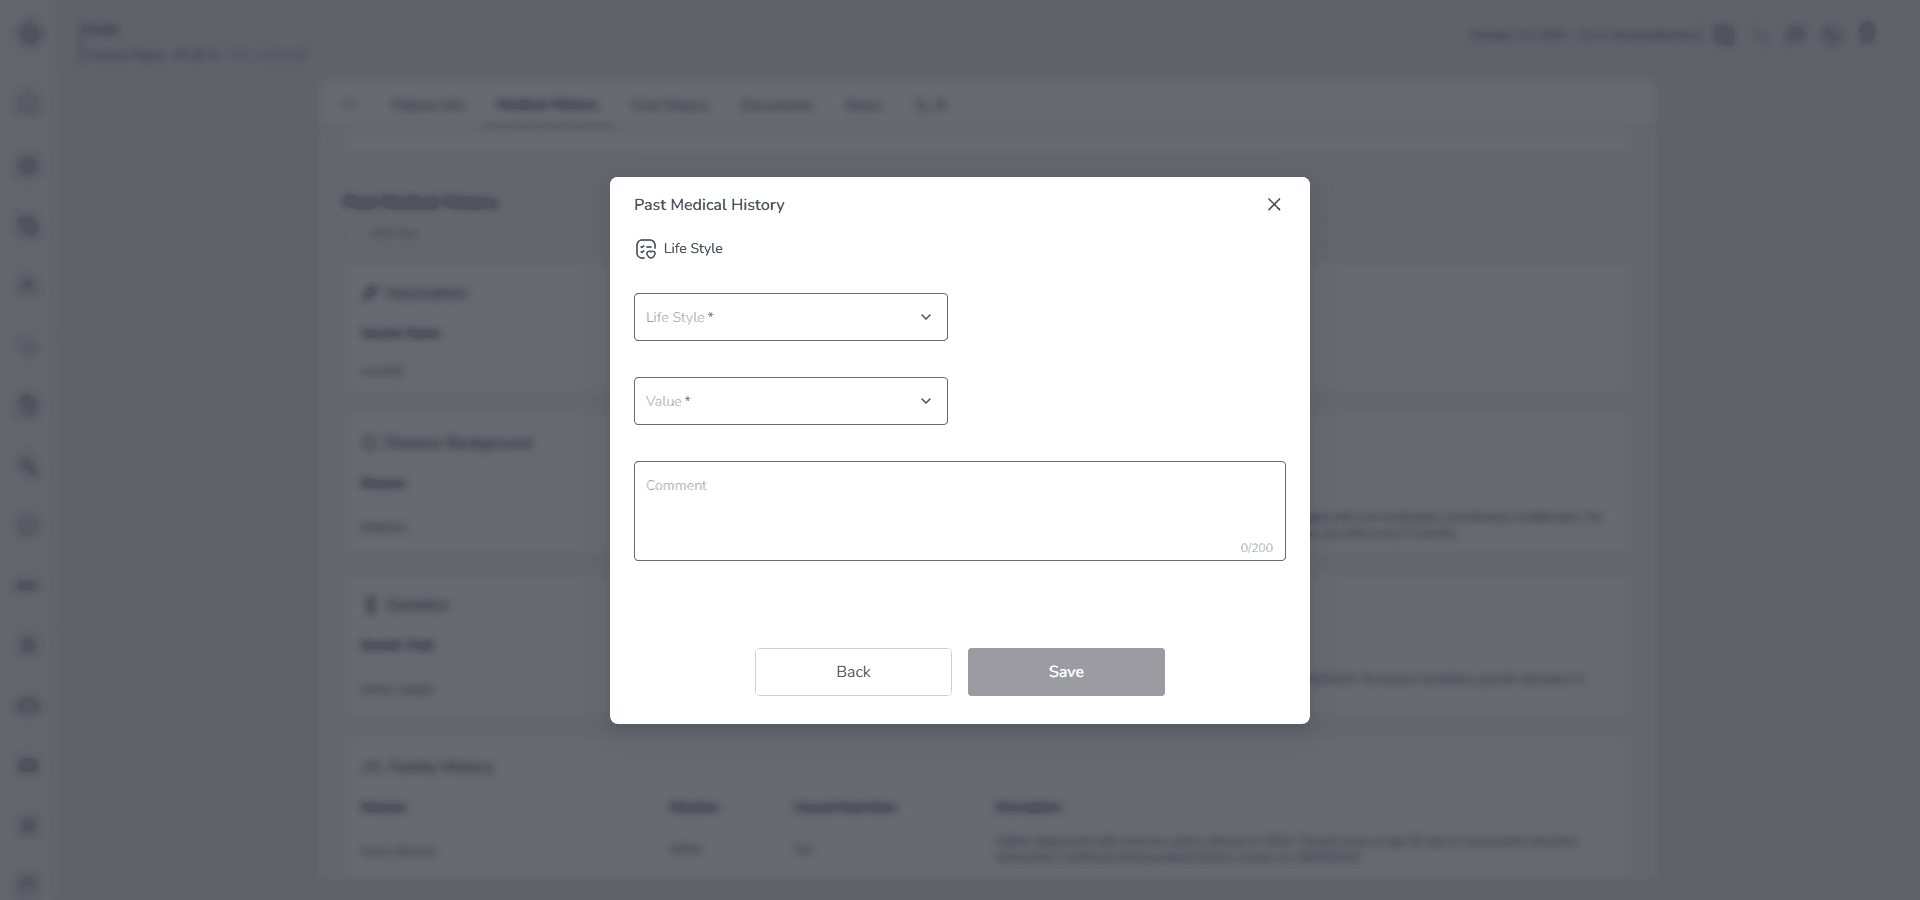
Fill in the Form
Start with Lifestyle.
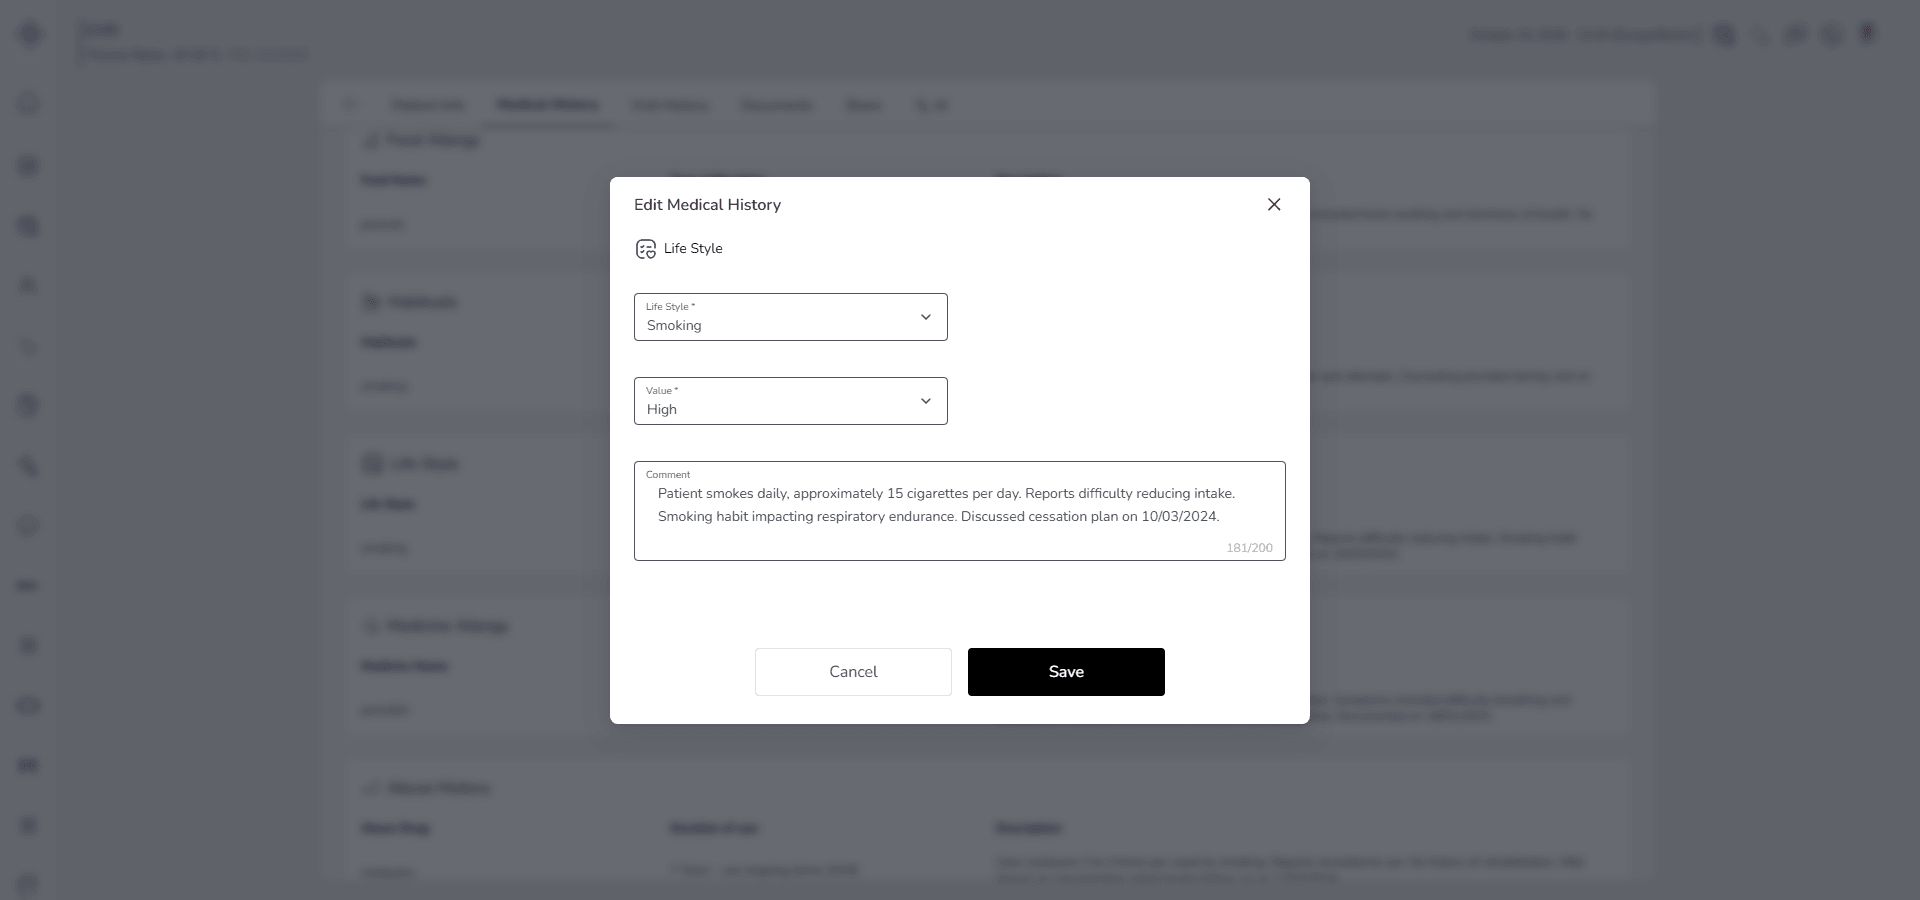
Select the lifestyle type from the dropdown list:
Smoking
Drinking
Gambling
Overeating
If the lifestyle is not listed, select Other.
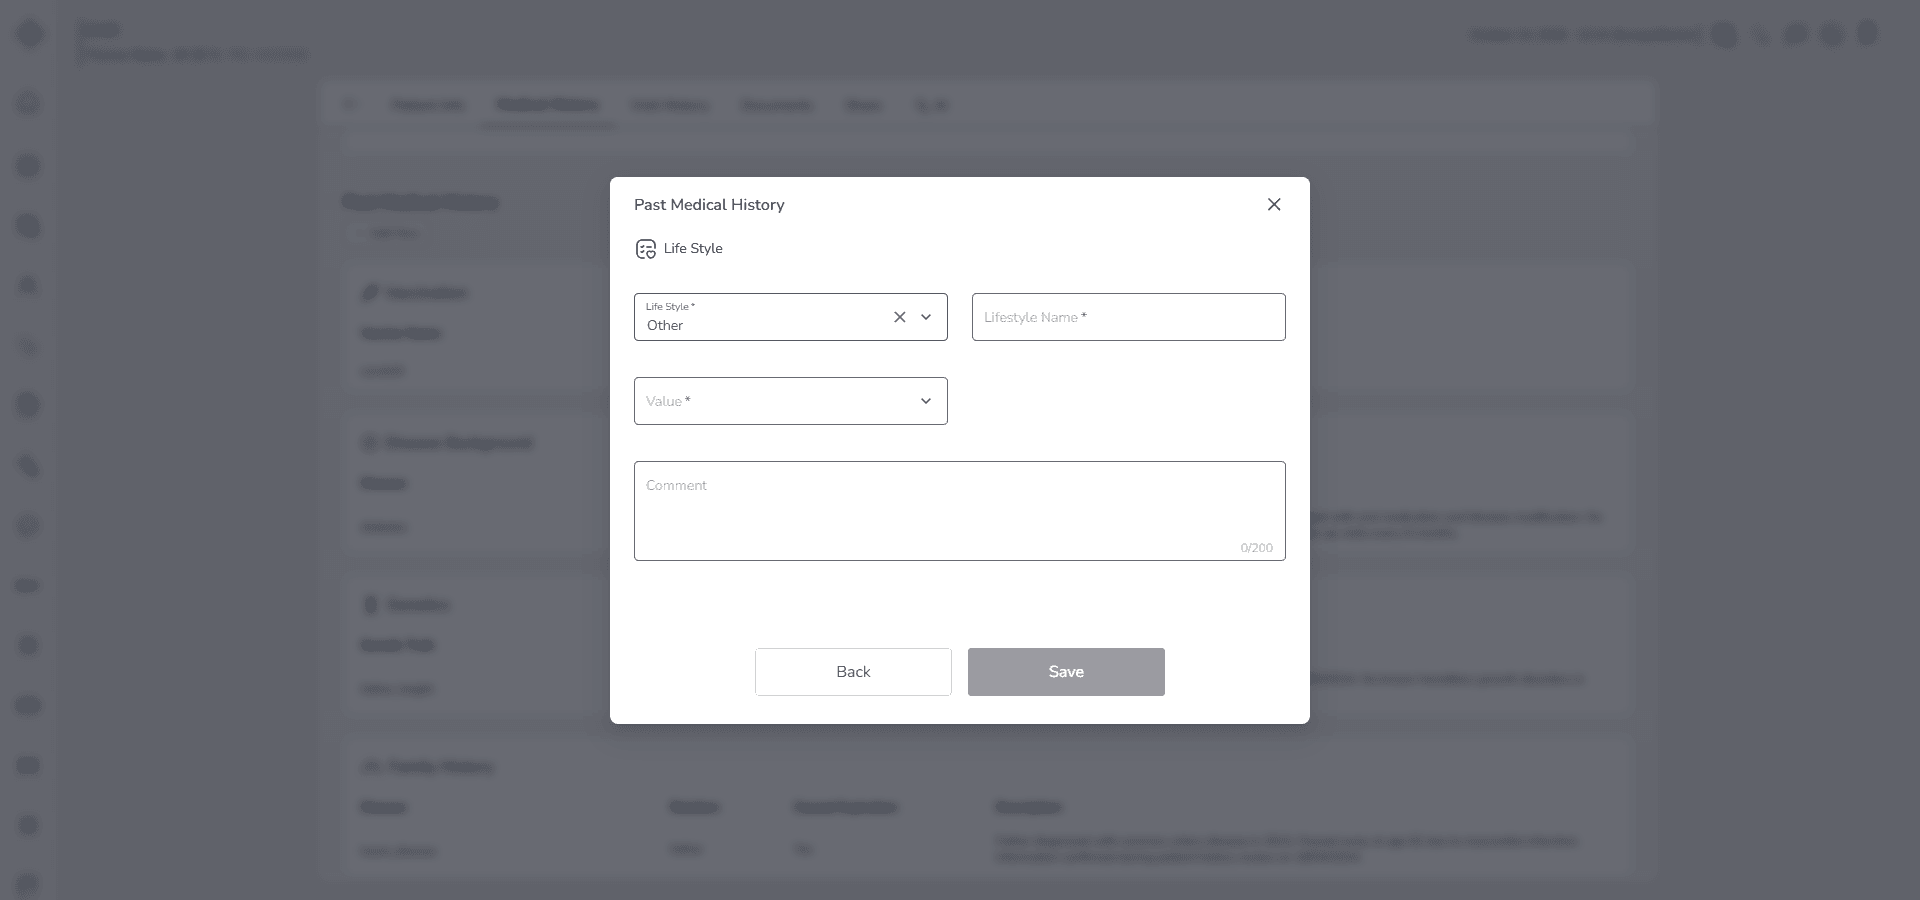
When you choose Other, a Lifestyle Name field becomes active. You must manually enter a clear and specific lifestyle description.
Next, select the Value.
This field defines the intensity or frequency level and is required. Choose one of the following:
Low
Indicates occasional or minimal engagement.
Medium
Indicates moderate or regular engagement.
High
Indicates frequent or heavy engagement that may carry increased health risk.
Select the value carefully based on clinical relevance and patient reporting.
Use the Description field to add supporting details when necessary. For example:
• Frequency per week
• Quantity or duration
• Impact on daily life
• Previous lifestyle modifications
• Related medical concerns
The description is optional but recommended when the lifestyle pattern affects clinical decision making.
Save the Record
• Click Save to store the Lifestyle record
• Click Cancel if you do not want to save
The record cannot be saved if:
• Lifestyle type is not selected
• Value is not selected
Behavior and Expected Outcome
• Selecting Other activates the manual Lifestyle Name field
• Each saved entry is grouped under Past Medical History → Lifestyle
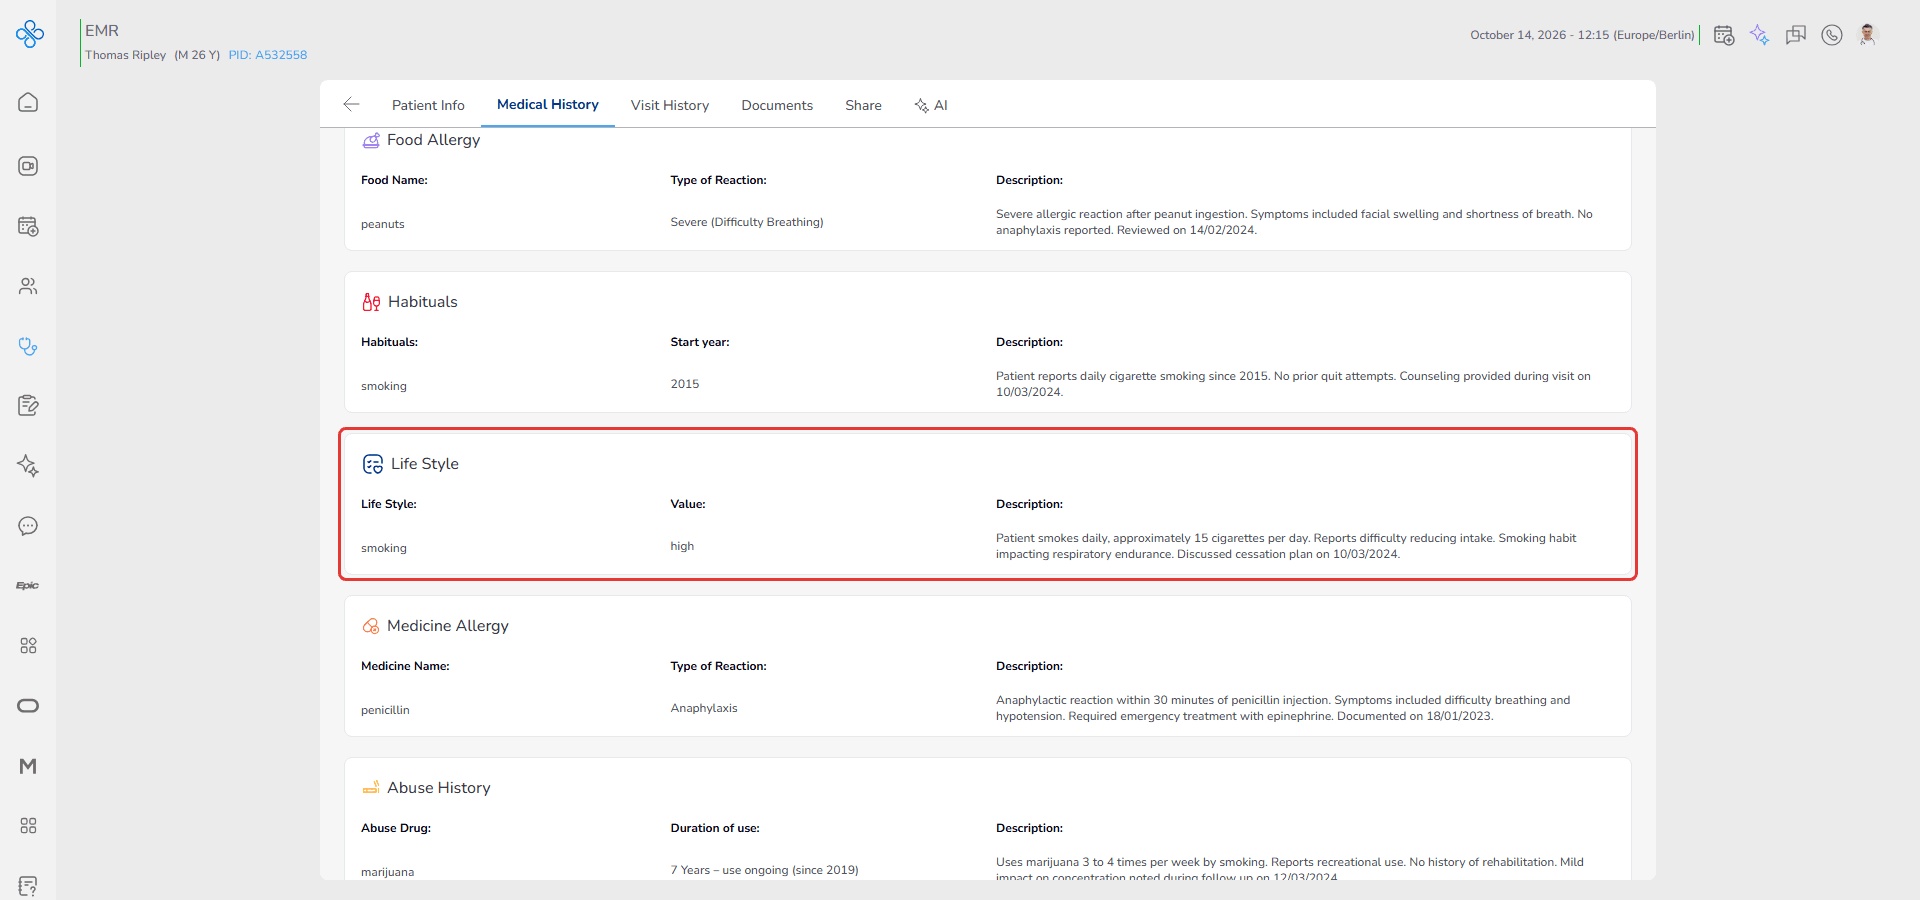
• All lifestyle entries are displayed together for structured review
This structure allows quick assessment of behavioral intensity and potential health risks.
Managing a Saved Lifestyle Record
After saving a lifestyle entry, you can manage it directly from the Lifestyle list.
Each saved record includes a More Actions menu shown as ⋮ located between the values of the Lifestyle type and Value columns.
Follow these steps:
1. Open More Actions
• Locate the lifestyle record in the list
• Click the ⋮ icon
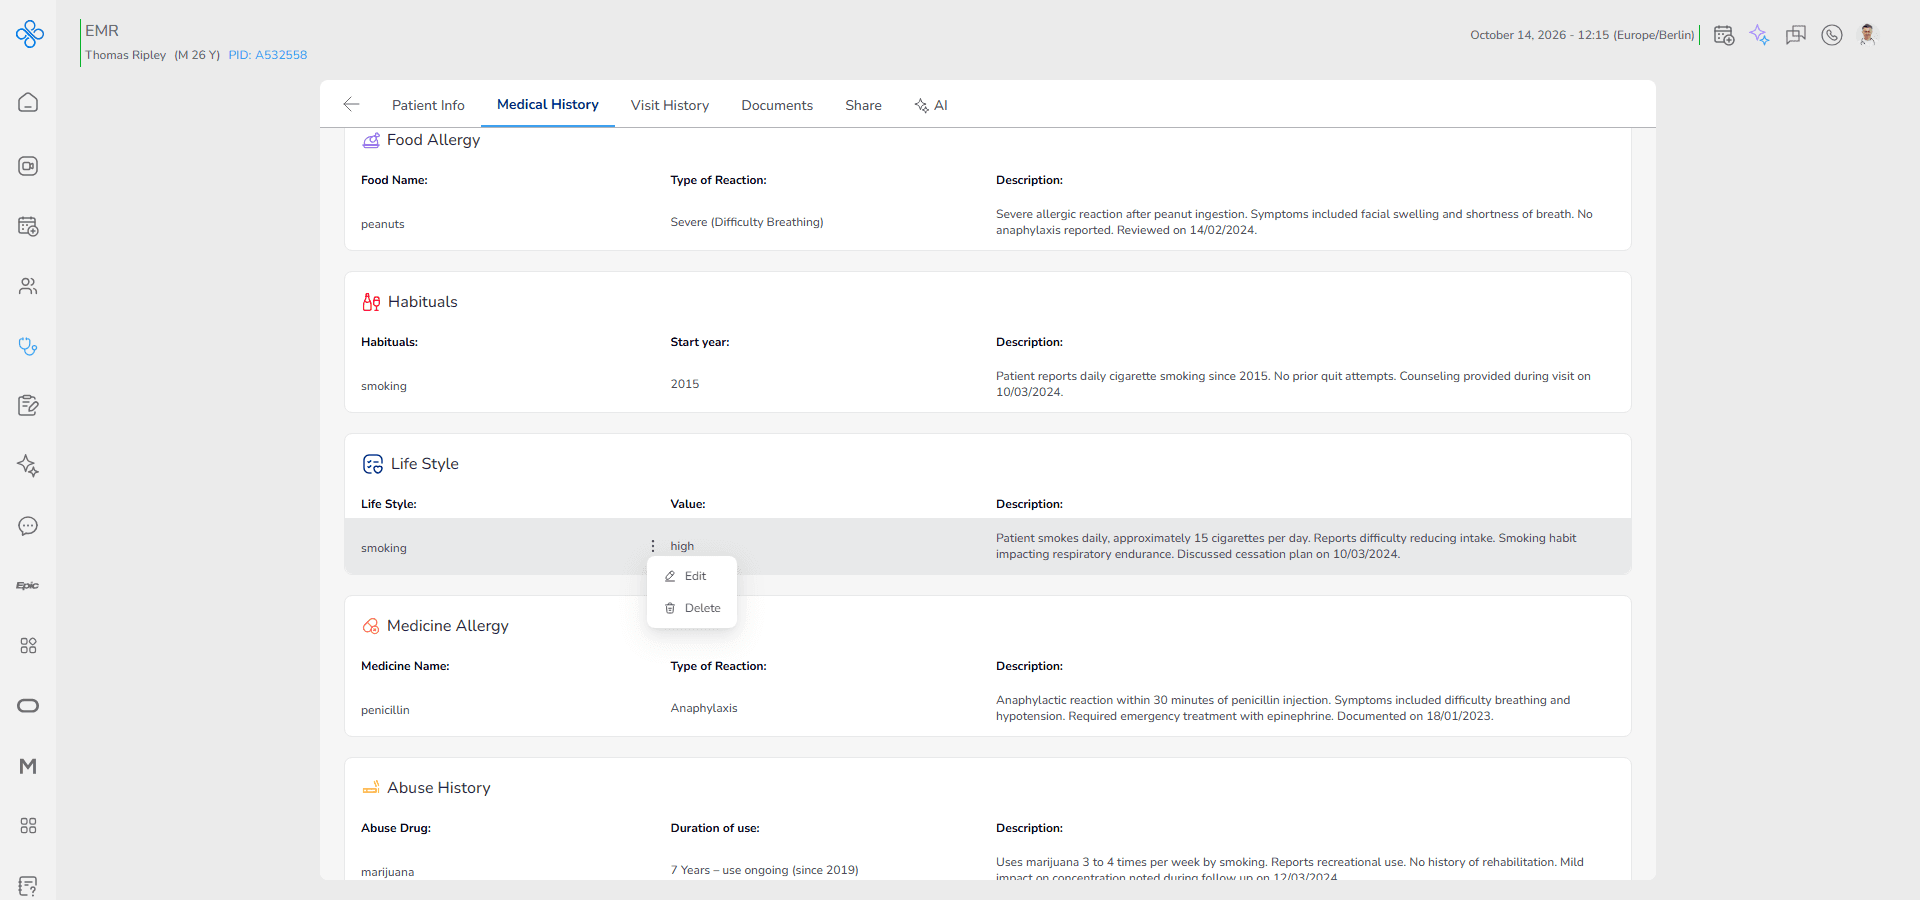
• A dropdown menu will appear with available options
2. Edit a Record
Use this option when you need to correct or update an existing entry.
• Click Edit from the More Actions menu
• The same Lifestyle modal will open
• All previously entered data will be prefilled in the form
You can now:
• change the selected lifestyle type
• update the custom lifestyle name if Other was used
• modify the Value level
• edit the description
After making changes:
• Click Save to apply updates
• Click Cancel to discard changes
Once saved, the updated information appears immediately in the list.
If you switch to Other during editing, you must enter a Lifestyle Name before saving.
3. Delete a Record
Use this option when a lifestyle entry was added by mistake or is no longer clinically relevant.
• Click Delete from the More Actions menu
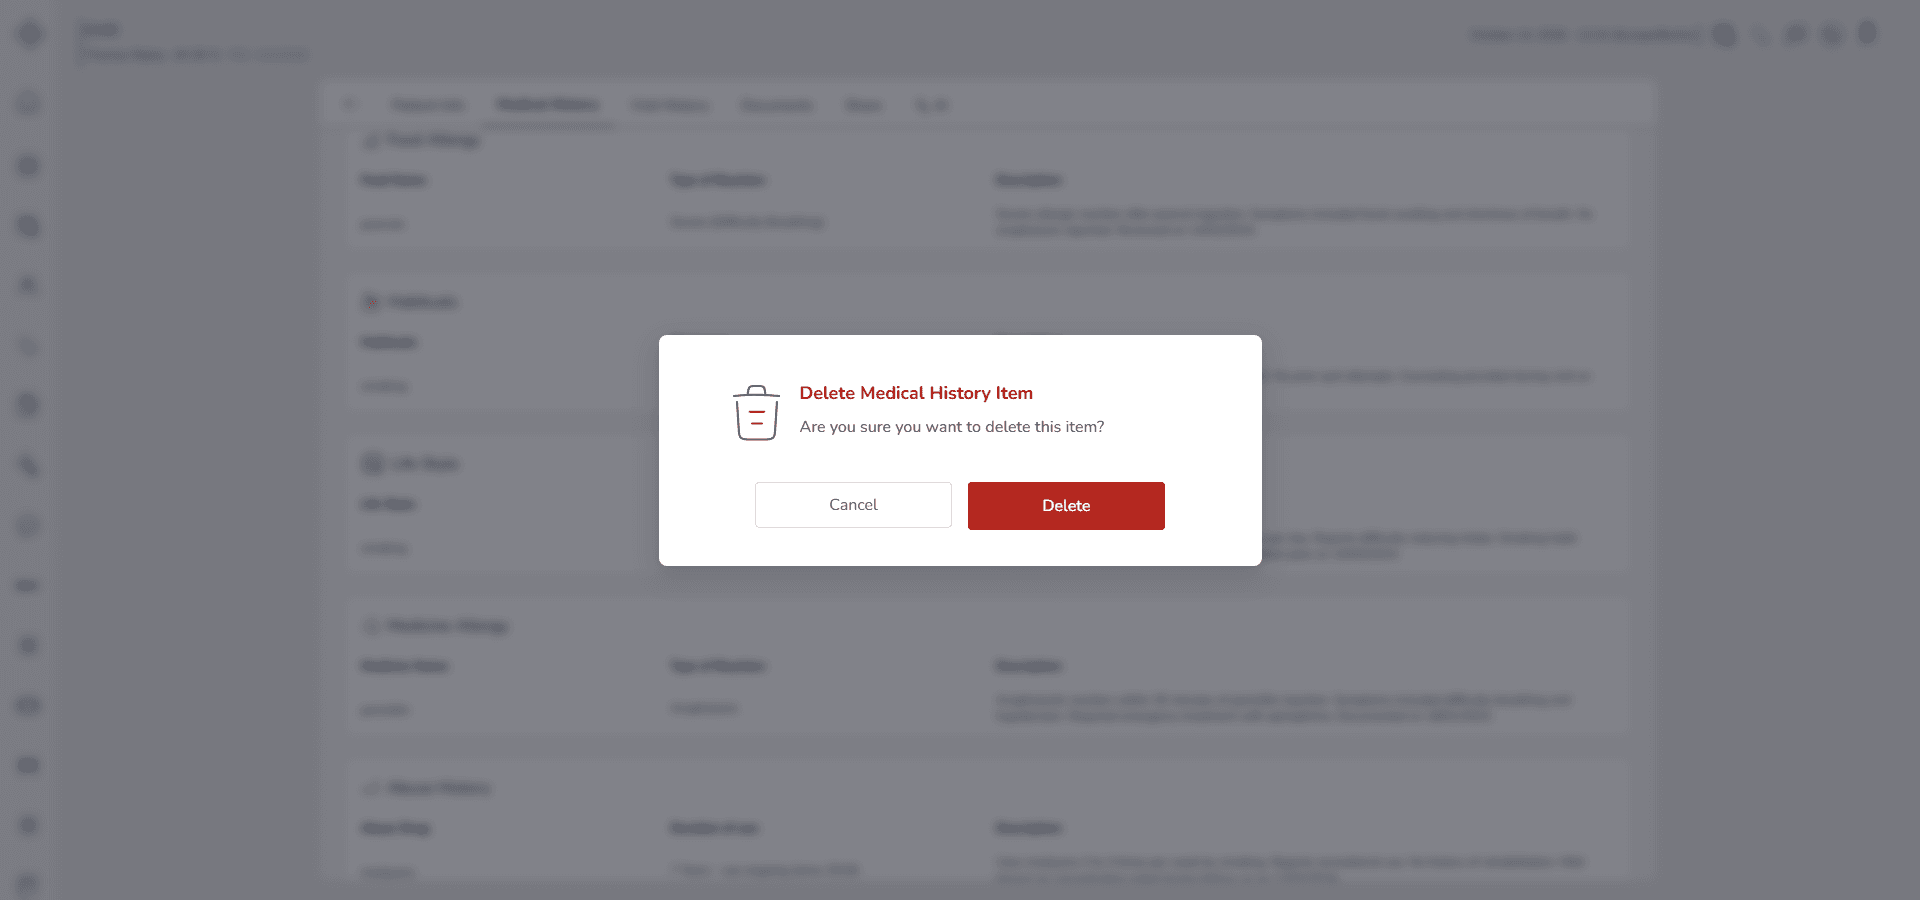
• A confirmation prompt will appear
• Confirm the deletion
After confirmation:
• The record is permanently removed from the Lifestyle list
• The data will no longer appear in the Past Medical History section
Deletion cannot be undone.
Ensure the lifestyle information is not required for clinical evaluation before confirming removal.
3-9. Medicine Allergy
Use this section to document any confirmed or suspected allergic reactions to medications.
Recording medicine allergies is critical to prevent adverse drug reactions and ensure safe prescribing.
When you open Past Medical History and select Medicine Allergy, the Medicine Allergy modal will appear.
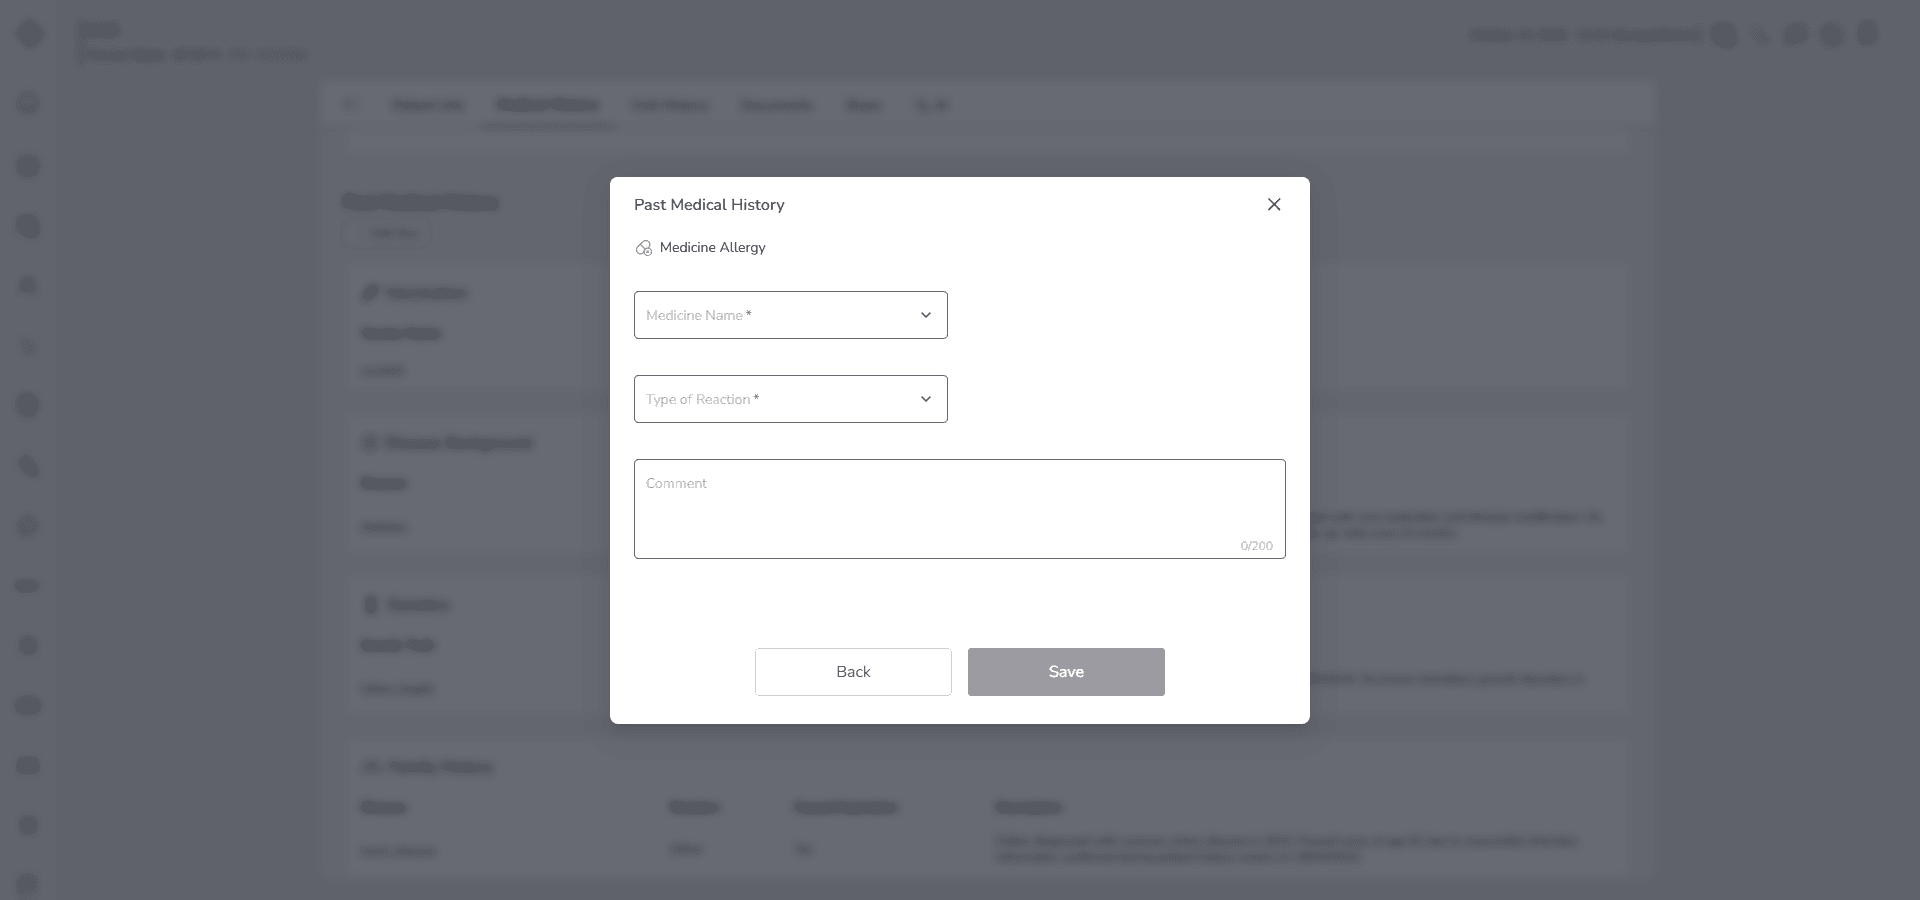
Fill in the Form
Start with Medicine Name.
Select the medication from the dropdown list:
Aspirin
Penicillin
Amoxicillin
Azithromycin
Ciprofloxacin
Ibuprofen
Acetaminophen
Codeine
Morphine
Sulfonamides
Tetracycline
Erythromycin
Cephalexin
Diclofenac
Ketoprofen
Naproxen
If the medication is not listed, select Other.
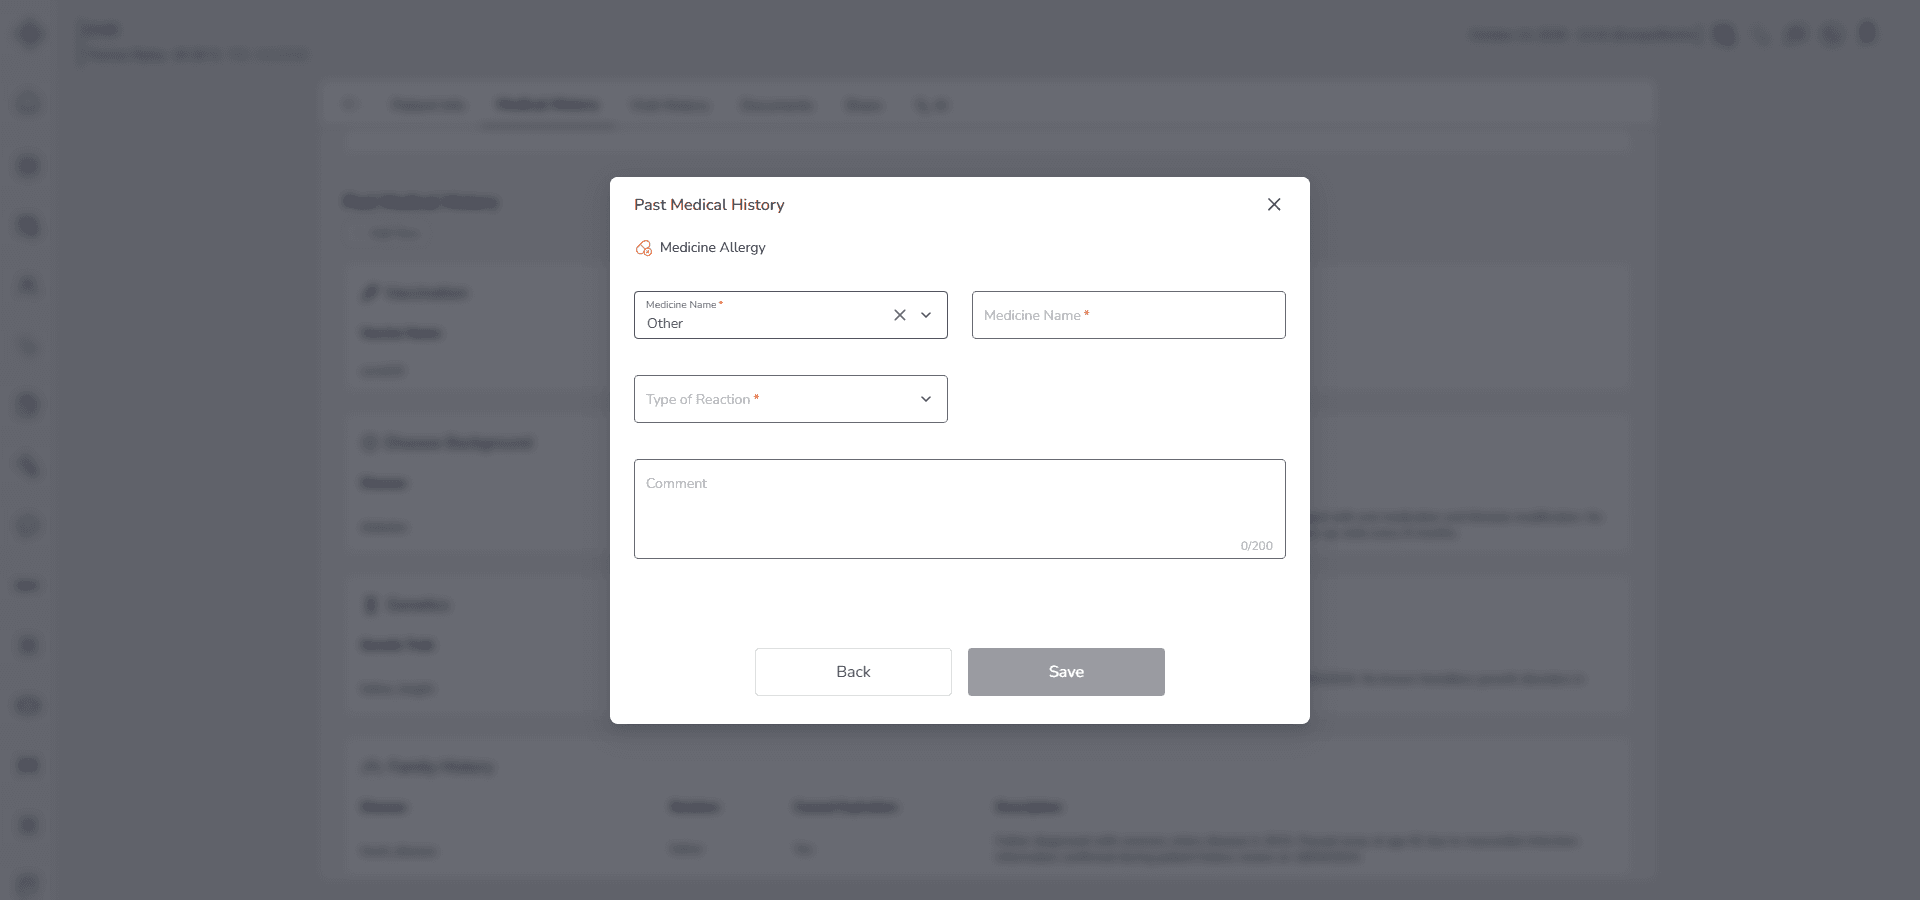
When you choose Other, a manual Medicine Name field becomes active. You must enter the exact medication name. Use a clear and clinically accurate term.
Next, select Type of Reaction.
This field is required and defines the severity or nature of the allergic response. Choose one of the following:
Mild
Examples may include rash or itching.
Moderate
Examples may include swelling or hives.
Severe
Examples may include difficulty breathing.
Anaphylaxis
A life threatening systemic reaction that requires immediate medical attention.
Accurate classification is important for safe medication planning and emergency preparedness.
Use the Description field to provide additional context when necessary. For example:
• Time of reaction after medication intake
• Dose involved
• Need for hospitalization
• Use of emergency treatment
• Cross sensitivity with similar drugs
The description is optional but strongly recommended when the reaction was severe or clinically significant.
Save the Record
• Click Save to store the medicine allergy record
• Click Cancel if you do not want to save
The record cannot be saved if required fields such as Medicine Name or Type of Reaction are incomplete.
Behavior and Expected Outcome
• Selecting Other activates the custom Medicine Name field
• Each saved entry is grouped under Past Medical History → Medicine Allergy
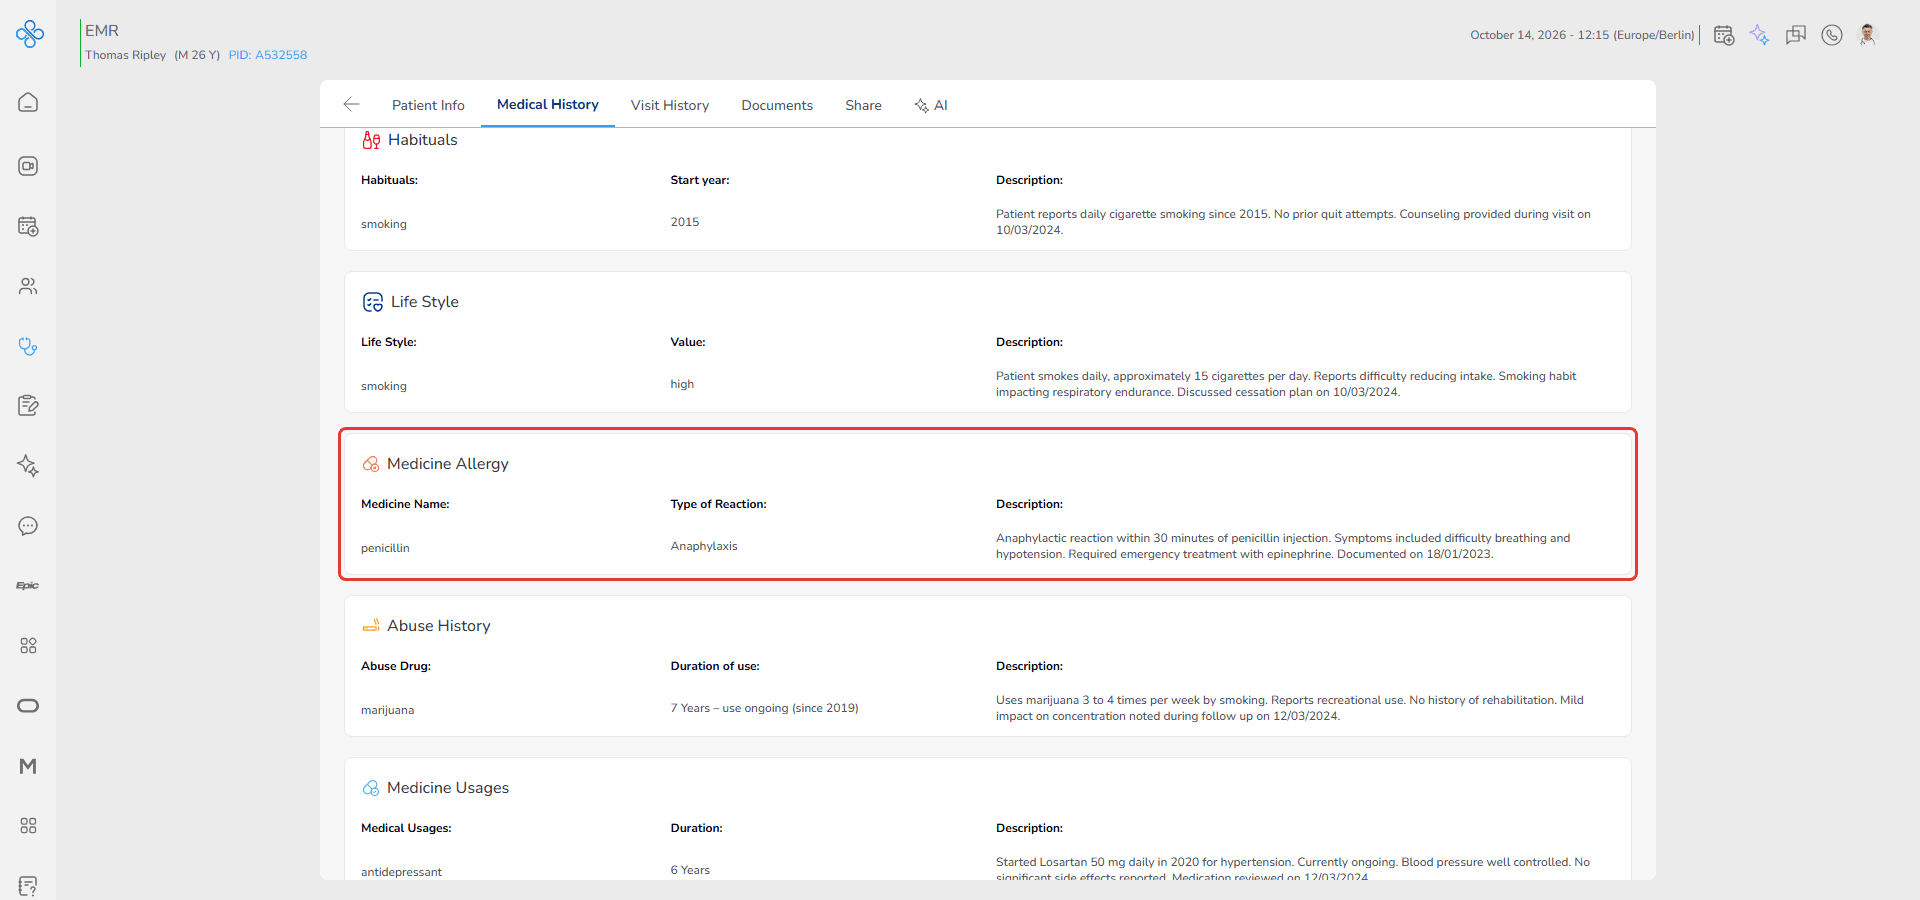
• All medication allergies are displayed together for quick clinical review
This structure ensures potential drug risks are clearly visible before prescribing or administering treatment.
Managing a Saved Medicine Allergy Record
After saving a medicine allergy entry, you can manage it directly from the Medicine Allergy list.
Each saved record includes a More Actions menu shown as ⋮ located between the values of the Medicine Name and Type of Reaction columns.
Follow these steps:
1. Open More Actions
• Locate the medicine allergy record in the list
• Click the ⋮ icon
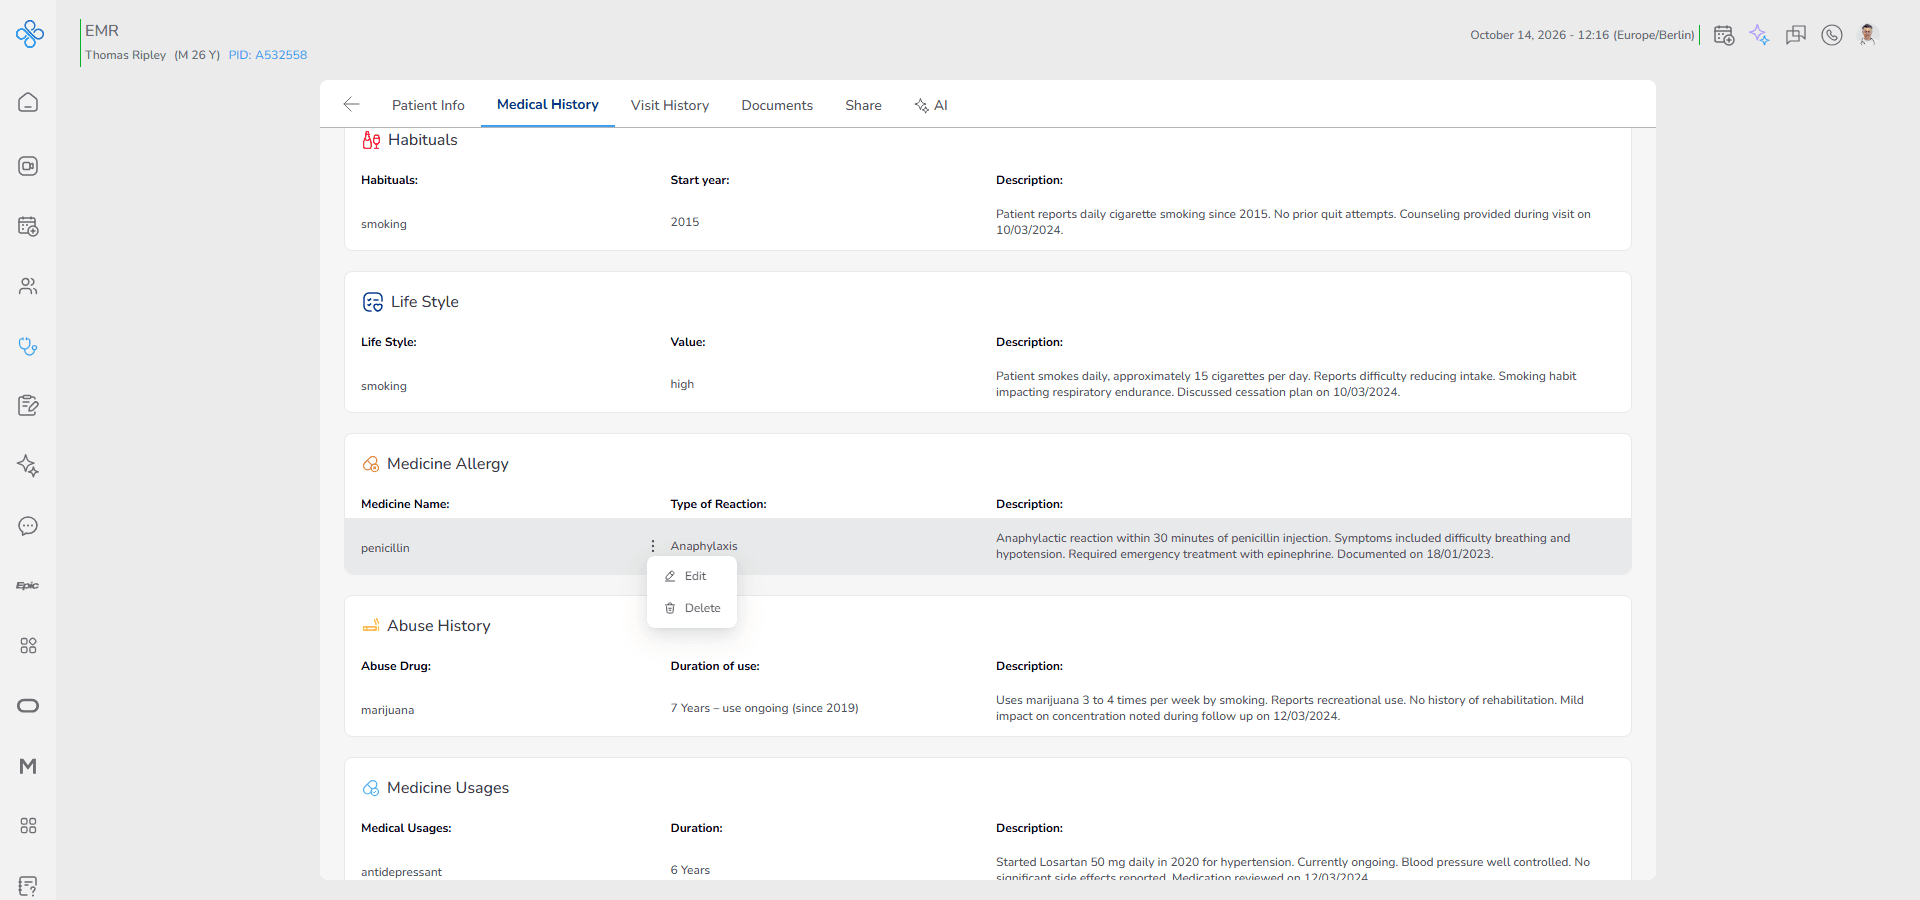
• A dropdown menu will appear with available options
2. Edit a Record
Use this option when you need to correct or update an existing entry.
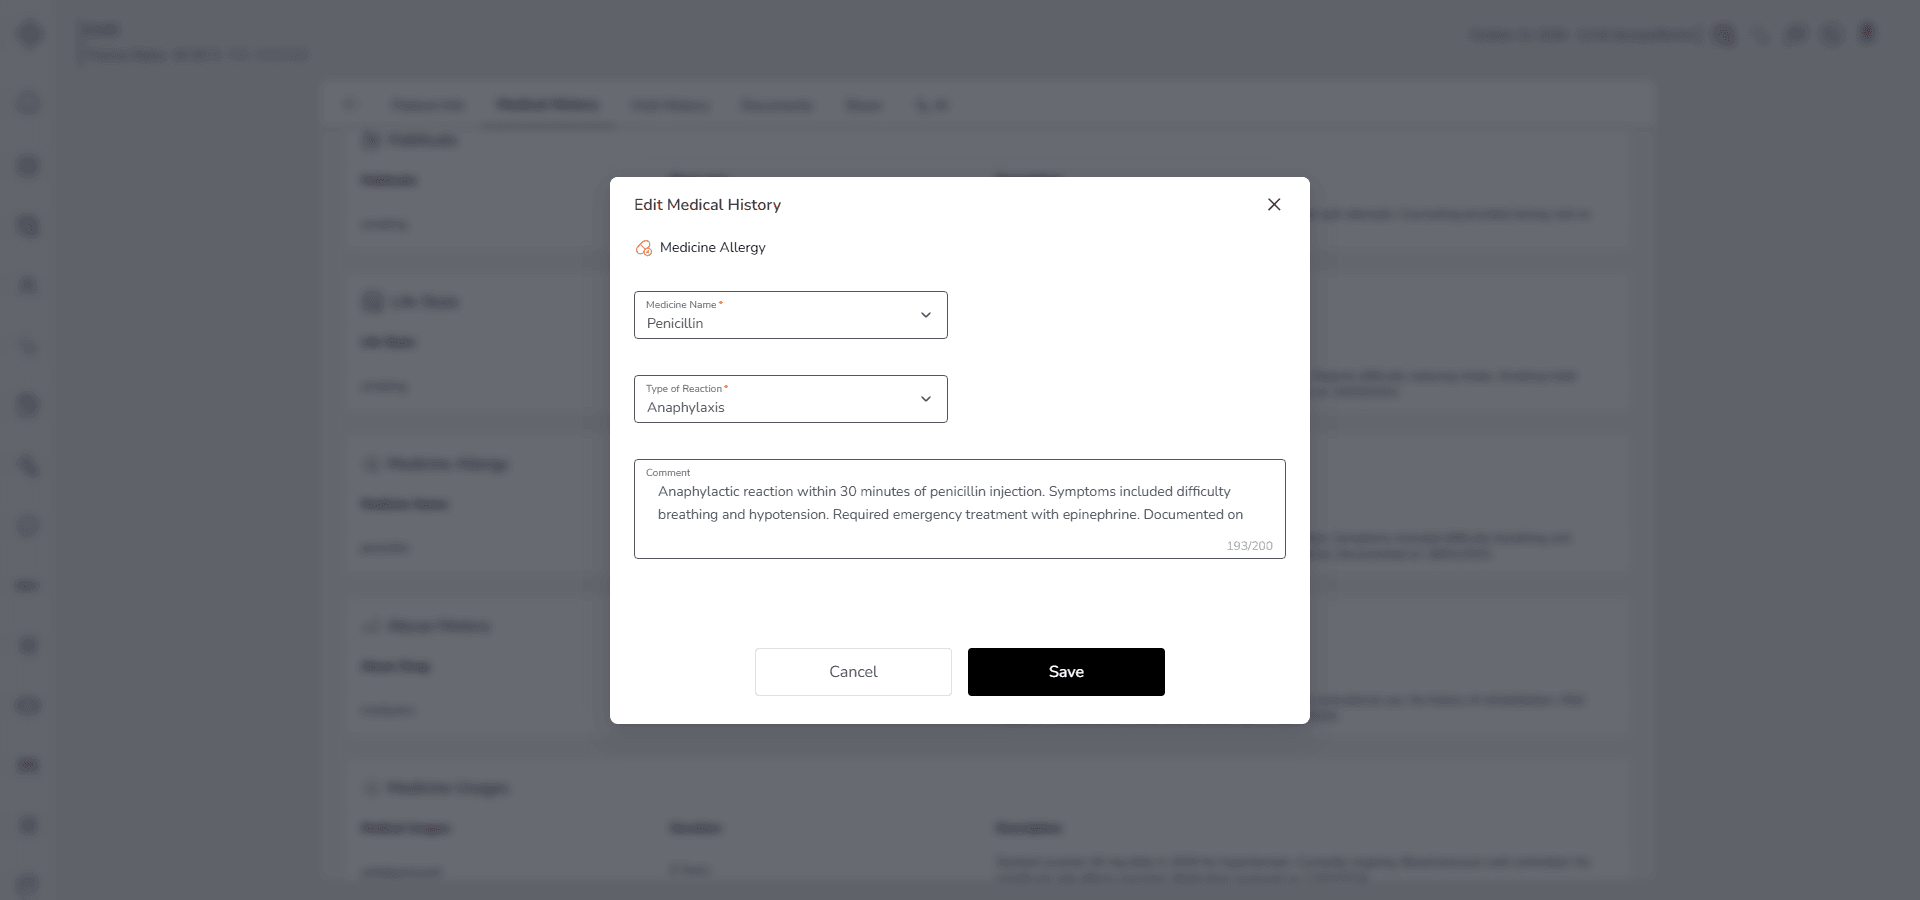
• Click Edit from the More Actions menu
• The same Medicine Allergy modal will open
• All previously entered data will be prefilled in the form
You can now:
• change the selected medication
• update the custom medicine name if Other was used
• modify the Type of Reaction
• edit the description
After making changes:
• Click Save to apply updates
• Click Cancel to discard changes
Once saved, the updated information appears immediately in the list.
If you switch to Other during editing, you must enter a Medicine Name before saving.
3. Delete a Record
Use this option when a medicine allergy entry was added by mistake or is no longer clinically relevant.
• Click Delete from the More Actions menu
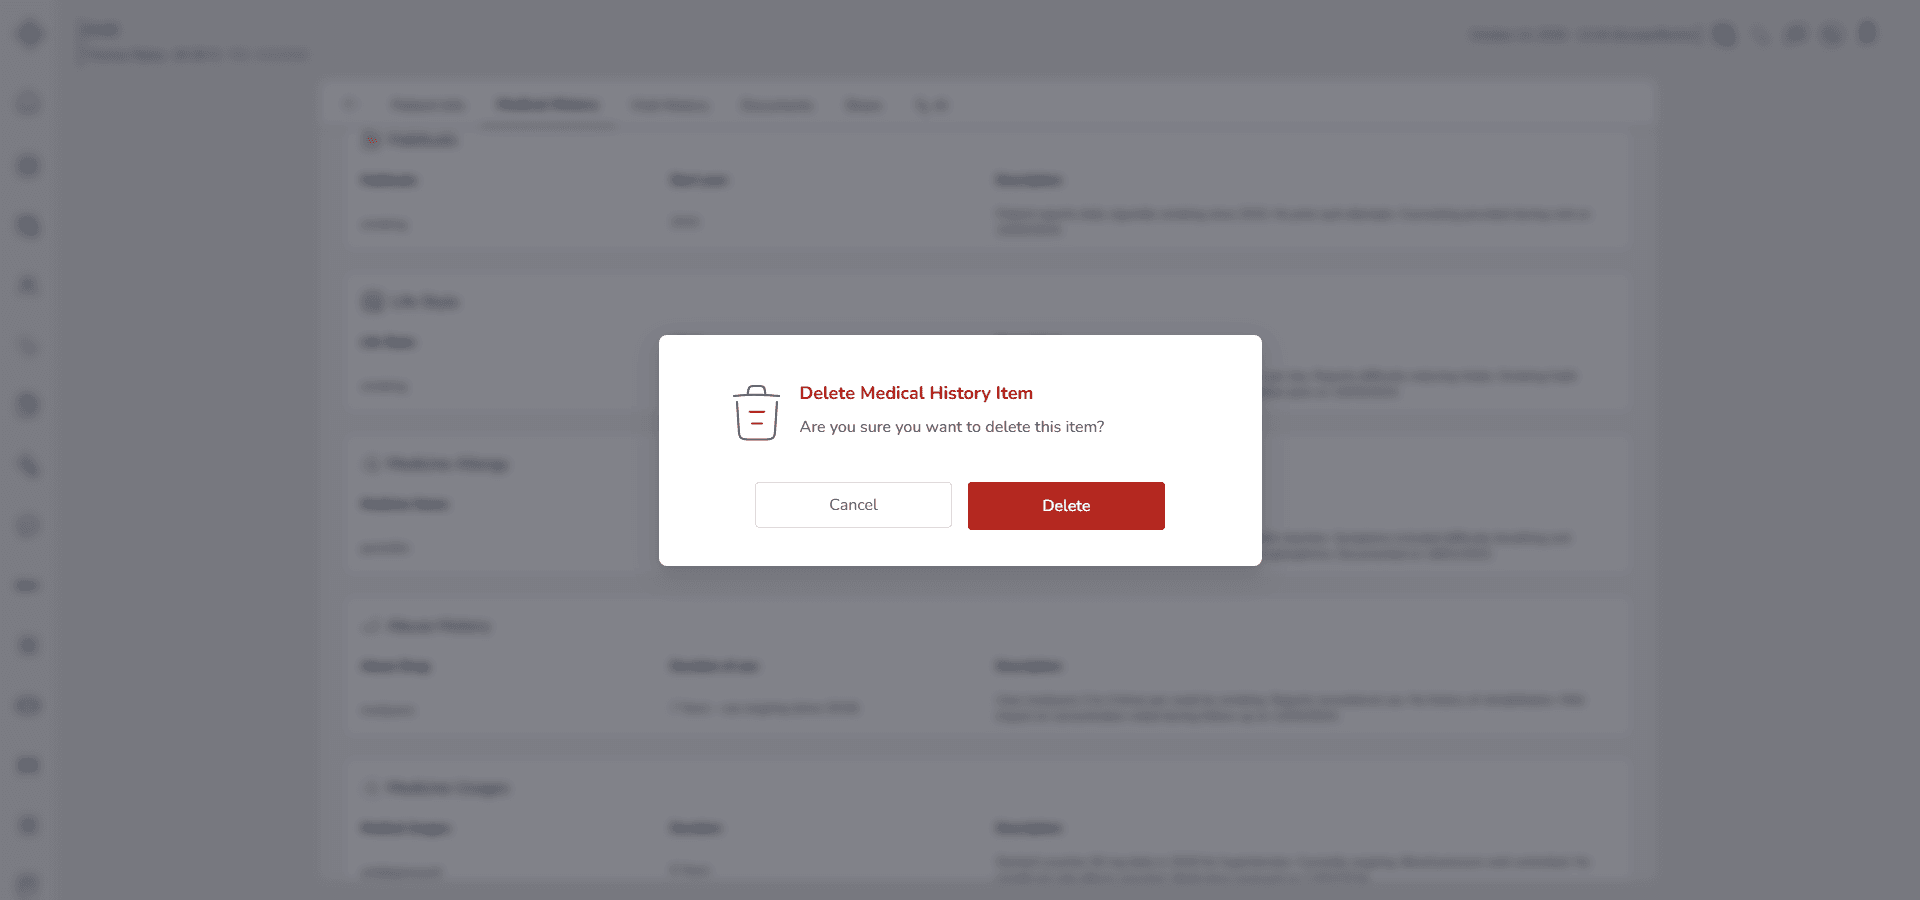
• A confirmation prompt will appear
• Confirm the deletion
After confirmation:
• The record is permanently removed from the Medicine Allergy list
• The data will no longer appear in the Past Medical History section
Deletion cannot be undone.
Make sure the medication allergy is not clinically required before confirming removal.
3-10. Abuse History
Use this section to document any substance abuse or drug misuse.
Recording abuse history helps you assess dependency risk, withdrawal risk and long term health impact.
When you open Past Medical History and select Abuse History, the Abuse History modal will appear.
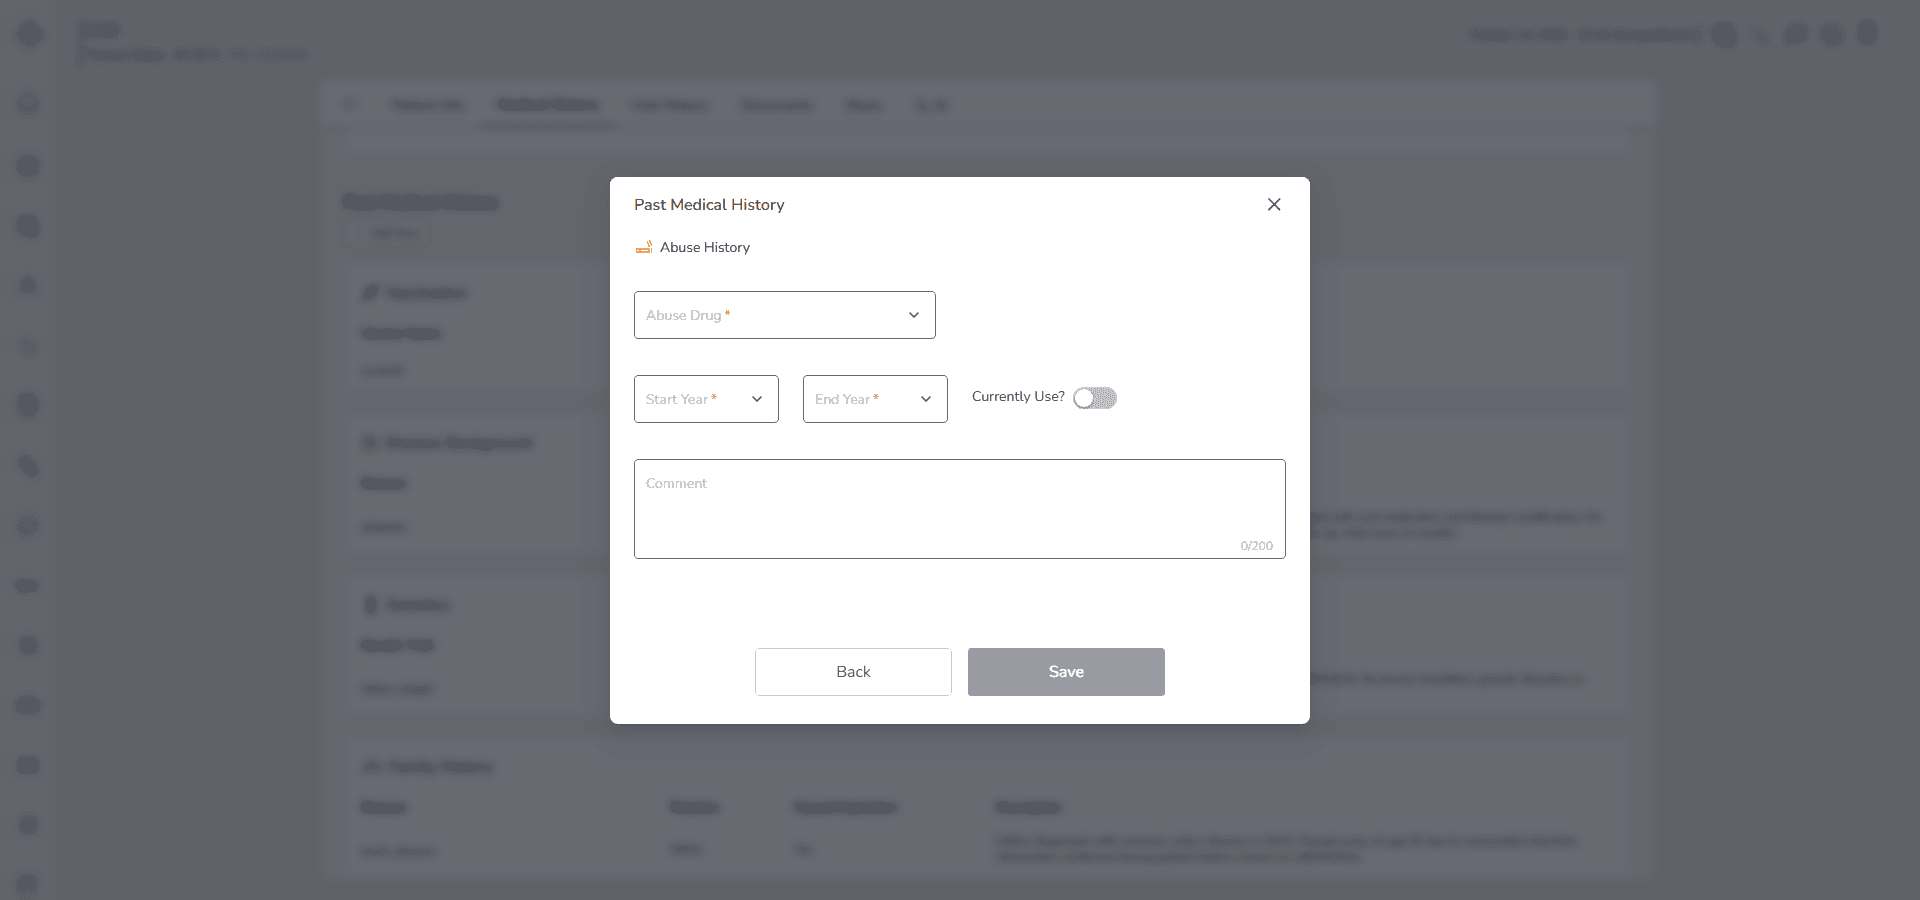
Fill in the Form
Start with Abuse Drug.
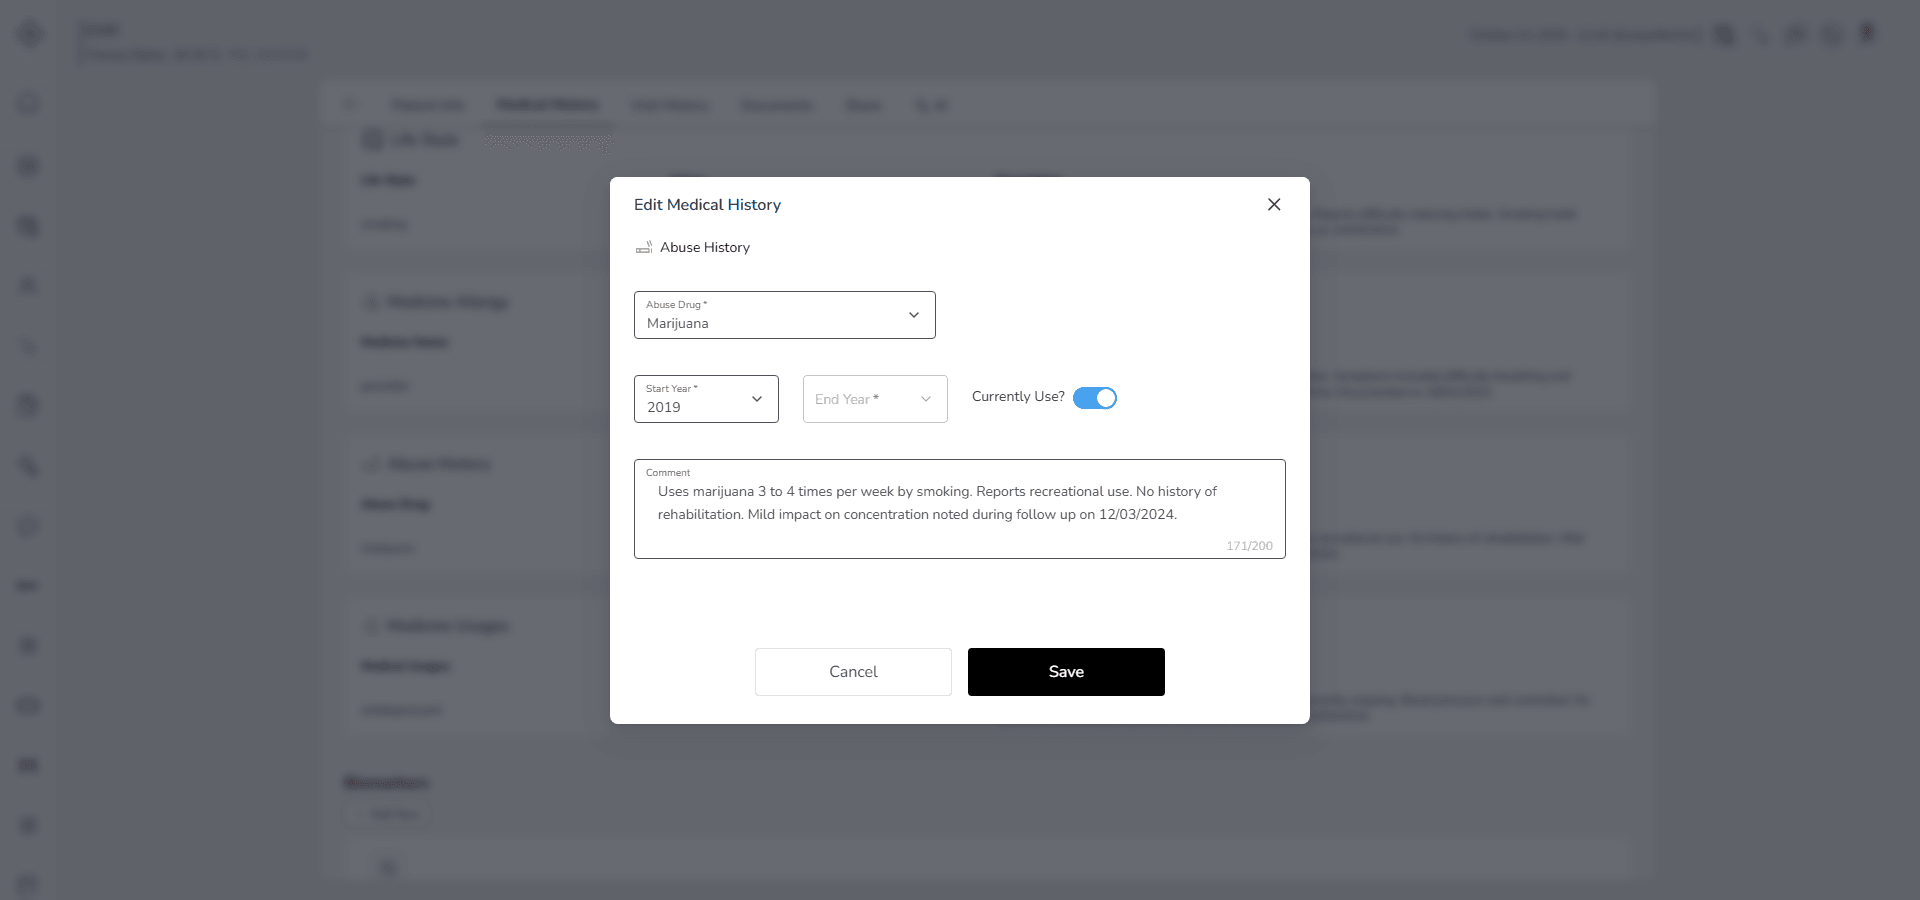
Select the substance from the dropdown list:
Tobacco
Alcohol
Marijuana
Cocaine
Heroin
Methamphetamine
Prescription Drugs
If the substance is not listed, select Other.
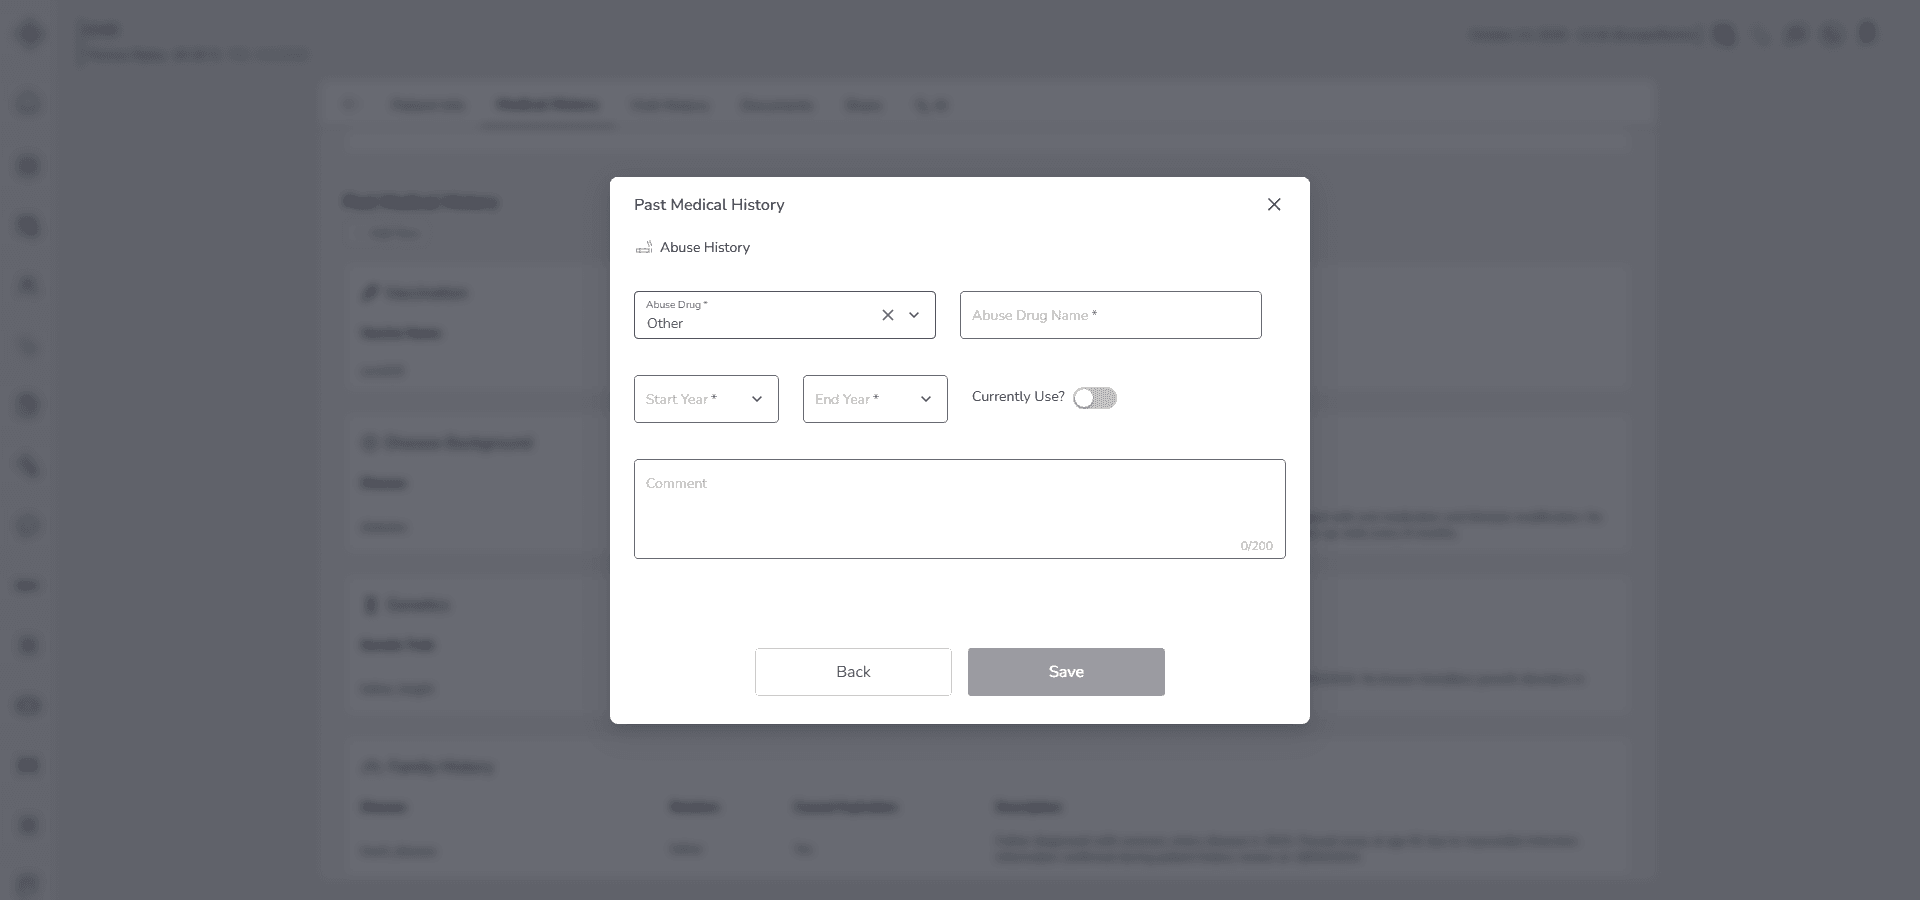
When you choose Other, an Abuse Drug Name field becomes active. You must manually enter the exact substance name. Use a clear and specific term.
Next, enter the Start Year.
This field is required.
Enter the year when the substance use began. Make sure it reflects the actual beginning of regular use.
Then review the Currently Use toggle.
Activate this option if the patient is still using the substance.
When Currently Use is active, the End Year field becomes automatically disabled.
If the patient has stopped using the substance, leave Currently Use inactive and enter the End Year.
This field becomes required when usage is not ongoing.
Use the Description field to provide additional context when necessary. For example:
• Frequency of use
• Daily or weekly quantity
• Route of administration
• History of rehabilitation
• Related medical or psychiatric complications
The description is optional but recommended when substance use has clinical significance.
Save the Record
• Click Save to store the abuse history record
• Click Cancel if you do not want to save
The record cannot be saved if:
• Start Year is missing
• End Year is missing while Currently Use is not active
Behavior and Expected Outcome
• Selecting Other activates the manual Abuse Drug Name field
• Activating Currently Use disables the End Year field
• Each saved entry is grouped under Past Medical History → Abuse History
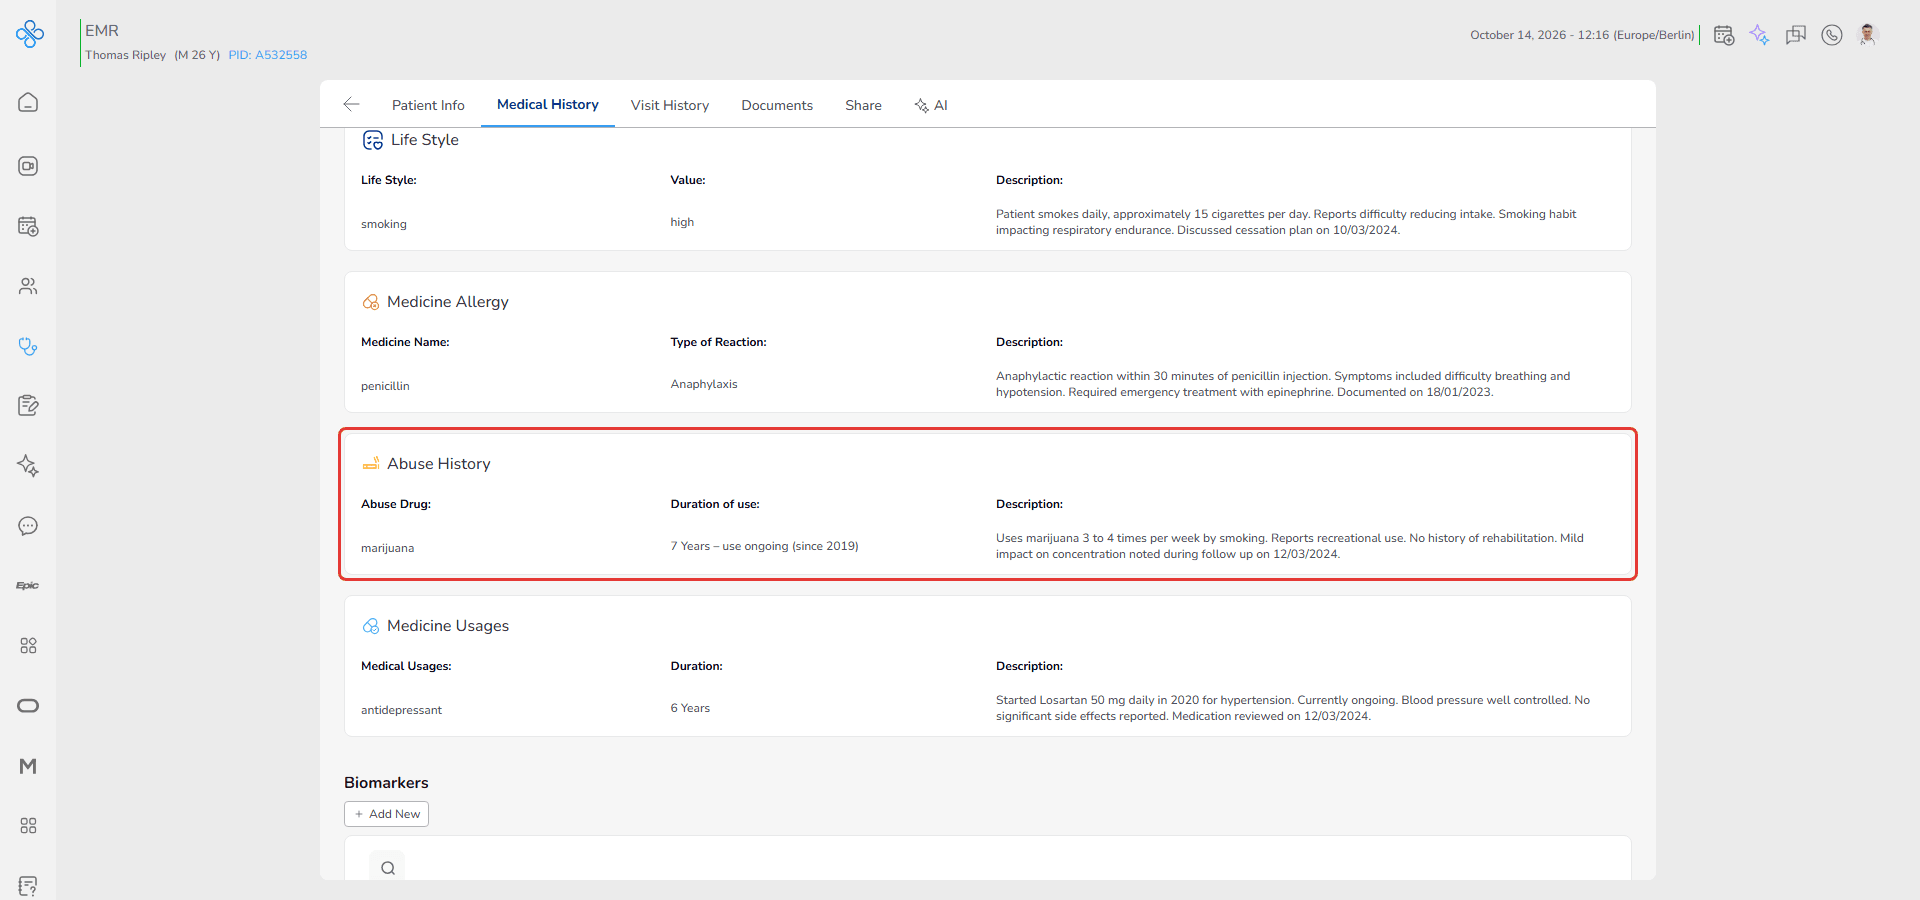
• All substance use records are displayed together for structured review
This organization allows clinicians to quickly evaluate exposure duration and current risk status.
Managing a Saved Abuse History Record
After saving an abuse history entry, you can manage it directly from the Abuse History list.
Each saved record includes a More Actions menu shown as ⋮ located between the values of the Abuse Drug and Start Year columns.
Follow these steps:
1. Open More Actions
• Locate the abuse history record in the list
• Click the ⋮ icon
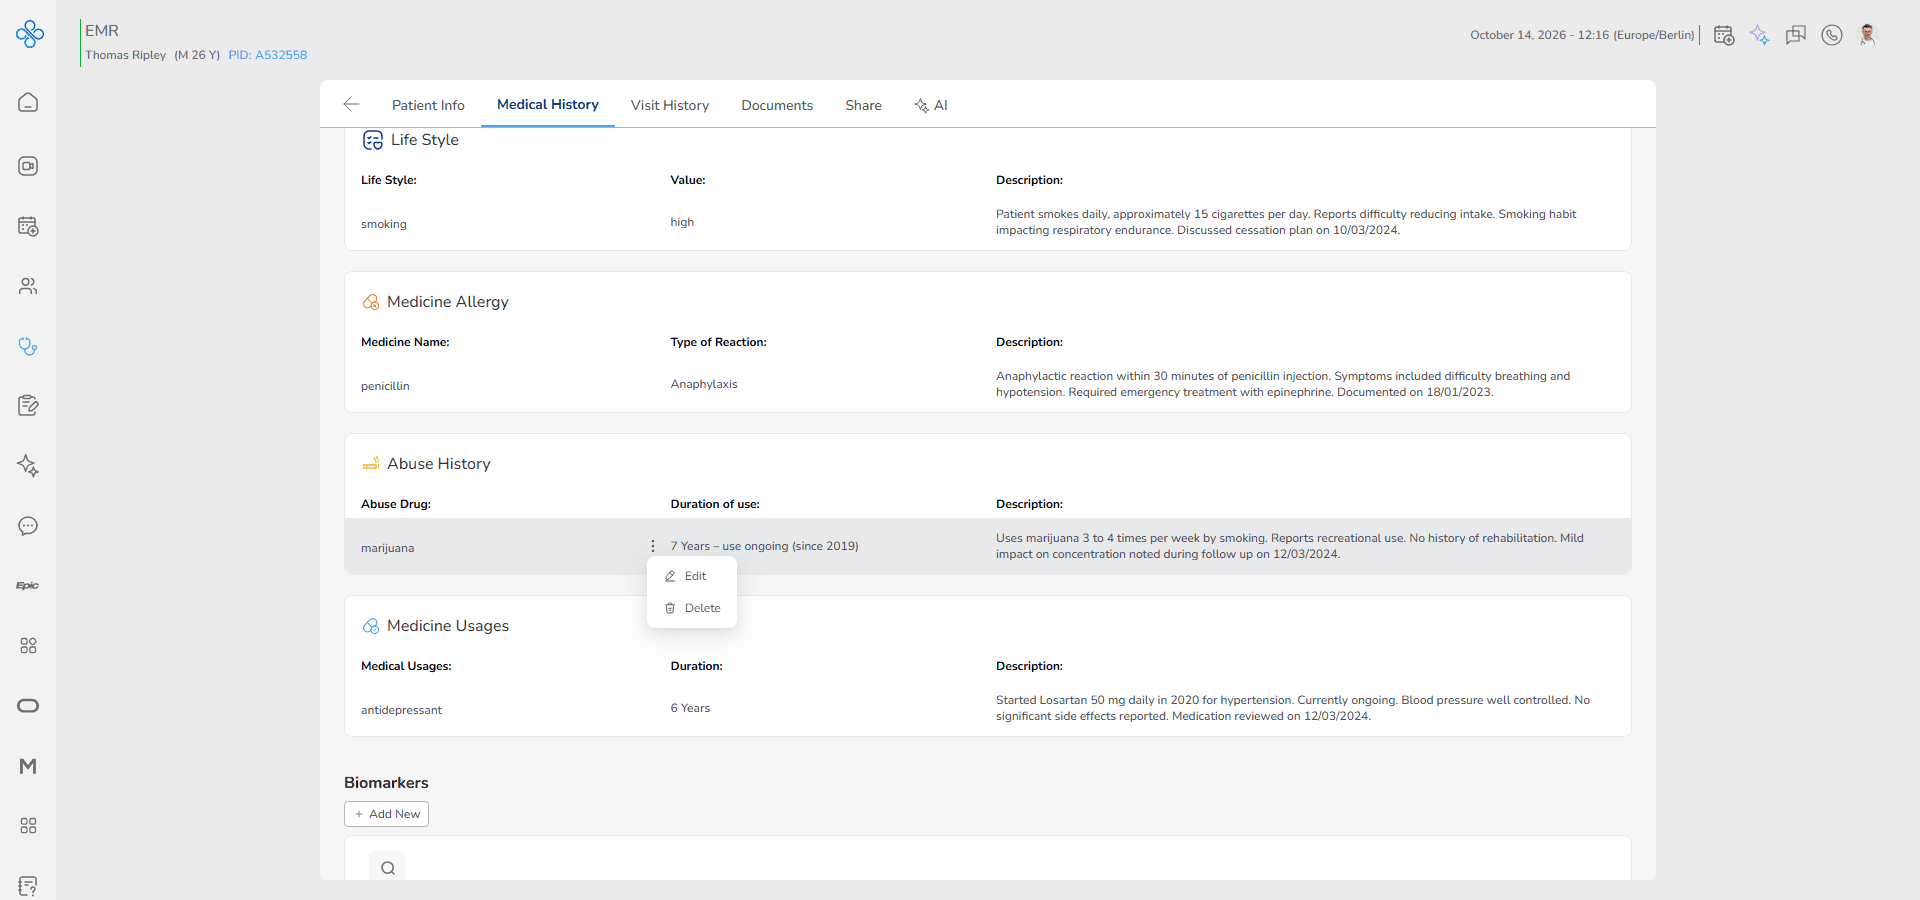
• A dropdown menu will appear with available options
2. Edit a Record
Use this option when you need to correct or update an existing entry.
• Click Edit from the More Actions menu
• The same Abuse History modal will open
• All previously entered data will be prefilled in the form
You can now:
• change the selected substance
• update the custom drug name if Other was used
• modify the Start Year
• activate or deactivate Currently Use
• update the End Year if applicable
• edit the description
After making changes:
• Click Save to apply updates
• Click Cancel to discard changes
Once saved, the updated information appears immediately in the list.
If you deactivate Currently Use during editing, you must enter an End Year before saving.
3. Delete a Record
Use this option when a substance entry was added by mistake or is no longer clinically relevant.
• Click Delete from the More Actions menu
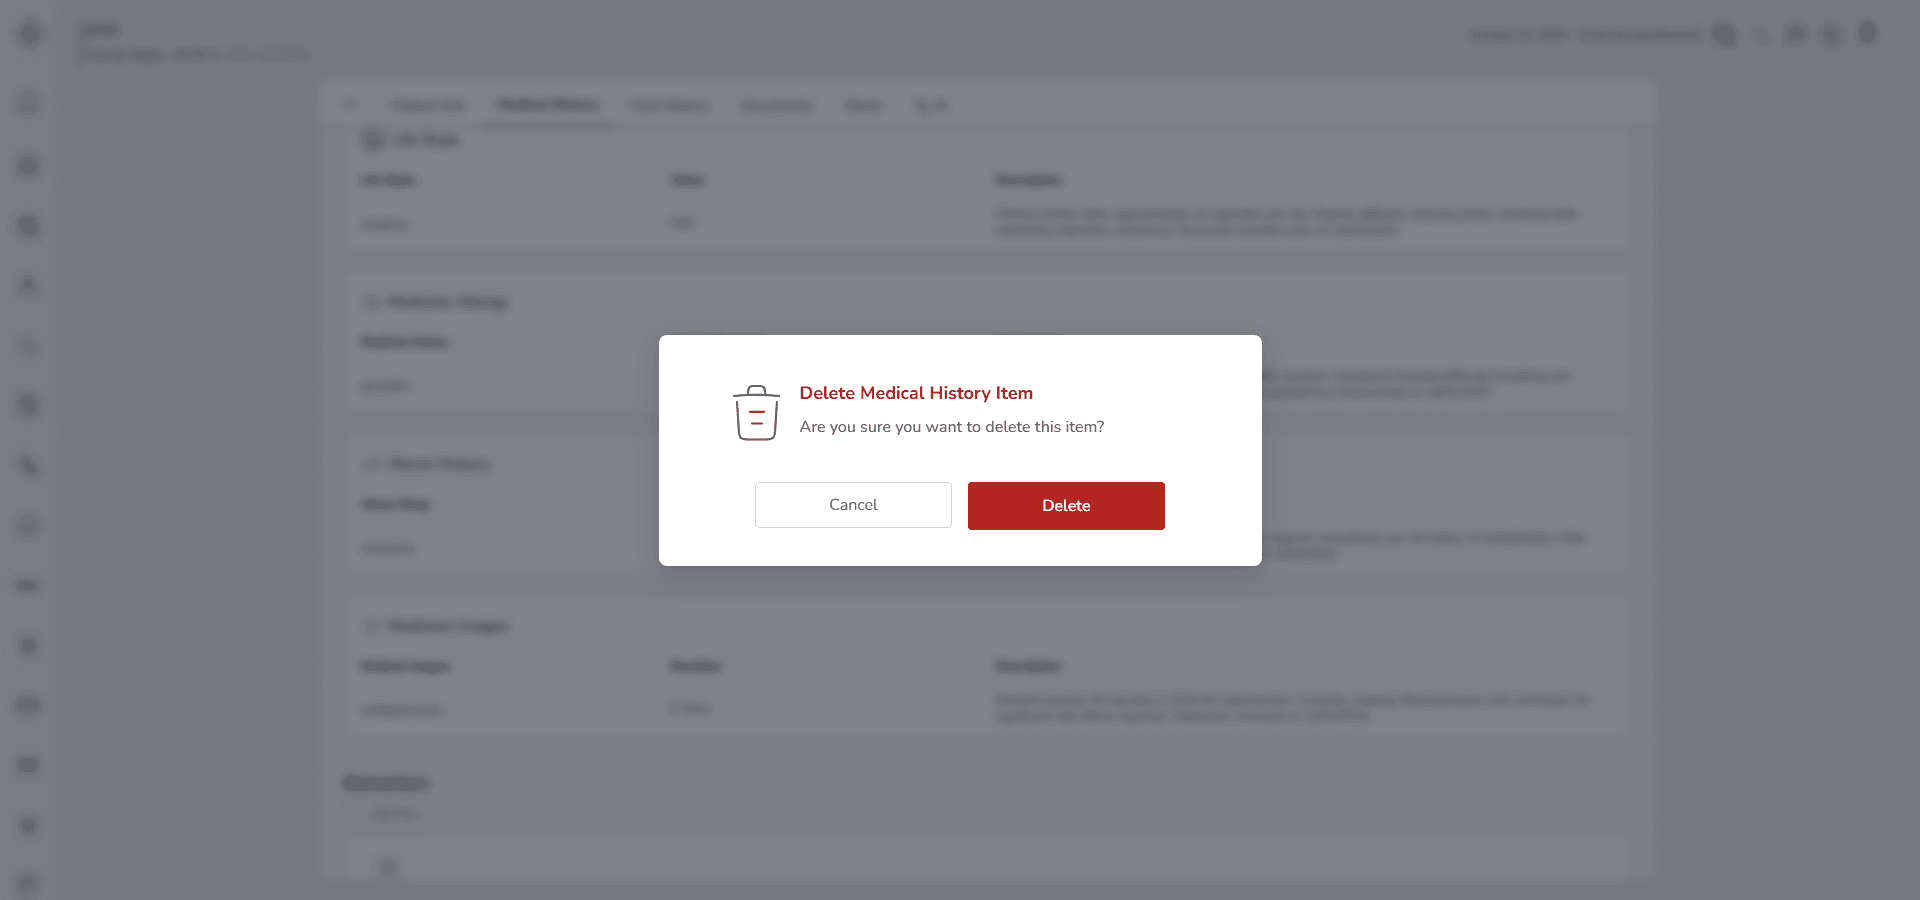
• A confirmation prompt will appear
• Confirm the deletion
After confirmation:
• The record is permanently removed from the Abuse History list
• The data will no longer appear in the Past Medical History section
Deletion cannot be undone.
Make sure the substance use information is not clinically required before confirming removal.
3-11. Medicine Usages
Use this section to document medications that the patient is currently taking or has taken in the past.
This helps you track treatment history, understand ongoing therapies and avoid drug interactions.
When you open Past Medical History and select Medicine Usages, the Medicine Usages modal will appear.
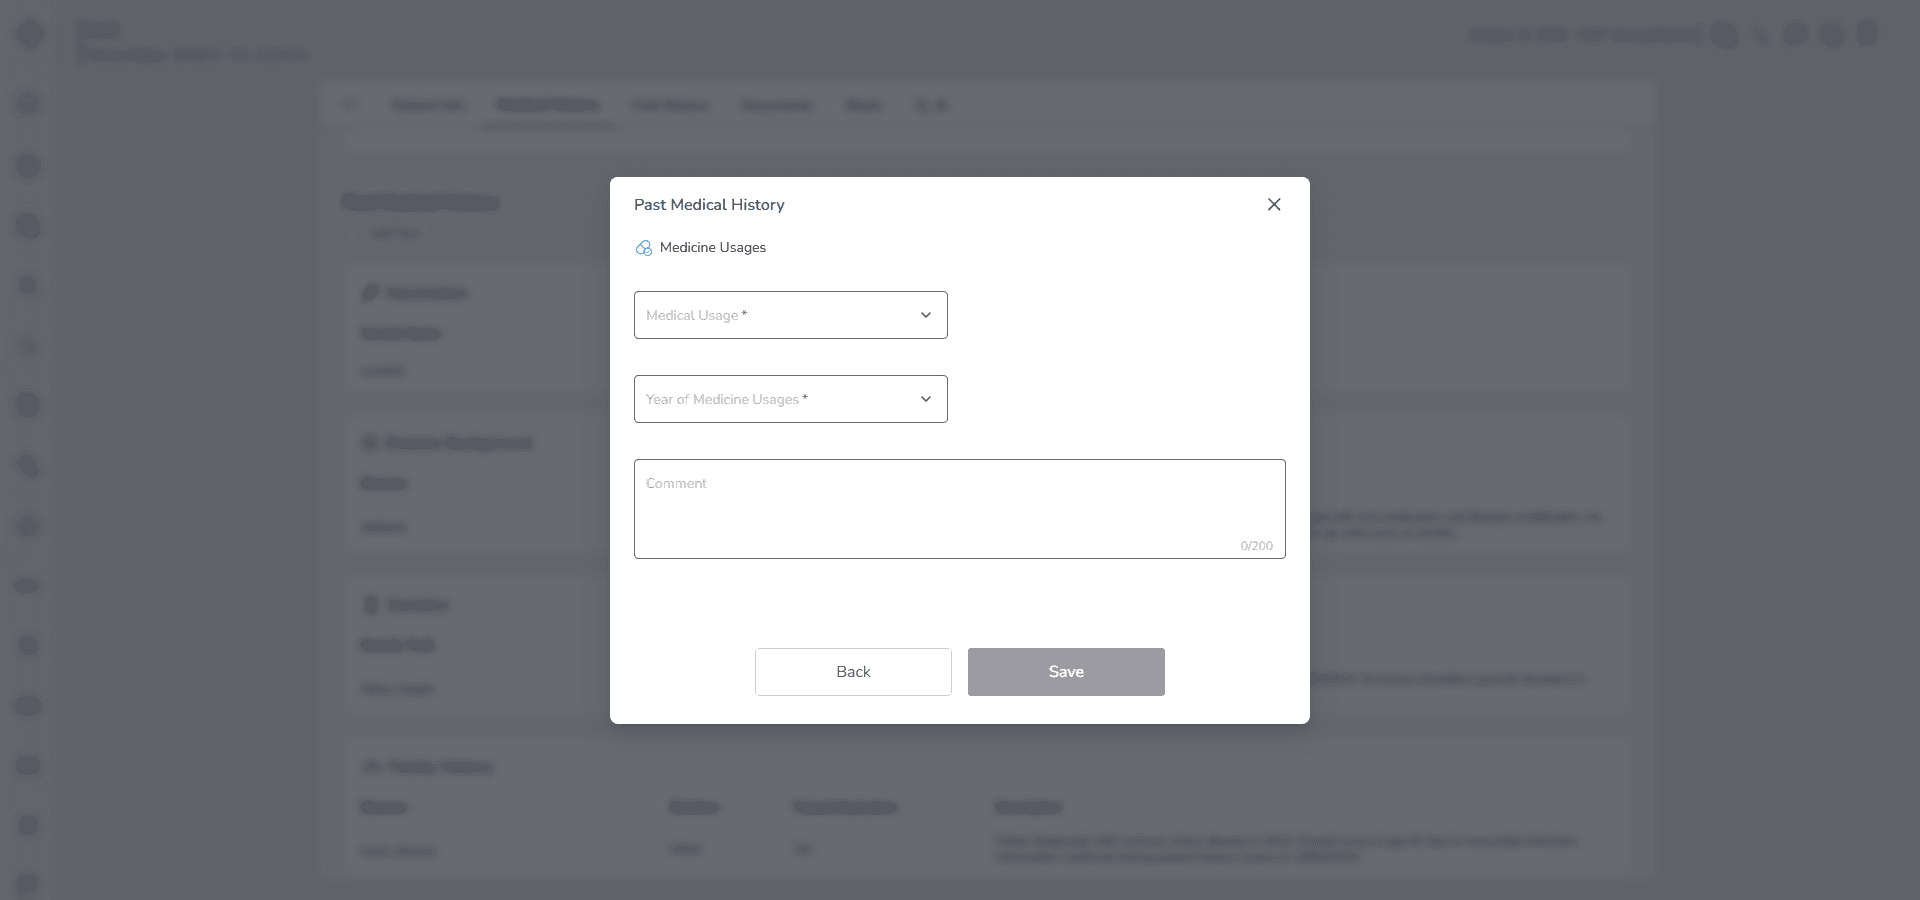
Fill in the Form
Start with Medical Usage.
Select the medication category from the dropdown list:
Blood Pressure Medication
Diabetes Medication
Blood Thinners
Antidepressants
Thyroid Medication
Cholesterol Medication
Asthma Medication
Pain Medication
Antibiotics
If the medication is not listed, select Other.
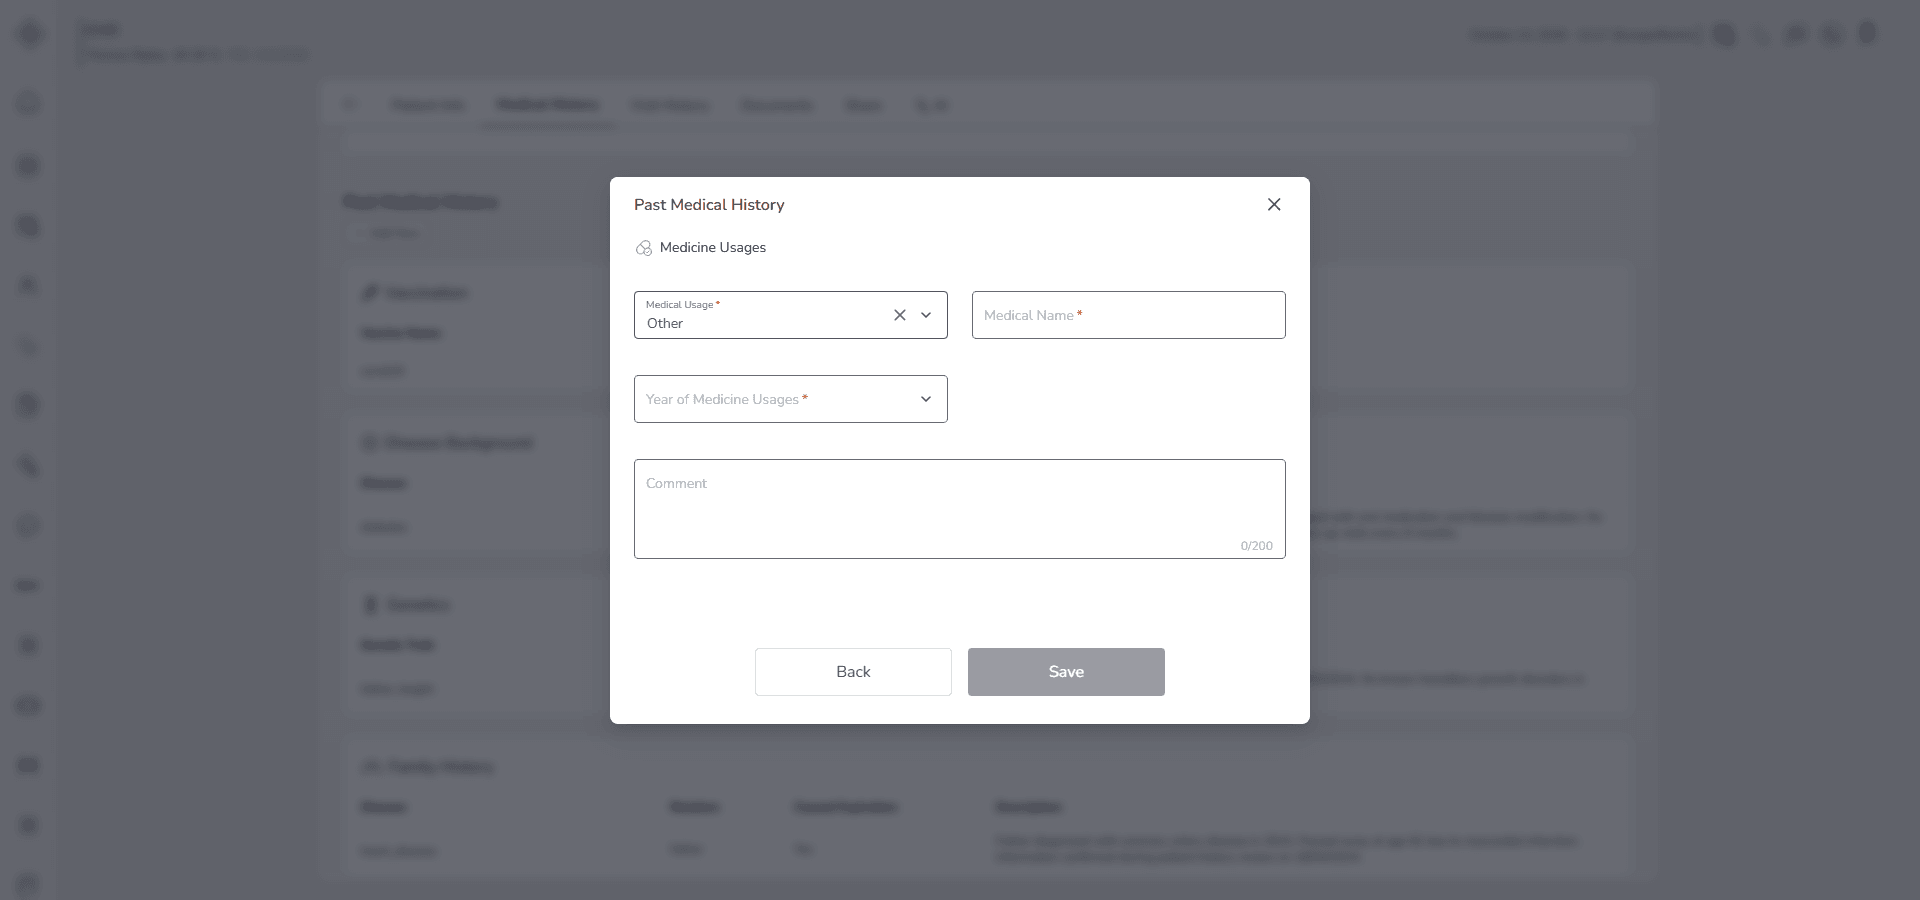
When you choose Other, a Medical Name field becomes active. You must manually enter the exact name of the medication. Use the proper medical name whenever possible.
Next, enter the Year of Medicine Usages.
This field is required.
Enter the year when the medication was started or primarily used.
If the medication was used in multiple periods, enter the most clinically relevant year and explain details in the description.
Then complete the Description field if needed.
Use this section to clarify important information such as:
• dosage
• duration of use
• current or discontinued status
• reason for prescription
• response to treatment
• side effects
The description is optional but strongly recommended for long term or high risk medications.
Save the Record
• Click Save to store the medicine usage record
• Click Cancel to exit without saving
The record cannot be saved if:
• Medical Usage is not selected
• Year of Medicine Usages is empty
Behavior and Expected Outcome
• Selecting Other activates the Medical Name field
• Each saved entry is grouped under Past Medical History → Medicine Usages
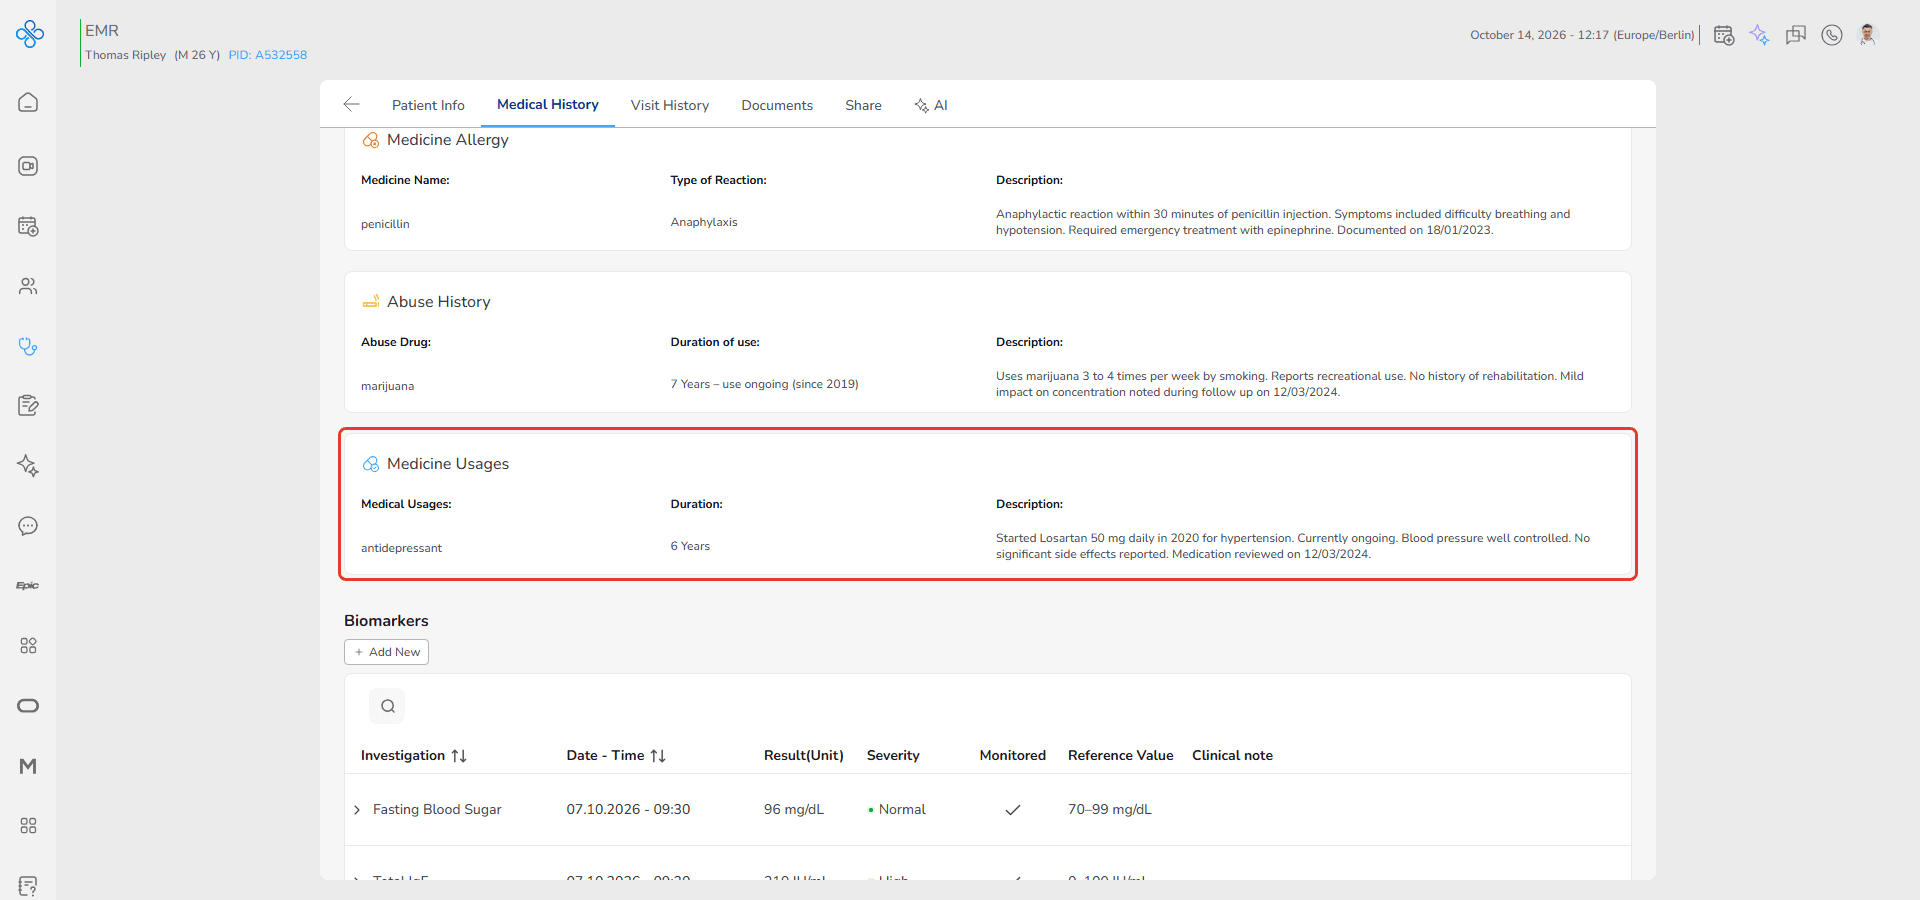
• All medication records are displayed together for structured review
This allows you to quickly review therapeutic history and ongoing treatments during clinical assessment.
Managing a Saved Medicine Usage Record
After saving a medicine usage entry, you can manage it directly from the Medicine Usages list.
Each saved record includes a More Actions menu shown as ⋮ located between the values of the Medical Usage and Year of Medicine Usages columns.
Follow these steps:
1. Open More Actions
• Locate the medicine usage record in the list
• Click the ⋮ icon
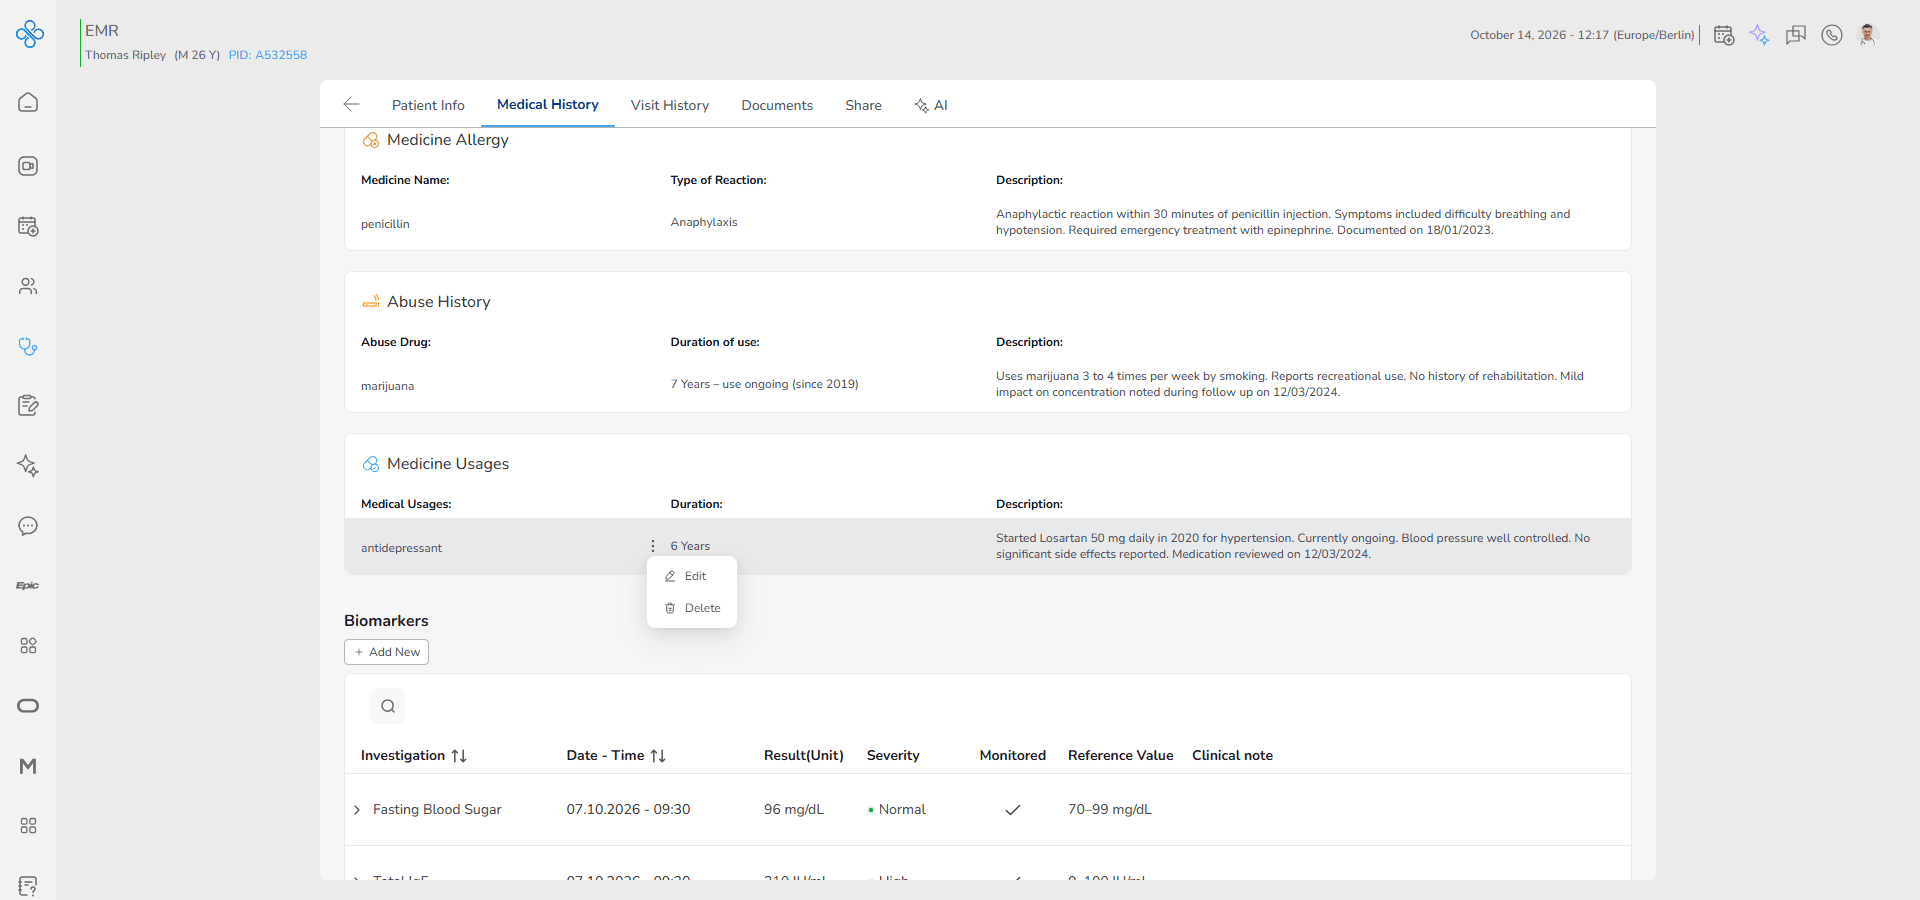
• A dropdown menu will appear with available options
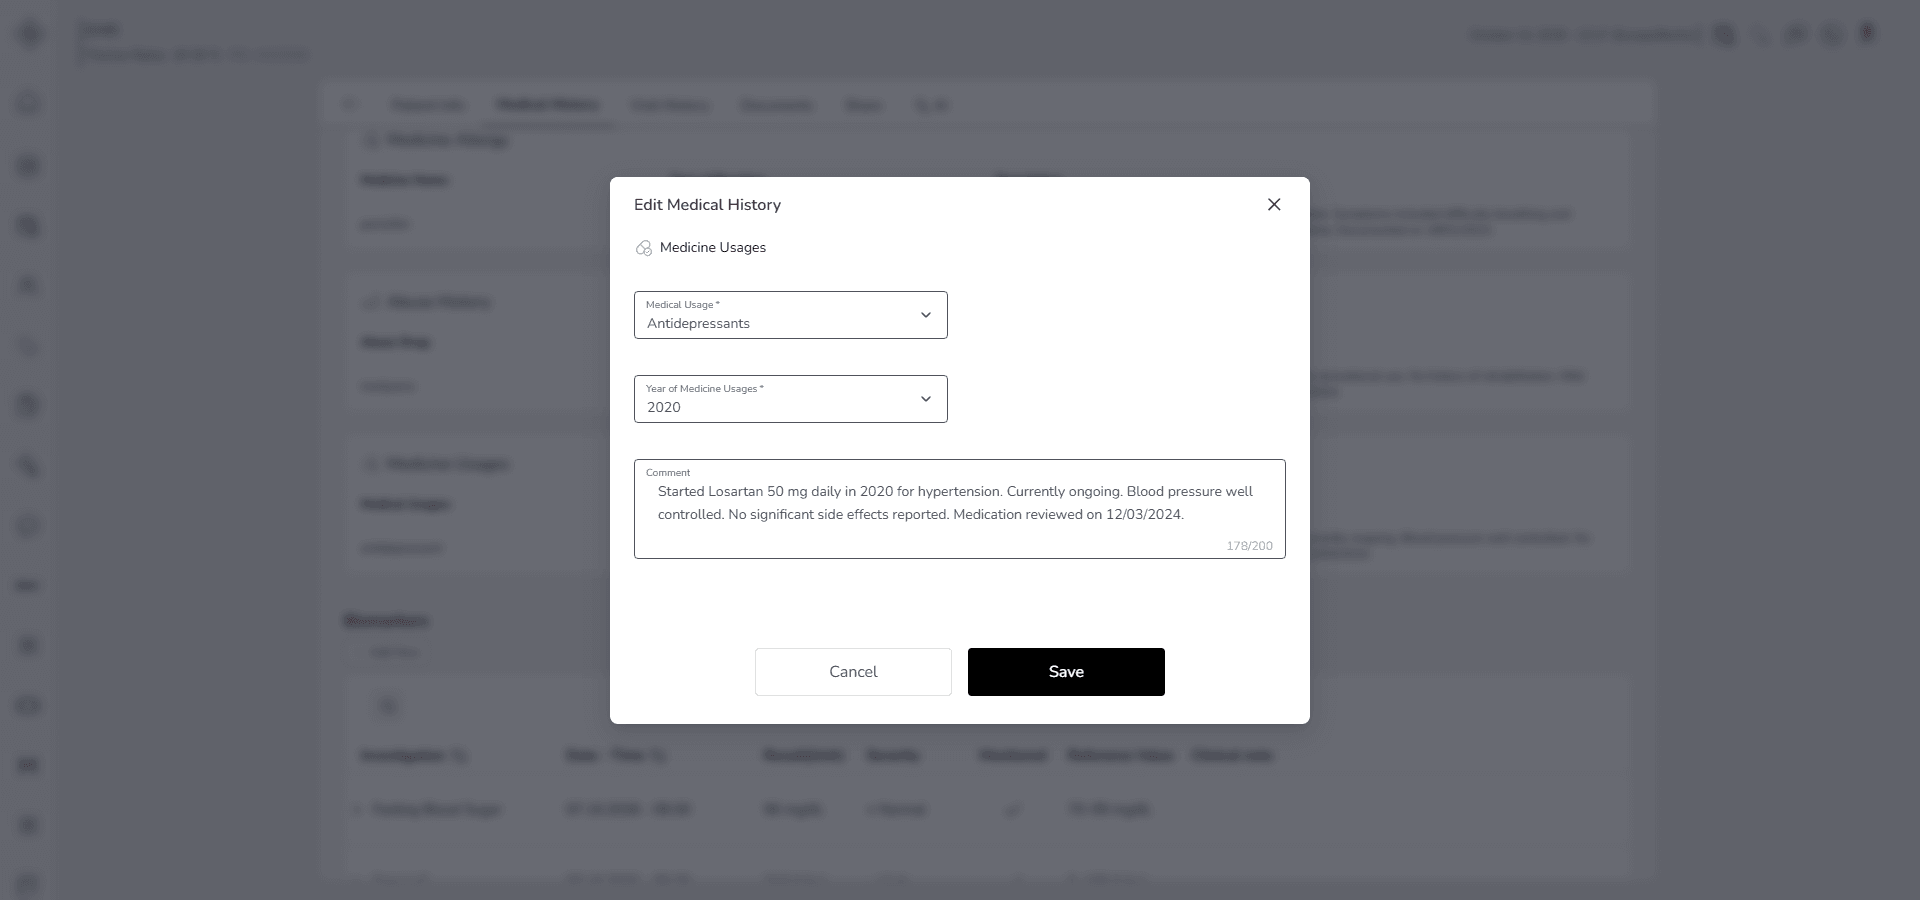
2. Edit a Record
Use this option when you need to correct or update an existing entry.
• Click Edit from the More Actions menu
• The same Medicine Usages modal will open
• All previously entered data will be prefilled in the form
You can now:
• change the medication category
• update the custom medical name if Other was used
• modify the year of usage
• edit the description
After making changes:
• Click Save to apply updates
• Click Cancel to discard changes
Once saved, the updated values appear immediately in the list.
3. Delete a Record
Use this option when a medication entry was added by mistake or is no longer clinically relevant.
• Click Delete from the More Actions menu
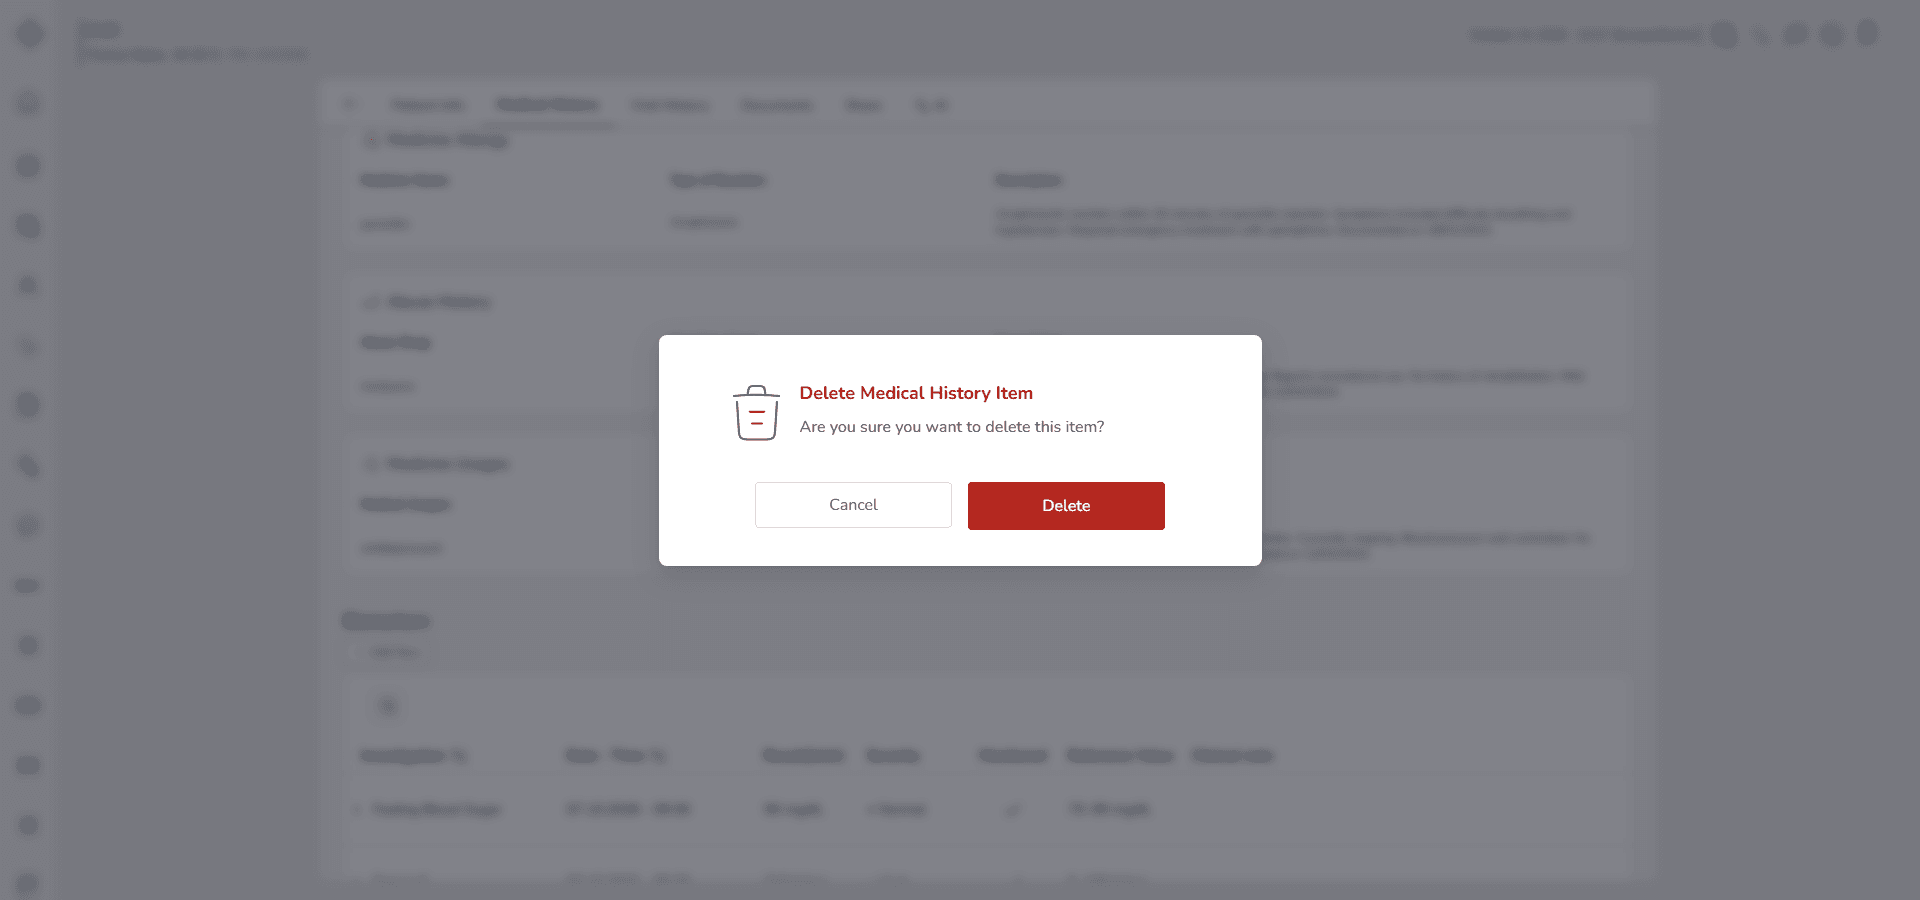
• A confirmation prompt will appear
• Confirm the deletion
After confirmation:
• The record is permanently removed from the Medicine Usages list
• The data will no longer appear in the Past Medical History section
Deletion cannot be undone.
Make sure the medication information is not clinically required before confirming removal.
Fields (Field Descriptions)
Vaccination
| Field | Description | Notes / Example |
|---|---|---|
| Vaccine Name* | Name of the vaccine administered | Required. Select from dropdown or enter manually if “Other” is selected |
| Date of Vaccination* | Date the vaccine was given | Required. Example: 15/08/2025 |
| Description | Additional notes about the vaccination | Optional. Example: “Second dose, no side effects” |
Disease Background
| Field | Description | Notes / Example |
|---|---|---|
| Disease Background* | Name of the disease | Required. Select from dropdown or enter manually if “Other” is selected |
| Disease Name* | Specific disease name (if “Other” is selected) | Example: “Rare Genetic Disorder” |
| Year of Diagnosis* | Year the disease was diagnosed | Required. Example: 2018 |
| Cured? | Indicates if the disease has been cured | Optional toggle; if active, enables Year of Cured* |
| Year of Cured* | Year the disease was cured | Required if Cured? is active. Example: 2022 |
| Description | Additional notes | Optional. Example: “Patient underwent successful surgery” |
Genetics
| Field | Description | Notes / Example |
|---|---|---|
| Genetic Trait* | Name of the genetic trait | Required. Select from the dropdown |
| Value* | The measured or recorded value for the trait | Example: 180 cm, 70 kg, American |
| Description | Additional notes | Optional. Example: “Father is of European descent” |
Family History
| Field | Description | Notes / Example |
|---|---|---|
| Disease* | Name of the family disease | Required. Select from dropdown or enter manually if “Other” |
| Disease Name* | Specific disease name (if “Other” is selected) | Example: “Rare Genetic Disorder” |
| Relation* | Relation of the affected family member | Required. Example: Mother, Father |
| Caused Expiration? | Indicates if the disease caused death | Optional toggle; if active, enables Age of Expiration (Year)* |
| Age of Expiration (Year)* | Age/year of death | Required if Caused Expiration? is active. Example: 68 |
| Description | Additional notes | Optional. Example: “Patient’s father passed due to heart disease” |
Surgical History
| Field | Description | Notes / Example |
|---|---|---|
| Surgical Name* | Name of the surgical procedure | Required. Select from dropdown or enter manually if “Other” |
| Surgical Name* (Other) | Specific surgical name if “Other” is selected | Example: “Lung Transplant” |
| Year of Surgery* | Year when the surgery was performed | Required. Example: 2018 |
| Description | Additional notes | Optional. Example: “Laparoscopic surgery, smooth recovery” |
Food Allergy
| Field | Description | Notes / Example |
|---|---|---|
| Food Name* | Name of the food allergen | Required. Select from dropdown or enter manually if “Other” |
| Food Name (Other)* | Specific allergen if “Other” is selected | Example: “Sesame Oil” |
| Type of Reaction* | Severity of allergic reaction | Required. Example: “Anaphylaxis” |
| Description | Additional notes | Optional. Example: “Patient reacts after consuming dairy products” |
Habituals
| Field | Description | Notes / Example |
|---|---|---|
| Habituals* | Type of lifestyle habit | Required. Select from dropdown |
| Habit Name* | Custom habit name (if "Other" is selected) | Example: "Video Gaming Addiction" |
| Start Year* | Year the habit started | Required. Example: 2015 |
| End Year* | Year the habit ended | Required if "Currently Use?" is not selected |
| Currently Use? | Indicates if the habit is ongoing | Disables End Year if active |
| Description | Additional notes | Optional. Example: "Patient smokes 1 pack per day" |
Lifestyle
| Field | Description | Notes / Example |
|---|---|---|
| Lifestyle* | Type of lifestyle habit | Required. Select from dropdown |
| Lifestyle Name* | Custom name if "Other" is selected | Example: "Video Gaming Addiction" |
| Value* | Intensity or frequency of the habit | Required. Options: Low, Medium, High |
| Description | Additional notes | Optional. Example: "Patient drinks socially once a week" |
Medicine Allergy
| Field | Description | Notes / Example |
|---|---|---|
| Medicine Name* | Name of the medicine | Required. Select from dropdown or enter Manually if “Other” |
| Medicine Name (Other)* | Specific medicine name if “Other” is selected | Example: “Ceftriaxone” |
| Type of Reaction* | Severity/type of reaction | Required. Example: “Anaphylaxis” |
| Description | Additional notes | Optional. Example: “Patient develops rash after taking penicillin” |
Abuse History
| Field | Description | Notes / Example |
|---|---|---|
| Abuse Drug* | Type of substance | Required. Select from dropdown |
| Abuse Drug Name* | Custom substance name (if "Other" is selected) | Example: “Kratom” |
| Start Year* | Year usage began | Required. Example: 2015 |
| End Year* | Year usage ended | Required if "Currently Use?" is not active |
| Currently Use? | Indicates if substance is still being used | Disables End Year if active |
| Description | Additional notes | Optional. Example: "Patient smokes occasionally" |
Medicine Usages
| Field | Description | Notes / Example |
|---|---|---|
| Medical Usage* | Type of medication | Required. Select from dropdown |
| Medical Name* | Custom medicine name (if "Other" is selected) | Example: “Levothyroxine” |
| Year of Medicine Usages* | Year the medicine was used | Required. Example: 2022 |
| Description | Additional notes | Optional. Example: “Patient took blood pressure medication daily” |
Behavior & Expected Outcome
Each record is saved under its corresponding category
• Conditional fields activate dynamically based on dropdown or toggle selection
• Required fields must be completed before saving
• Records appear immediately in the related category list
• Each record includes a More Actions menu shown as ⋮
• Users can Edit or Delete records
• Editing opens the same modal with prefilled data
• Deleting permanently removes the record
• Edit requires Edit permission
• Viewing requires View permission
Common Errors + Fixes
| Issue | Cause | Fix |
|---|---|---|
| Cannot save record | One or more required fields are empty | Complete all mandatory fields marked with * |
| Conditional field missing | A toggle or Other selection activated an additional required field but it was not completed | A toggle or Other selection activated an additional required field but it was not completed |
| Invalid year | Year field contains invalid or incomplete value | Year field contains invalid or incomplete value |
| Enter a valid four digit year | Numeric field contains text or unsupported characters | Numeric field contains text or unsupported characters |
| Invalid value format | Entered value does not match expected field type | Entered value does not match expected field type |
| End Year required | Currently Use toggle is inactive and End Year was not entered | Currently Use toggle is inactive and End Year was not entered |
| Access denied | User does not have required permission | Ensure View or Edit permission is granted |