Documents
Overview
The Documents tab allows you to centrally manage all medical documents related to a patient.
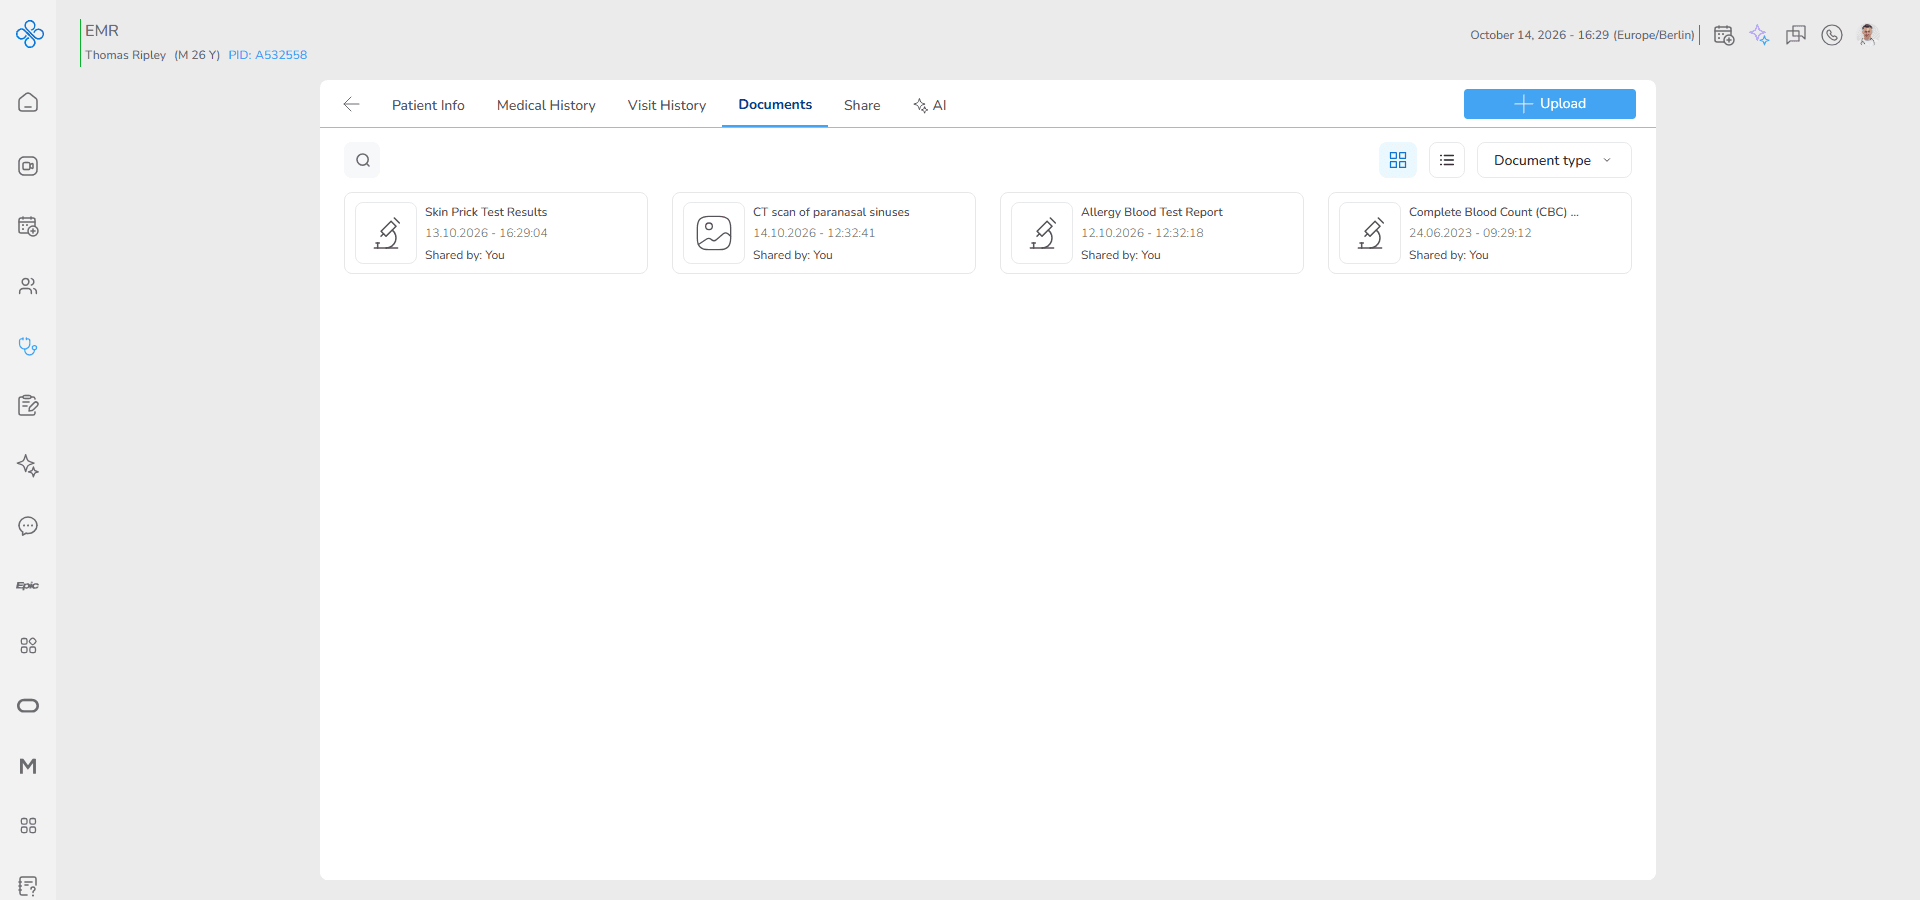
Unlike the Documents section inside a visit, which is limited to a single visit, this tab provides a complete view of all documents across all visits. This includes files uploaded directly at the patient level as well as documents attached to different visits.
This structure allows you to access all patient documents in one place without needing to open each visit individually.
Using this tab, you can review the patient’s complete medical history, compare documents from different visits, quickly locate specific files, and manage all uploaded documents in a single unified view.
Access
Follow these steps to open the Documents tab for a patient.
Steps
1. Go to EMR from the sidebar or Dashboard shortcut
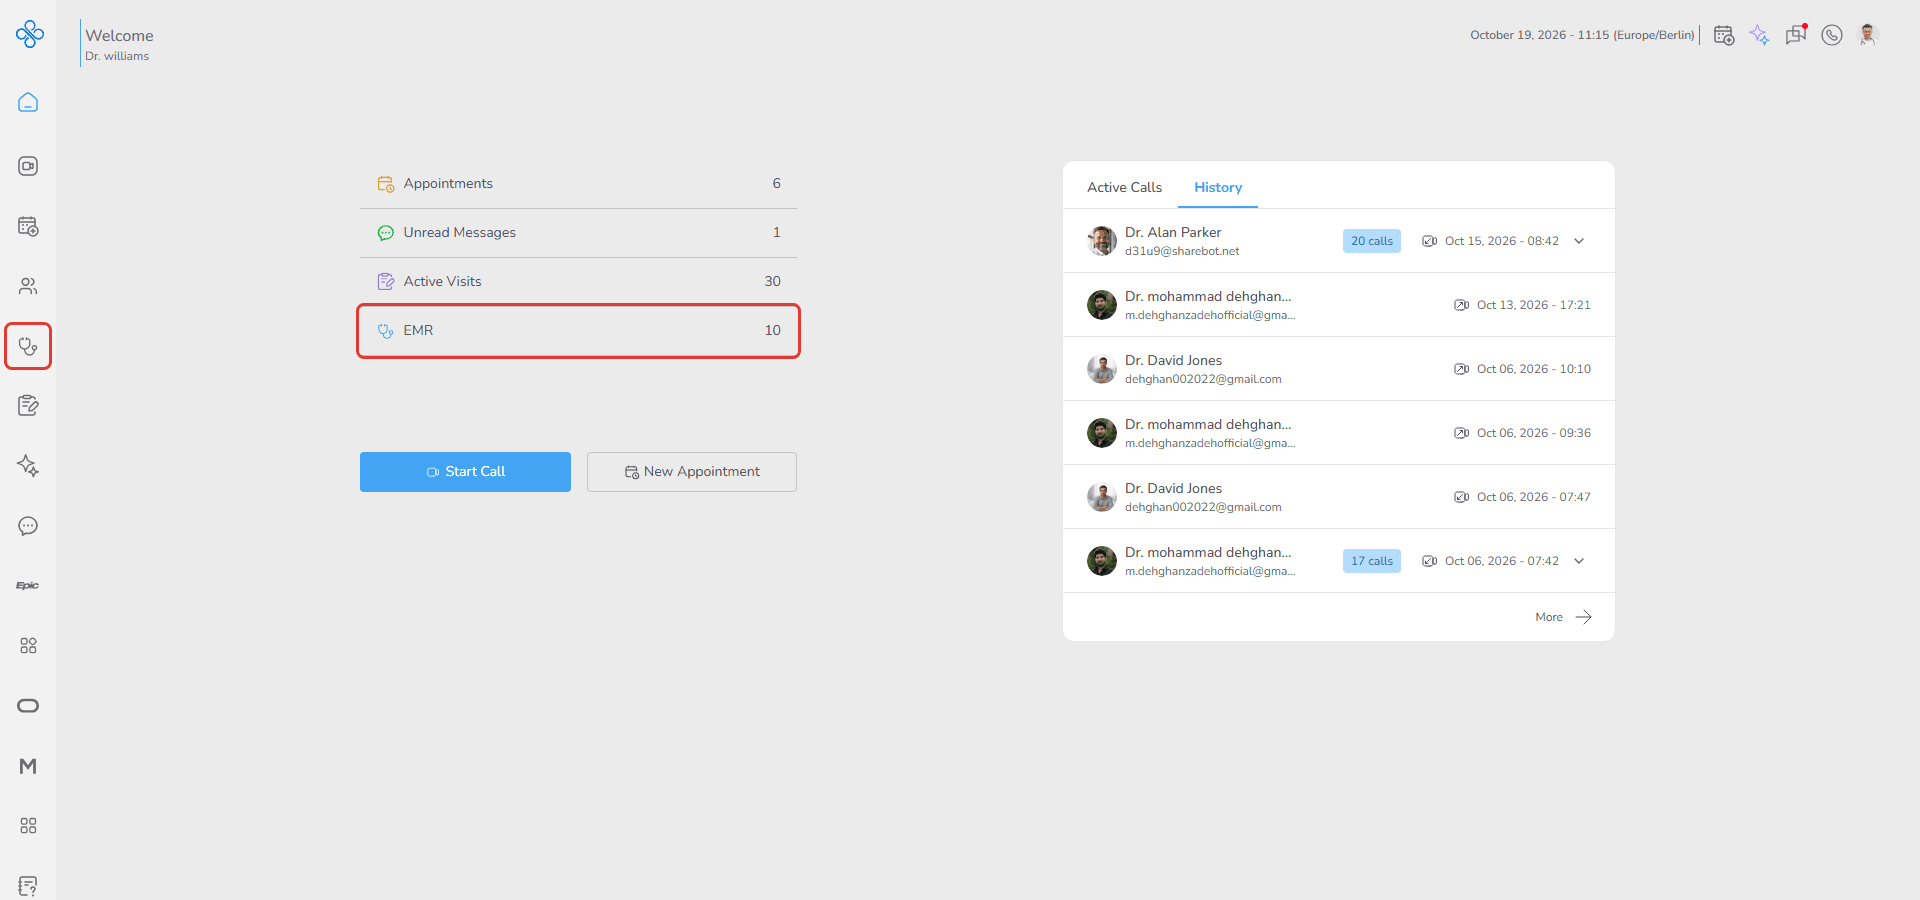
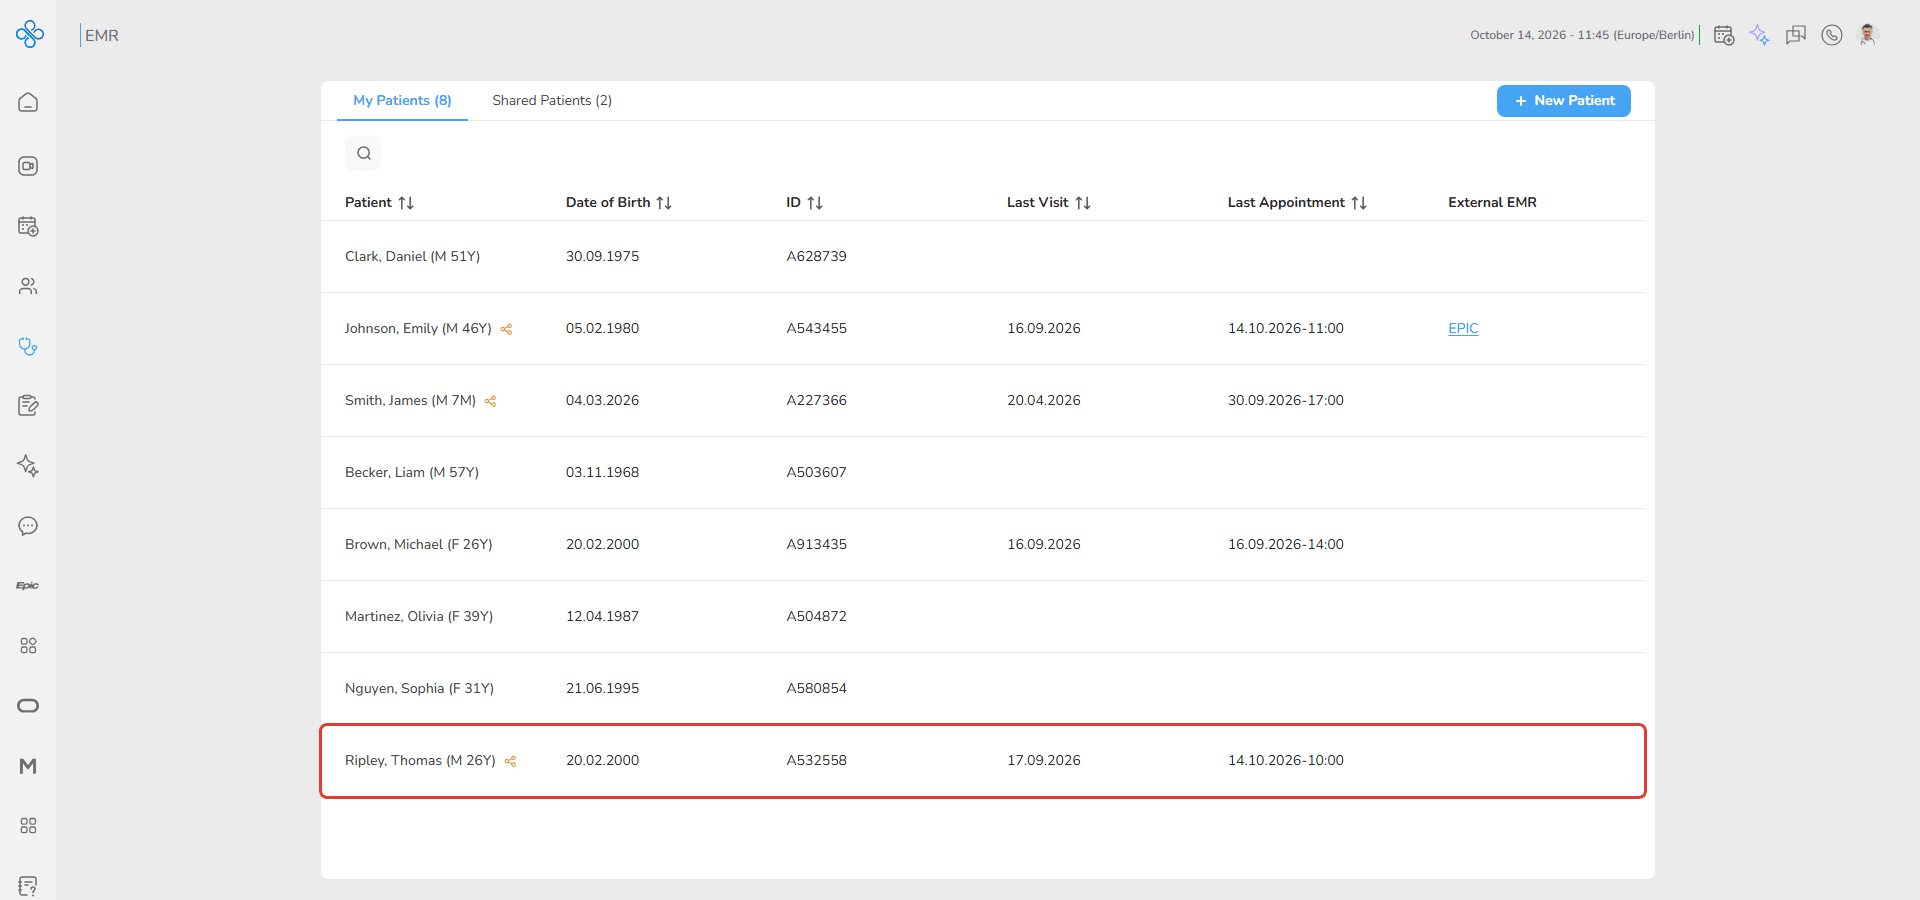
2. Select a patient from the list and open the patient file
3. Navigate to the Documents tab
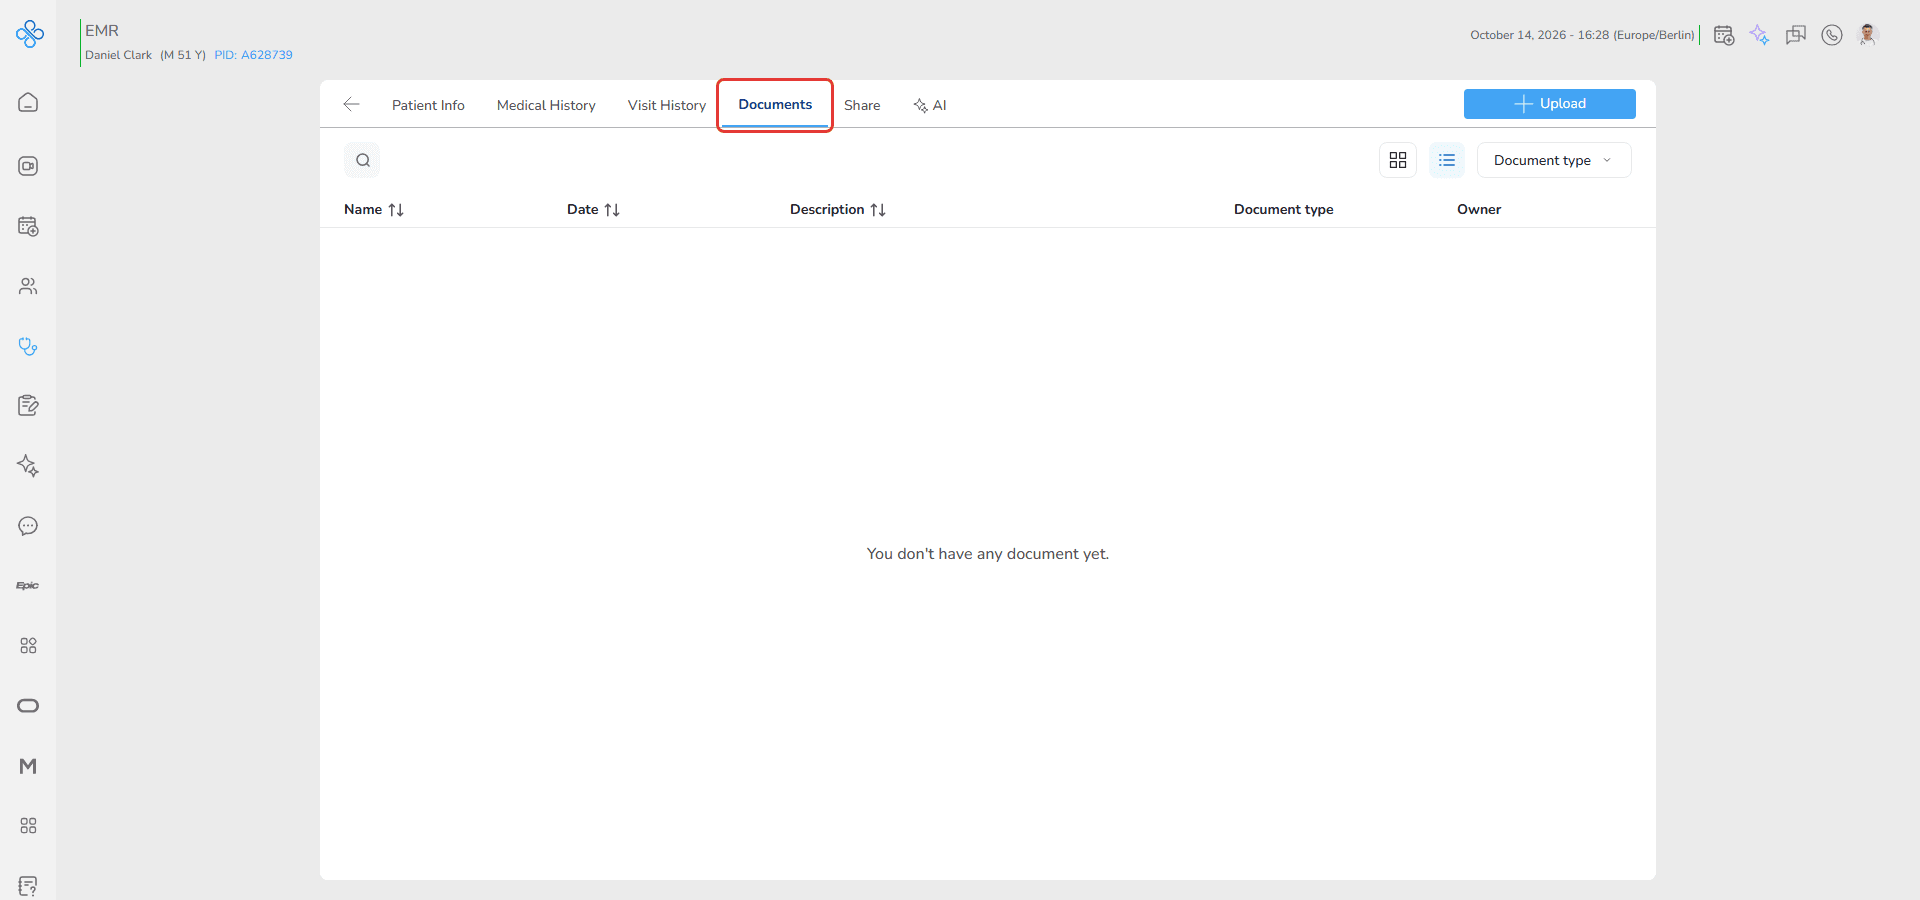
The tab loads all uploaded documents related to the patient automatically.
What You Can Do in This Section
In the Documents tab you can
- upload medical documents at the patient level
- view documents using built in viewers
- search and filter documents
- edit document information
- download files when needed
- process documents using AI to extract structured medical data
- open documents from different visits in one place
- annotate documents and medical images
- add comments or highlight areas of interest on images
Annotations allow you to draw shapes mark specific points highlight regions and add notes directly on medical images. This can help providers explain findings or mark important observations.
Relationship with Visit Documents
Documents uploaded inside a visit are also accessible in this tab.
This means
- you can view all documents without opening each visit
- documents remain linked to their original visit
- you can manage files from a central location
Next Steps in This Section
The following sections explain how to work with patient level documents in detail.
Uploading Documents
Learn how to upload and classify documents.
Viewing Documents
Learn how to open and review files using the document viewers.
Editing Documents
Learn how to update document information.
How to upload a document
Follow these steps to upload a document in the Documents tab.
Step 1: Locate the Documents Tab
Go to EMR
Select a patient from the list and open the patient file
Navigate to the Documents tab
Upload a Document
In the top right corner of the Documents tab, click + Upload
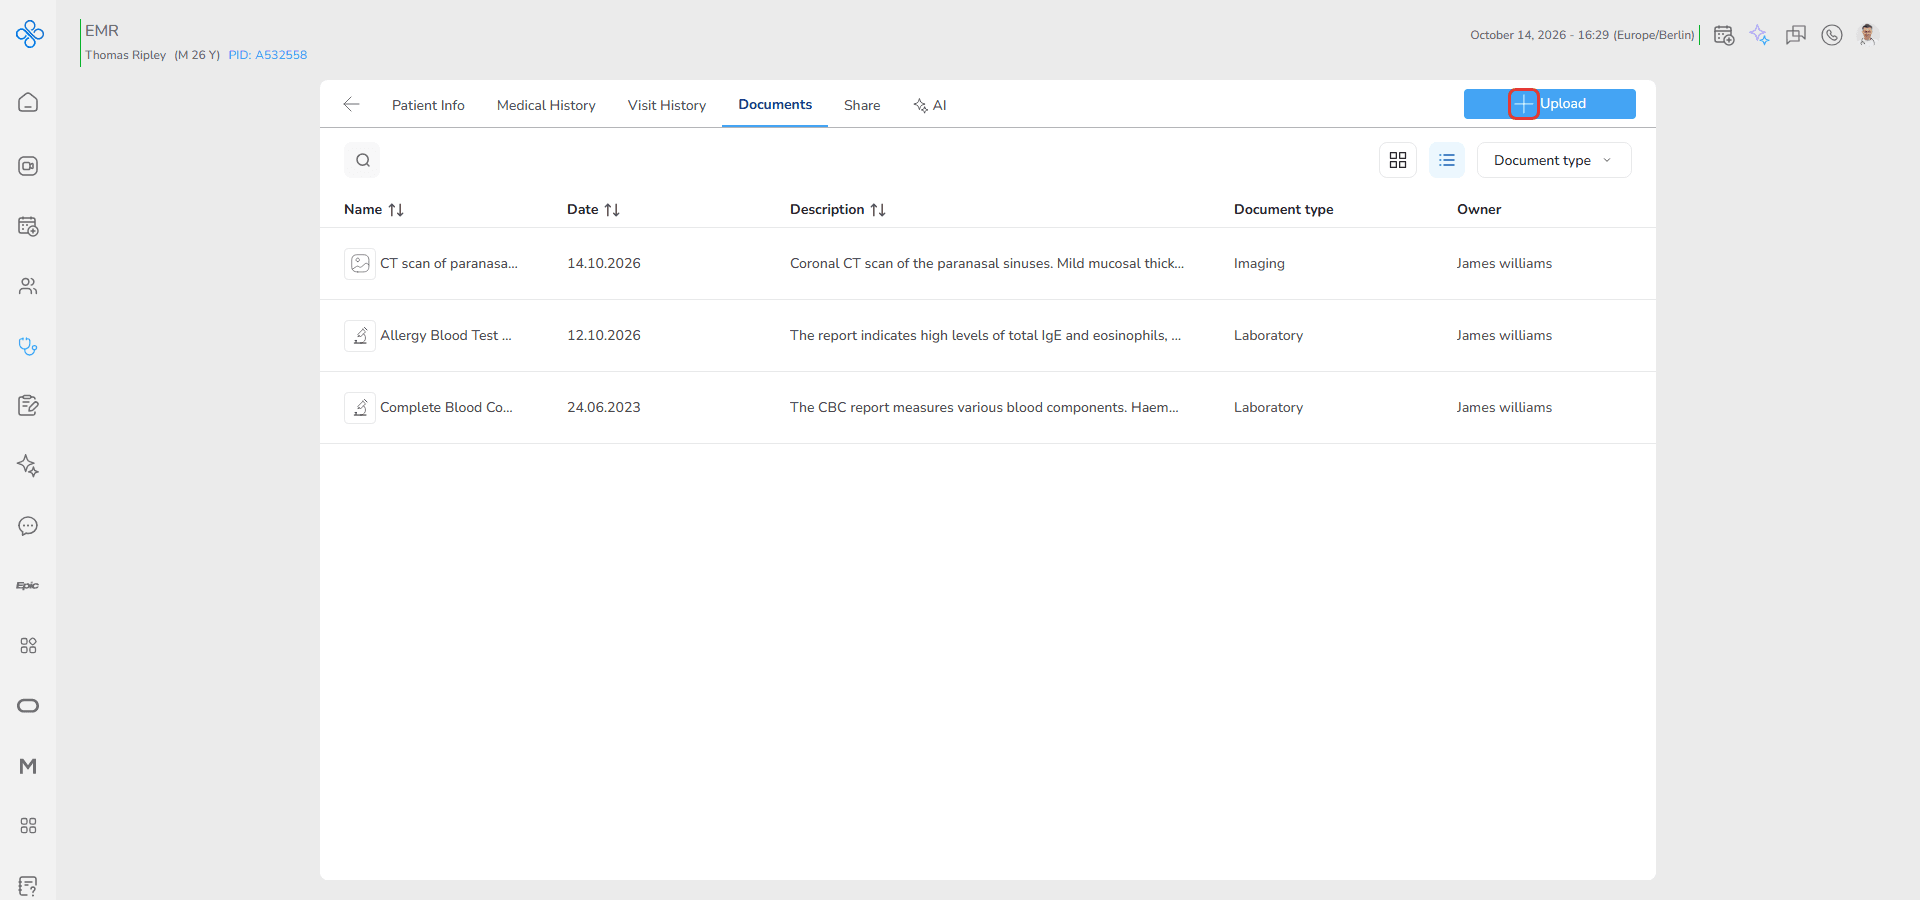
This opens the upload modal where you can add a new document and enter its details.
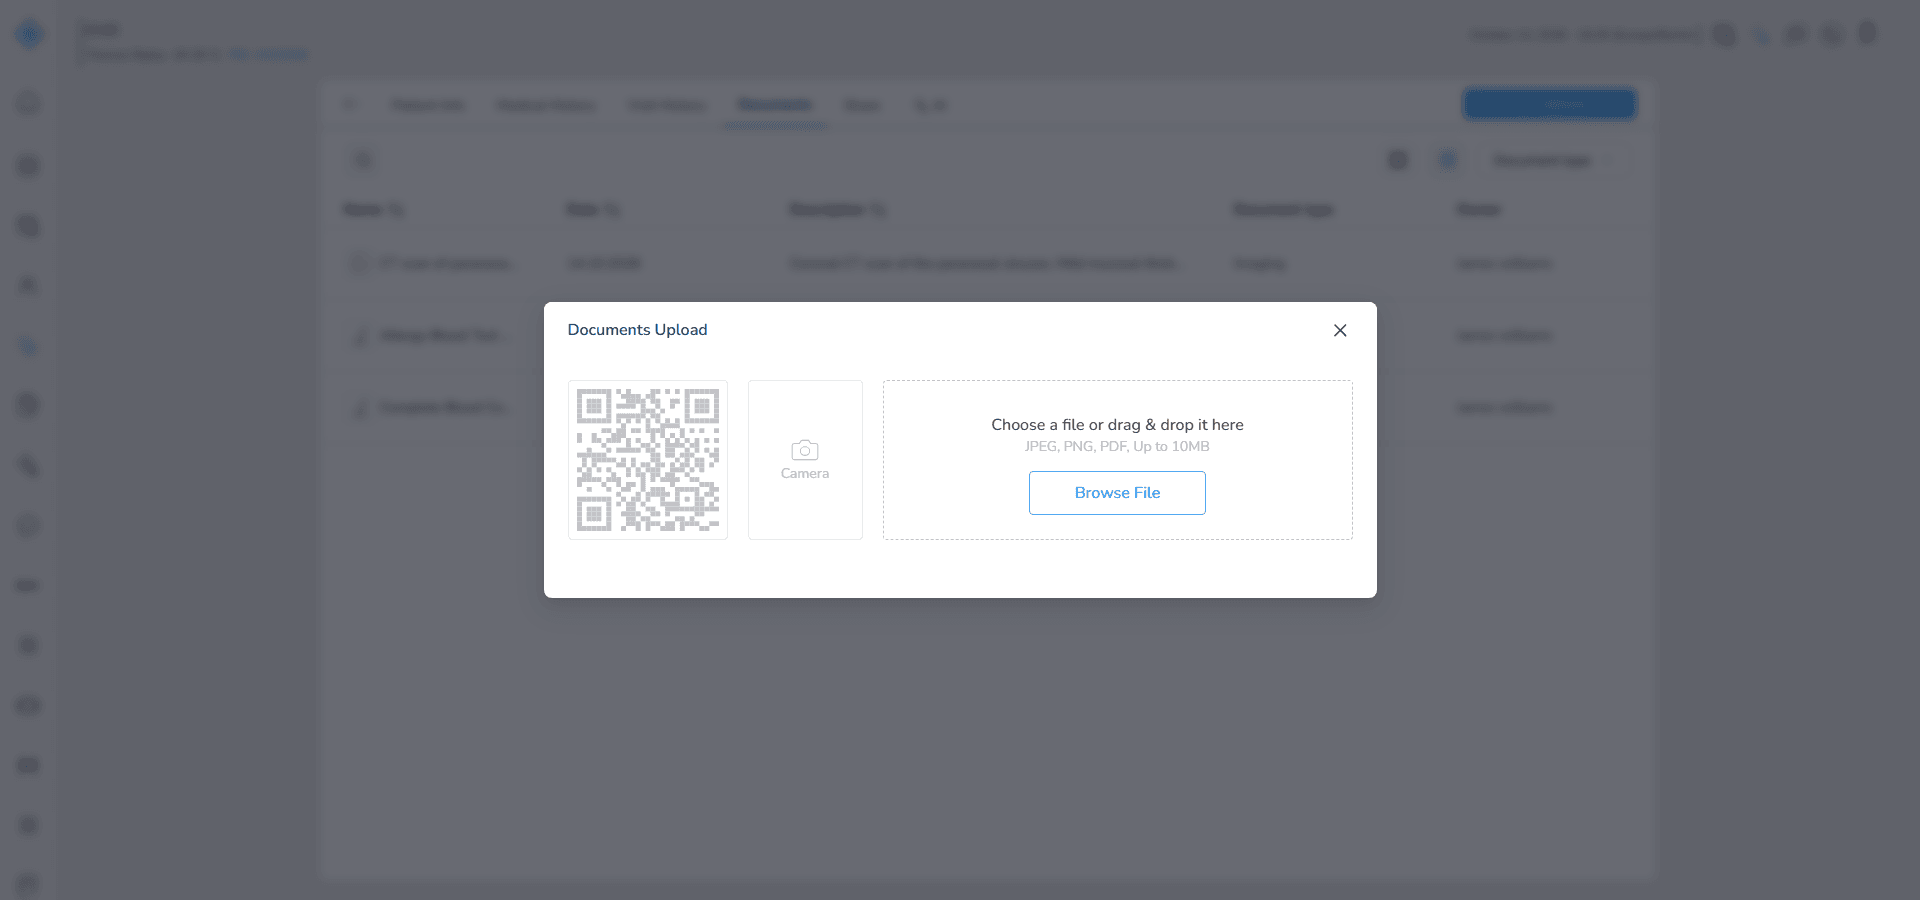
Step 2: Select and Upload the File
Click Browse File.
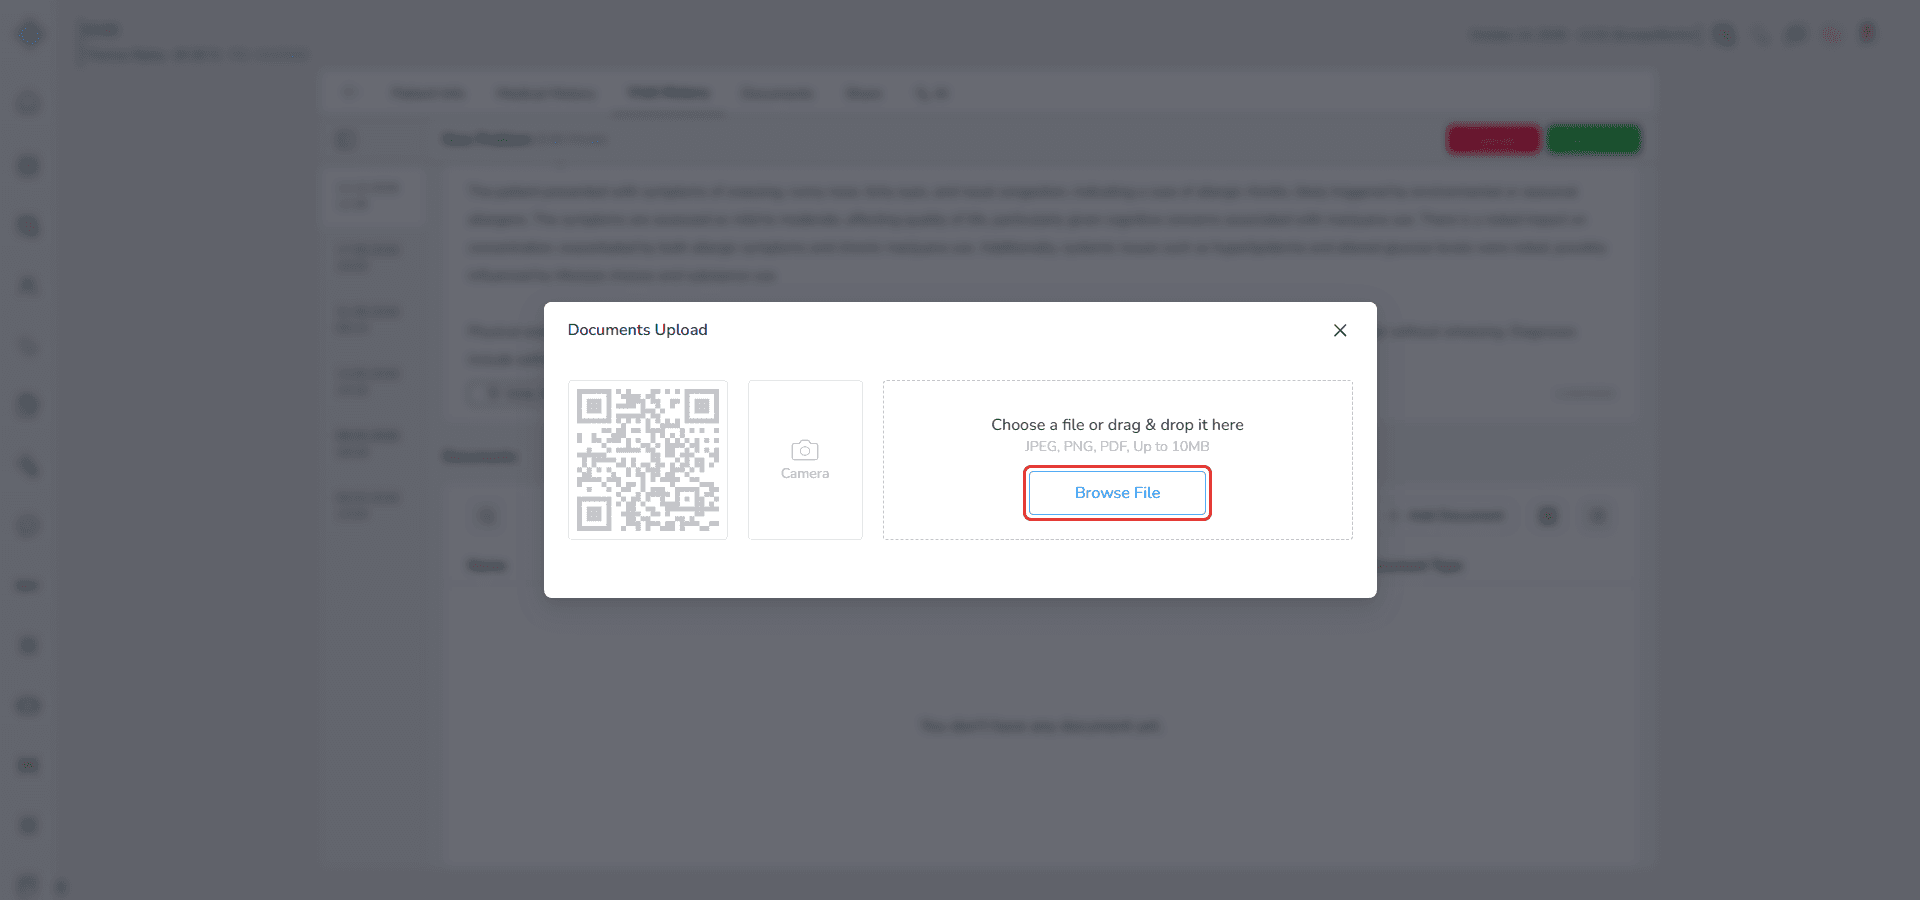
Your system file explorer opens.
Find the file on your computer and select it.
After you choose the file, the upload starts automatically.
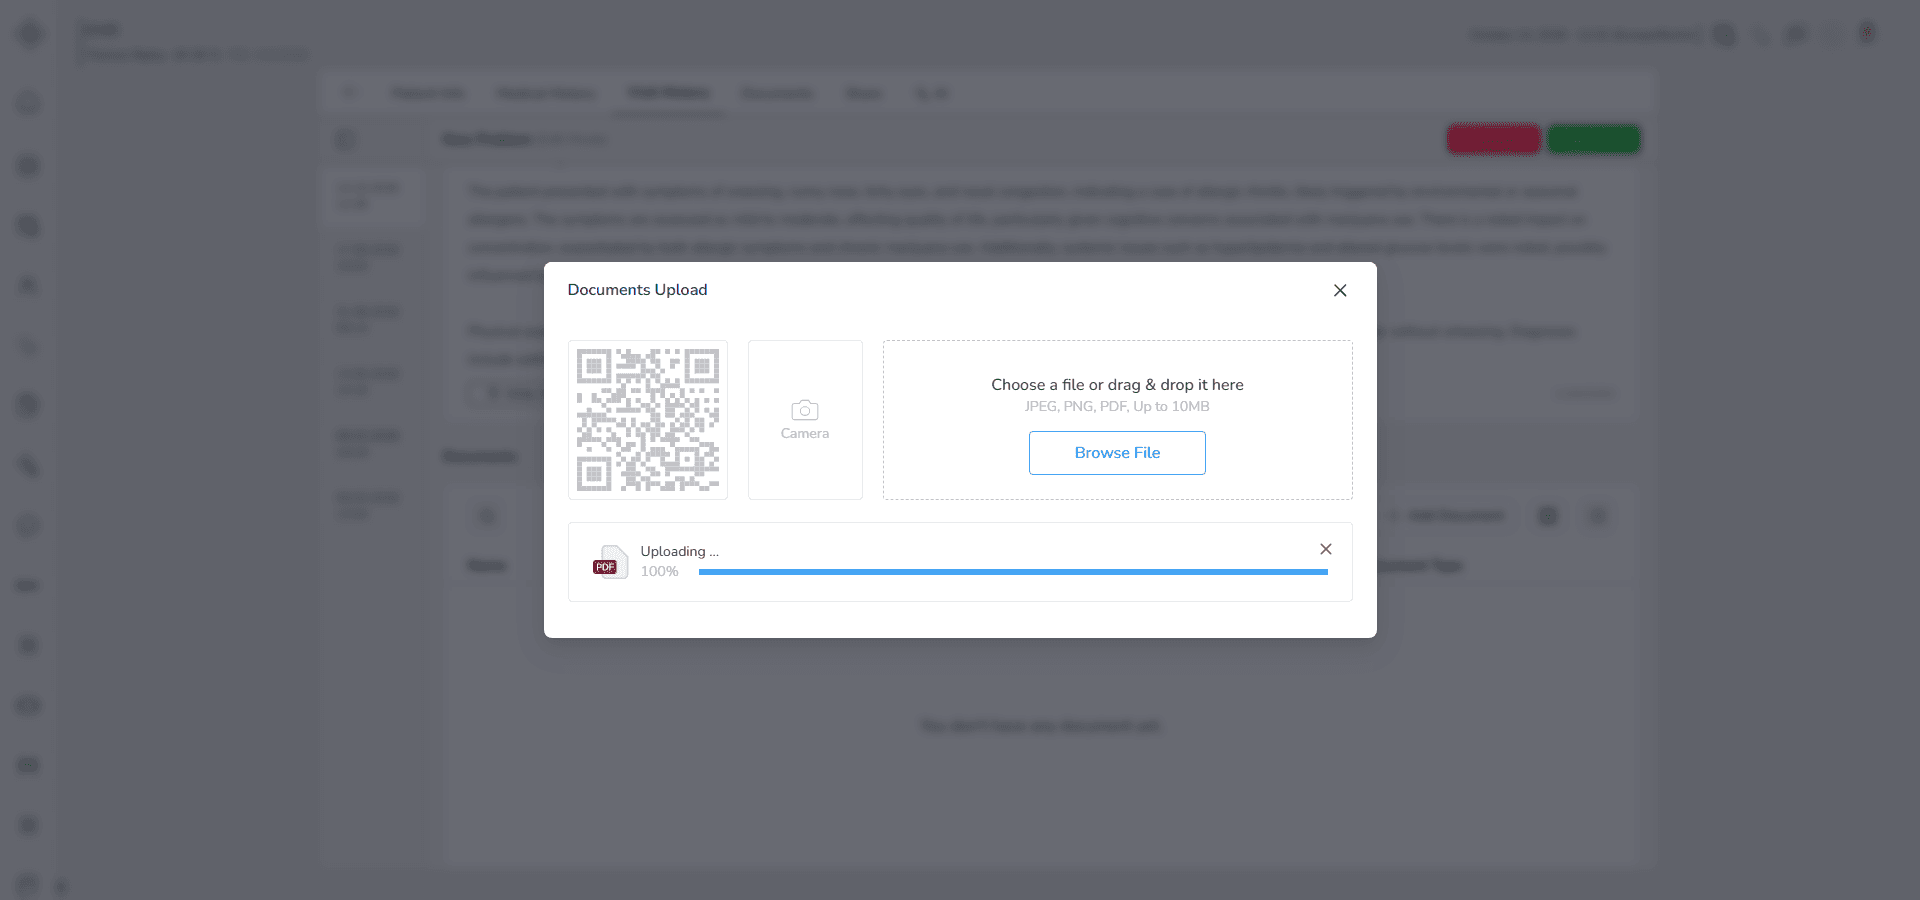
You can upload common document formats such as
- JPEG
- PNG
Make sure the file size is not too large.
The system accepts files up to 10 MB. If the file is larger than this limit, you will need to reduce the file size or choose a smaller version before uploading.
Step 3: Select the Document Type
Choose the main category that best describes the document you are uploading.
Available options include
• Imaging
• Laboratory
• Clinical Notes
• Prescriptions
• Other Documents
After selecting the file, it will appear in the upload area.
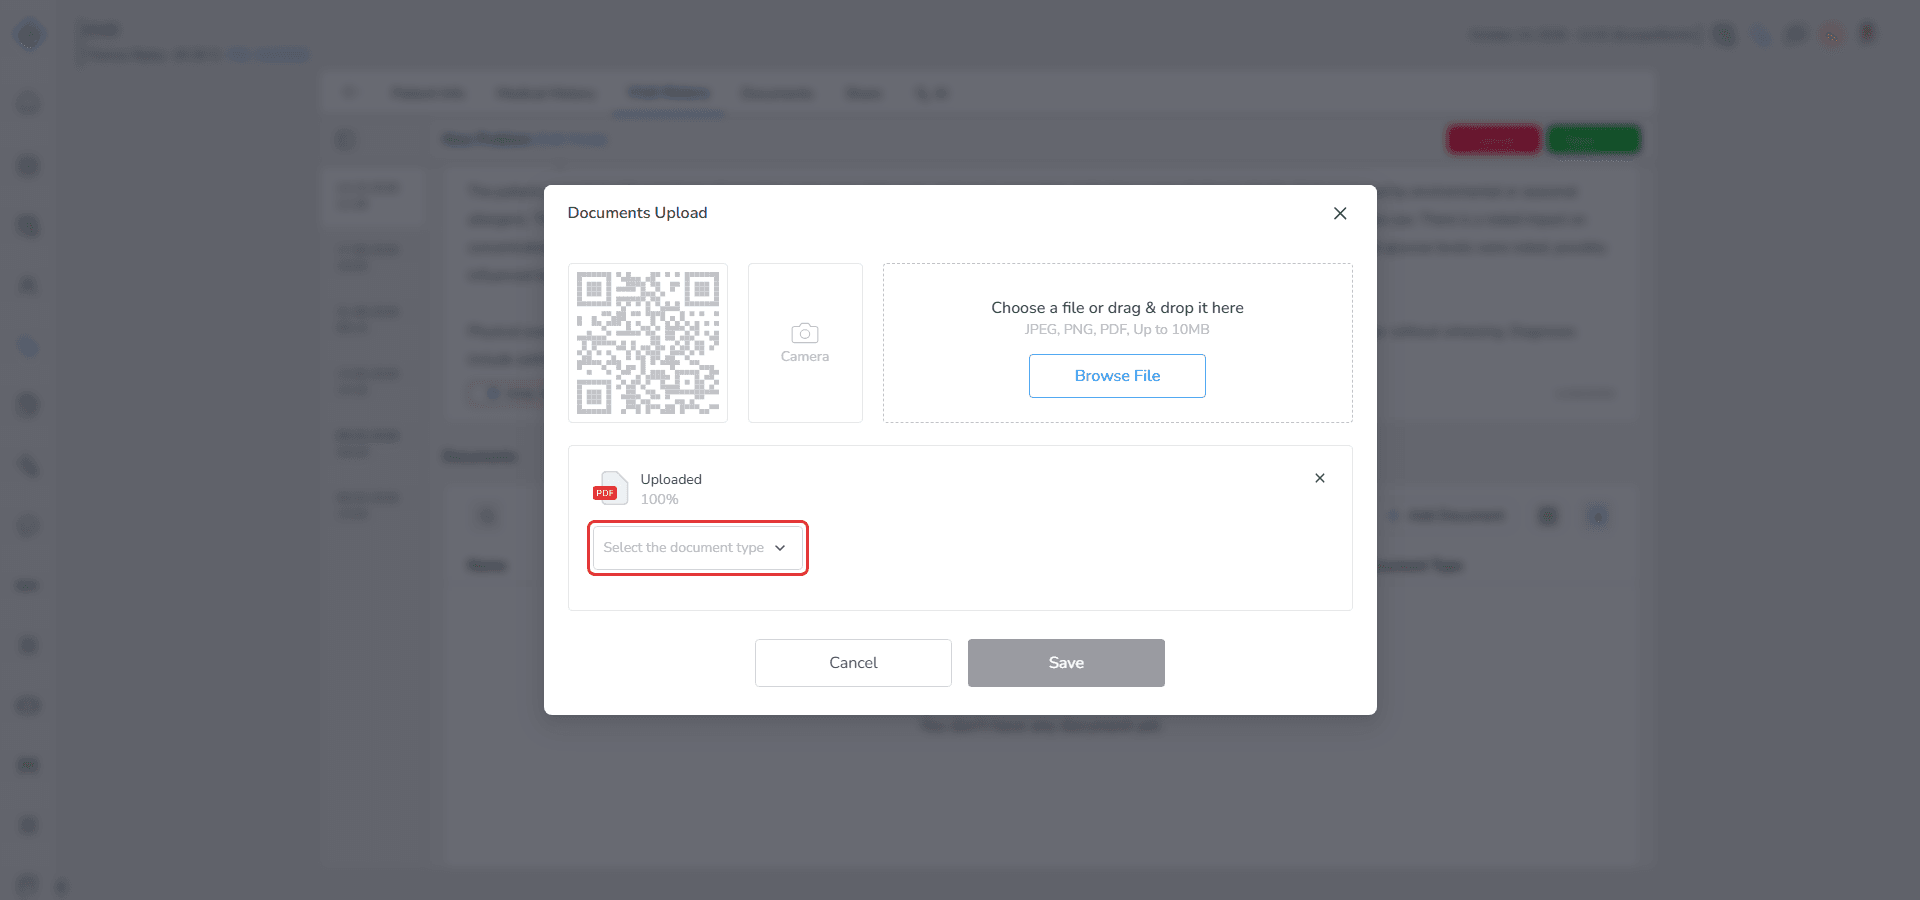
If you uploaded the wrong file or decide not to attach it, you can cancel the upload.
Move your cursor to the top right corner of the uploaded file and click the Cancel button.
This removes the file from the upload area and prevents it from being added to the Document section.
Step 4: Choose Annotation Type
Next decide how you want to fill in the document information.
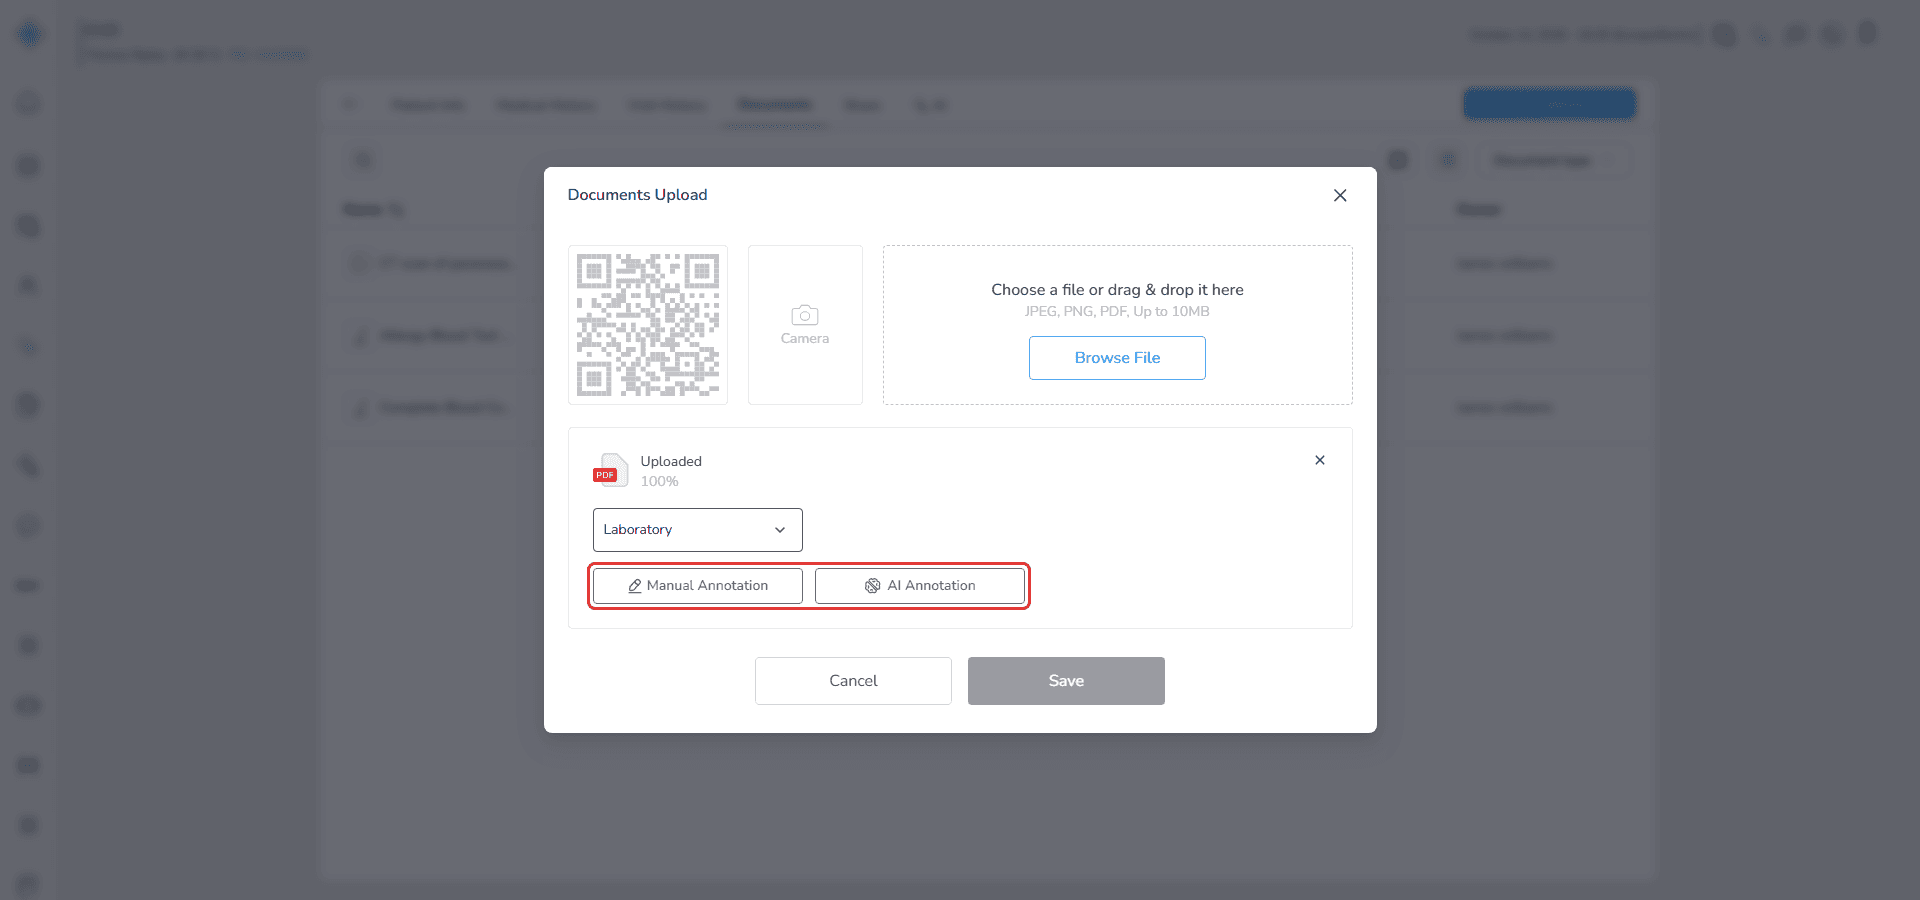
You can choose between two methods.
AI Annotation
The system reads the uploaded document and tries to automatically extract medical information from it.
This can help you fill fields faster by suggesting structured data based on the document content.
Manual Annotation
You enter all document information yourself by filling in the form fields manually.
Use this option when you want full control over the information being added.
Important note
If the Document Type is Imaging, the AI Annotation option will not be available.
In this case the system automatically switches to Manual Annotation, and you will need to complete the document information fields yourself.
Step 5: Complete the Document Information
After uploading the file, the document form appears.
Now you need to complete the document details so the file can be stored properly in the patient's records.
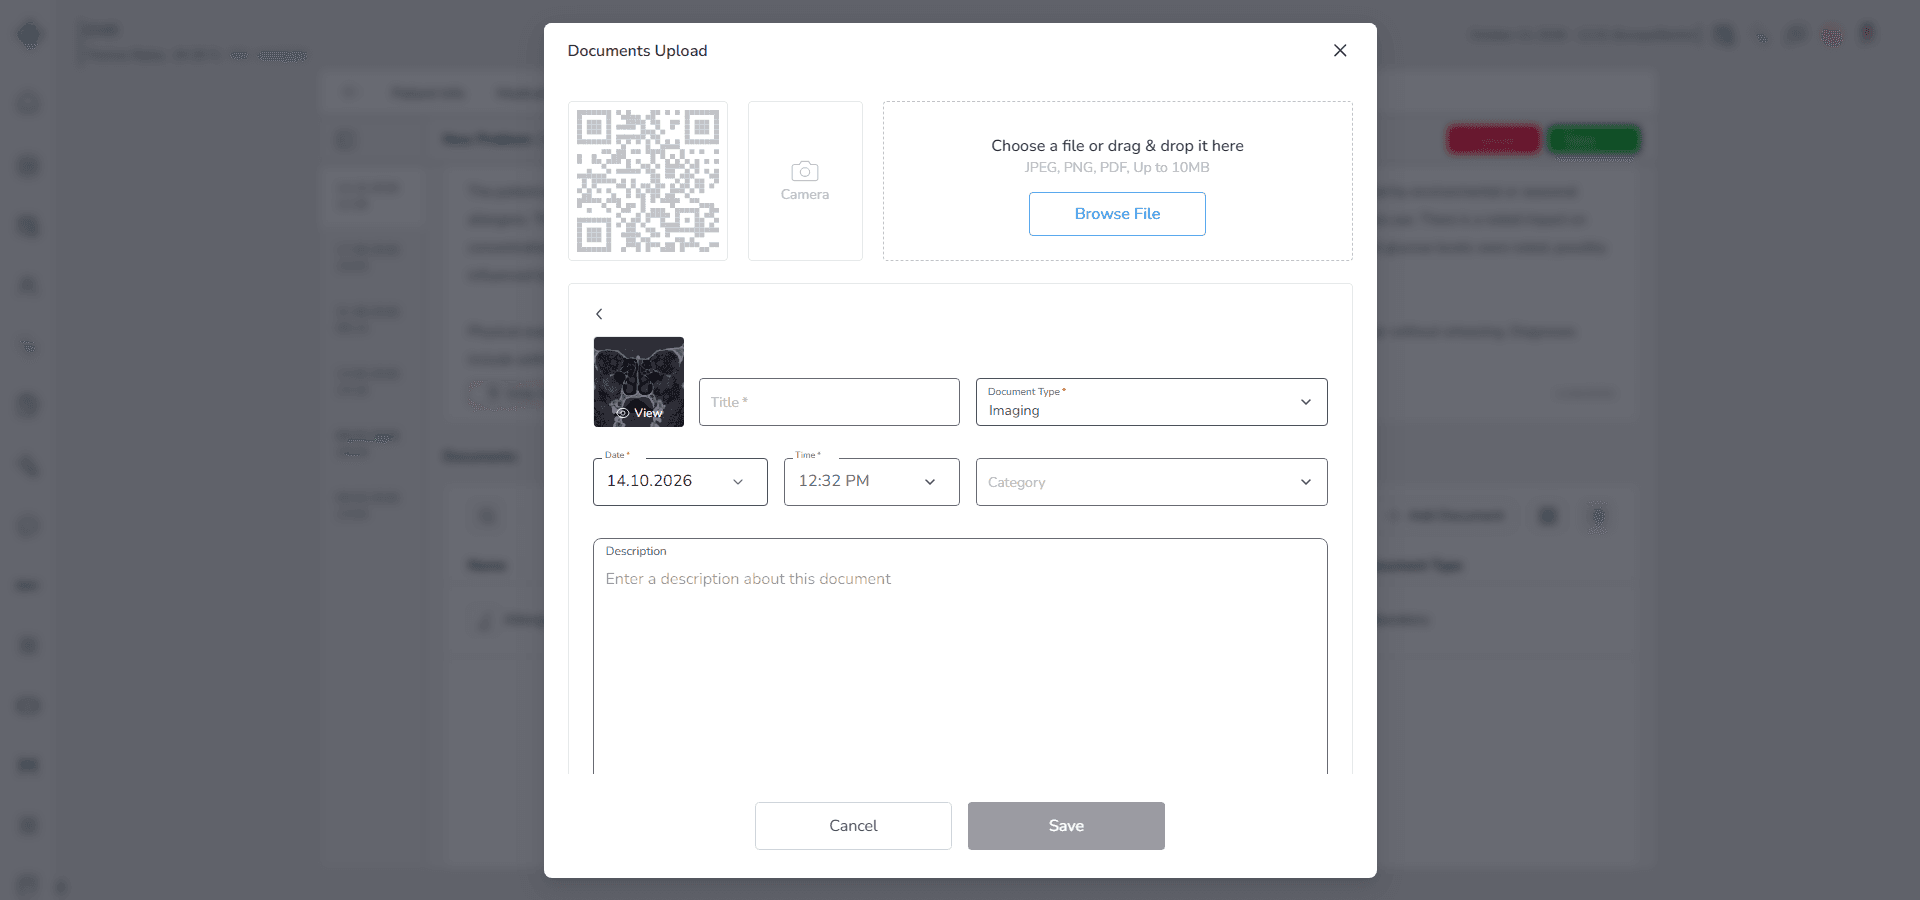
Fill in the fields step by step.
Title*
Start by entering a title for the document.
The title helps you and other users quickly recognize the document later when reviewing the visit documents.
Try to choose a clear and descriptive name.
Example
Allergy Blood Test Result
Chest CT Scan Report
Consultation Note
Document Type*
Next select the document type.
This tells the system what kind of medical document you are uploading.
Choose the option that best matches the file.
Available options
- Imaging
- Laboratory
- Clinical Notes
- Prescriptions
- Other Documents
Selecting the correct type helps organize documents properly and makes them easier to find later.
Date*
Select the date related to the document.
This usually represents the date when the test, report or medical note was created.
For example
- the date a laboratory test was performed
- the date an imaging report was issued
- the date a clinical note was written
Time*
Use this field to record the time associated with the document.
In most cases this is the time the document is being uploaded into the system.
Adding the time helps keep visit records more precise, especially when several documents are added during the same day.
Description
This field is optional.
Use it if you want to add extra information or notes about the document.
For example you may mention
- what the document contains
- why the document is important for the visit
- any key findings or remarks related to the file
You can leave this field empty if no additional explanation is needed.
Step 6: Save the Document
Click Save to store the document.
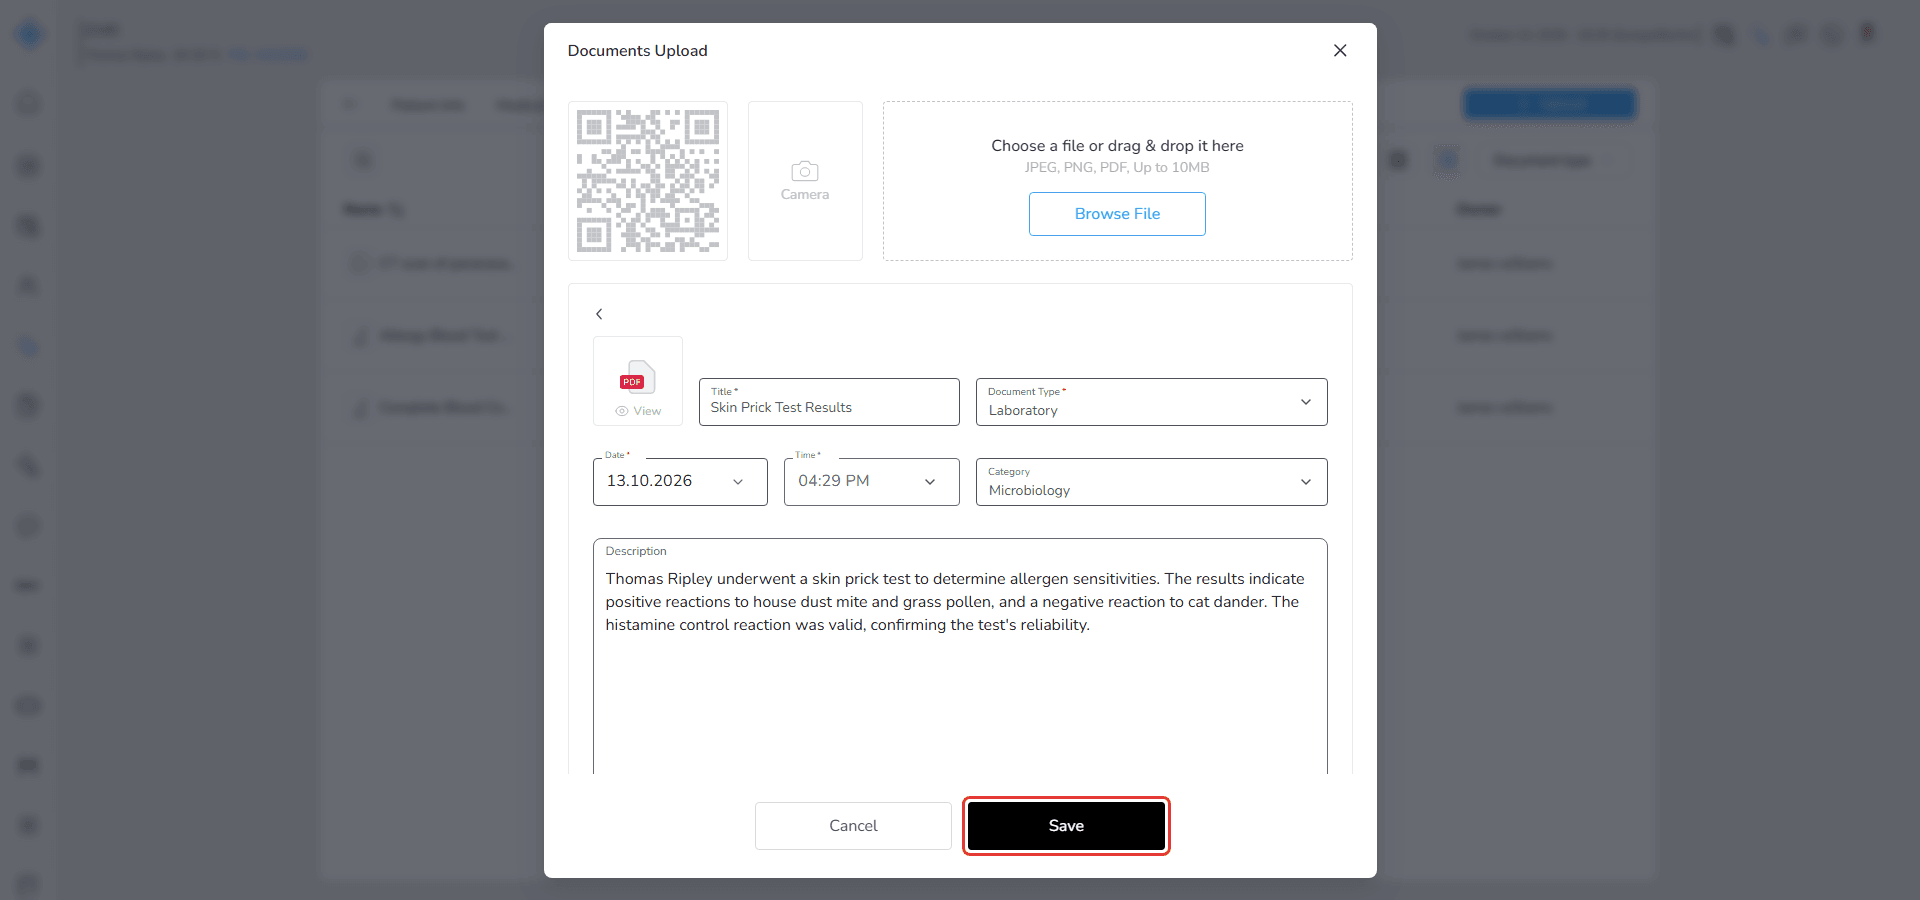
After saving
- the document appears immediately in the document list
- the file becomes available for viewing and management
Document List and Viewing Options
After you upload documents, they appear in the Document list.
You can review them in different layouts depending on how you prefer to browse the files.
Switch Between Views
At the top left of the document area, you will see two separate buttons for changing how documents are displayed.
Grid Button
Select this button if you want to view documents as cards.
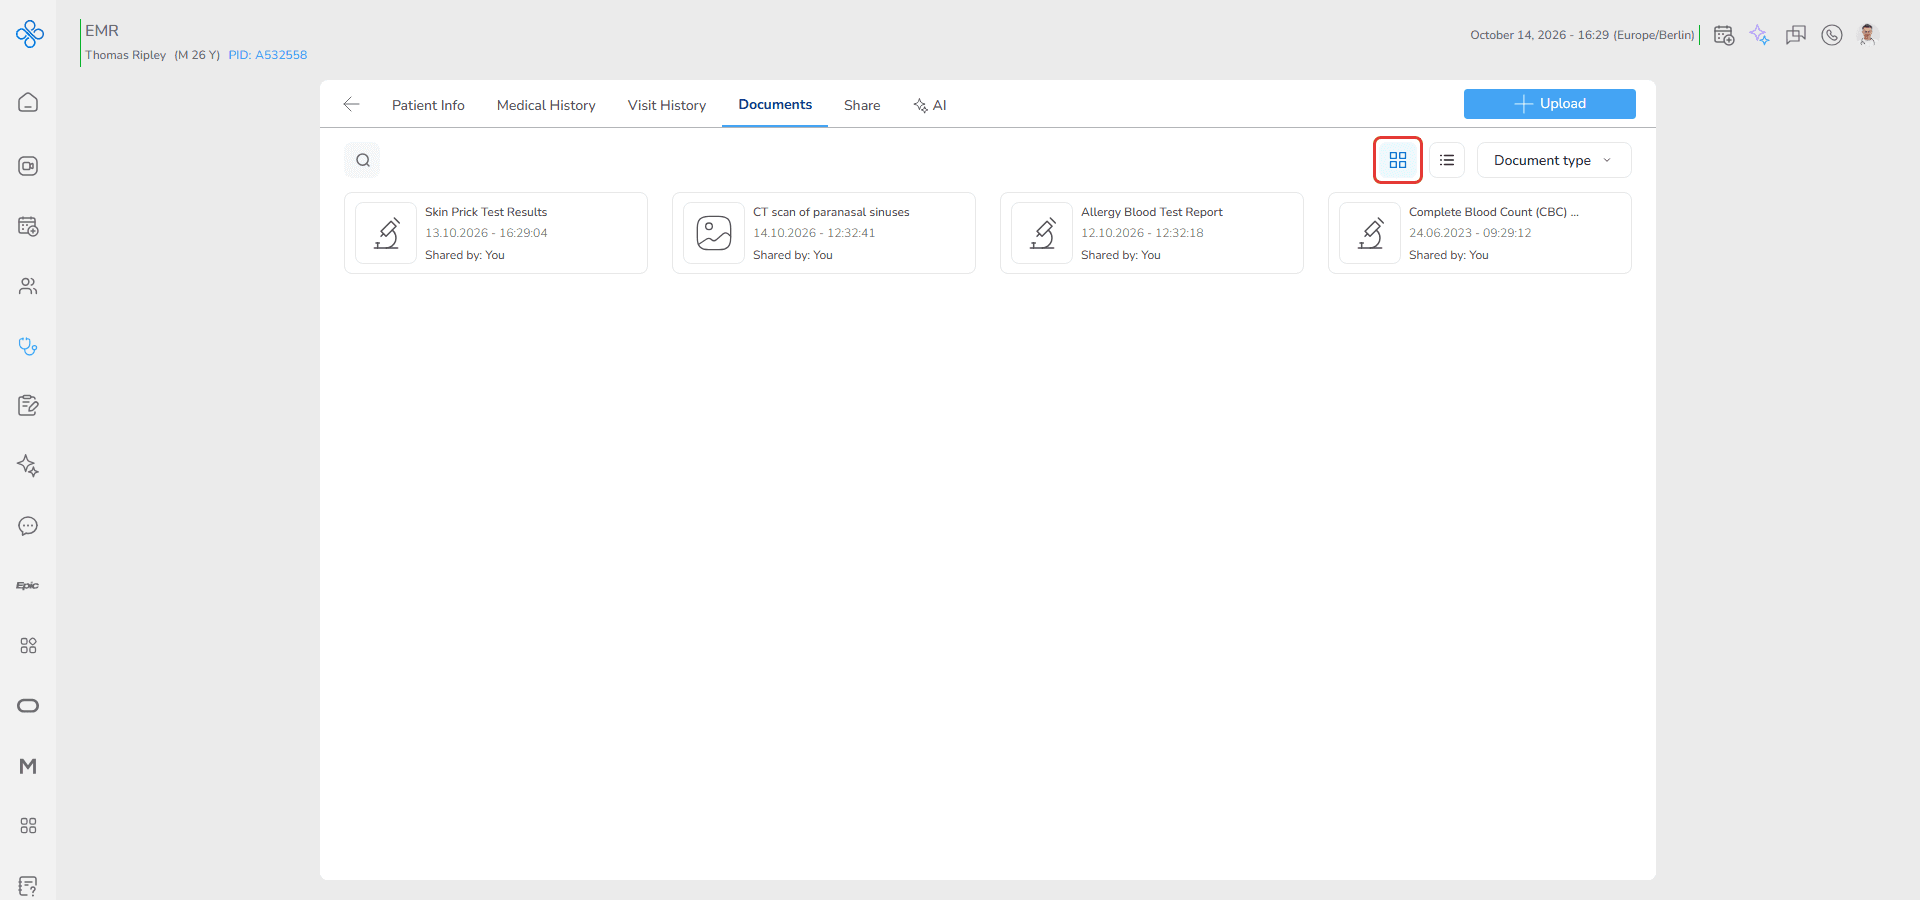
Each document appears as a visual card showing basic information such as the title, date and document type.
This view is useful when you want to quickly scan documents.
List Button
Select this button if you prefer a detailed list view.
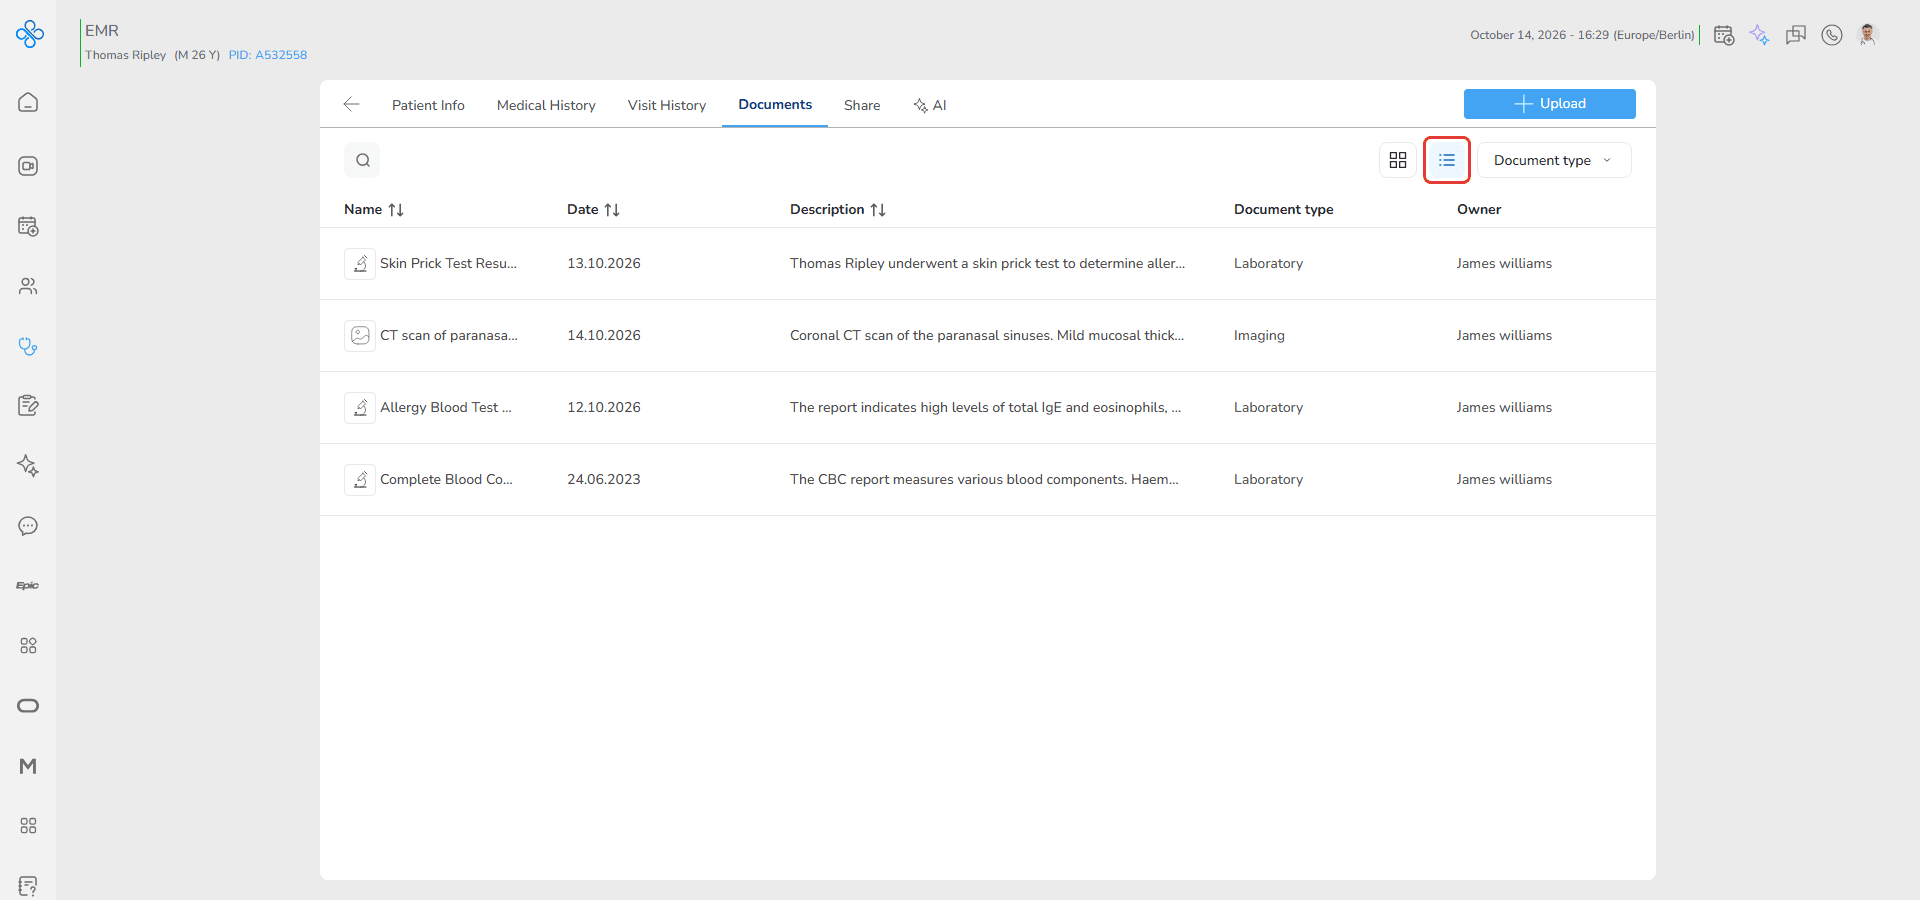
Documents appear in rows and show more information such as title, date, type, description, document type and document owner.
You can switch between these two views at any time depending on how you prefer to review the documents.
Manage Uploaded Documents
After a document is uploaded, you can manage it directly from the Document list.
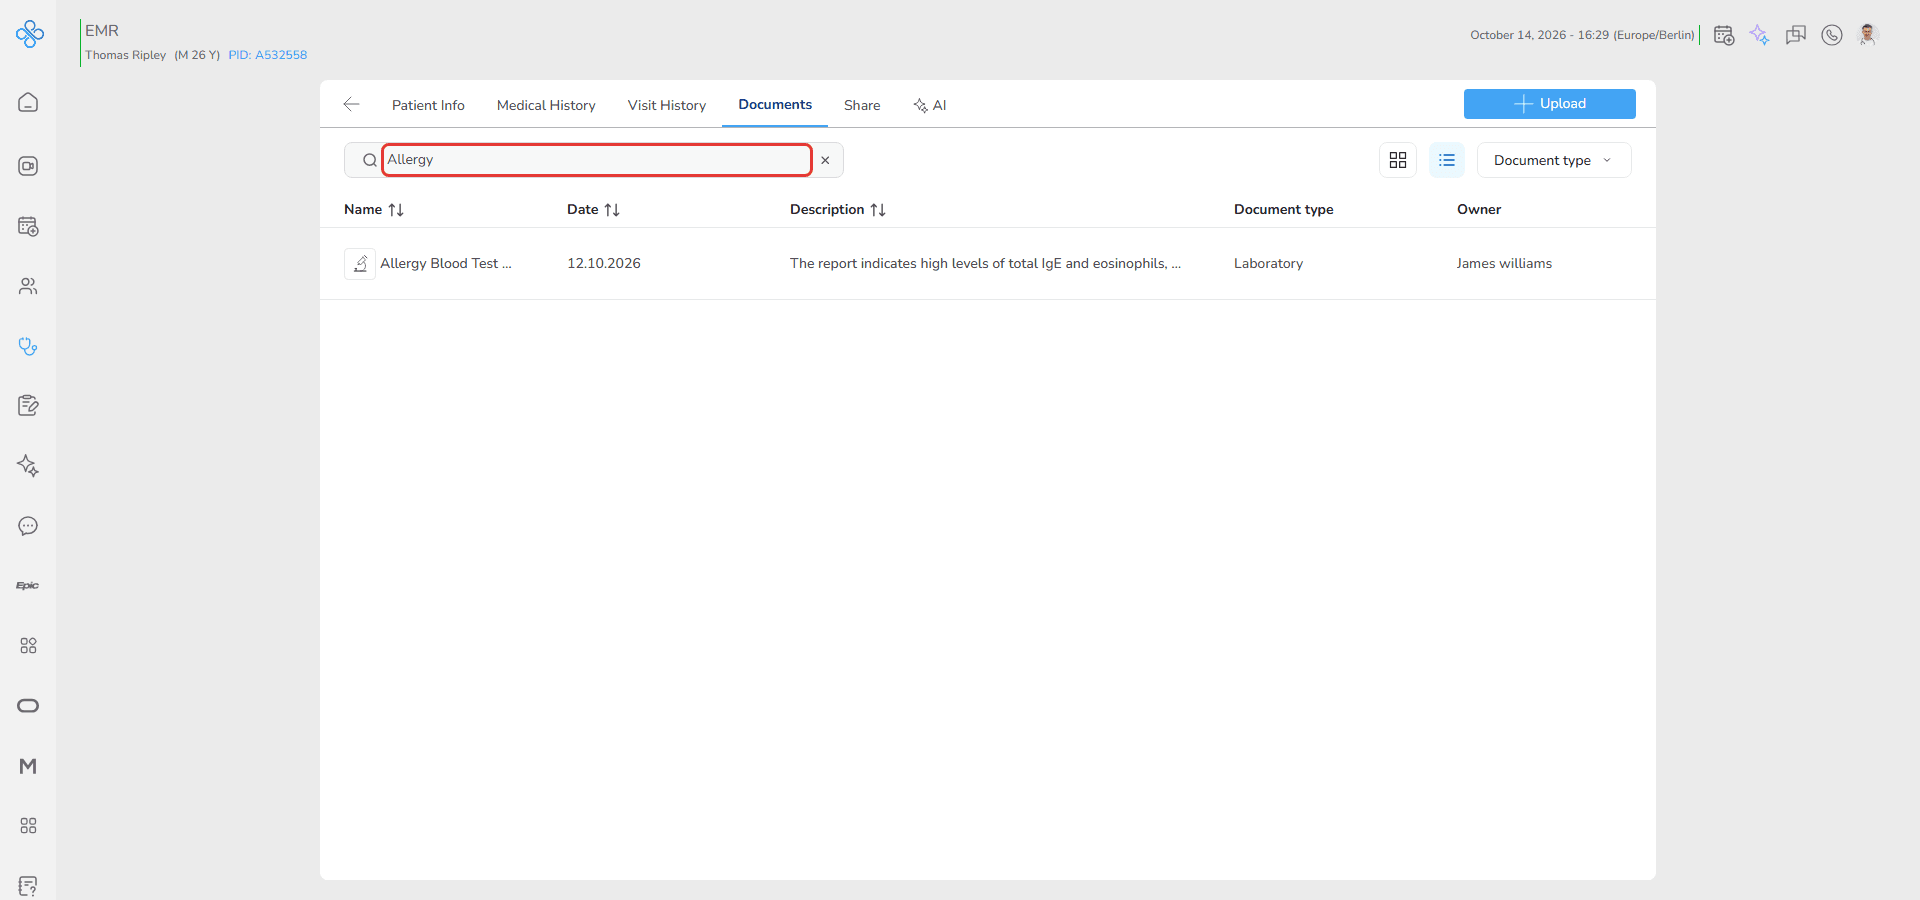
You can also quickly find uploaded medical documents and images using the search and filter options at the top of the page. Use the search bar to look for documents by title or keywords. Use the Document type filter to narrow results based on categories such as Imaging, Laboratory, Clinical Notes, or Prescriptions. These tools help you access the required document faster, especially when multiple files are available.
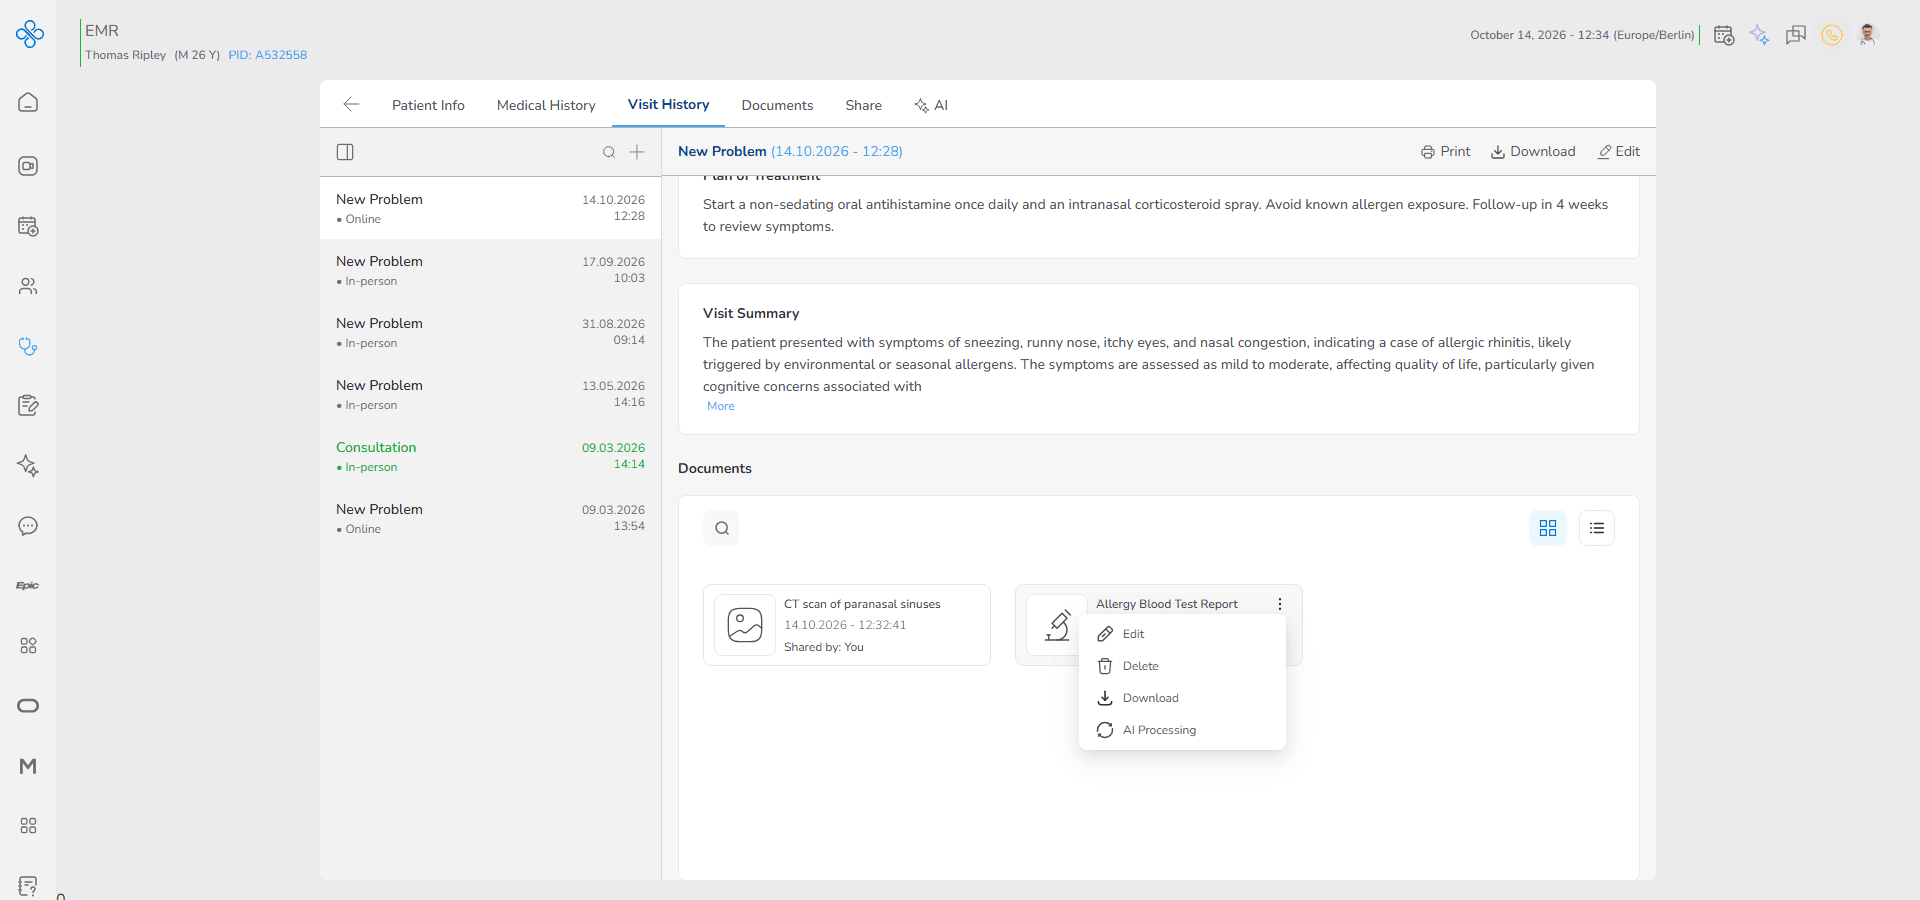
For every document in the list, you will see a More Actions button (⋮).
This button is available both in Grid view and in List view, so you can access the same options regardless of which layout you are using.
To manage a document
- Locate the document you want to manage
- Find the More Actions (⋮) button on the document card (in Grid view) or on the document row (in List view)
- Click the ⋮ button
A menu will open showing the available actions.
Grid Button
List Button
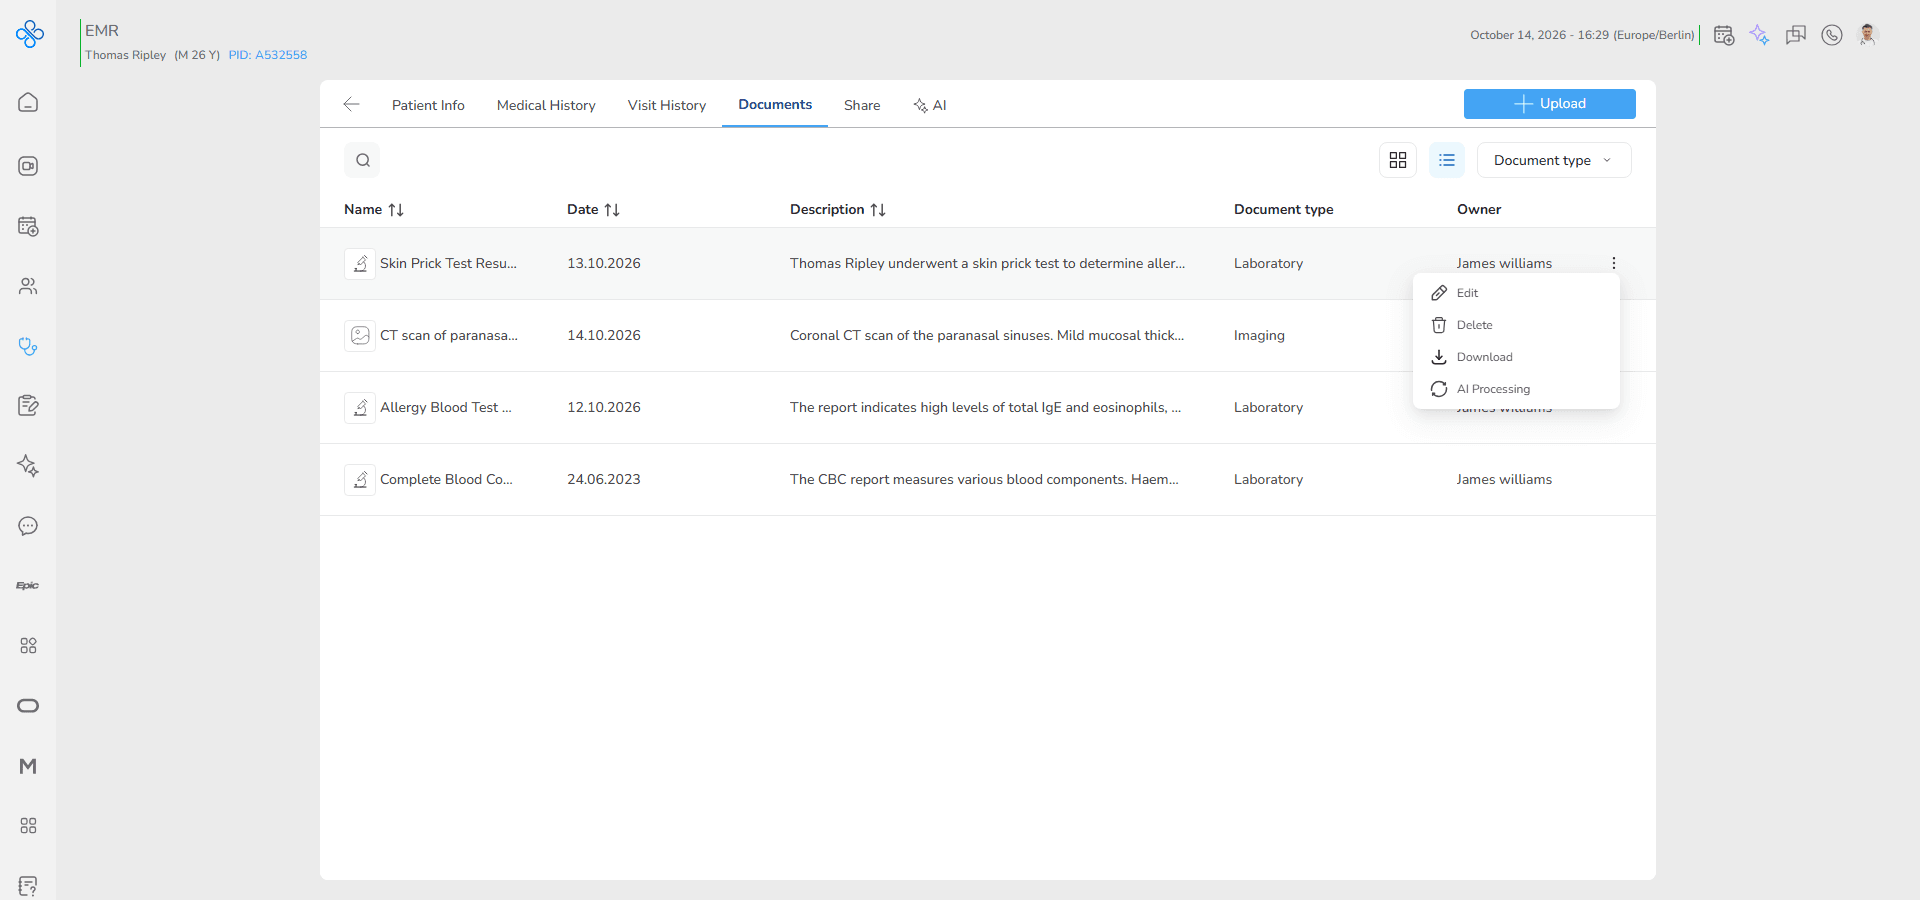
From this menu you can
- Edit Document → update the document information such as title, type or description
- Delete Document → remove the document if it was uploaded by mistake or is no longer needed
- Download Document → save the original file to your computer
- AI Processing → analyze the document and extract structured medical data
These options allow you to quickly manage documents without leaving the Documents tab.
Edit Document
Use this option when you need to change or correct the information of a document you previously uploaded.
For example, you may want to fix the title, change the document type or update the description.
Follow these steps.
- Find the document you want to edit in the Document list
- Click the More Actions (⋮) button on the document
- From the menu that opens, select Edit Document
The same form used when uploading the document will open again.
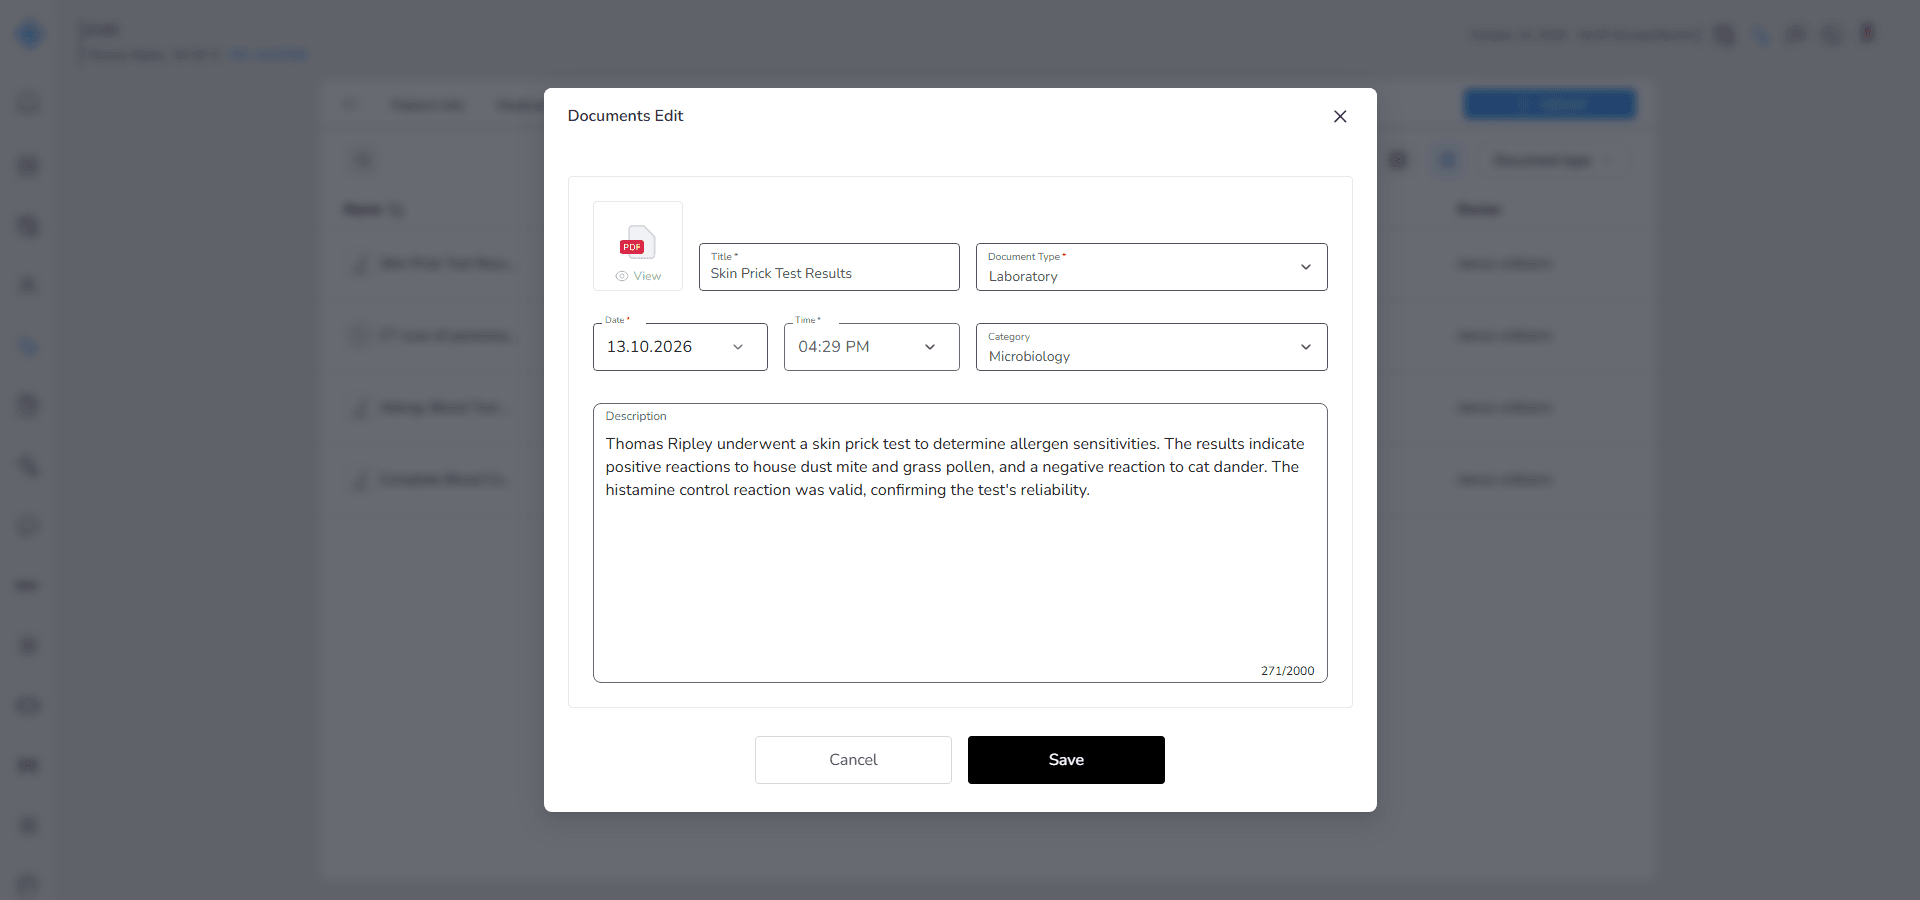
Now you can review the information and update any field if needed.
You can modify items such as
- Title if you want a clearer name for the document
- Document Type if the wrong type was selected
- Date or Time if the document timing needs correction
- Description to add or adjust notes about the file
After making your changes, click Save.
The system updates the document information immediately and the changes will appear in the document list.
Delete Document
Use this option if you want to remove a document from the patient's documents.
For example, you might delete a document if the wrong file was uploaded or if the document is no longer needed.
Follow these steps.
- Find the document you want to remove in the Documents list
- Click the More Actions (⋮) button next to that document
- From the menu that opens, select Delete Document
The system will ask you to confirm the deletion to make sure the document is not removed by mistake.
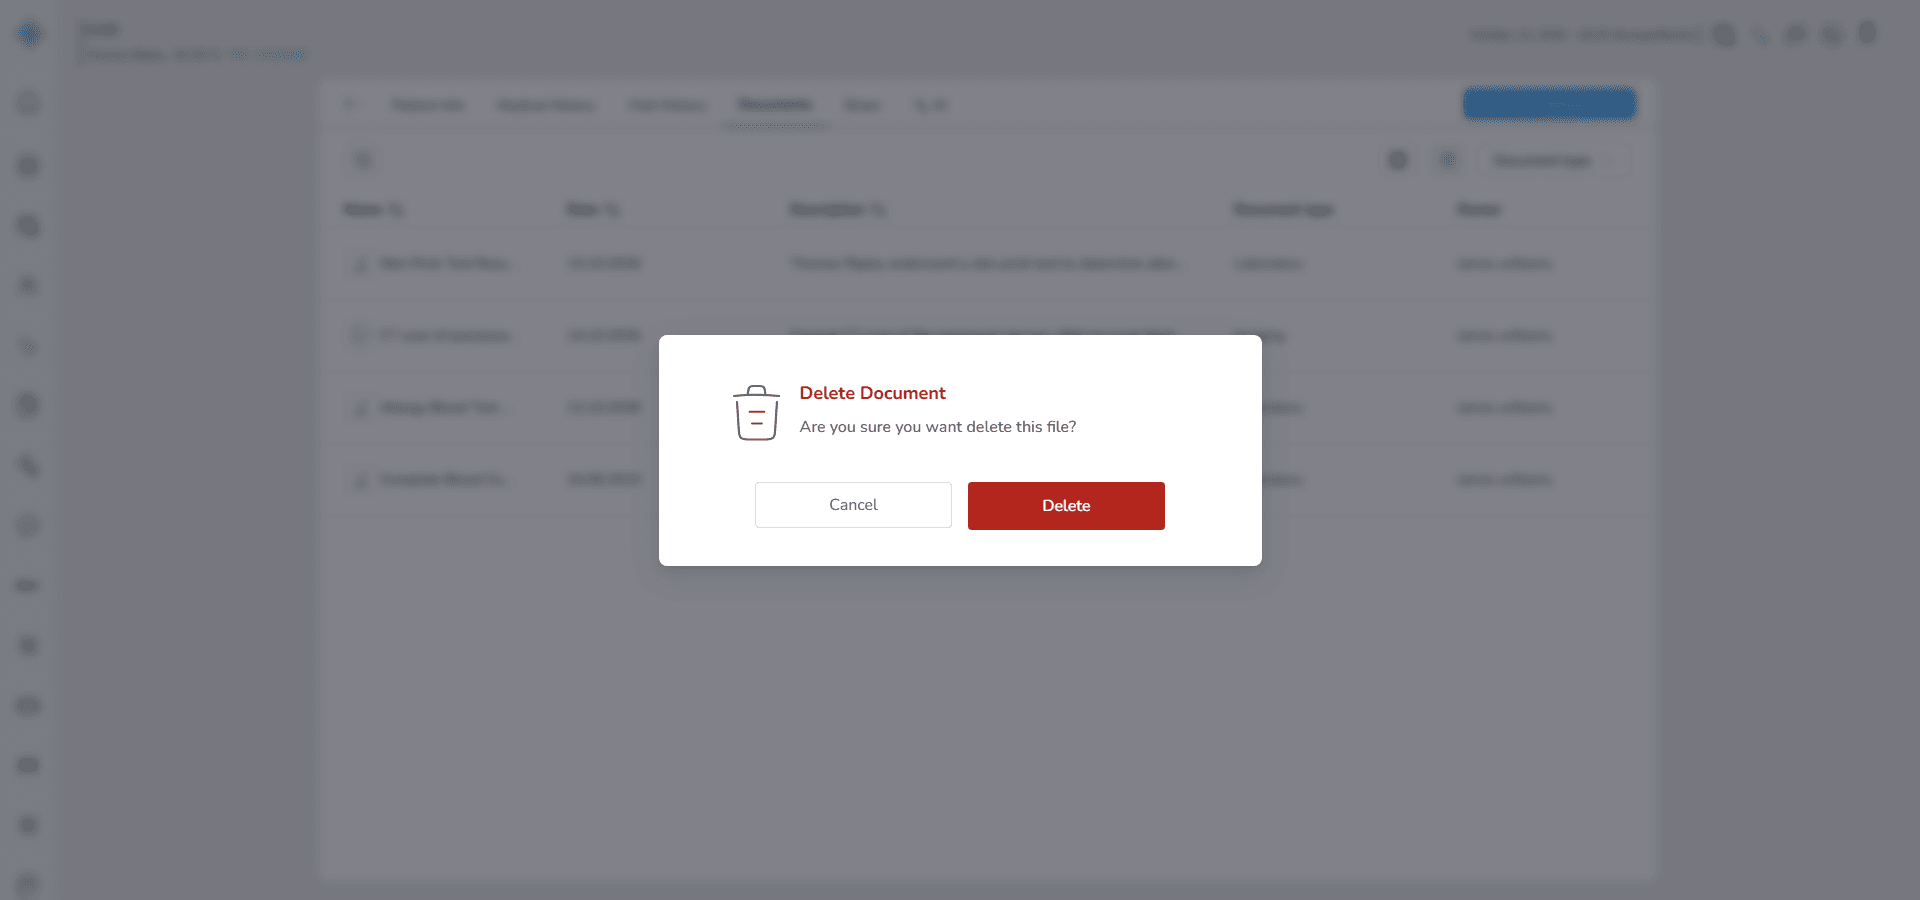
If you confirm
- the document is removed from the document list
- it disappears from both Grid view and List view
Keep in mind that once a document is deleted, it cannot be restored, so make sure the file is not needed before confirming the deletion.
Download Document
Use this option when you want to save a copy of the document on your computer.
This can be helpful if you need to review the file outside the system, share it with someone or keep a local copy.
Follow these steps.
- Find the document in the Documents list
- Click the More Actions (⋮) button next to the document
- From the menu that opens, select Download Document
The system will automatically start downloading the file to your computer.
The document will be downloaded in the same format it was uploaded.
For example, if the file was uploaded as a PDF, JPEG or PNG, it will be downloaded in that same format.
AI Processing
Use AI Processing when you want the system to read the document and extract medical data from it automatically.
This feature is especially helpful for documents that contain test results or medical measurements. Instead of entering those values manually, the system can detect them and prepare them for you.
Examples of documents where this is useful include
- laboratory reports
- diagnostic test results
- imaging reports that include measurable findings
Start AI Processing
First locate the document in the Documents list.
Then follow these steps.
- Find the document you want to process
- Click the More Actions (⋮) button next to that document
- From the menu, select AI Processing
After you select this option, the system begins analyzing the document.
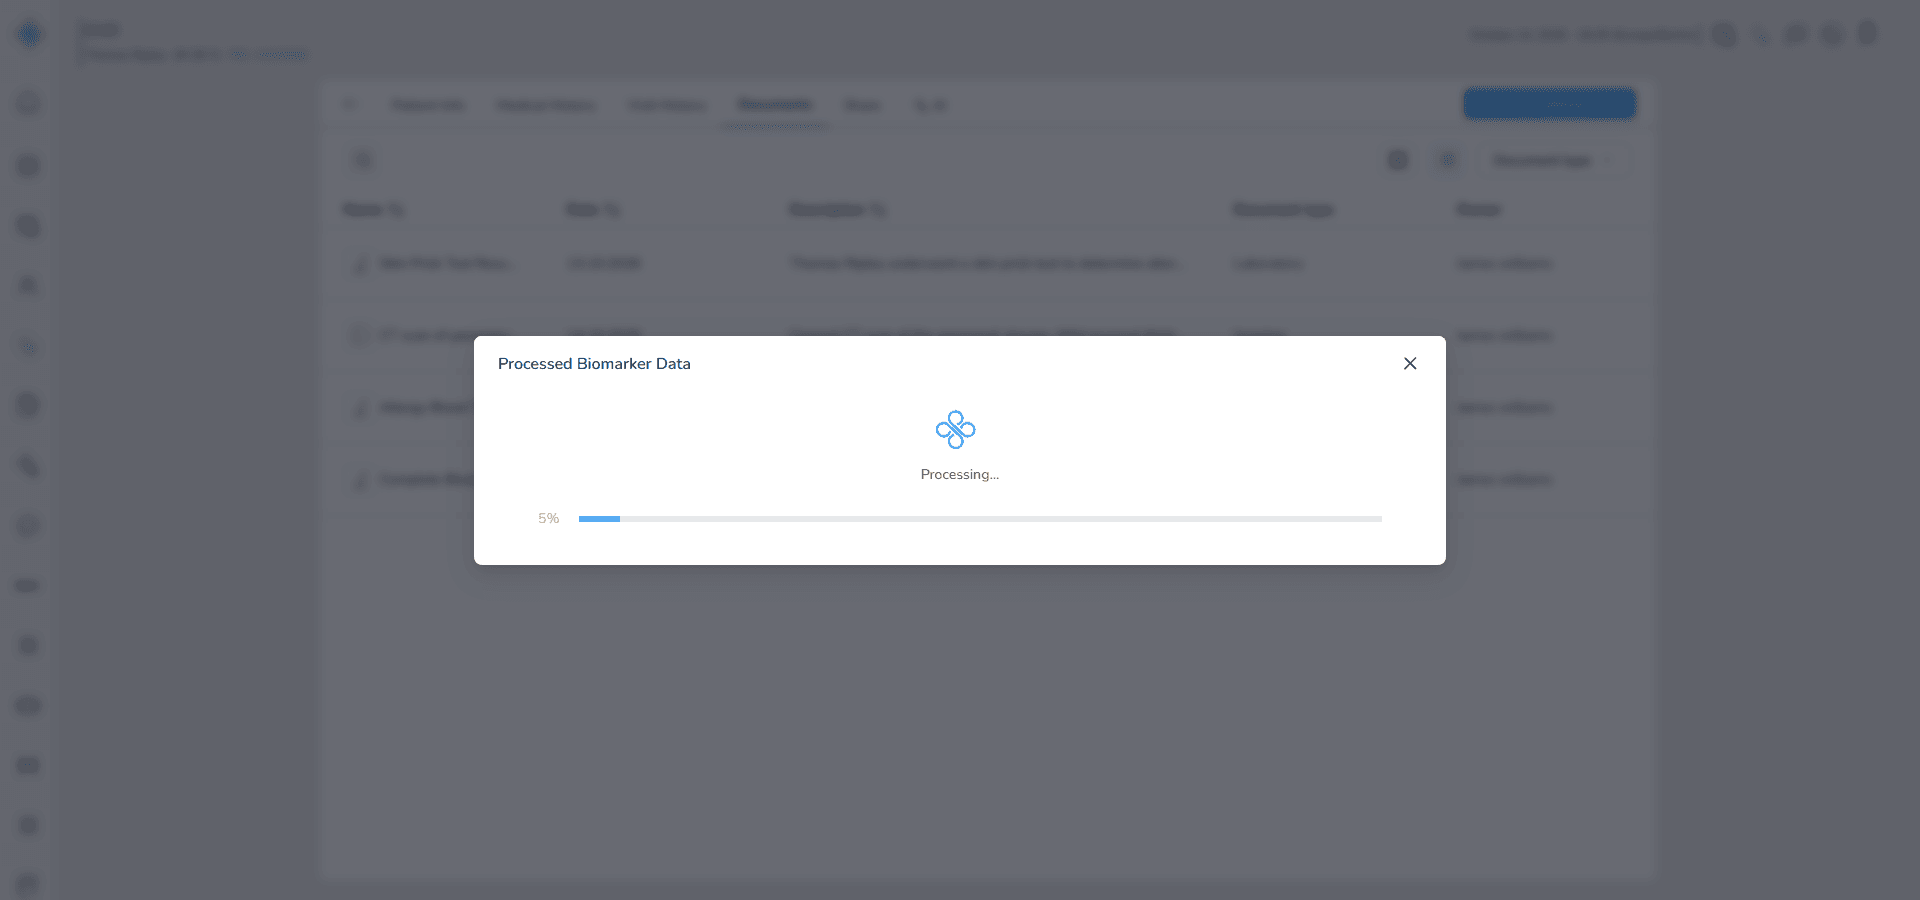
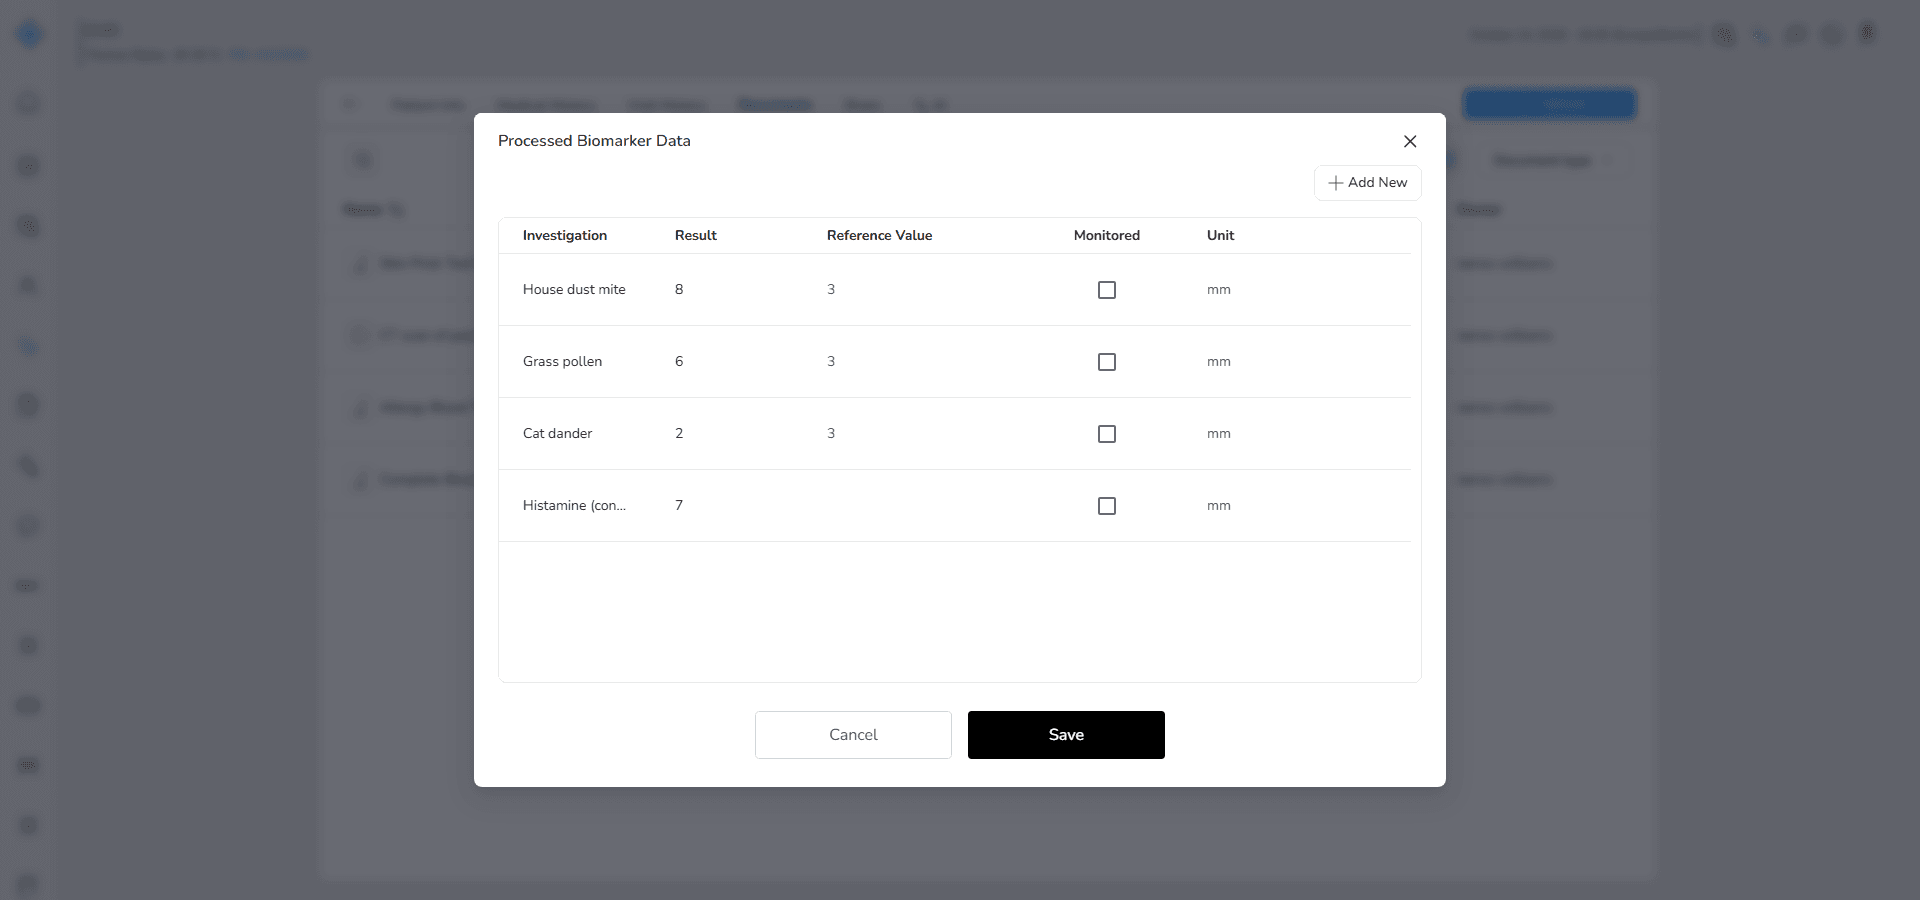
When the analysis finishes, a processing window opens showing the information the system was able to extract from the file.
Review the Extracted Information
Inside the processing window you will see the medical data organized into structured fields.
Each row represents a test or investigation that was detected in the document.
The fields you will see include the following.
Investigation
This shows the name of the test or examination found in the document.
Example
Blood Test
MRI
Result
This shows the value or outcome of the test.
Example
12.5 g/dL
Reference Value
This shows the normal range for that test.
This helps you quickly understand whether the result is within the normal limits.
Example
13 to 17 g/dL
Monitored
Indicates whether this investigation will also be displayed in the Under Monitor Indicators section of the patient's Medical History. When enabled, an indicator card is created for this investigation after the processed data is saved.
Unit
This shows the measurement unit used for the result.
Example
mg/dL
Review and Adjust the Data
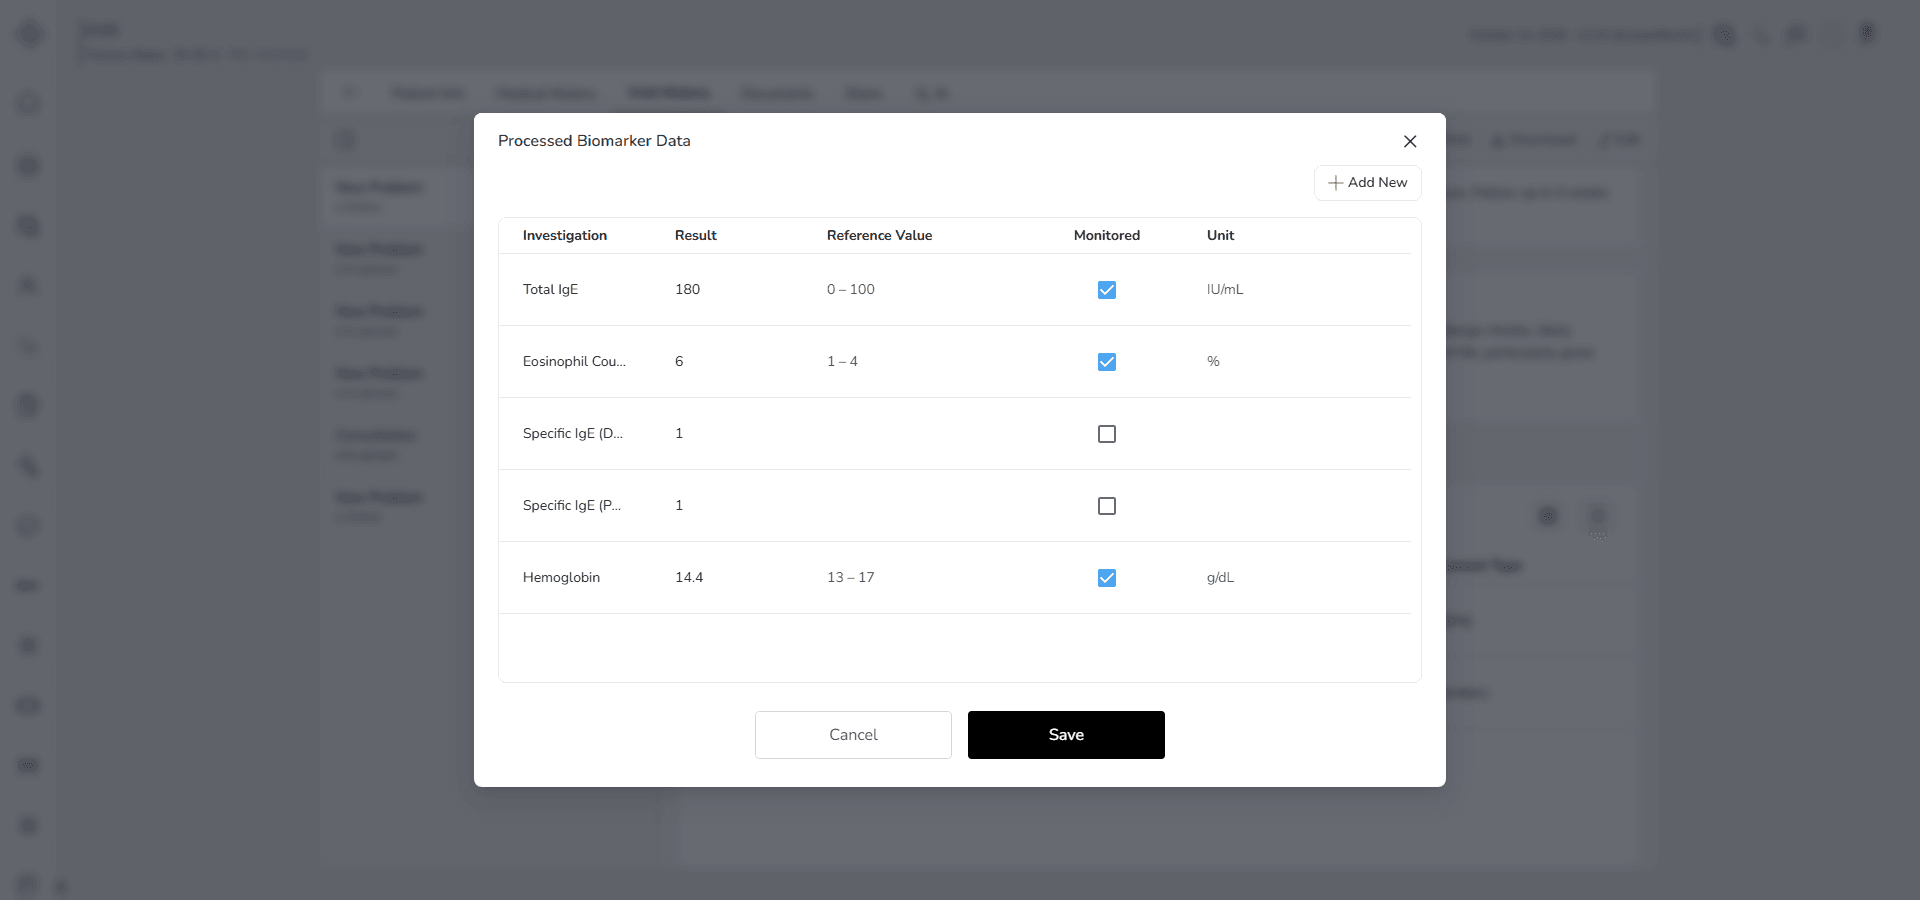
The information extracted by AI is fully editable, so you can adjust it if something needs correction.
Inside this window you can
- edit any field if the value needs correction
-
delete rows that are not relevant
-
add a new row manually using +Add New if something was not detected automatically
Take a moment to review the information and make sure everything looks correct.
Save the Extracted Data
After reviewing the data, click Save.
Once saved, the confirmed information is automatically stored in the patient's Biomarkers section inside Medical History.
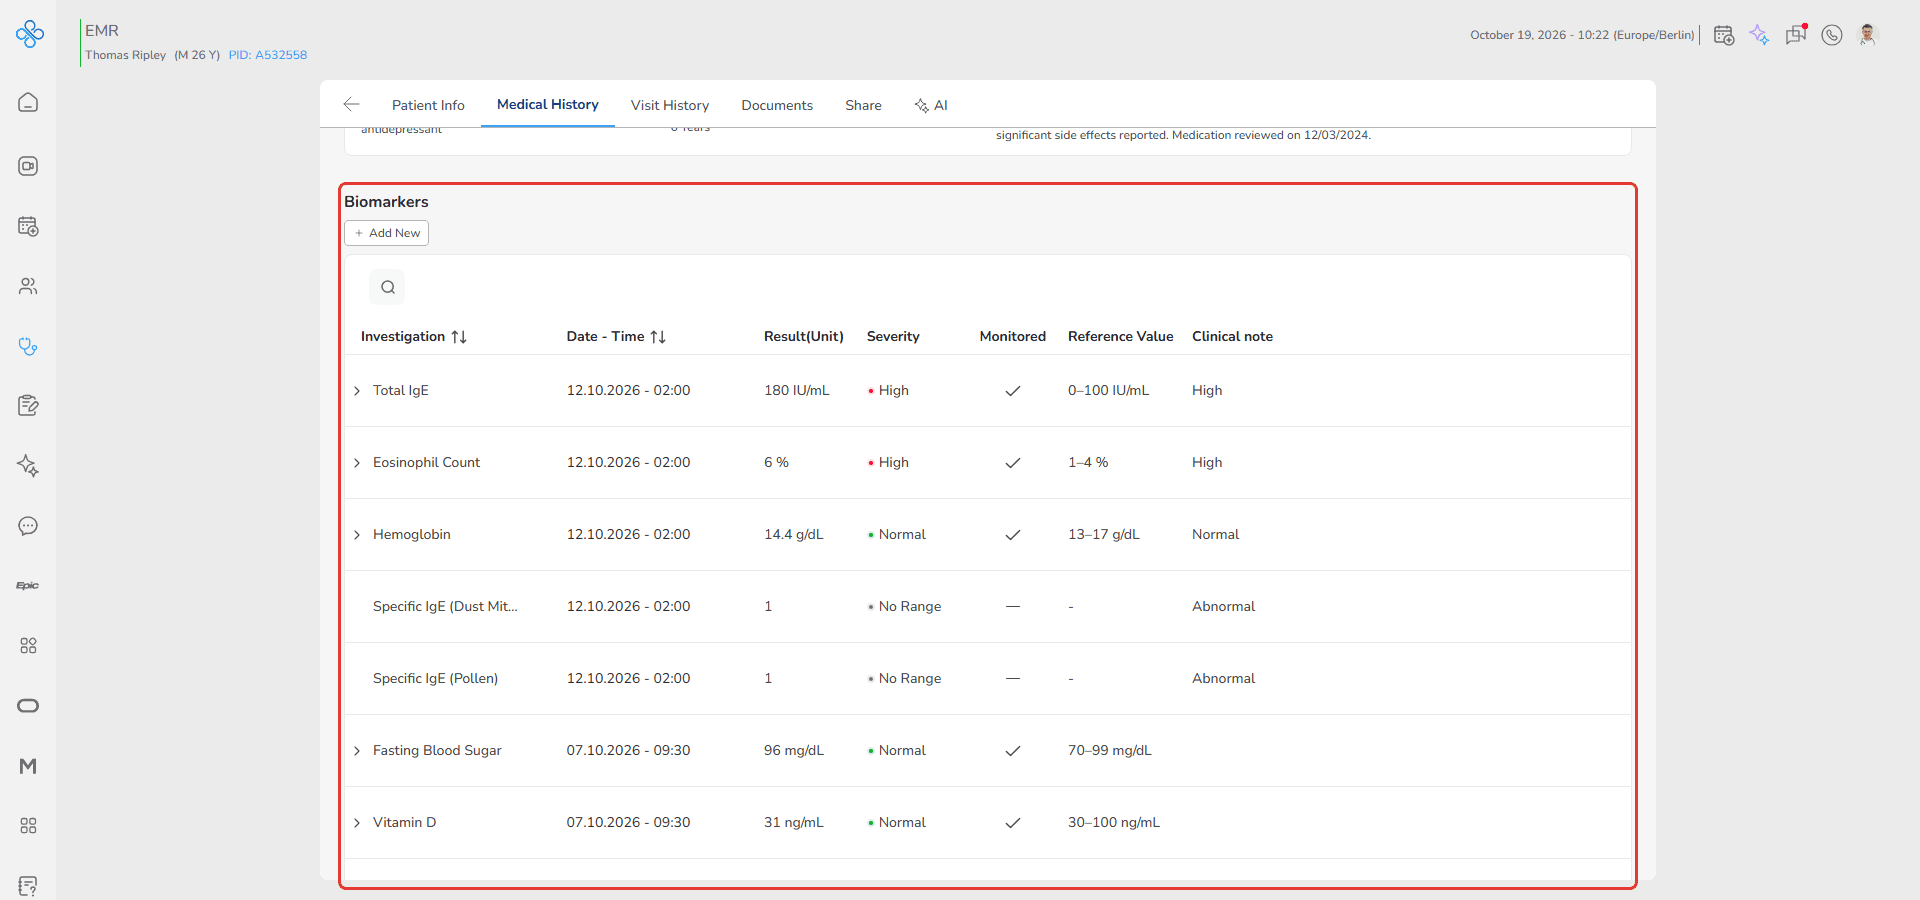
This allows the extracted results to become part of the patient’s structured medical record and be used later for tracking trends and clinical analysis.
Viewing Documents
After documents are uploaded, you can open and review them directly inside the platform using the built in document viewers.
This allows you to quickly access medical files without downloading them to your device. The system automatically detects the file type and opens the appropriate viewer.
To open a document
- Locate the document in the Documents list
- Click the document
Grid View
List View
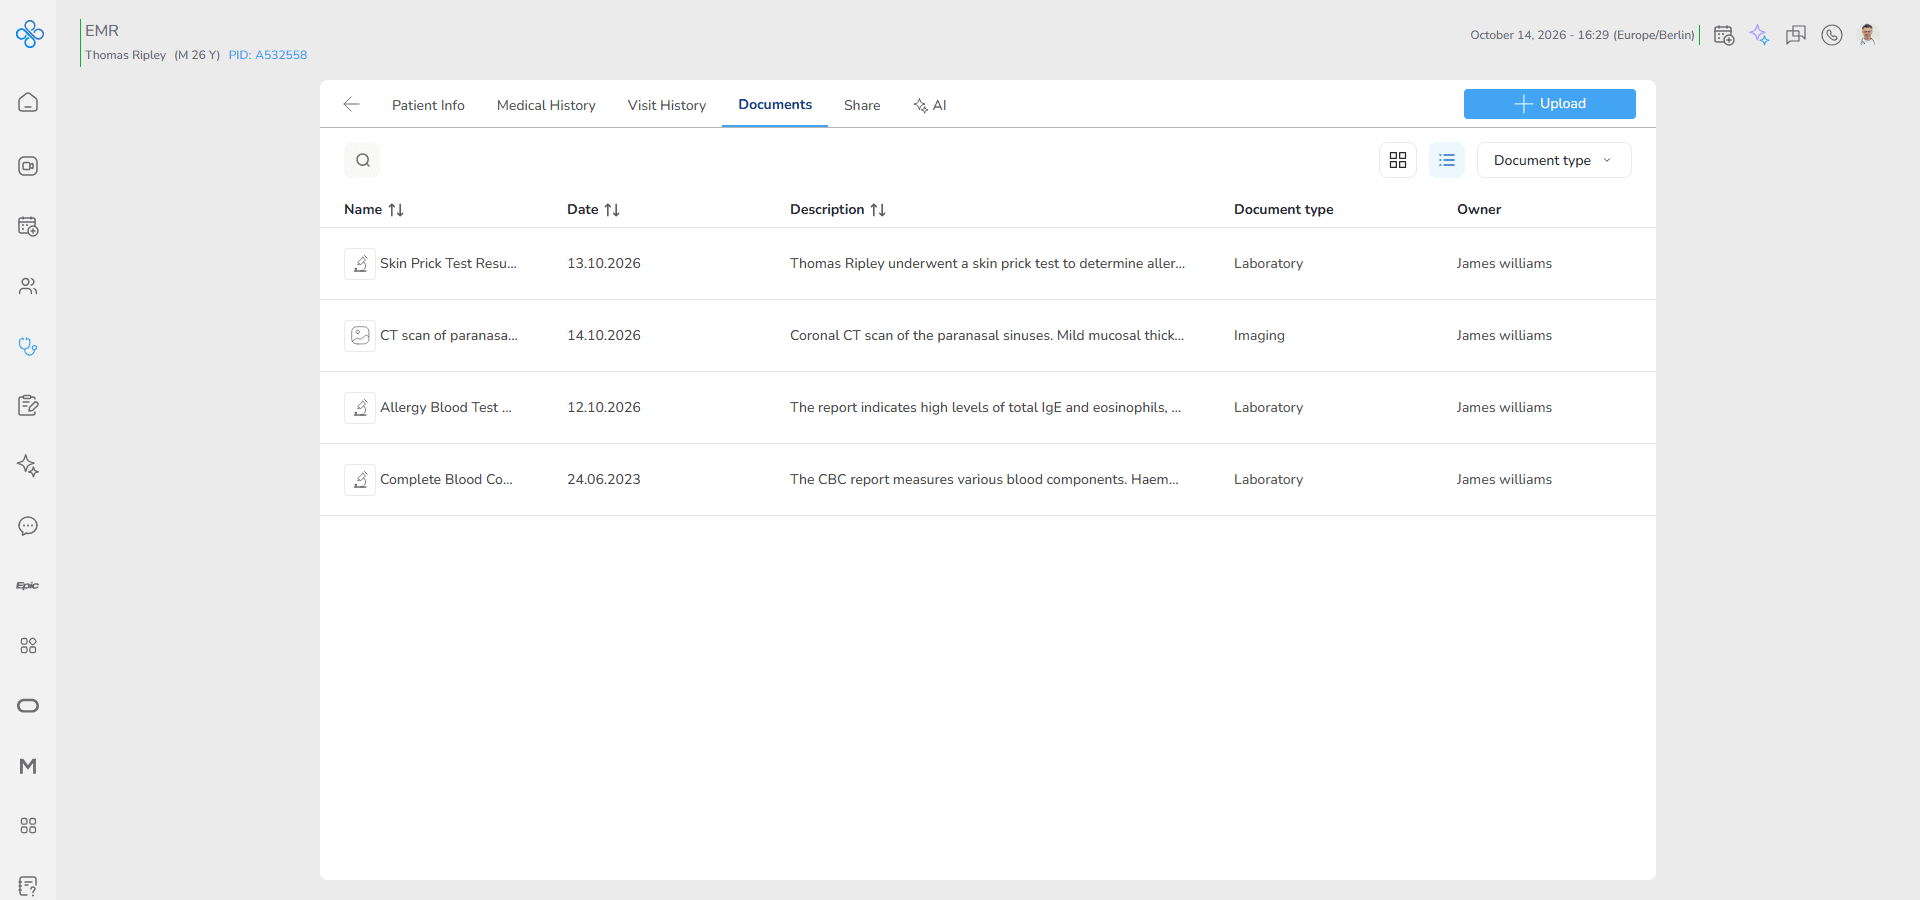
The selected file will open inside a viewer modal where you can review the document and access additional tools.
The type of viewer that opens depends on the document format.
Supported Document Viewers
The platform provides two different viewers depending on the type of file you open.
PDF Document Viewer
PDF files open in the Document Viewer.
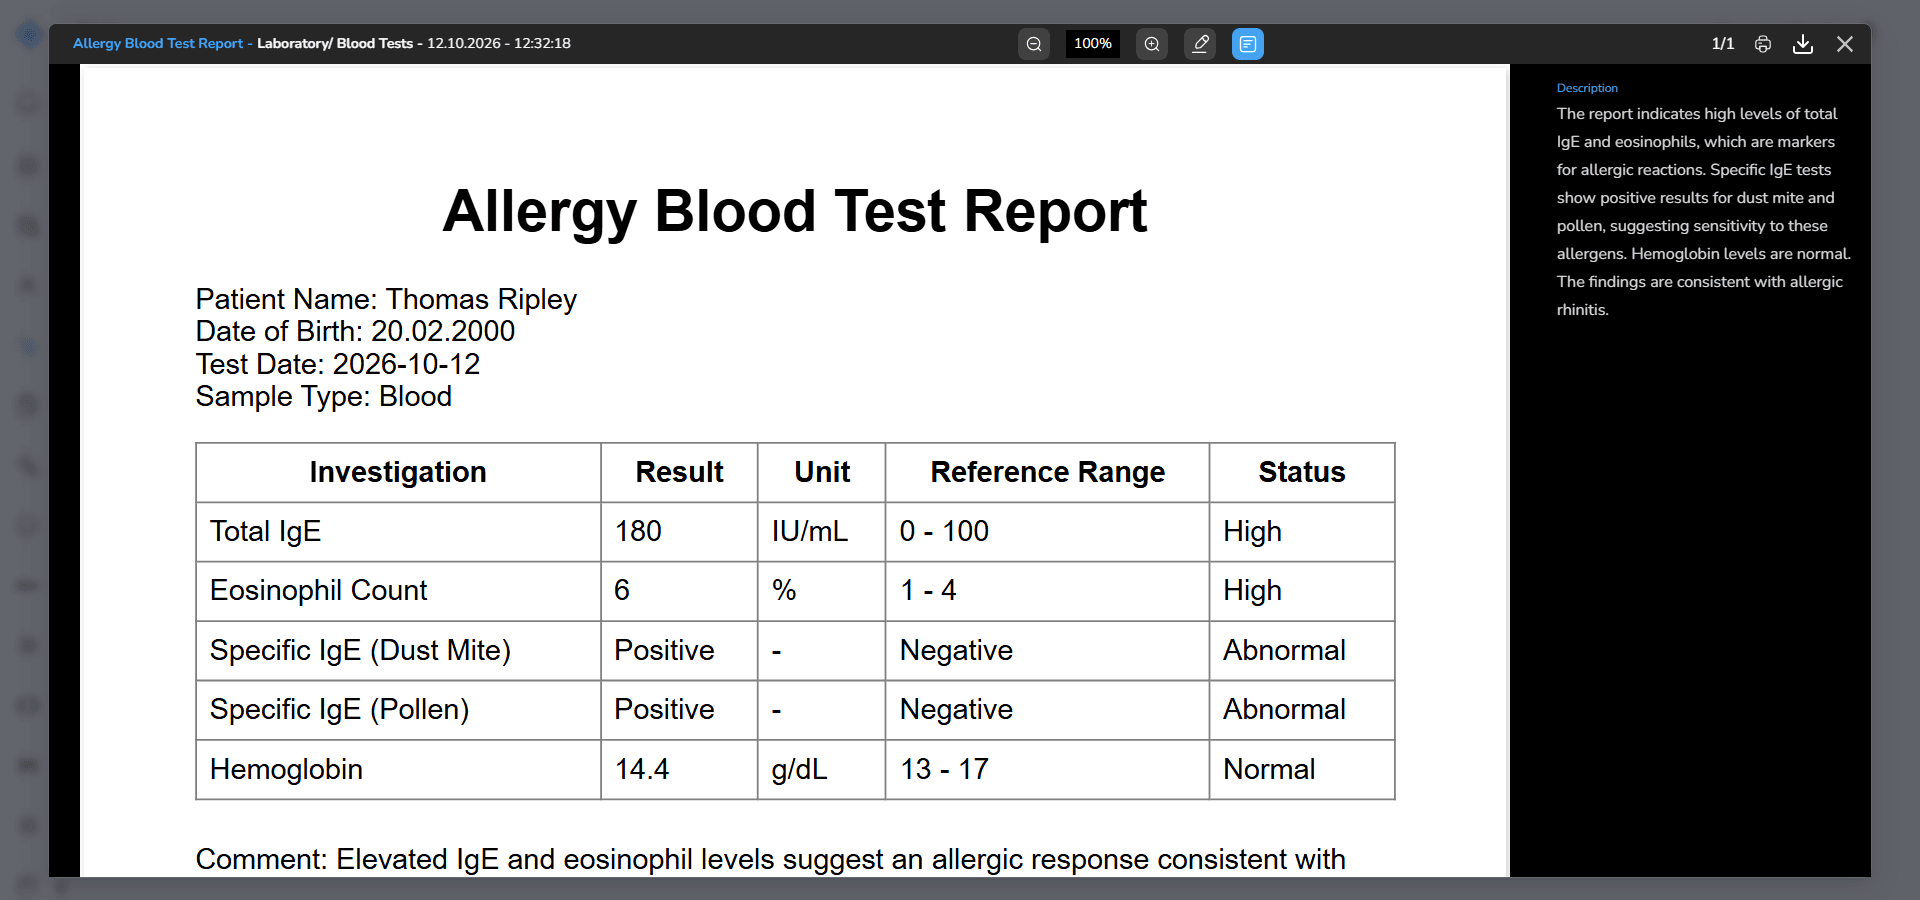
This viewer is designed for reviewing multi page documents and written medical reports. It allows you to read the document, navigate between pages and manage document information directly inside the viewer.
This viewer is commonly used for documents such as
- laboratory reports
- diagnostic reports
- referral letters
- consultation summaries
- clinical notes
In addition to viewing the document you can also update document information directly from the viewer when needed.
Image Viewer
Image files open in the Image Viewer.
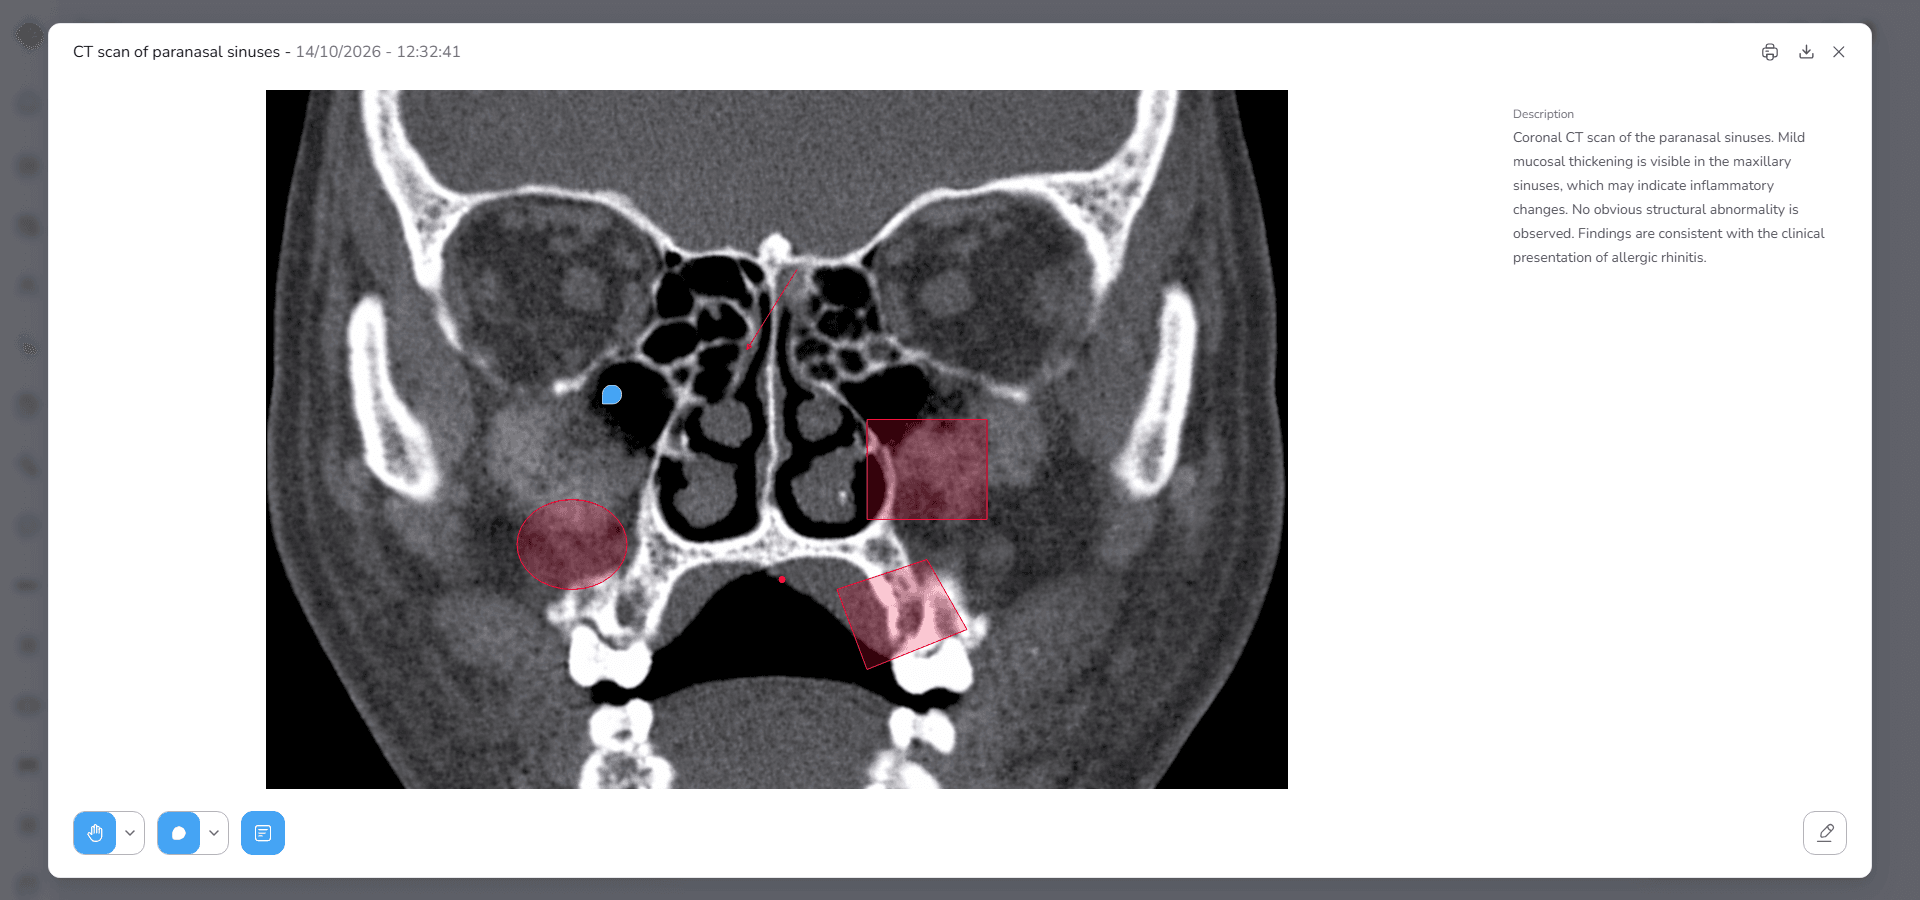
This viewer is used for medical images and scanned visual documents.
Supported image formats include
- JPEG
- PNG
The Image Viewer allows you to examine images more closely and interact with them using navigation tools. You can also edit document information and add visual markers directly on the image when needed.
This viewer is commonly used for
- medical images
- scanned reports
- diagnostic images
- clinical photographs
What You Will Learn Next
In the following sections you will learn how to work with each viewer in detail.
- how to review documents using the PDF Document Viewer
- how to edit document information inside the PDF viewer
- how to view images using the Image Viewer
- how to use editing tools and work with image annotations
View PDF Documents
When you open a document from the Document list, the system displays the file inside the Document Viewer.
This viewer allows you to read the document, zoom in or out, print it, download it and manage its information without leaving the Documents tab.
To open the viewer simply click on any document card or row in the Document list.
The viewer opens as a modal and shows the document in the center of the screen.
Header Information
At the top of the viewer, a header bar displays key information about the document.
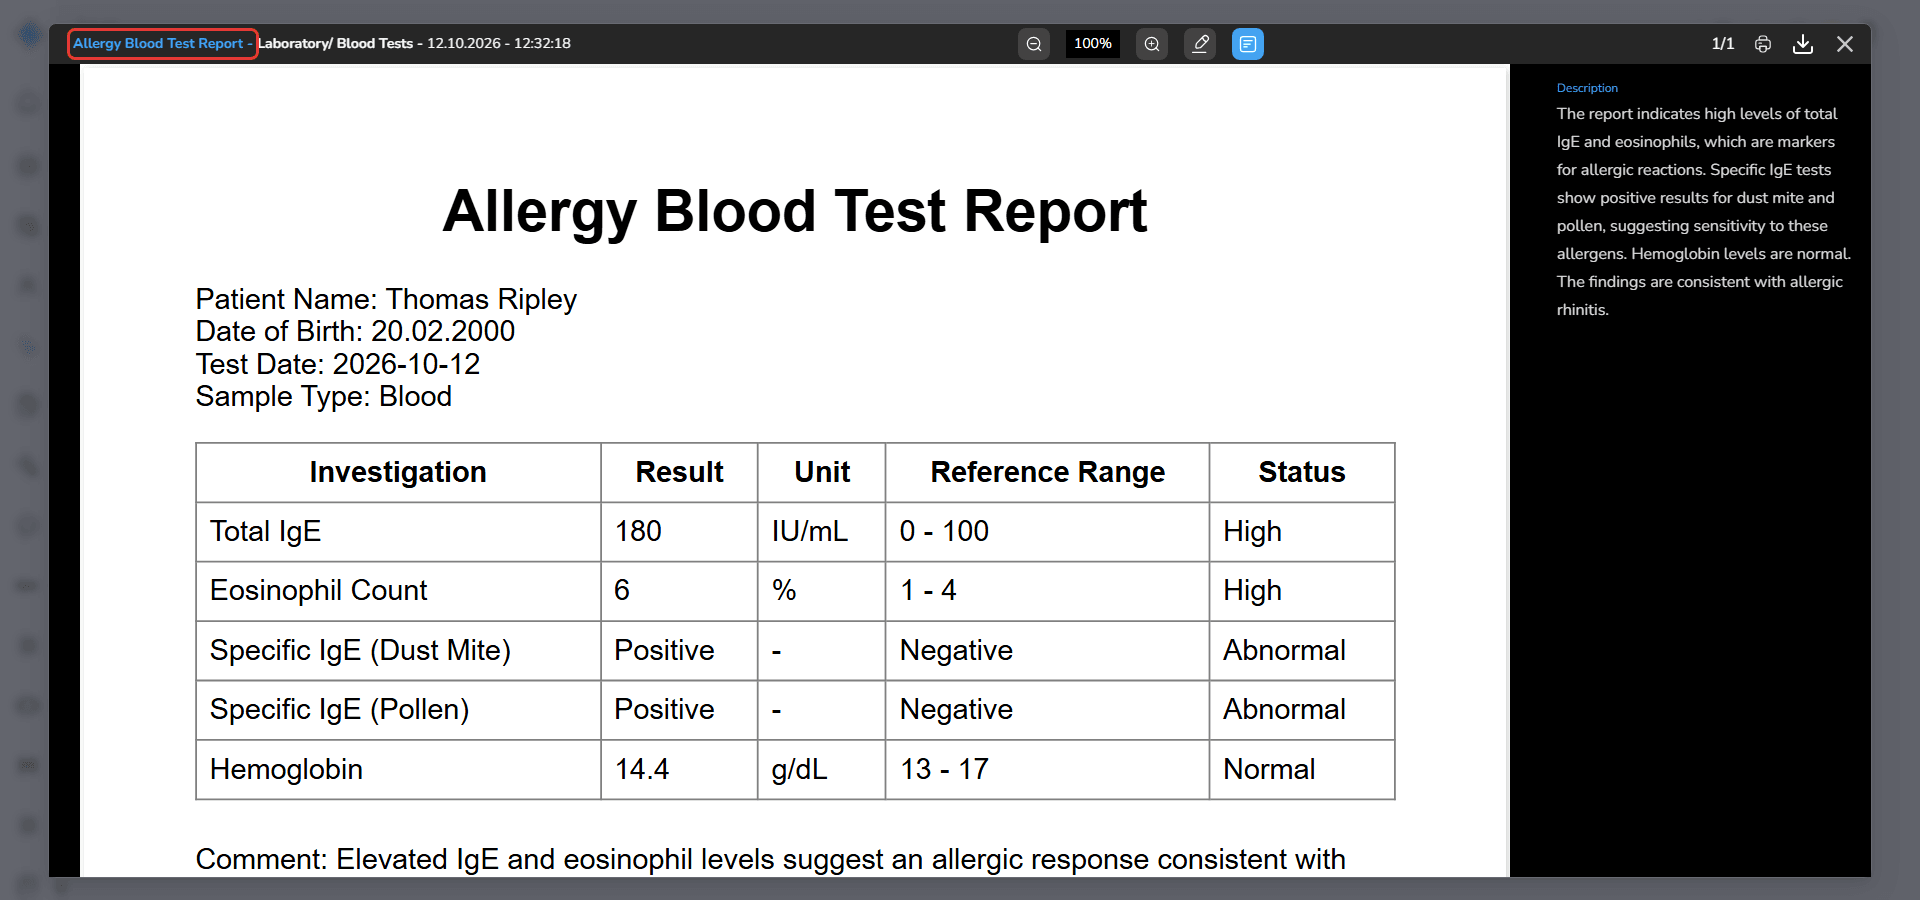
This information comes directly from the data you entered when uploading the file.
You will see the following details.
Title
The name of the document.
Document Type and Category
The type of document selected during upload such as Laboratory or Imaging and its related category.
Date and Time
The date and time associated with the document record.
These values help you quickly confirm that you are reviewing the correct document.
Zoom Controls
In the center of the header, you will see the zoom controls.
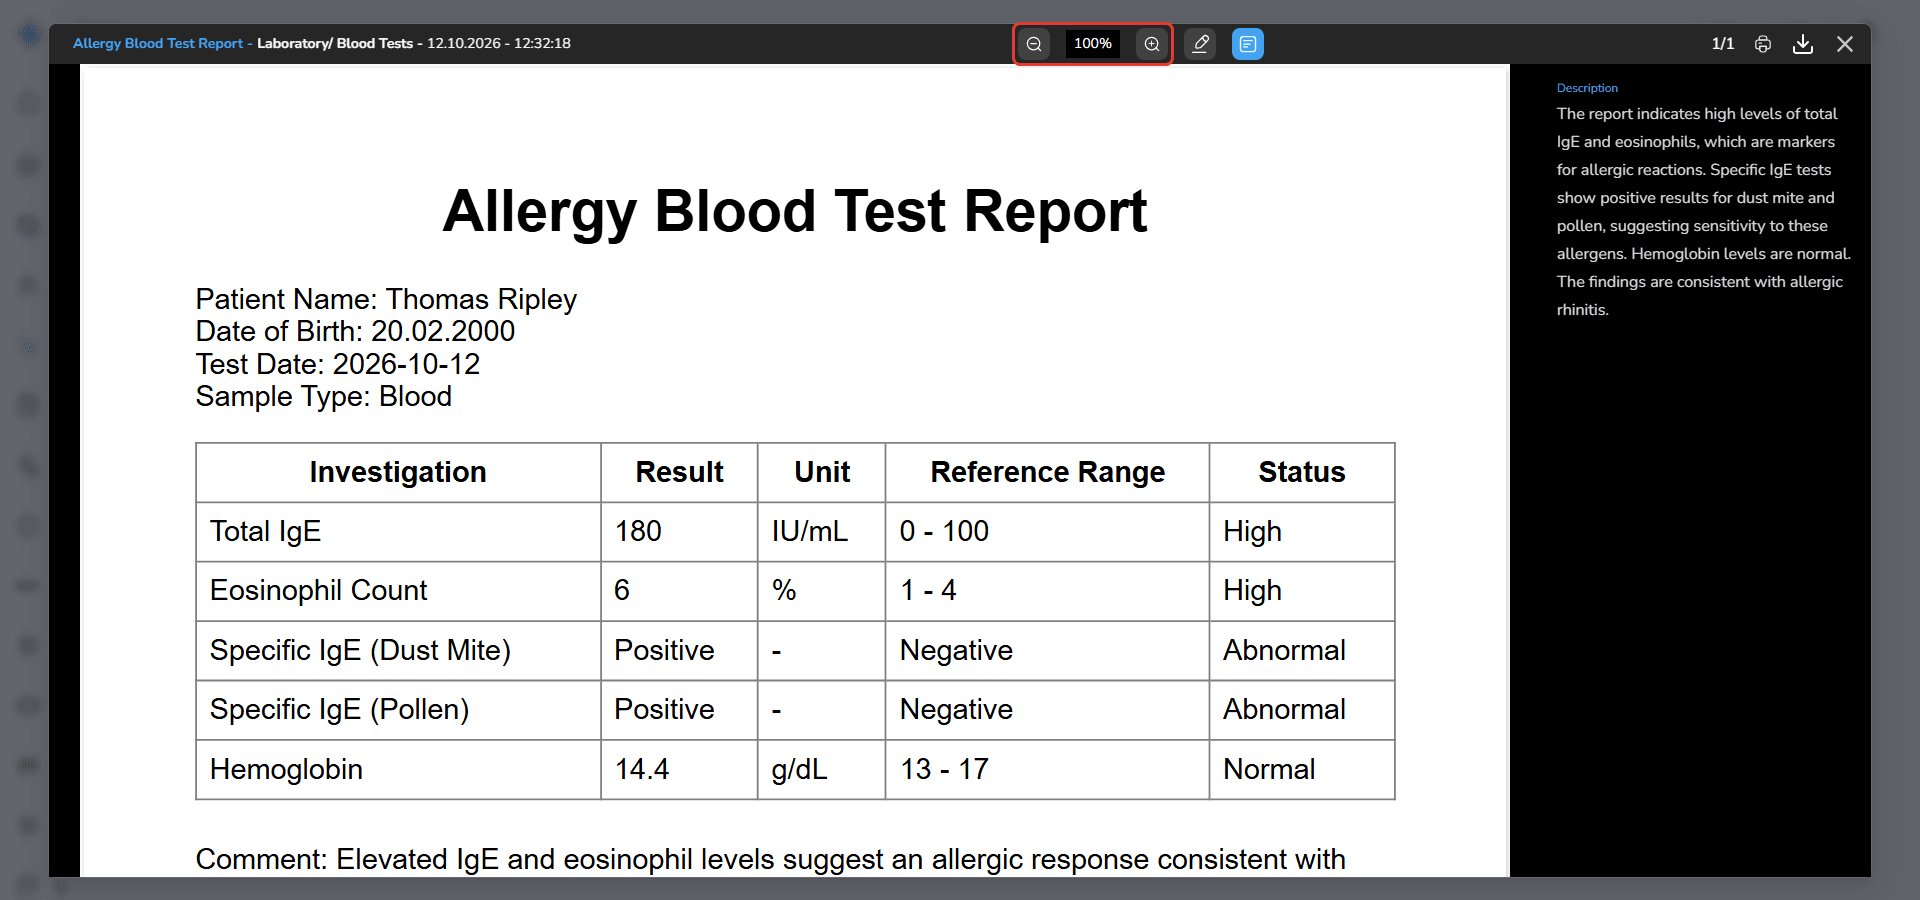
These controls allow you to adjust the document size for easier reading.
Available controls include
Zoom Out
Reduces the size of the document.
Zoom Percentage
Displays the current zoom level such as 100 percent.
Zoom In
Increases the size of the document.
Use these controls when you want to focus on small text or view the entire page more comfortably.
Description Panel
The Description button in the viewer header is used to control the display of the document description.
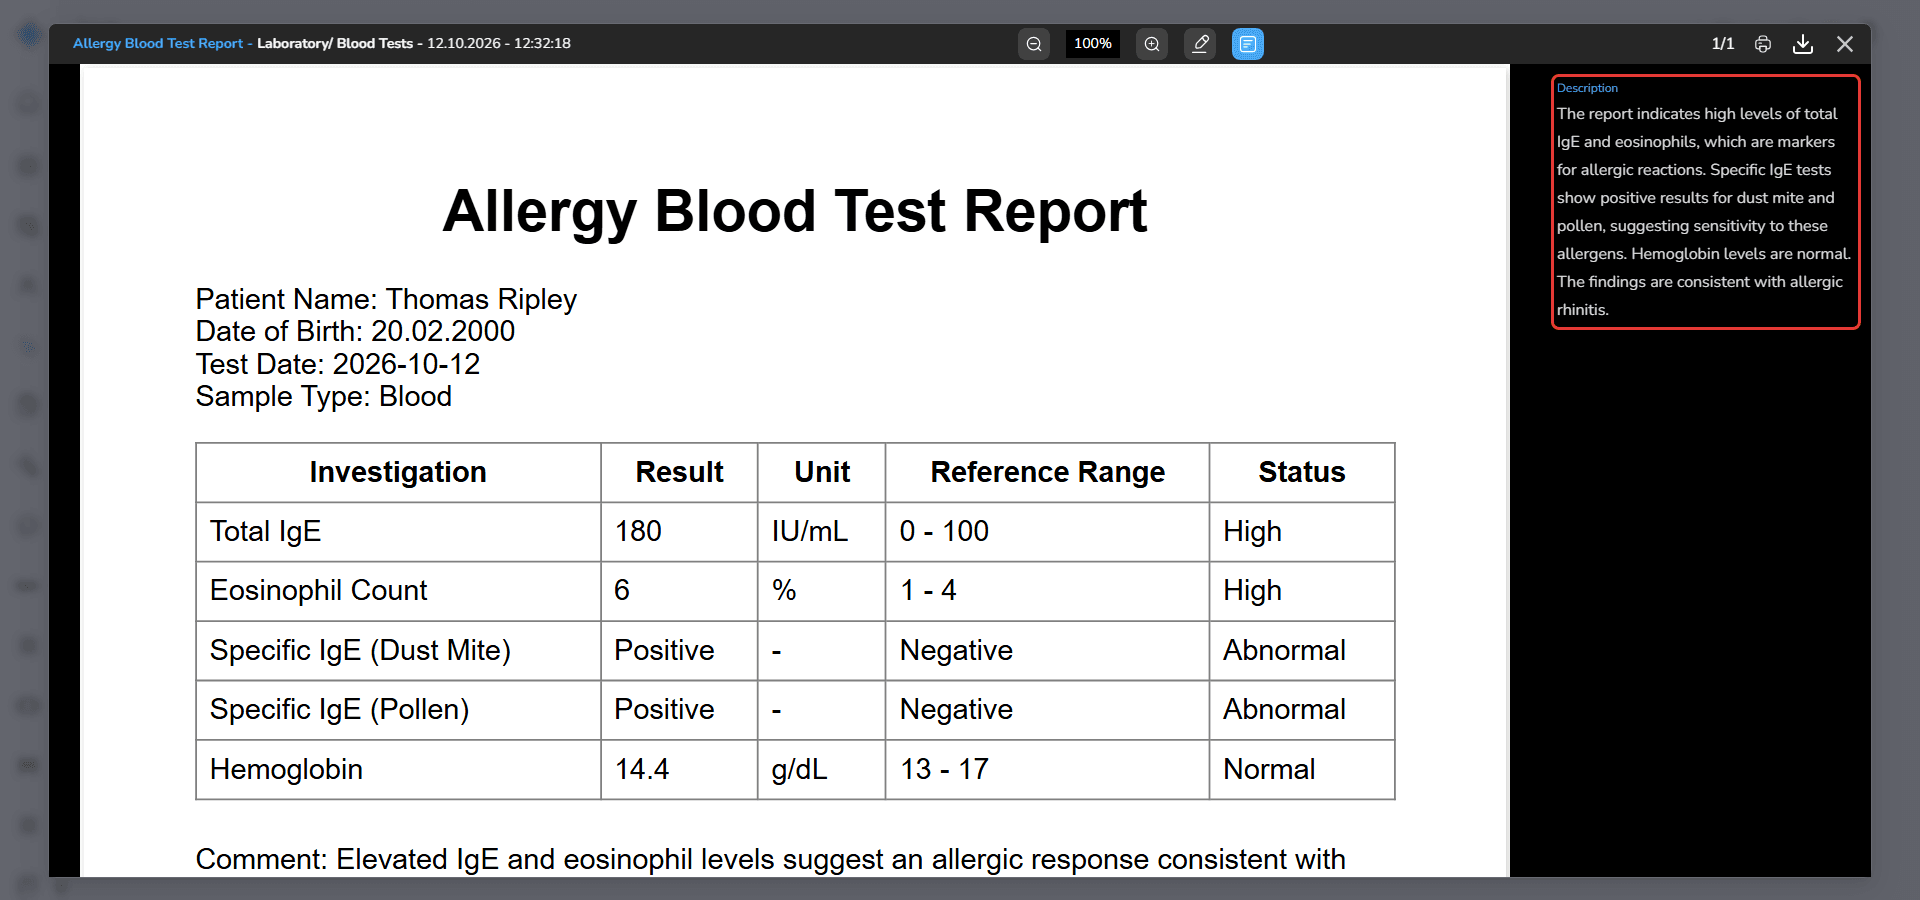
If the uploaded document contains a description, the viewer automatically opens the Description panel when the document is displayed.
This means that as soon as the viewer opens, the right side of the screen shows the description text associated with the document.
The text shown in this panel is the same content that was entered in the Description field during document upload.
If the description is long, you can scroll inside the panel to read the full text.
Hide the Description Panel
If you prefer to view the document in a larger area, you can hide the description panel.
To do this
- Click the Description button in the viewer header
After clicking the button
- the description panel closes
- the document expands and uses the full viewer space
Show the Description Panel Again
If the description panel is hidden and you want to see it again
- Click the Description button once more
The description panel will appear again on the right side of the viewer.
When a Document Has No Description
If the document does not contain any description, the Description button becomes inactive.
In this situation
- the description panel will not be displayed
- the document opens in full view by default
- the description button cannot be selected
This helps keep the viewer clean when there is no additional information to display.
Page Navigation
On the right side of the header, you will see the page navigation indicator.
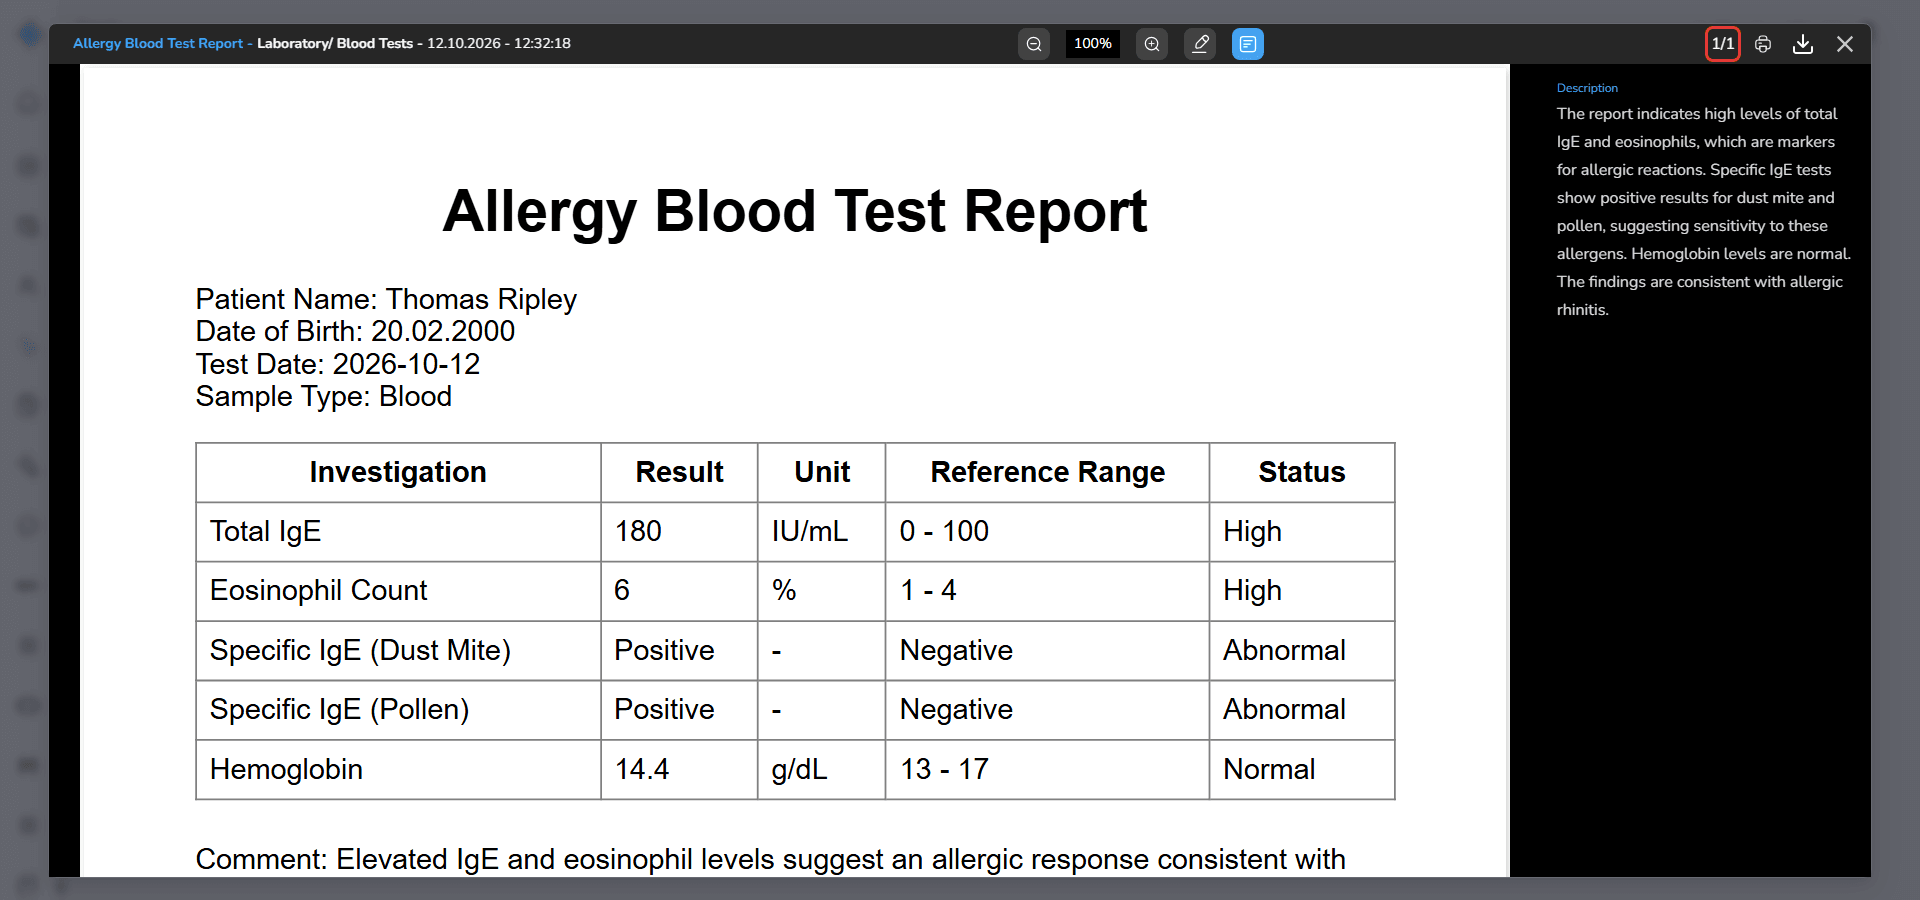
This shows
- the current page number
- the total number of pages
Example
1 / 1
This allows you to understand where you are inside the document.
Print the Document
Click the Print button in the header to print the document.
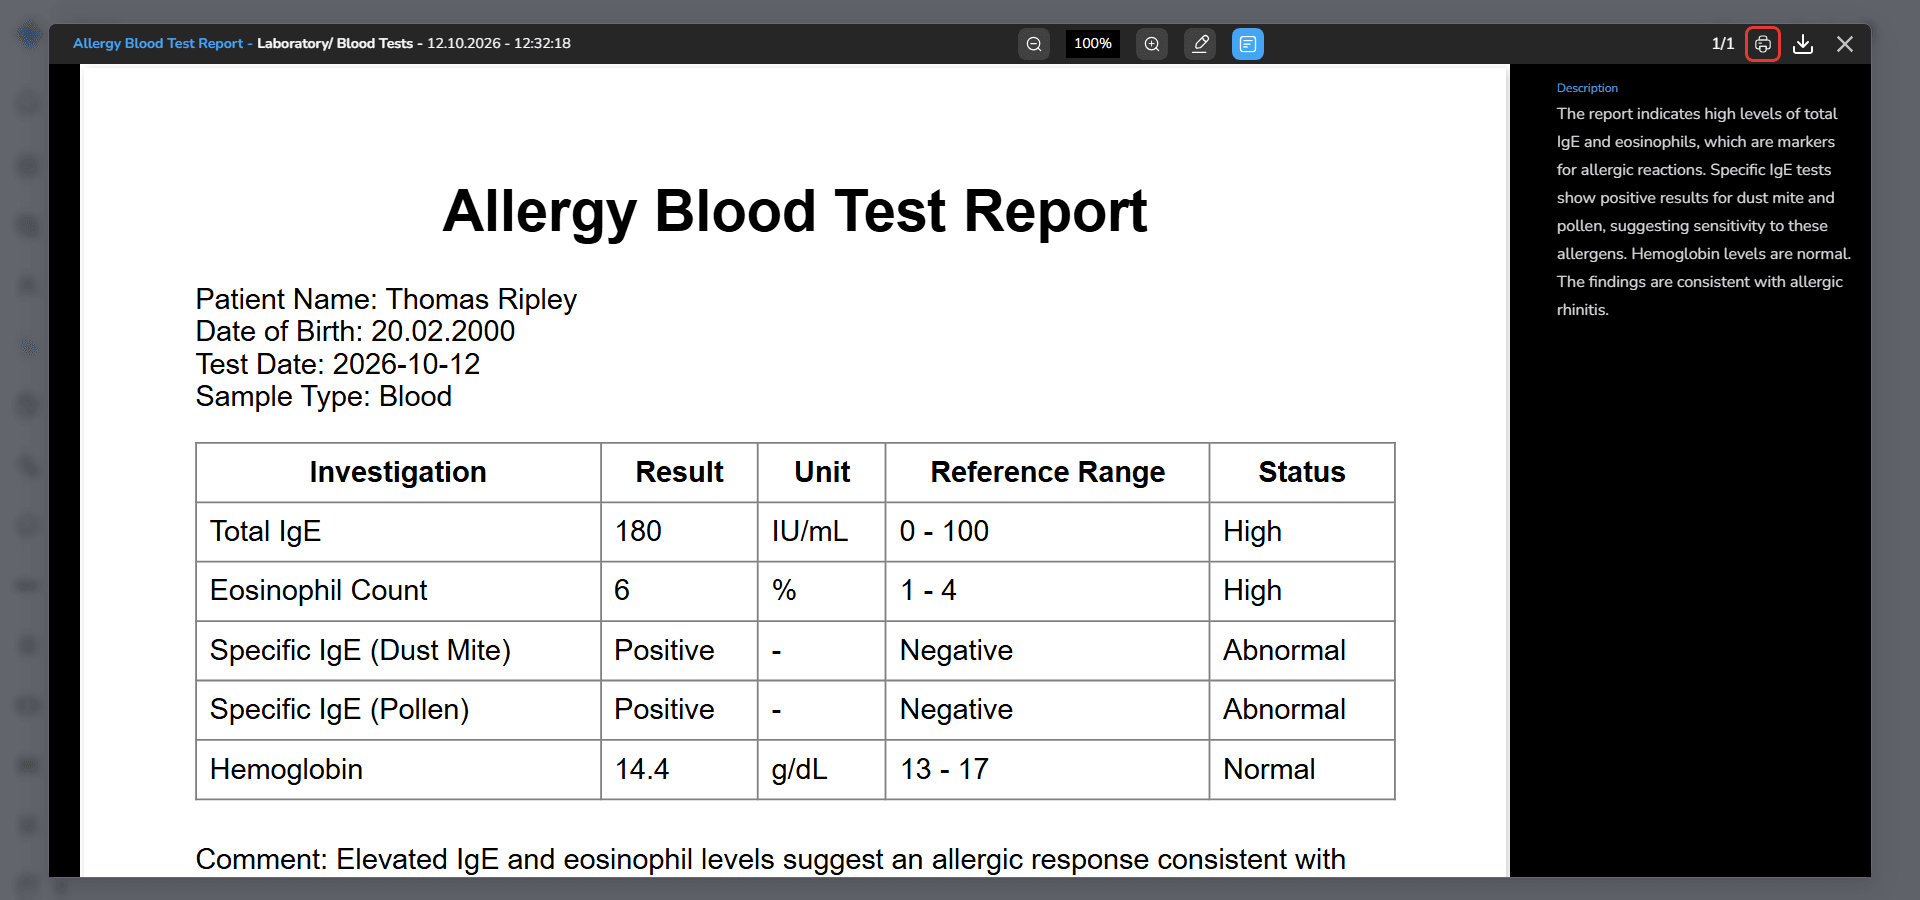
This opens your system's print dialog so you can choose a printer and print settings.
Download the Document
Click the Download button to save the document to your computer.
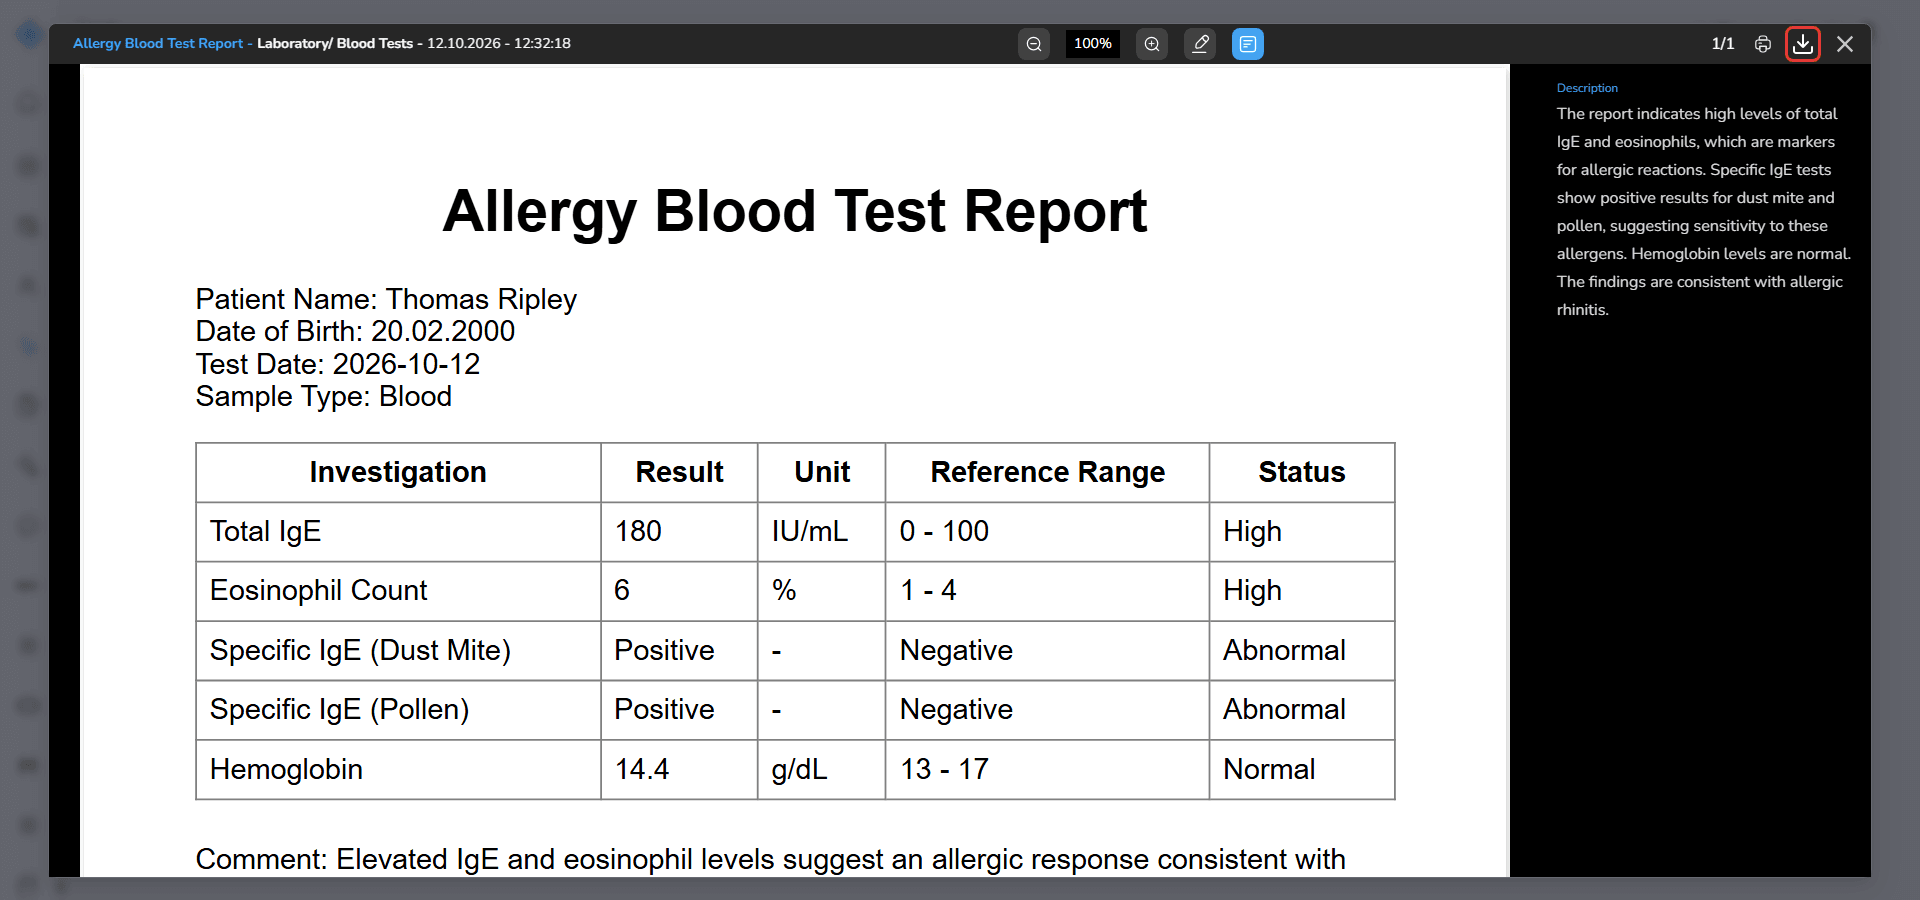
The file will download in its original format.
Edit PDF Document Information
Next to the description button you will see a pencil icon.
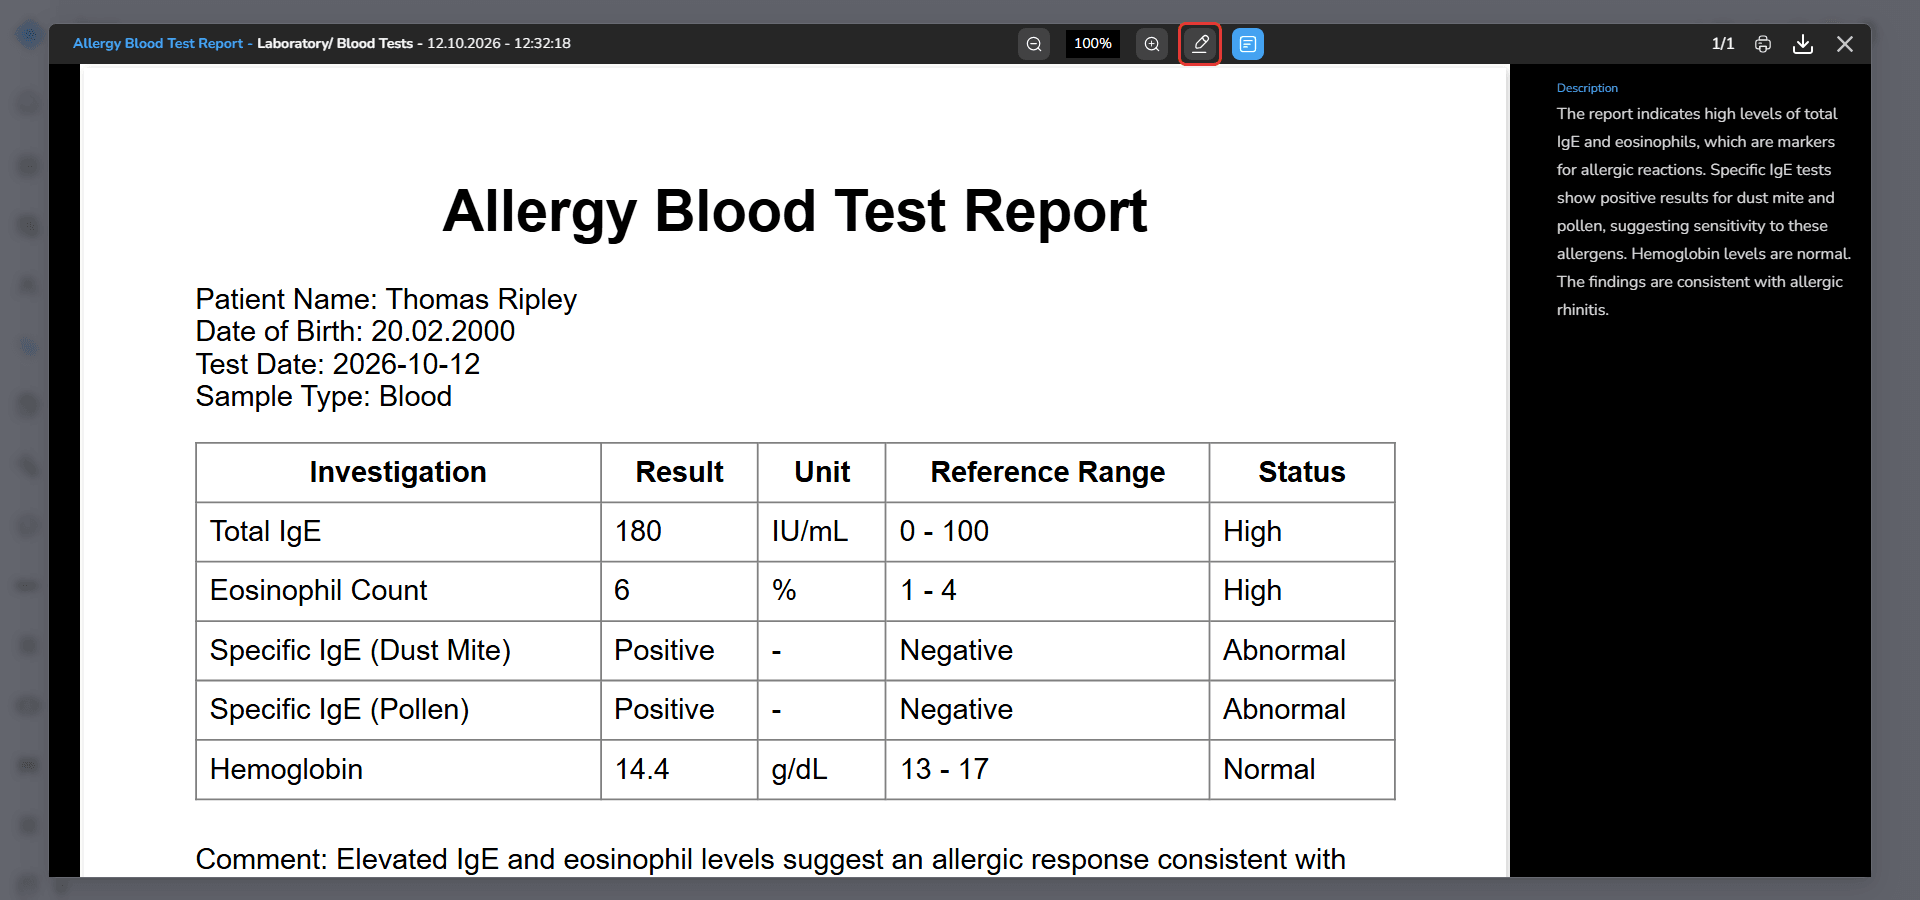
This button opens the Edit mode for the document.
Use this feature if you need to update the document information without leaving the viewer.
Start Editing
Click the Edit button.
The viewer enters Edit Mode.
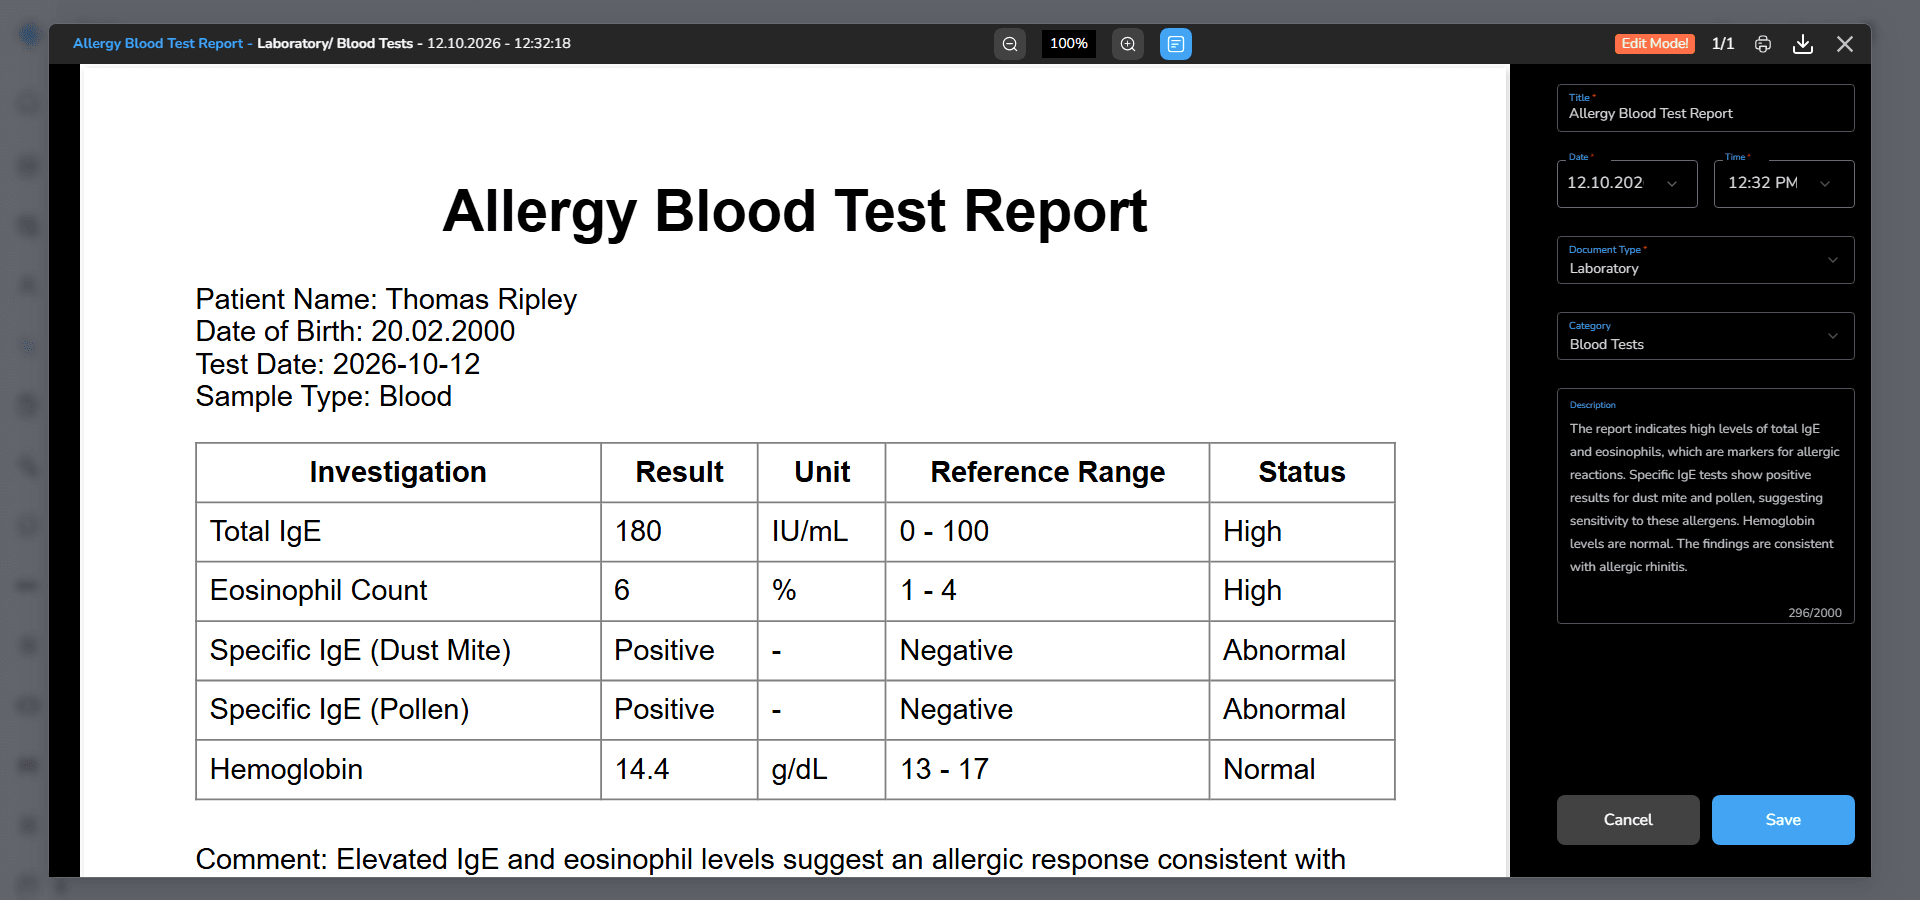
Instead of the description panel, a document information form appears on the right side of the viewer.
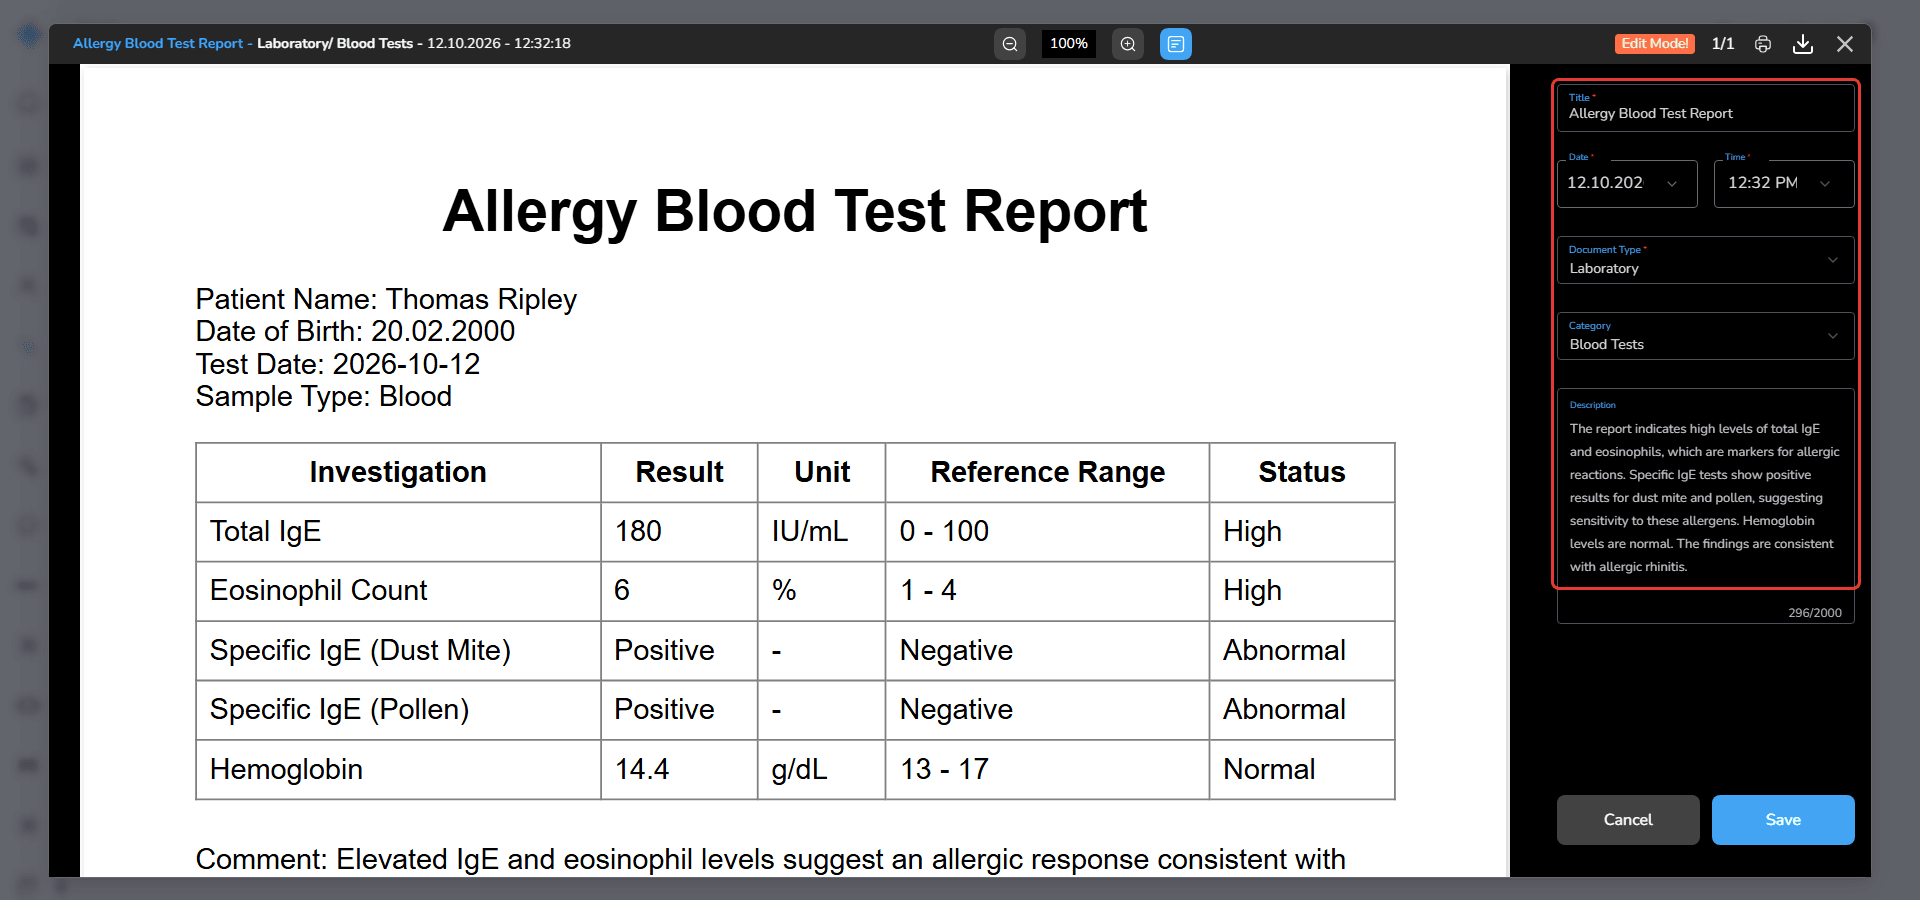
This form contains the same fields used when uploading the document.
You can update the following fields.
Title
Update the document title if needed.
Date
Change the date associated with the document.
Time
Adjust the time value.
Document Type
Select a different document type if required.
Category
Update the document category.
Description
Edit or add additional notes related to the document.
Save or Cancel Changes
At the bottom of the edit form you will see two buttons.
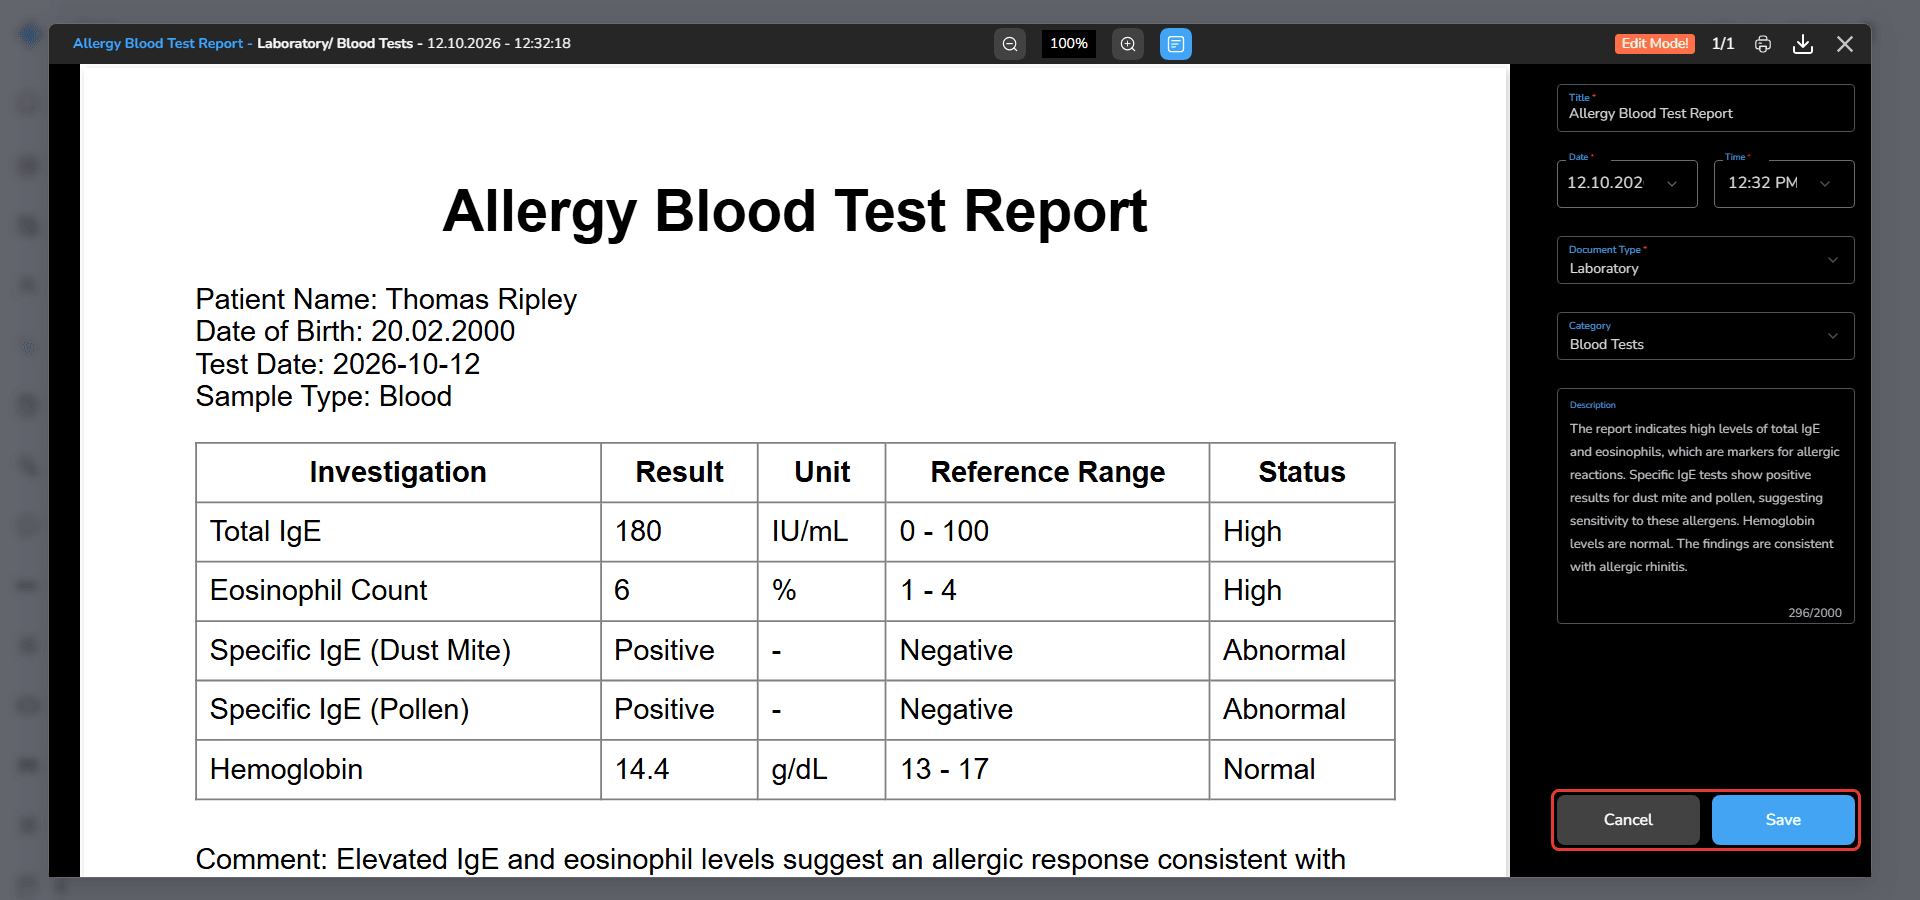
Save
Stores the changes you made to the document information.
Cancel
Discards the changes and exits edit mode.
After selecting either option the edit panel closes and the document returns to full view.
Edit Mode Label
While editing is active, the viewer displays an Edit Mode label near the page navigation area in the header.
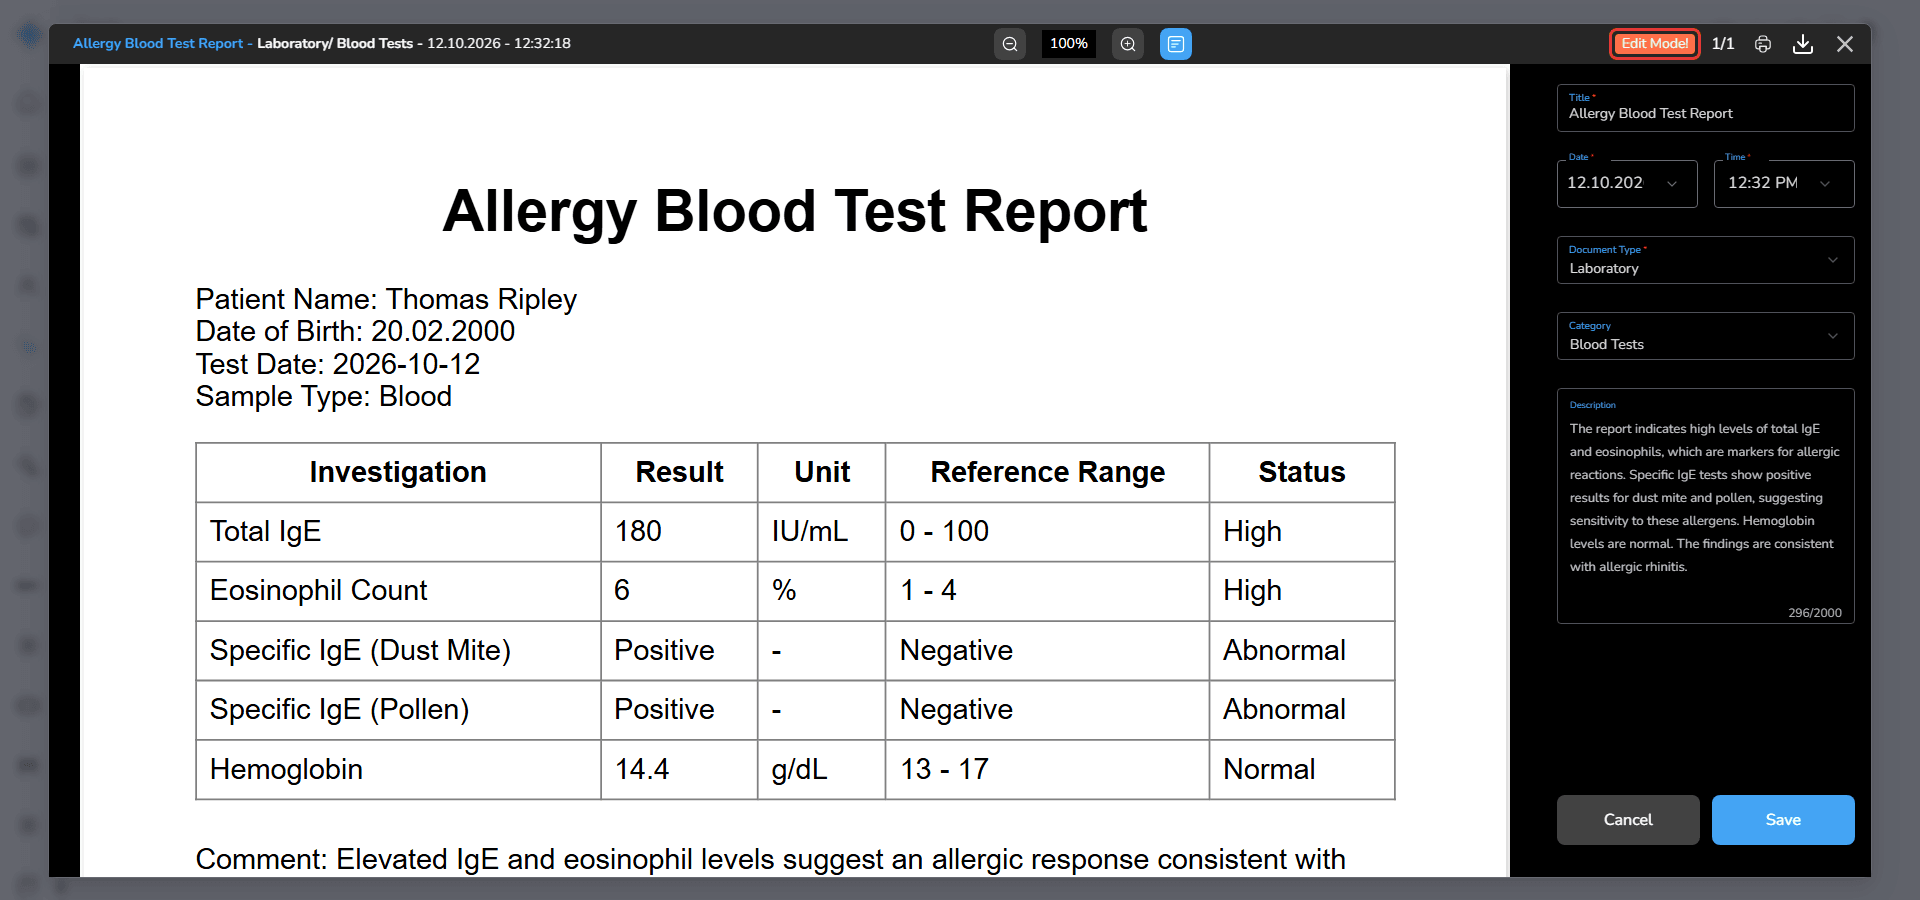
This label helps you quickly recognize that the document is currently in editing state.
Close the Viewer
To exit the viewer click the Close button on the right side of the header.
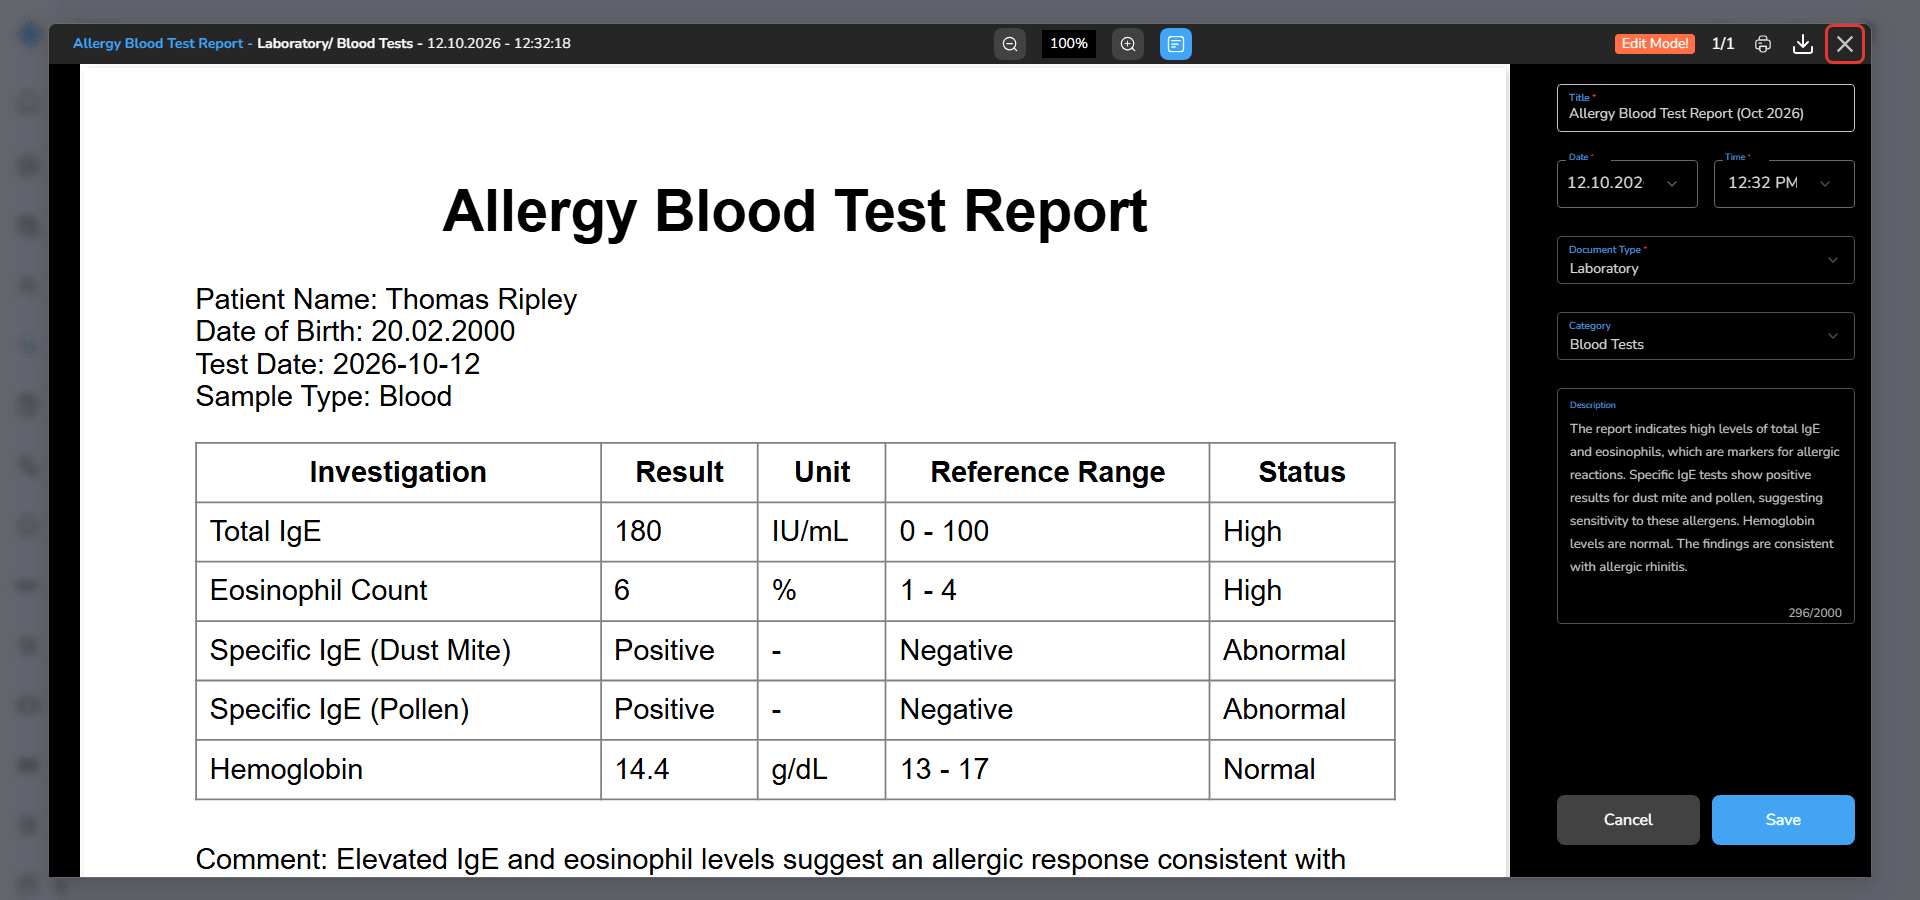
The viewer closes and you return to the Documents tab.
Unsaved Changes Warning
If you attempt to close the viewer while Edit Mode is active and changes have not been saved, the system displays a confirmation dialog.
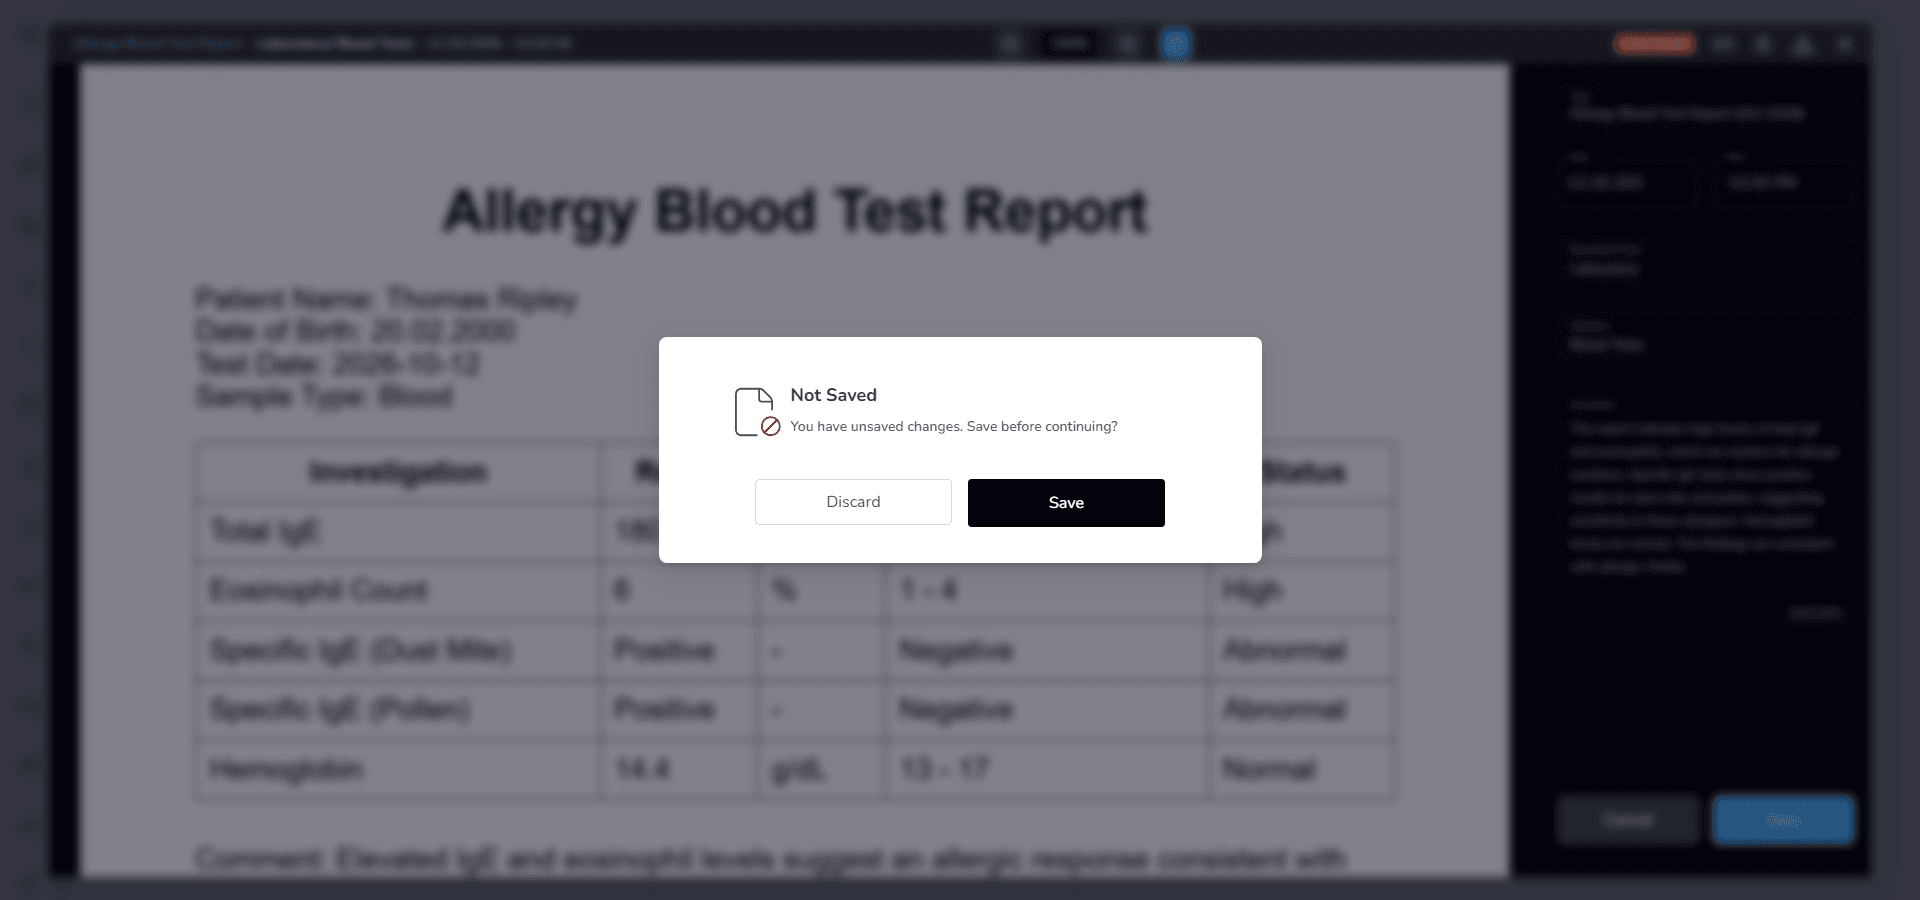
The message shown is
You have unsaved changes. Save before continuing?
Two options will be available.
Save
Saves your changes before leaving the viewer.
Discard
Closes the viewer without saving the changes.
This protection prevents accidental loss of updated document information.
View Images
When you click on an image file in the Documents list, the file opens inside the Image Viewer.
This viewer is used for displaying medical images such as
- JPG
- PNG
The Image Viewer allows you to view the image, read its description, review annotations and navigate inside the image using movement and zoom tools.
Viewer Header
At the top of the Image Viewer there is a header that displays the main information of the document.
These values are the same details that were entered when the document was uploaded.
The header displays the following information.
Title
The name of the document.
Document Type
The type of document.
Category
The category assigned to the document.
Date and Time
The date and time associated with the document.
On the right side of the header there is only one button.
Close
Click this button to close the Image Viewer and return to the previous page.
Description Panel
On the right side of the Image Viewer there is a panel used to display the document description.
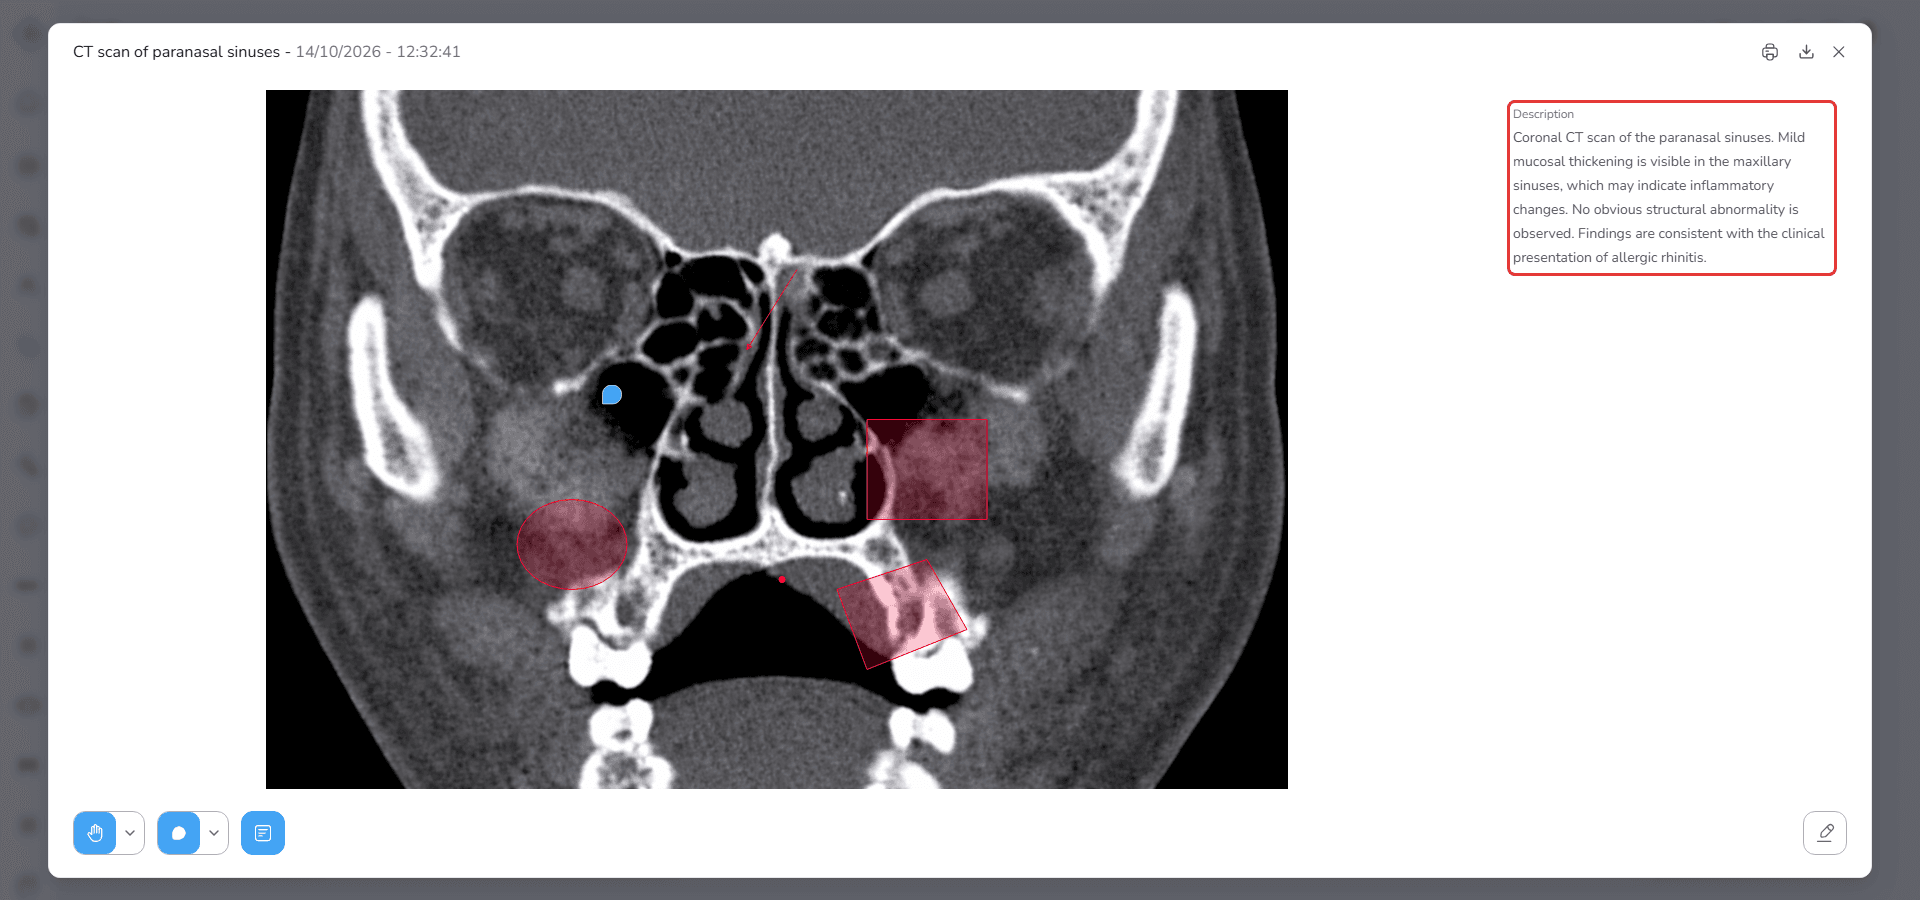
This description is the same text that was entered in the Description field during document upload.
Automatic Display of Description
If the document contains a description
- the description panel opens automatically
- the description text appears on the right side of the viewer
In this state the image is displayed in the remaining space on the left side.
If the description text is long you can scroll inside the panel to read the full content.
When the Document Has No Description
If the document does not contain a description
- the description panel does not appear
- the image is displayed in full view inside the viewer
In this case the entire viewer area is used for displaying the image.
Viewer Controls
At the bottom of the Image Viewer you will find several control buttons used for interacting with the image.
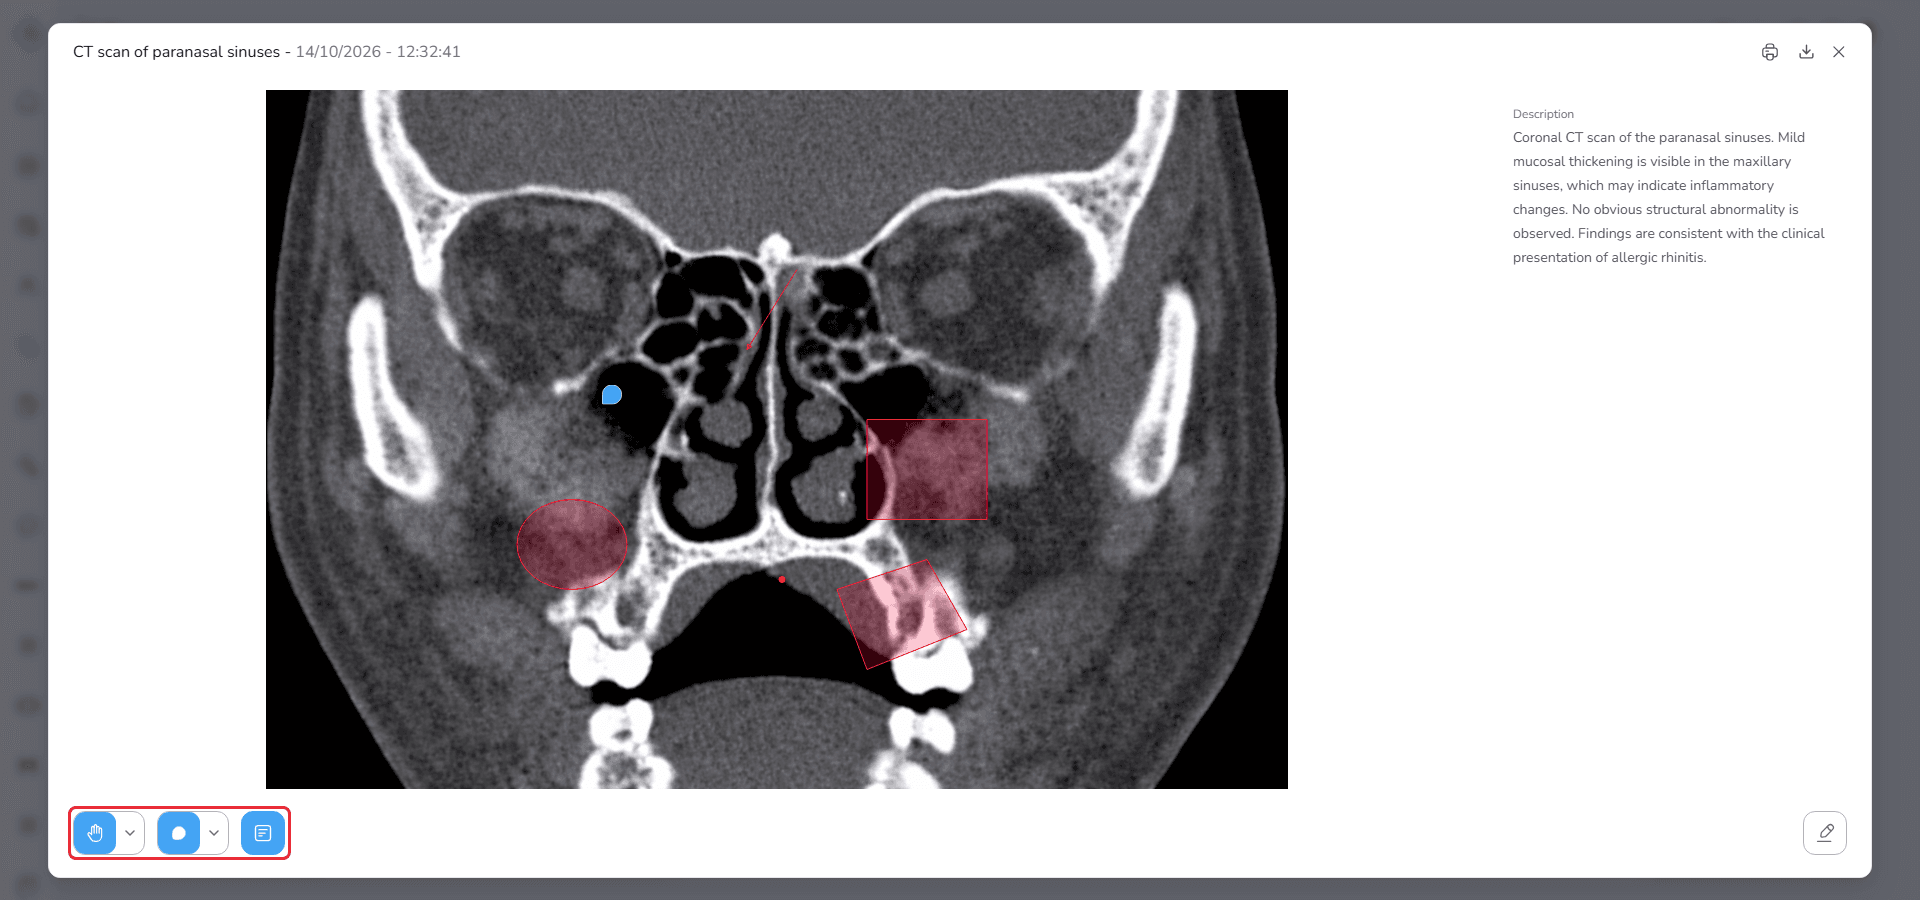
Three buttons are located in the center bottom area of the viewer and one button is located on the bottom right side.
We will first review the buttons located in the center.
Description Toggle Button
The first button from the right in the control area is the Description button.
This button controls the visibility of the description panel.
When the Document Has a Description
If the document contains a description
- the button is active
- the description panel is open by default
If you want to hide the description
- Click the Description button
After clicking
- the description panel closes
- the image expands to use more viewing space
To display the description again
- Click the Description button again
The description panel will reopen on the right side of the viewer.
When the Document Has No Description
If the document does not contain a description
- the Description button is disabled
- the description panel does not appear
- the image is displayed in full view
Annotation Visibility Button
The second button is used for displaying image annotations.
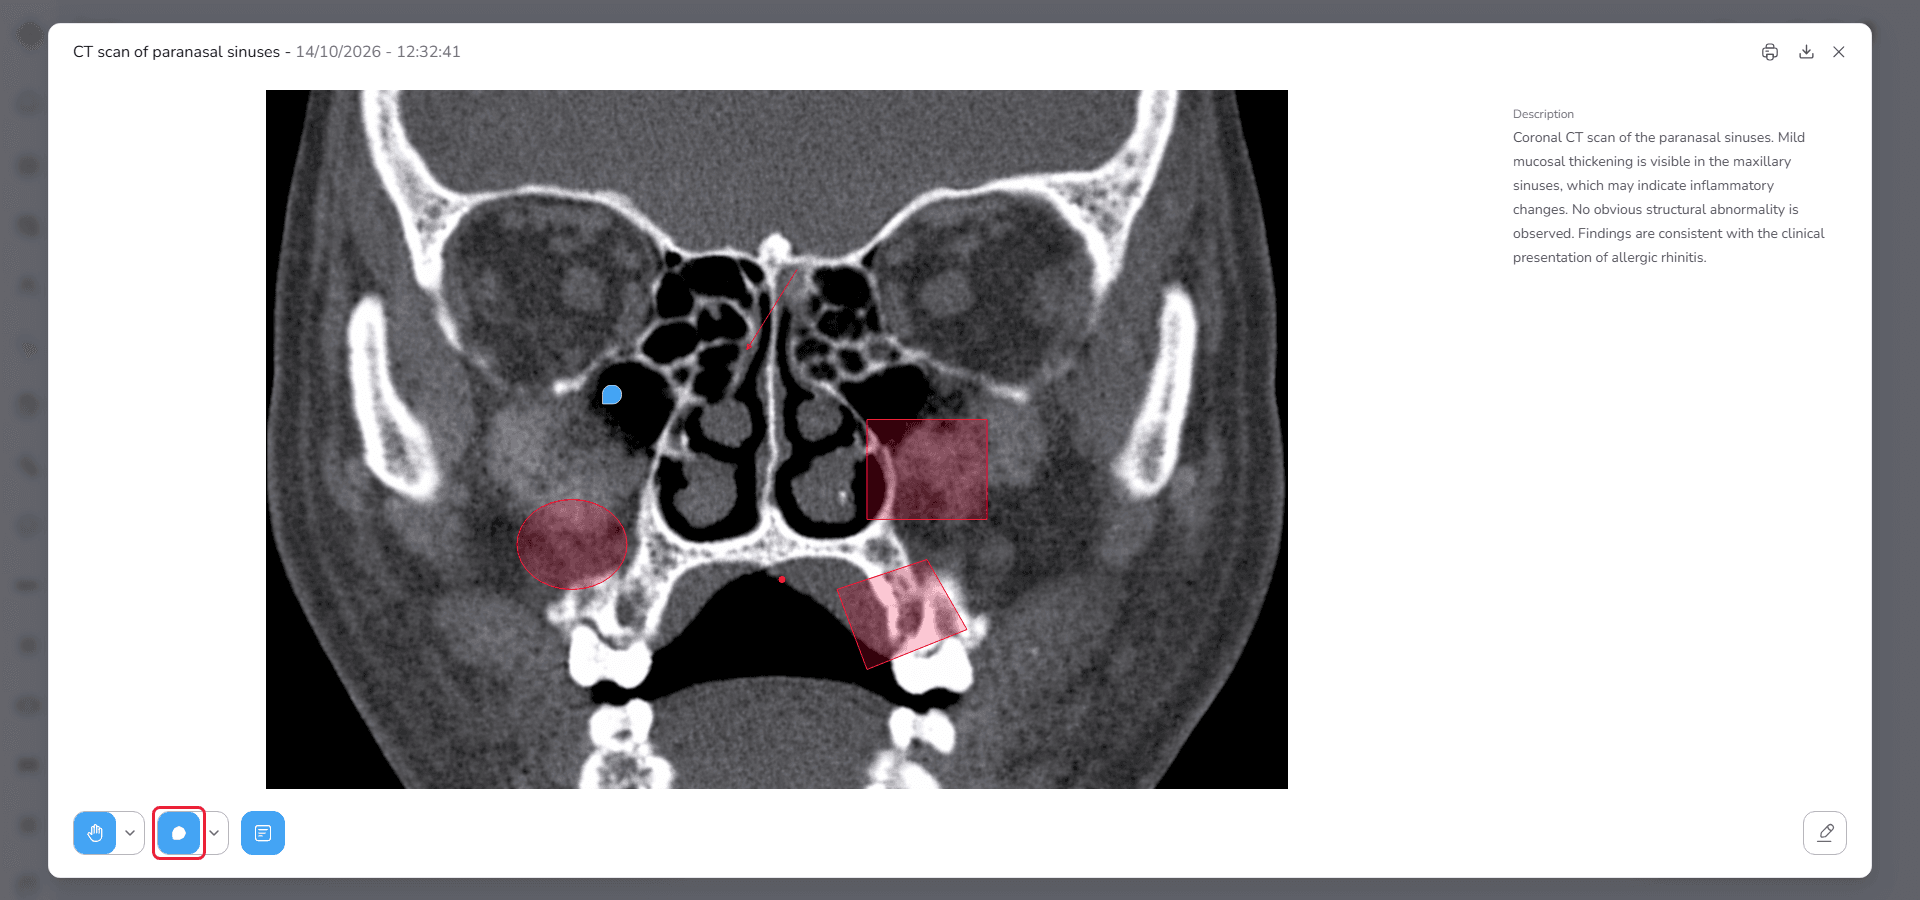
If providers or users have placed annotations on the image, this button allows you to view them.
Viewing Annotations
To display annotations
- Click the Annotation button
After activation
- annotations placed on the image will appear
Viewing Annotations from Specific Providers
Next to this button there is a small arrow icon.
Clicking this arrow opens a dropdown list.
This list shows the providers who have added annotations to the image.
From this list you can choose
- a specific provider to view only their annotations
- or select all providers to view all annotations together
Hand and Zoom Tool
The third button, located on the left side of the control group, controls image navigation and zoom interaction.
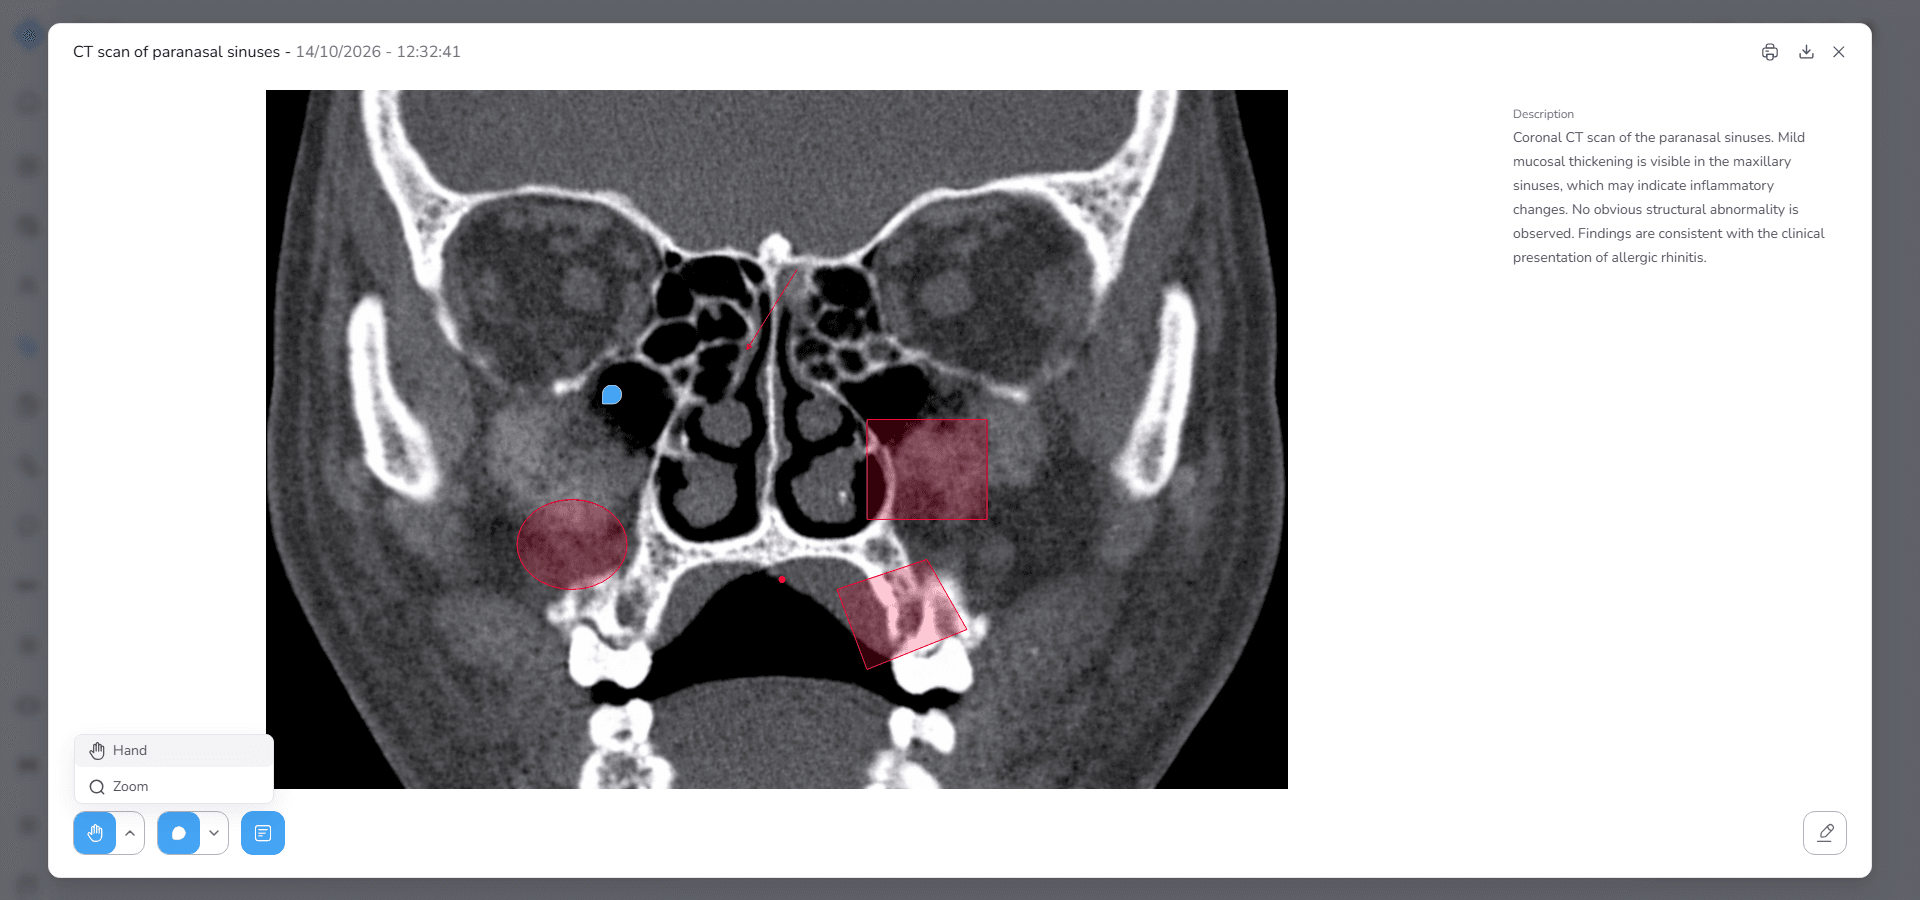
This tool allows you to move around the image and zoom into specific areas.
Hand Mode
Hand Mode is active by default.
In this mode
- you can click and drag the image
- move the image in different directions inside the viewer
This is useful when the image is large and you want to examine different areas.
Zoom Mode
Next to this button there is also a small arrow.
Clicking the arrow opens a menu with two options
- Hand
- Zoom
If you select Zoom
You can use the mouse scroll wheel
- to zoom in
- or zoom out of the image
Using Hand and Zoom Together
One important feature of this viewer is that Hand Mode remains active even when Zoom Mode is selected.
This means you can
- move the image across the viewer
- zoom in and out using the mouse scroll
This combination allows you to explore the image more easily and focus on specific areas.
Edit Button
On the bottom right side of the Image Viewer there is an additional button.
This button is used for editing the document information.
When you click this button
the viewer switches from View Mode to Edit Mode.
In Edit Mode you can modify the document details.
The full explanation of this feature is provided in the Image Viewer Edit Mode section.
Edit Images and Add Annotations
In the Image Viewer you can not only view the image but also edit image information and add annotations or comments directly on the image.
To enter Edit Mode follow these steps.
- In the Image Viewer click the Edit button located at the bottom right of the viewer.
After clicking this button
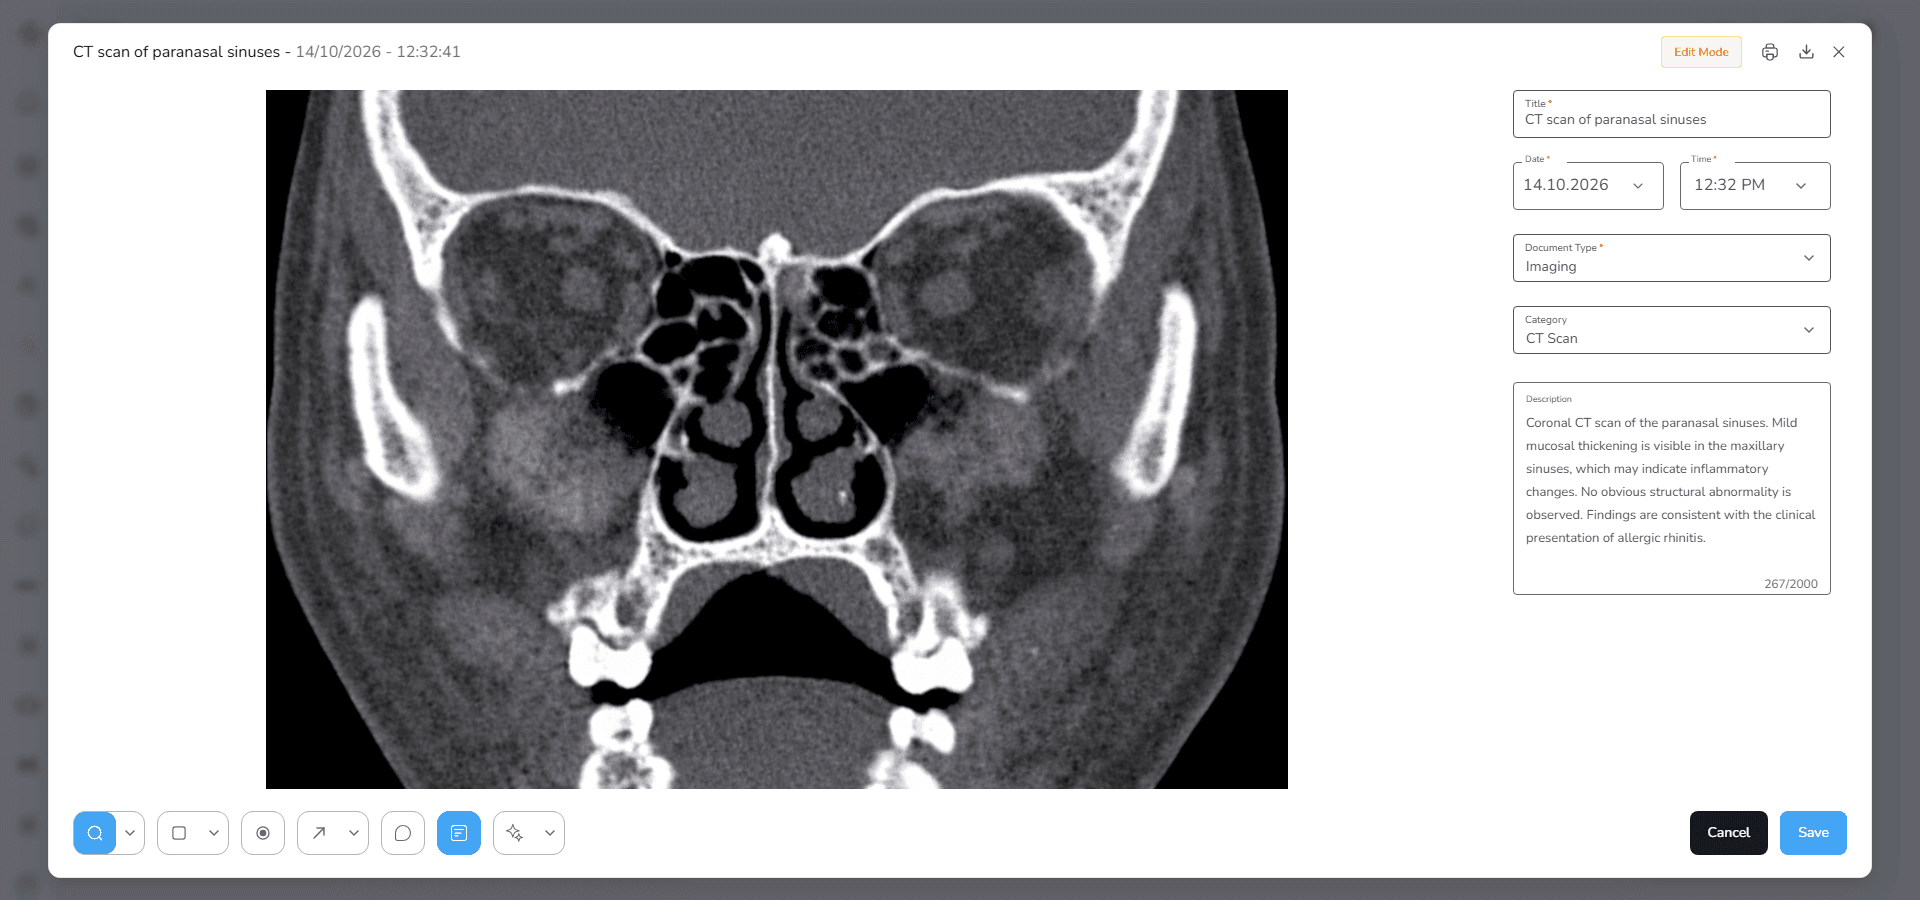
- the viewer switches to Edit Mode
- annotation tools become available
- the document information panel opens on the right side
In Edit Mode you can
- edit the image information
- add annotations on the image
- add comments
- edit or delete existing annotations
Edit Mode Header
In Edit Mode the header remains almost the same as in View Mode and still displays the document information.
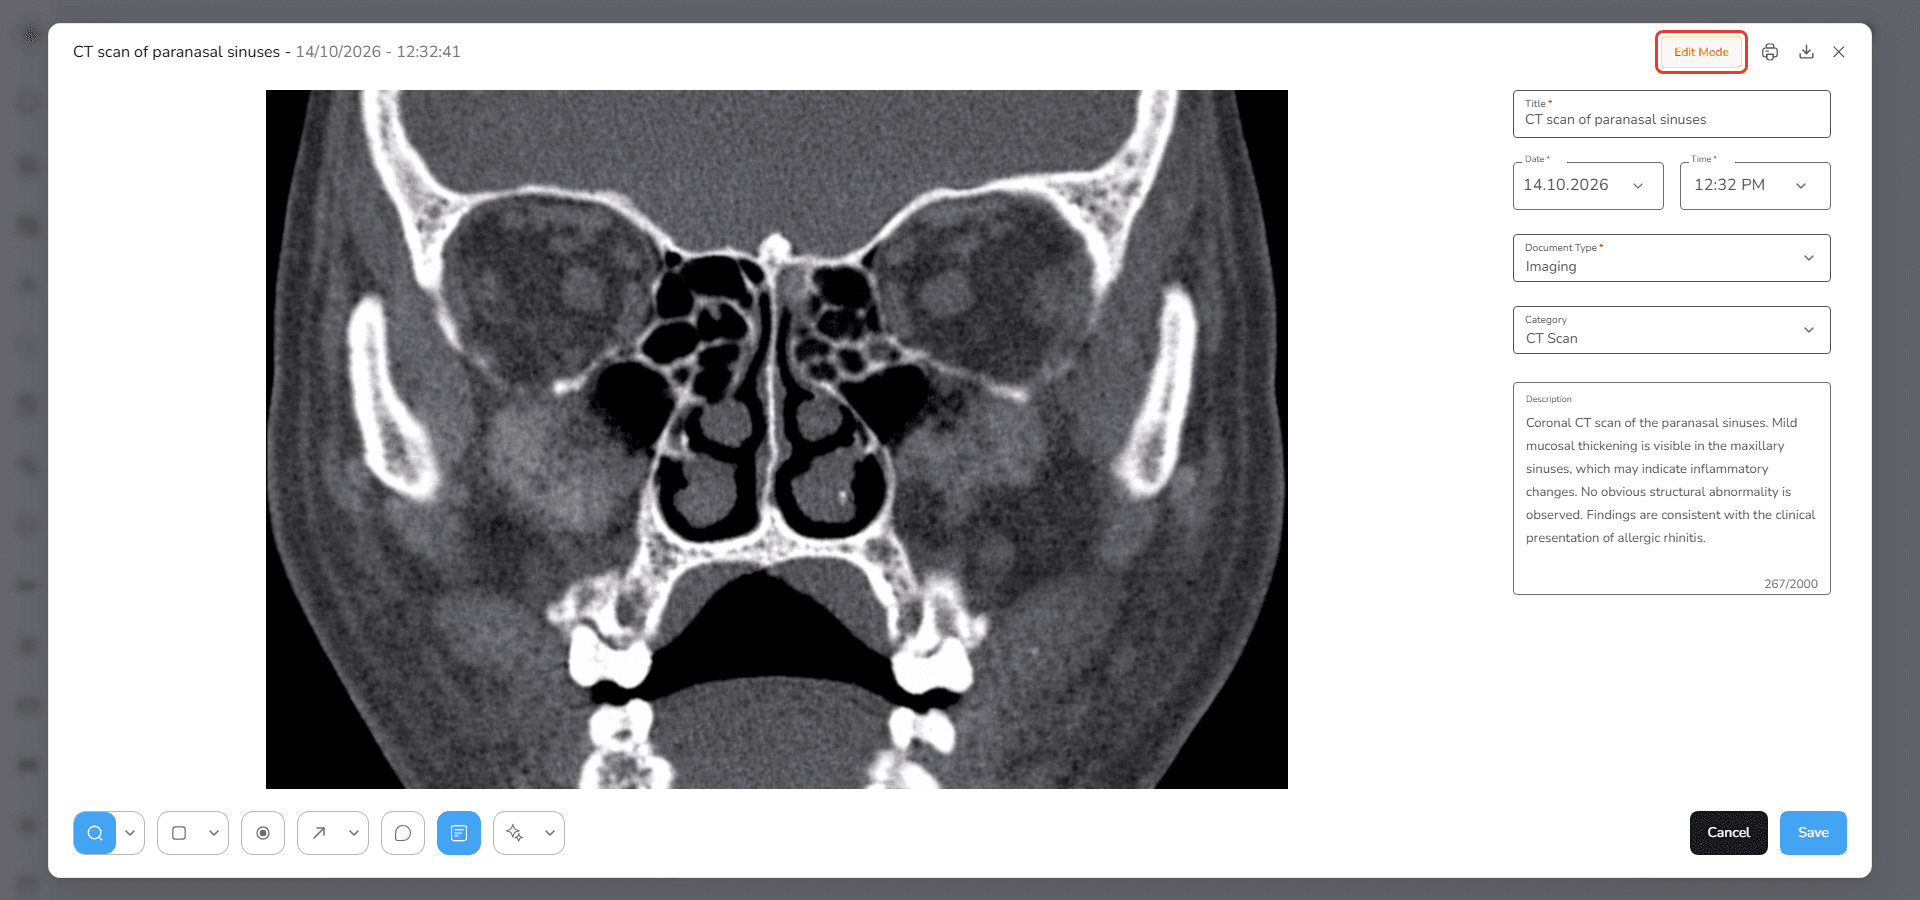
The header shows the following information.
Title
The name of the document.
Document Type
The type of document.
Category
The category assigned to the document.
Date and Time
The date and time associated with the document.
Next to the Close button an additional label appears.
Edit Mode
This label indicates that the viewer is currently in editing mode.
Document Information Panel
When Edit Mode is active a panel opens on the right side of the viewer.
This panel contains the document information and allows you to edit it.
The panel includes the following fields.
Title
The name of the image.
Date
The date associated with the image.
Time
The time associated with the image.
Document Type
The document type.
Category
The category of the image.
Description
Additional notes or description related to the image.
You can modify any of these fields and save the changes later.
Edit Mode Tools
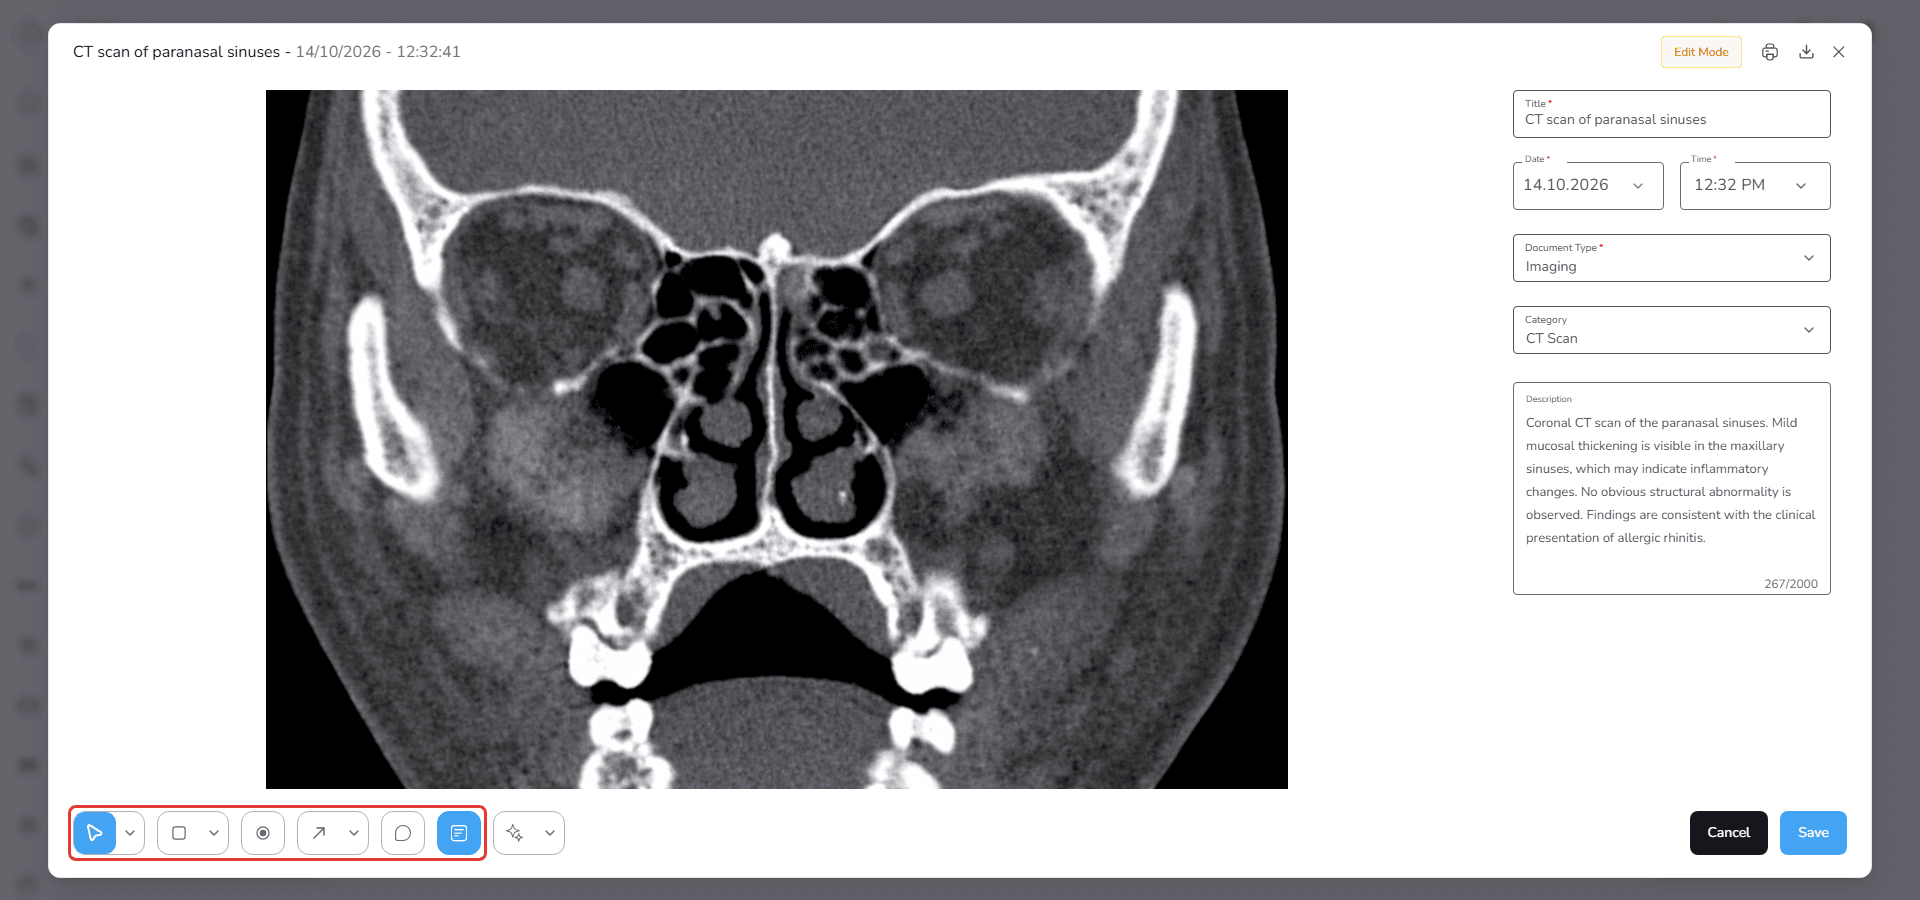
At the bottom of the Image Viewer there is a toolbar that contains the tools used for interacting with the image and creating annotations.
From left to right, the toolbar contains
- the Navigation tool (Hand, Zoom and Pointer)
- the Shape tool (Rectangle, Ellipse and Area)
- the Point tool
- the Arrow tool (Arrow, Double-headed arrow and Line)
- the Comment tool
- the Description Panel Toggle
A tool with a small arrow next to it groups several options. Click the arrow to open its menu and choose an option.
Navigation Tool
The first tool from the left side controls image navigation and interaction.
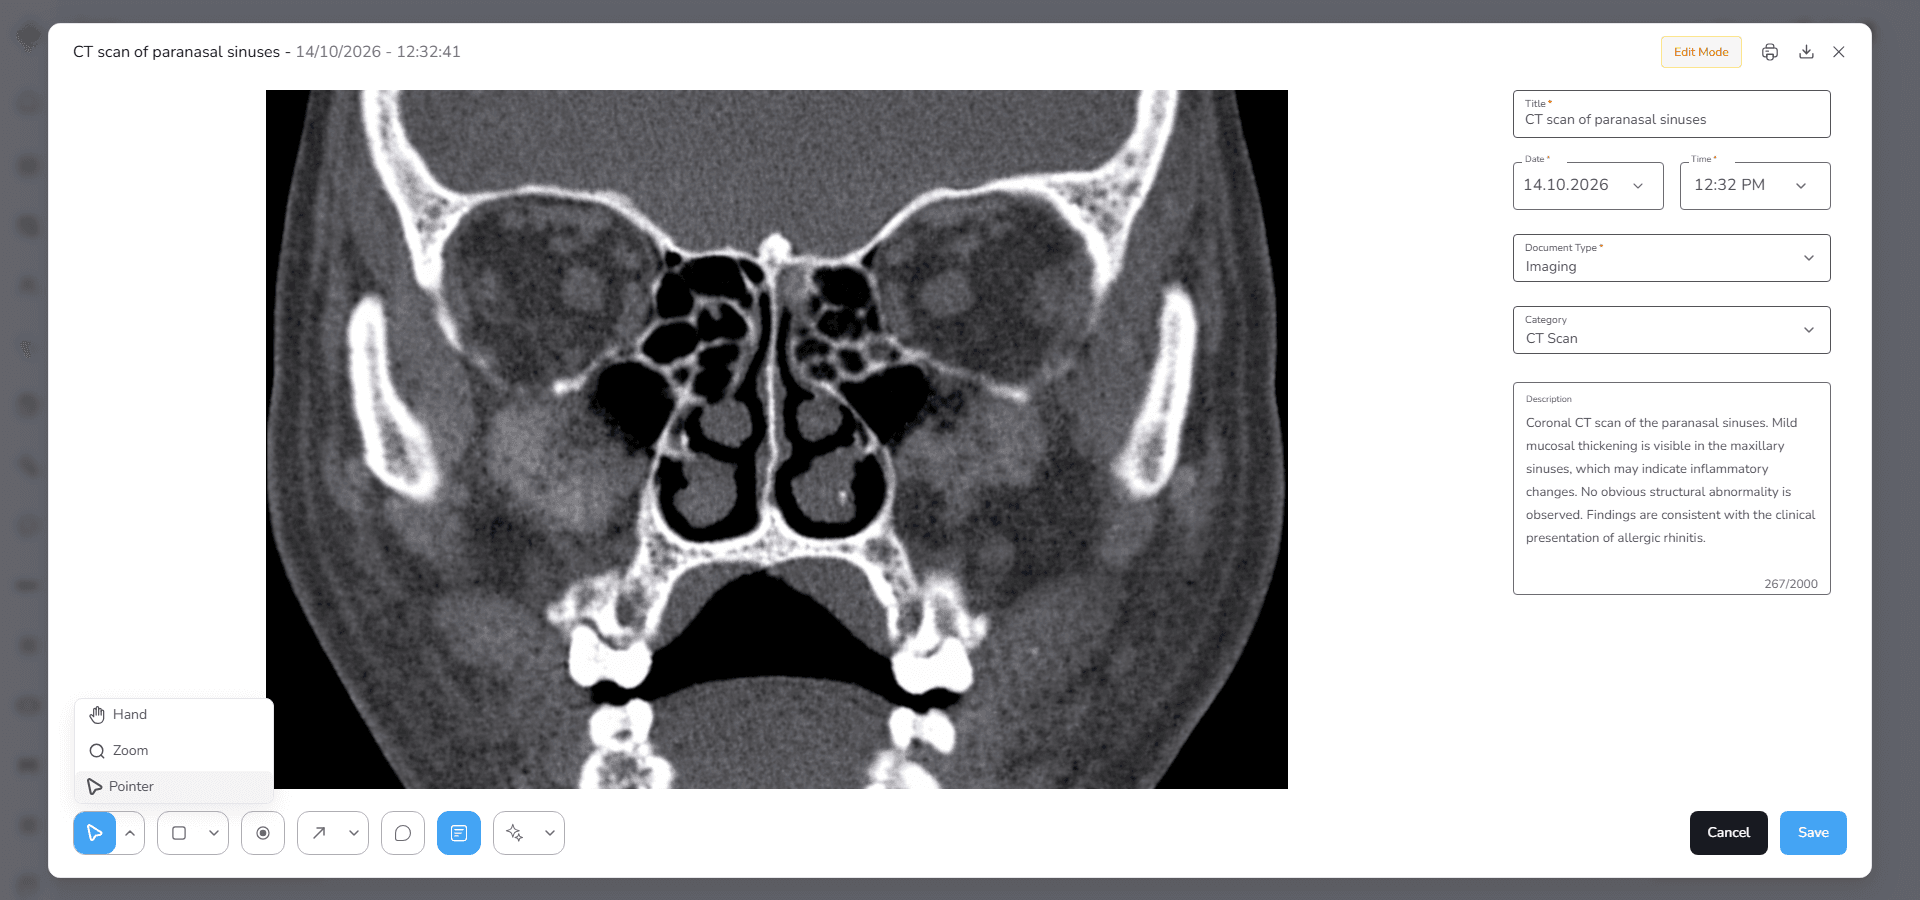
This tool includes three modes.
- Hand
- Zoom
- Pointer
You can select the desired mode from the dropdown menu next to the button.
Hand Mode
Hand Mode allows you to move the image inside the viewer.
To use it
- Click and hold on the image
- Drag the image to move it in any direction
This is useful when working with large images.
Zoom Mode
Zoom Mode allows you to zoom in or zoom out using the mouse scroll wheel.
Scroll up to zoom in
Scroll down to zoom out
Pointer Mode
Pointer Mode is used for selecting and editing annotations.
When Pointer Mode is active you can
- select annotations
- resize annotations
- move annotations
- edit annotation labels
- delete annotations
This mode is mainly used when you want to modify annotations that already exist on the image.
Shape Tool (Rectangle, Ellipse and Area)
The second tool groups the three shape tools: Rectangle, Ellipse and Area.
To choose a shape, click the small arrow next to the button and select it from the menu. The button then shows the icon of the selected shape.
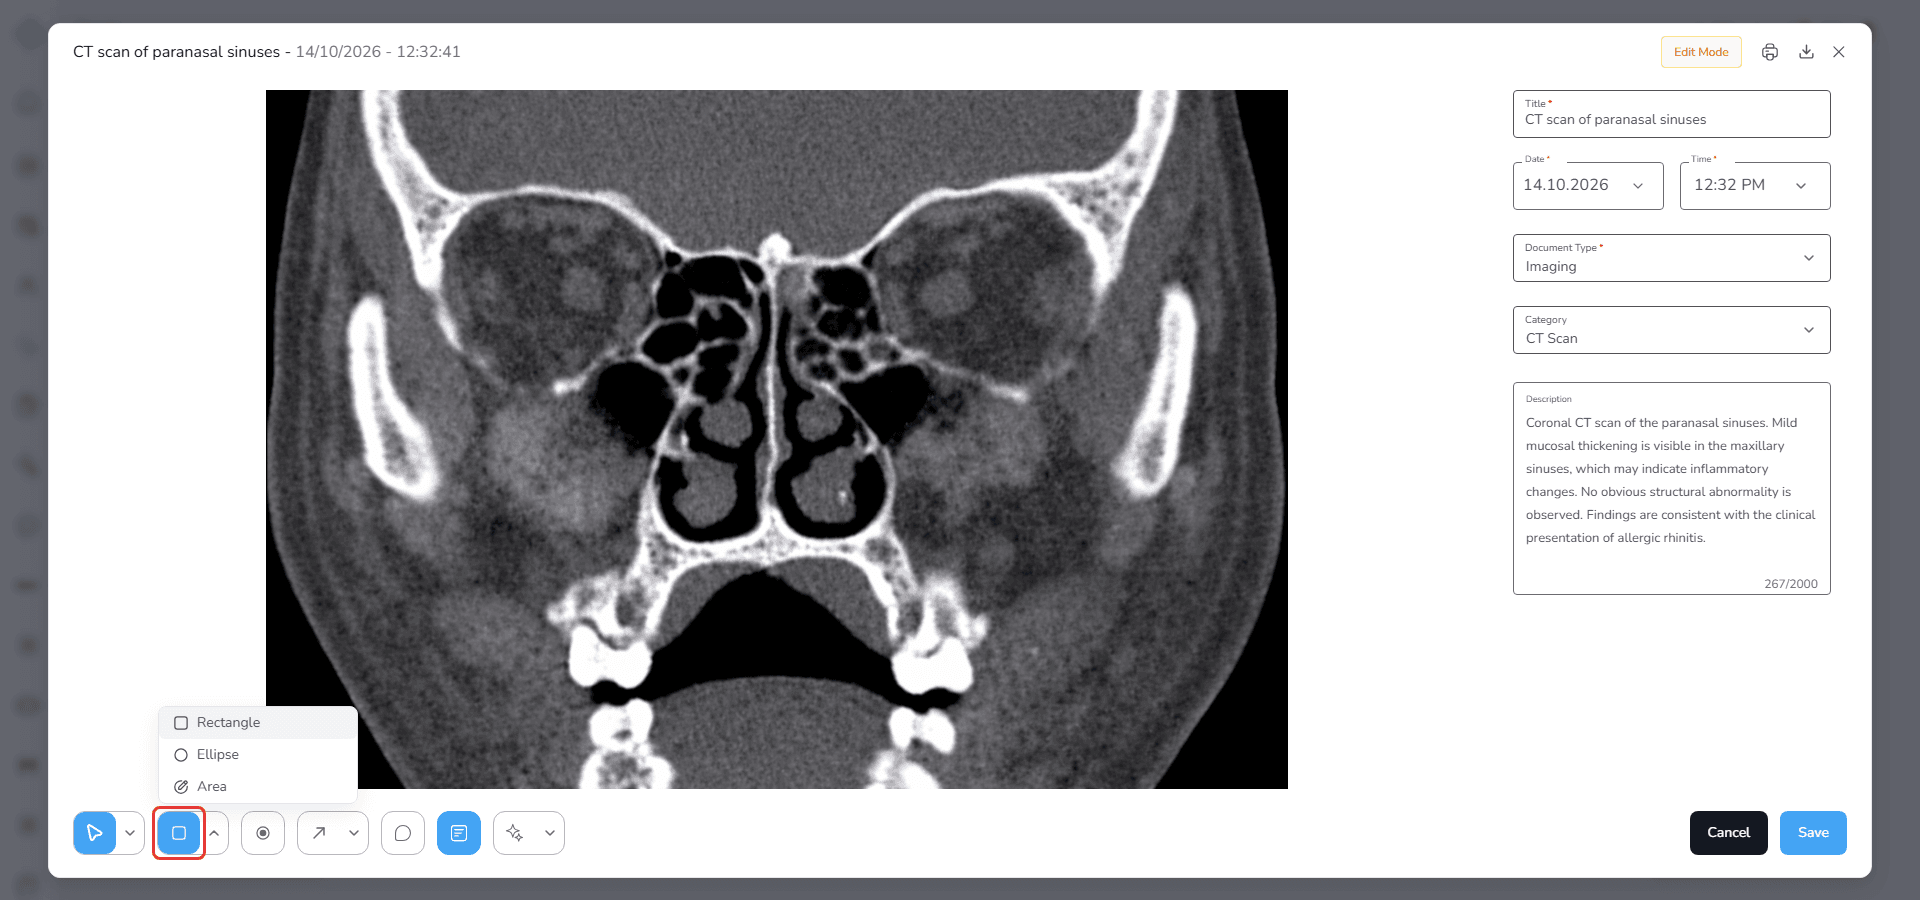
Rectangle
The Rectangle tool allows you to draw square or rectangular shapes.
To draw a rectangle
- Select Rectangle from the shape menu
- Click on the image and hold the mouse button
- Drag the mouse to define the rectangle size
- Release the mouse button
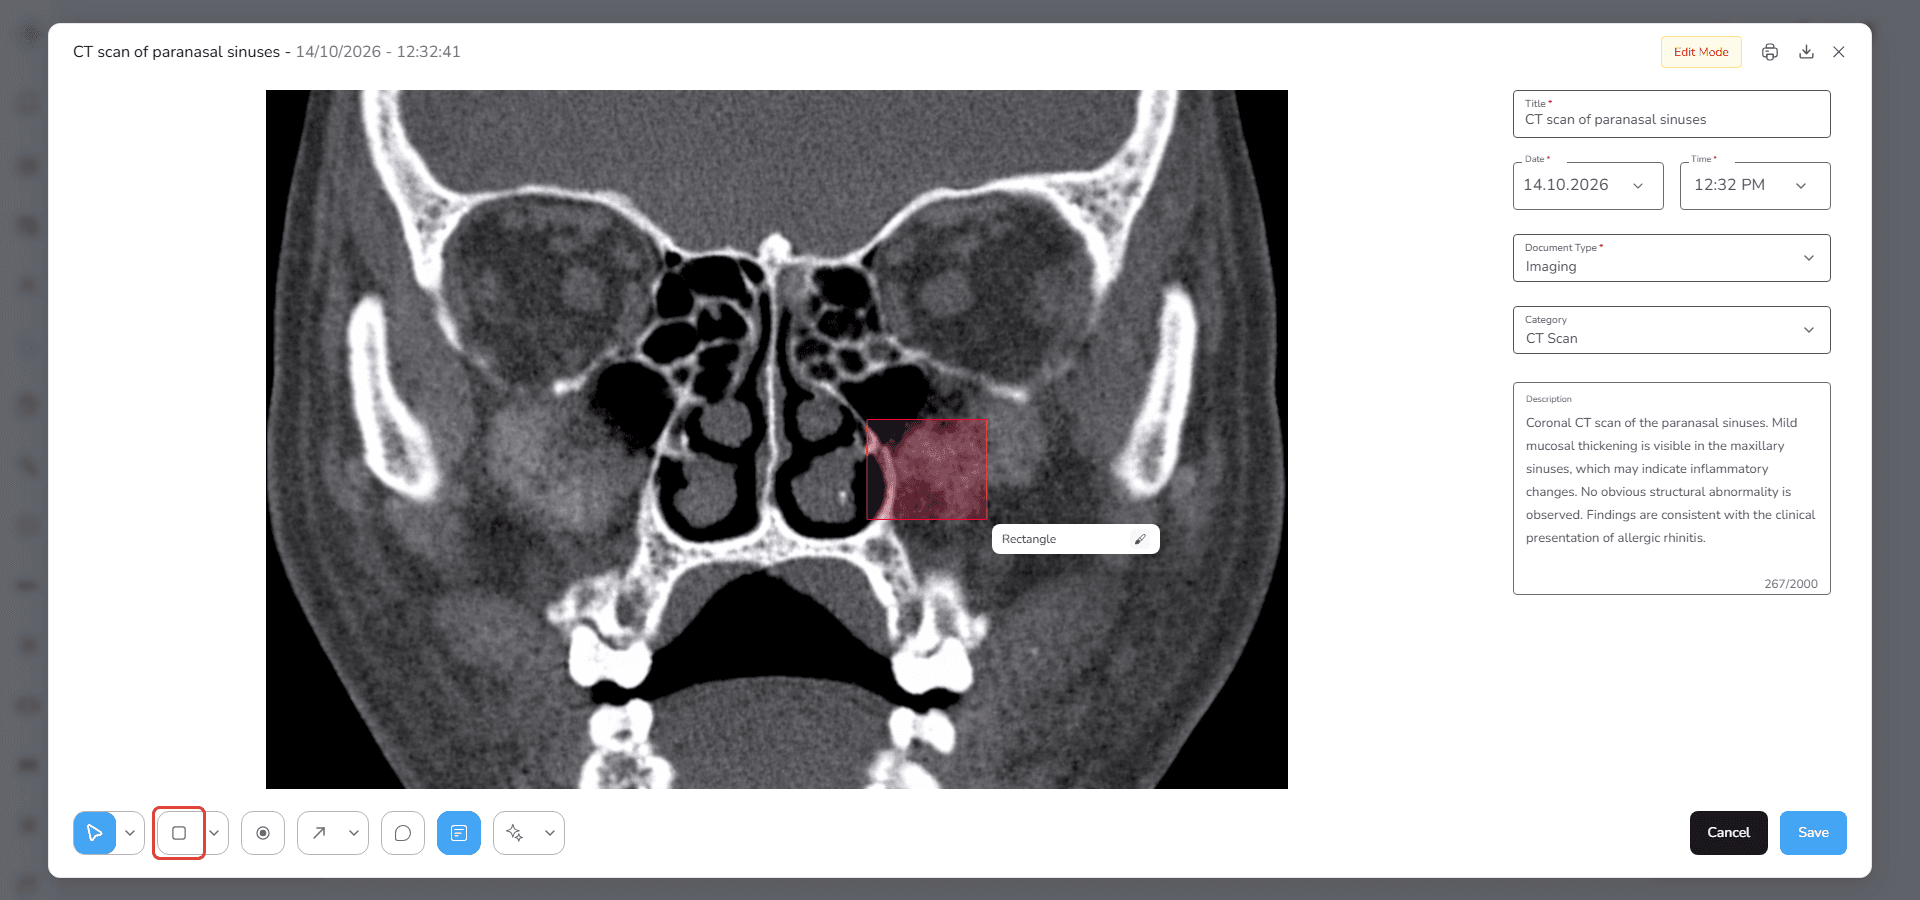
A label with the default text Rectangle appears next to the shape.
Ellipse
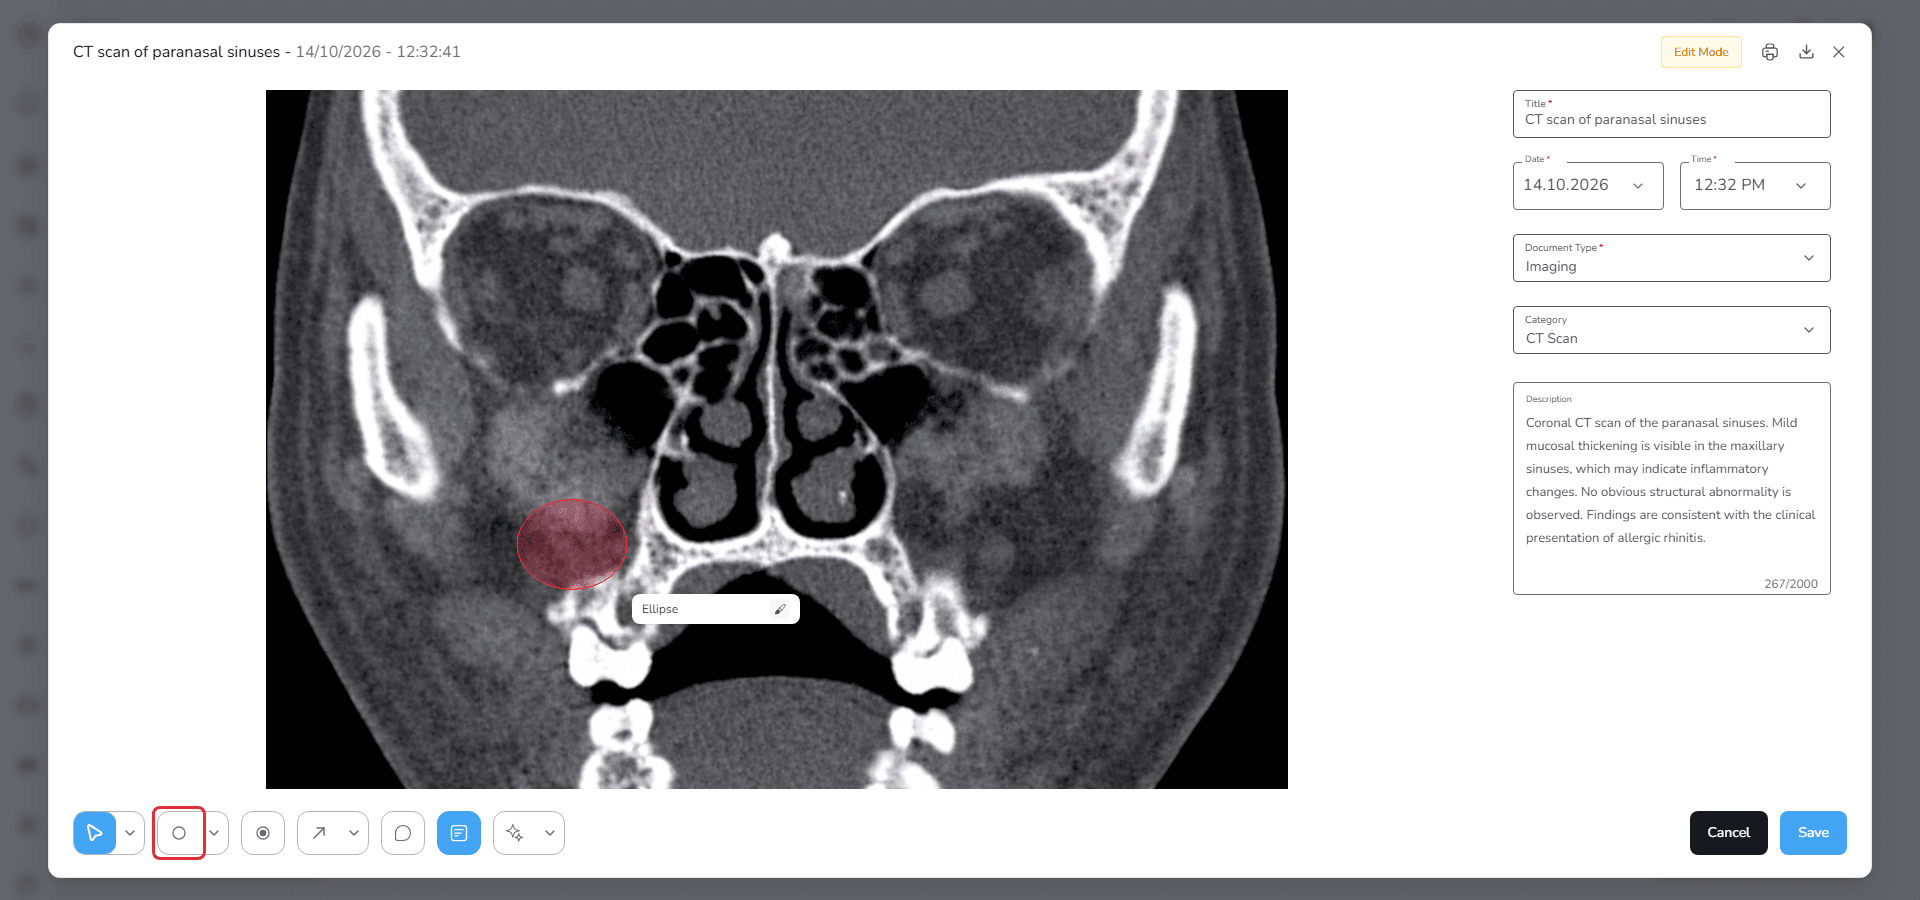
The Ellipse tool allows you to draw circular or oval shapes.
To draw an ellipse
- Select Ellipse from the shape menu
- Click on the image and hold the mouse button
- Move the mouse to define the size
- Release the mouse button when the desired shape is created
Area
The Area tool allows you to define a custom region on the image.
To create an area
1. Select Area from the shape menu
2. Click on the image to place the first point
3. Move the mouse and click again to place the next point
A temporary guide line appears while selecting points. After each click the line becomes a solid line connecting the selected points.
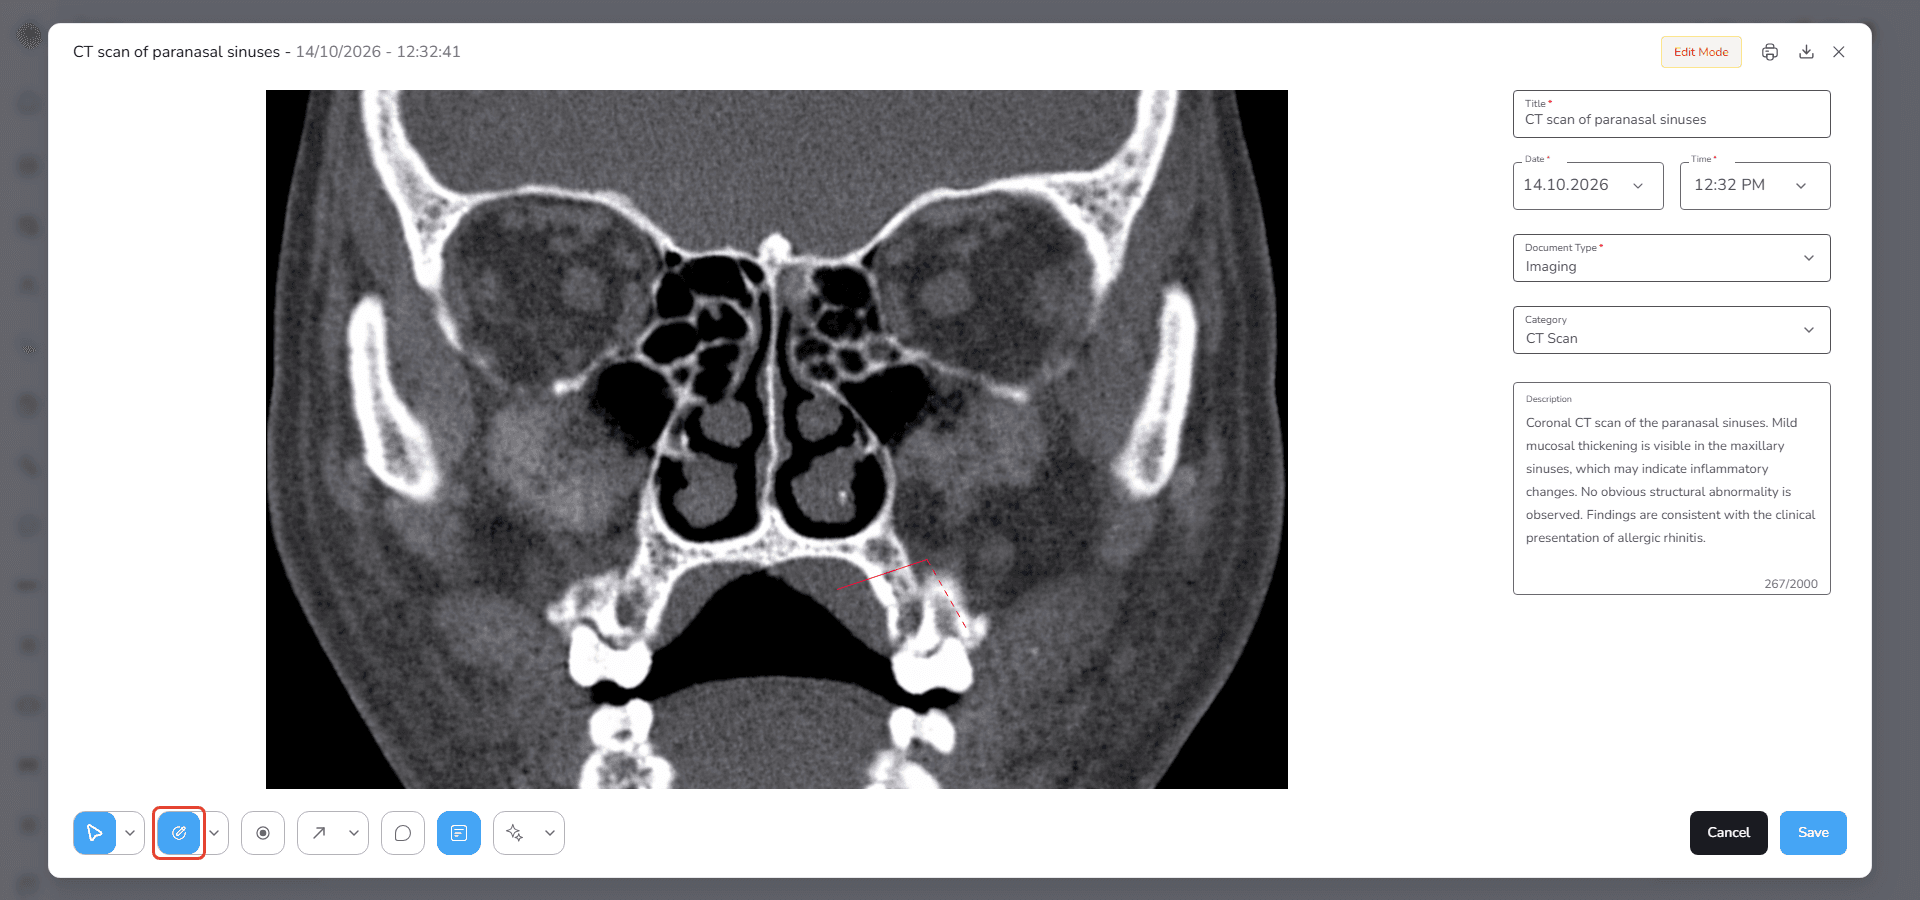
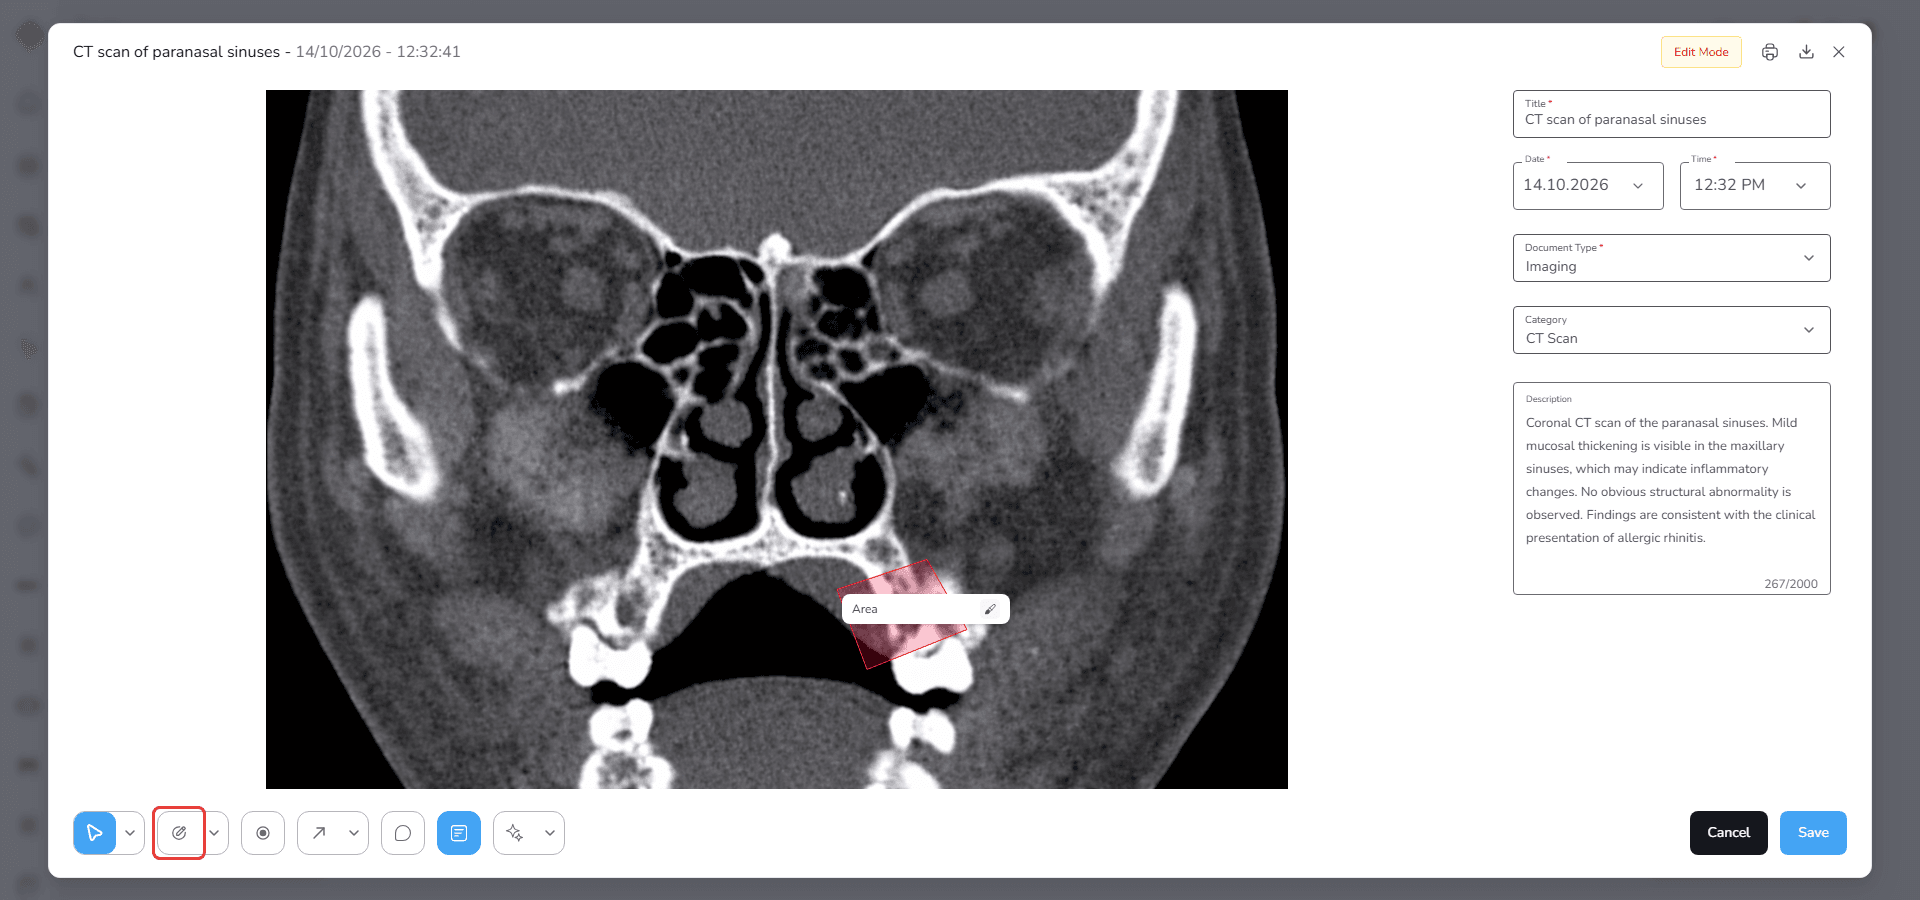
4. Continue adding points until the shape is complete, then click near the first point to close the shape
The system then connects all points and creates the final area.
Label and Color
Every shape has a label. The default label is the name of the shape, such as Rectangle, Ellipse or Area.
To change the label
1. Click on the label
2. Type the desired text and press Enter
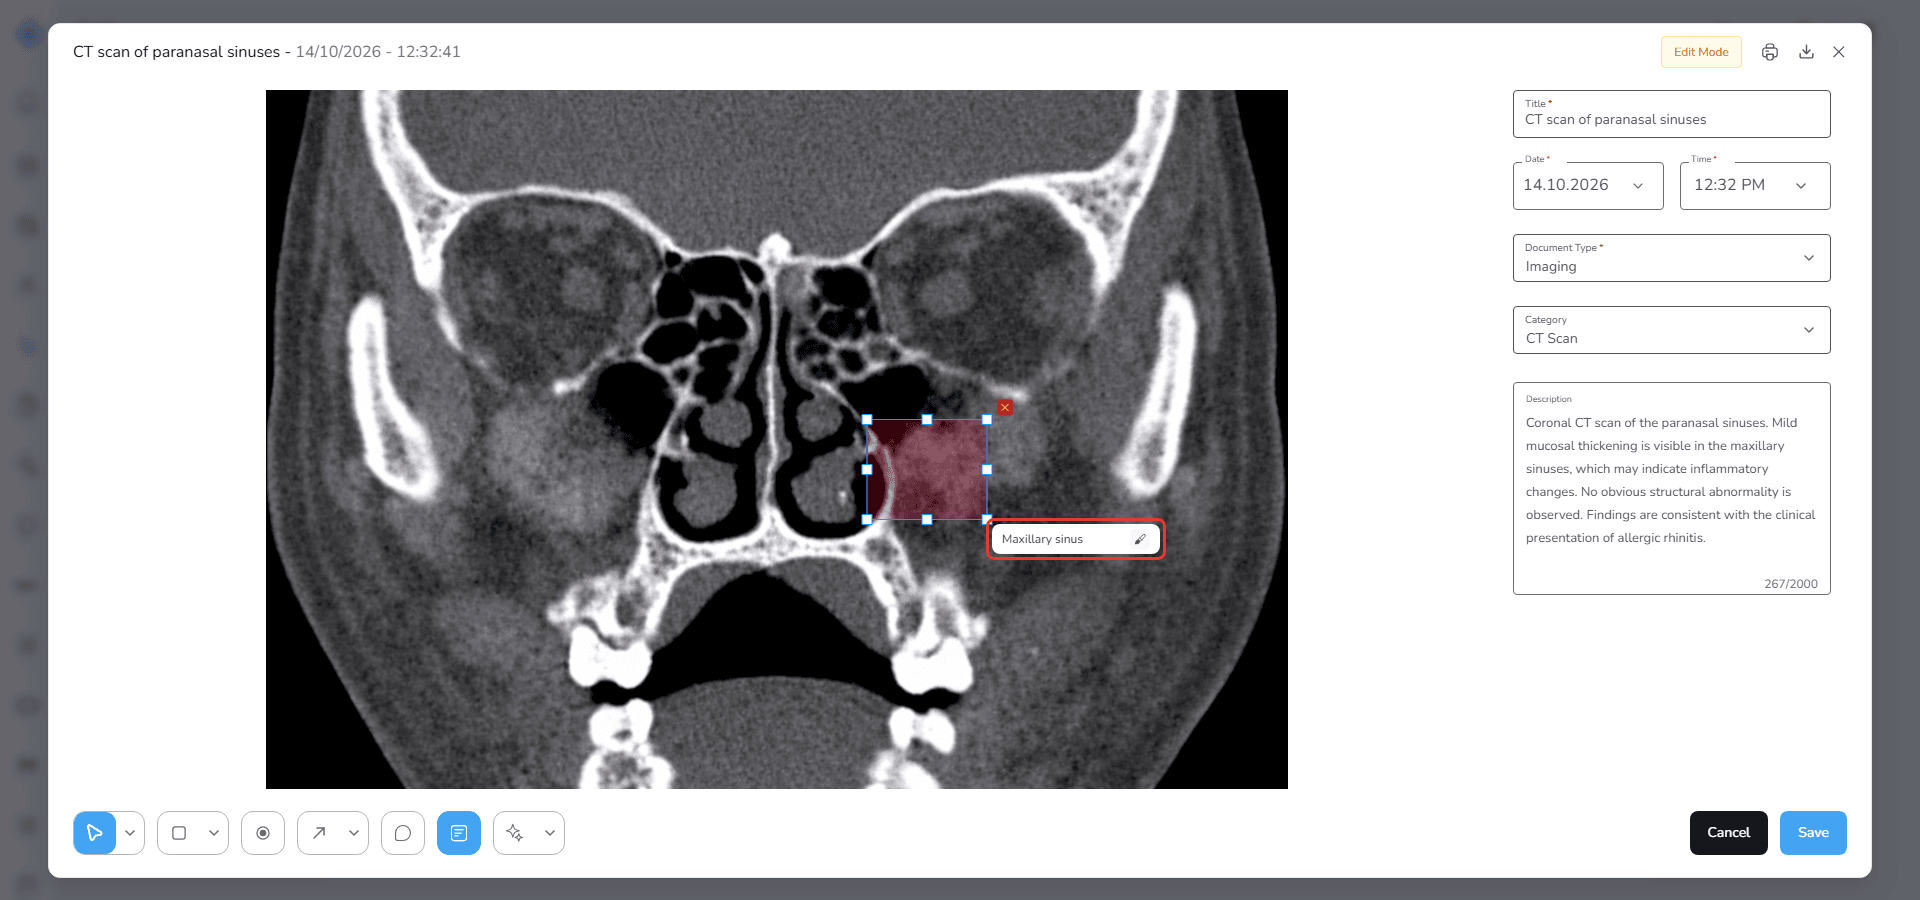
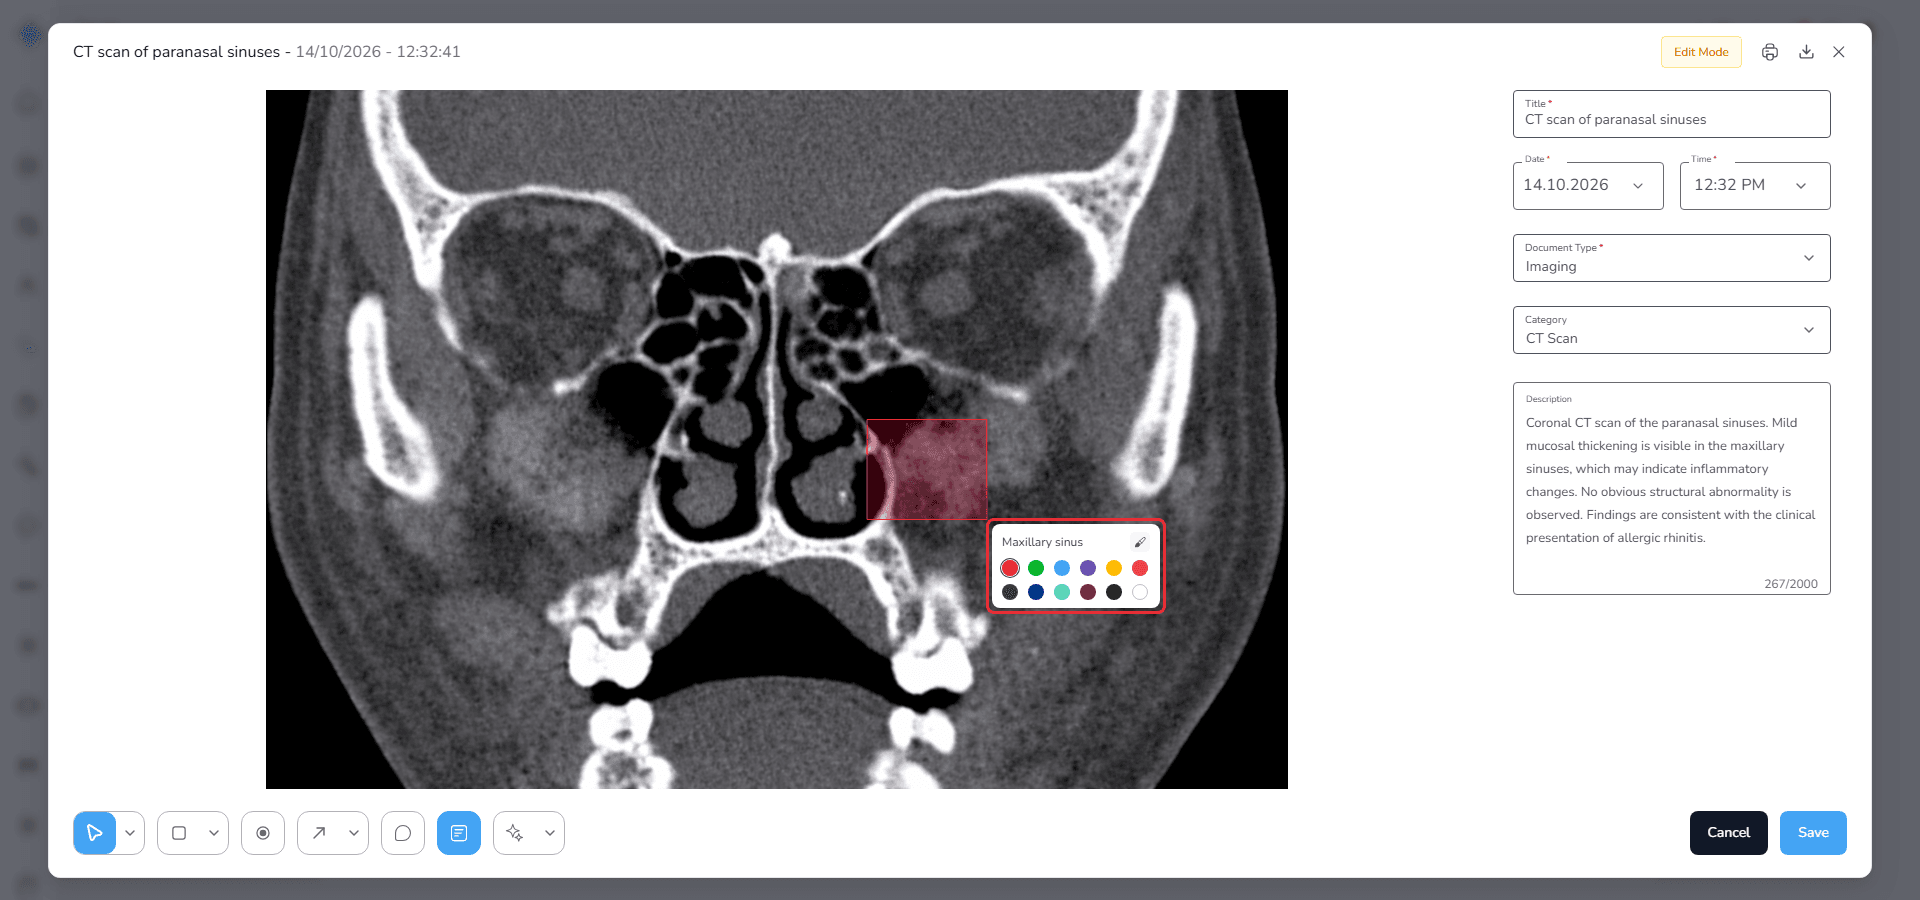
To change the color of the shape, click the color button next to the label and choose a color from the palette.
Editing and Deleting a Shape
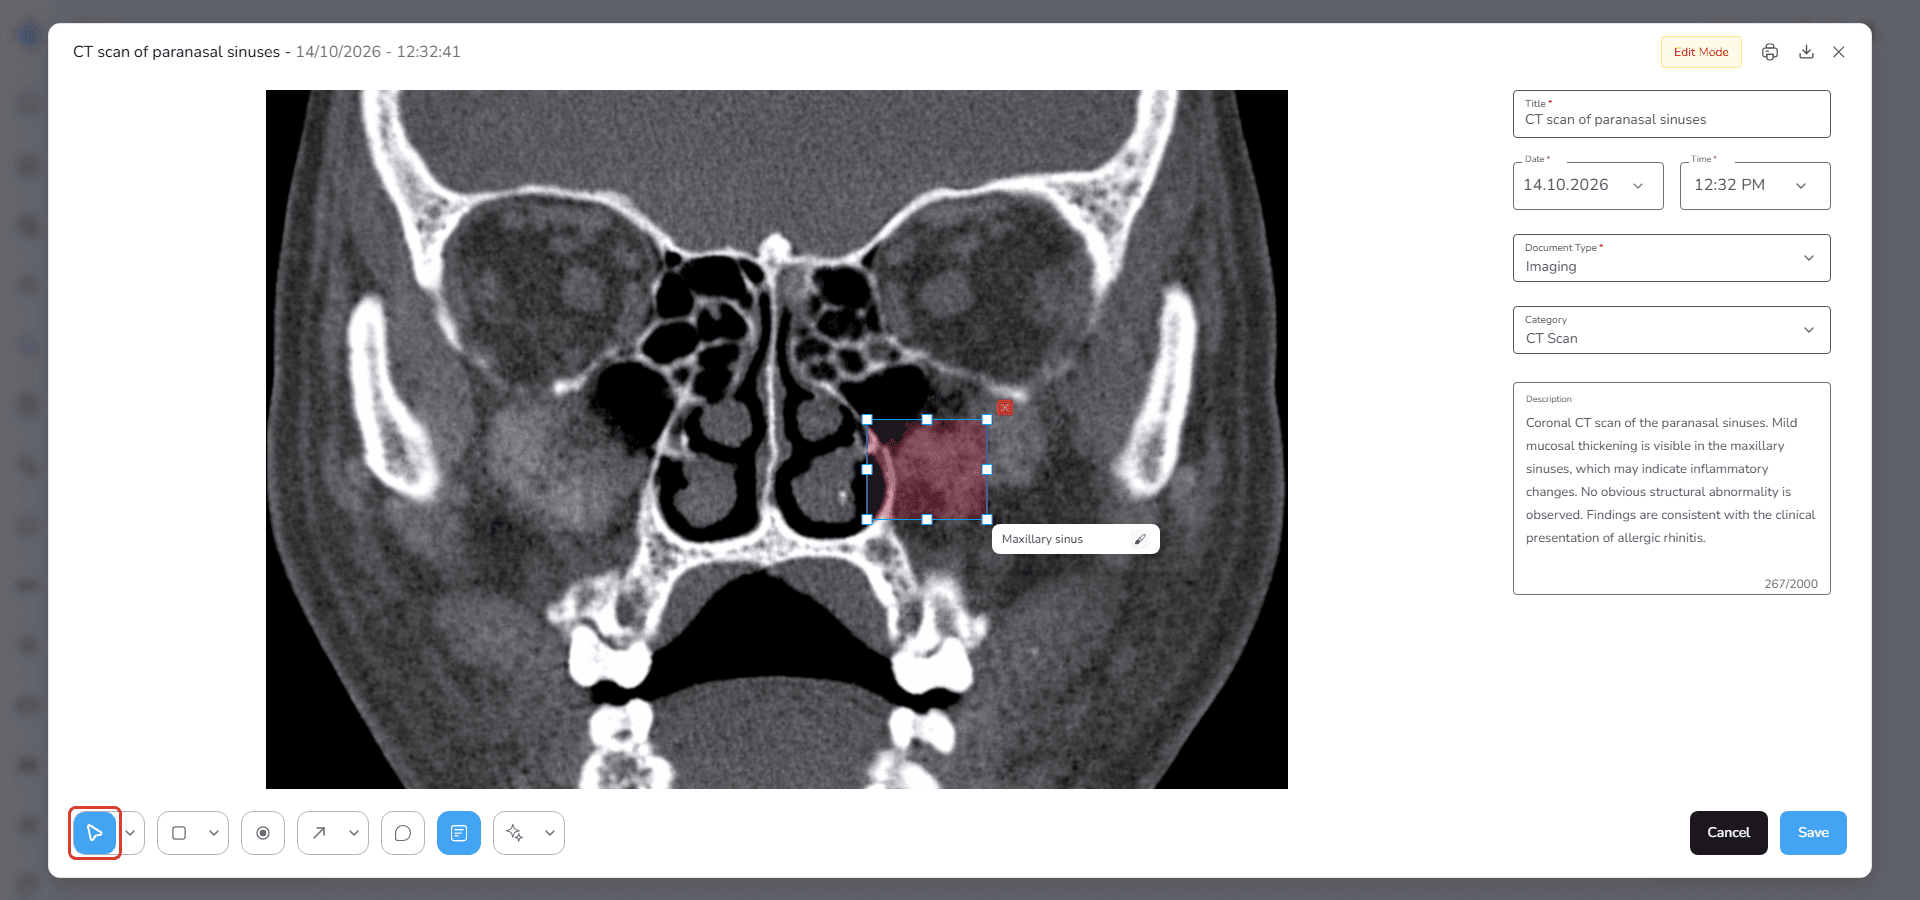
To edit a shape, select Pointer from the Navigation tool menu and click the shape. Handles appear around the selected shape.
In Pointer Mode you can
- move the shape
- resize the shape using its handles (for an area, move its points to adjust its shape)
When the shape is selected, a delete icon (×) appears at its top right corner.
Clicking this icon opens the Delete Shape confirmation dialog.
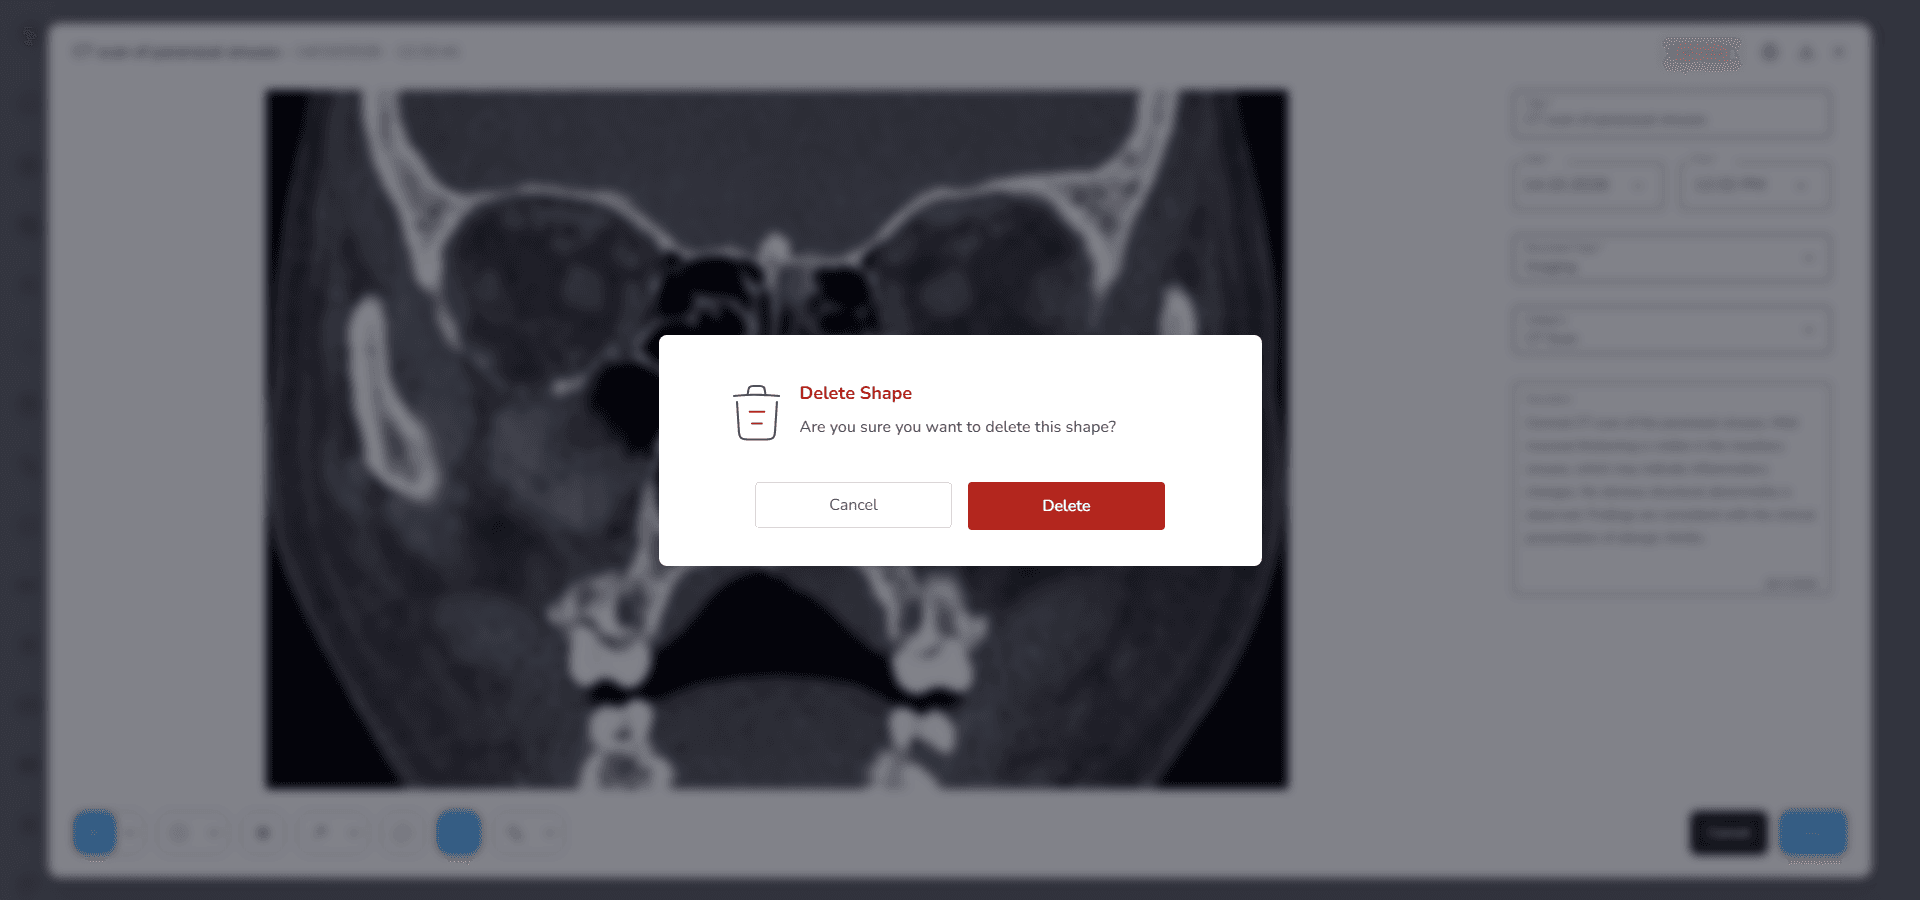
Click Delete to remove the shape from the image, or Cancel to keep it.
Point Tool
The Point tool allows you to mark a specific point on the image.
To create a point
- Click the Point tool
- Click on the desired location in the image
A point marker will appear on the image.
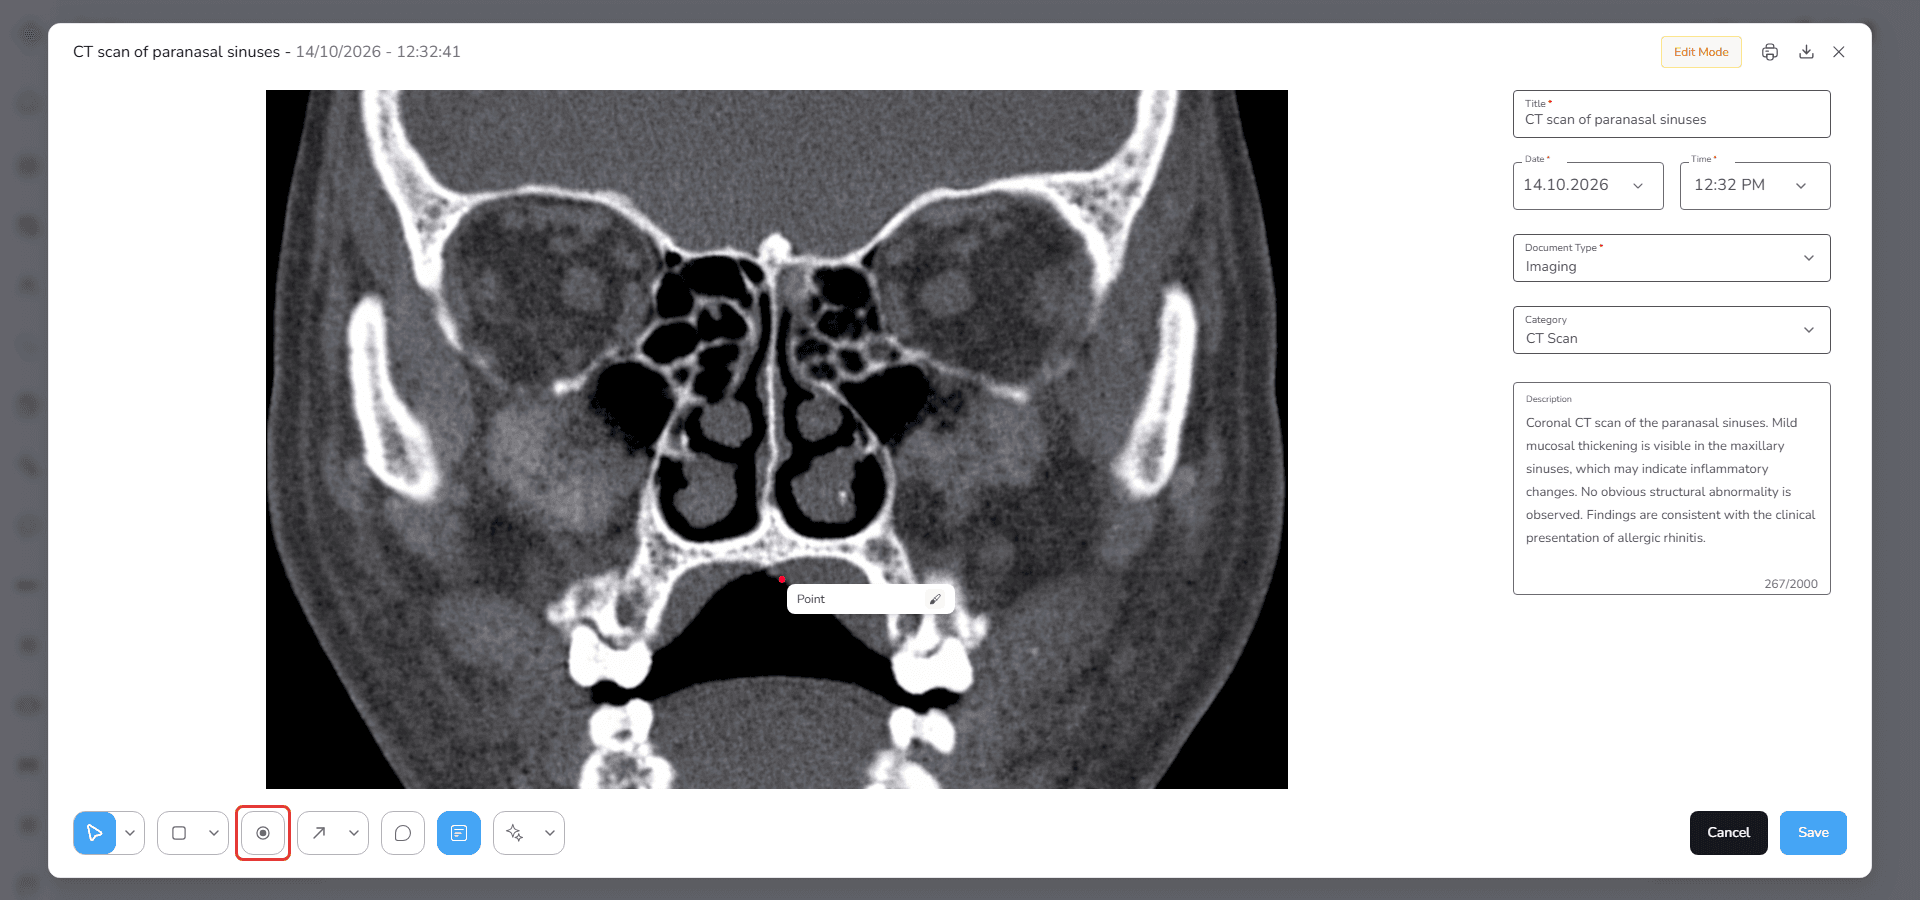
After creating the point you can
- edit the label
- change the color
- delete the point
The editing behavior is the same as for the shapes.
Arrow Tool (Arrow, Double-headed arrow and Line)
The Arrow tool is used to draw directional arrows or lines on the image.
Click the small arrow next to the button to choose the line type.
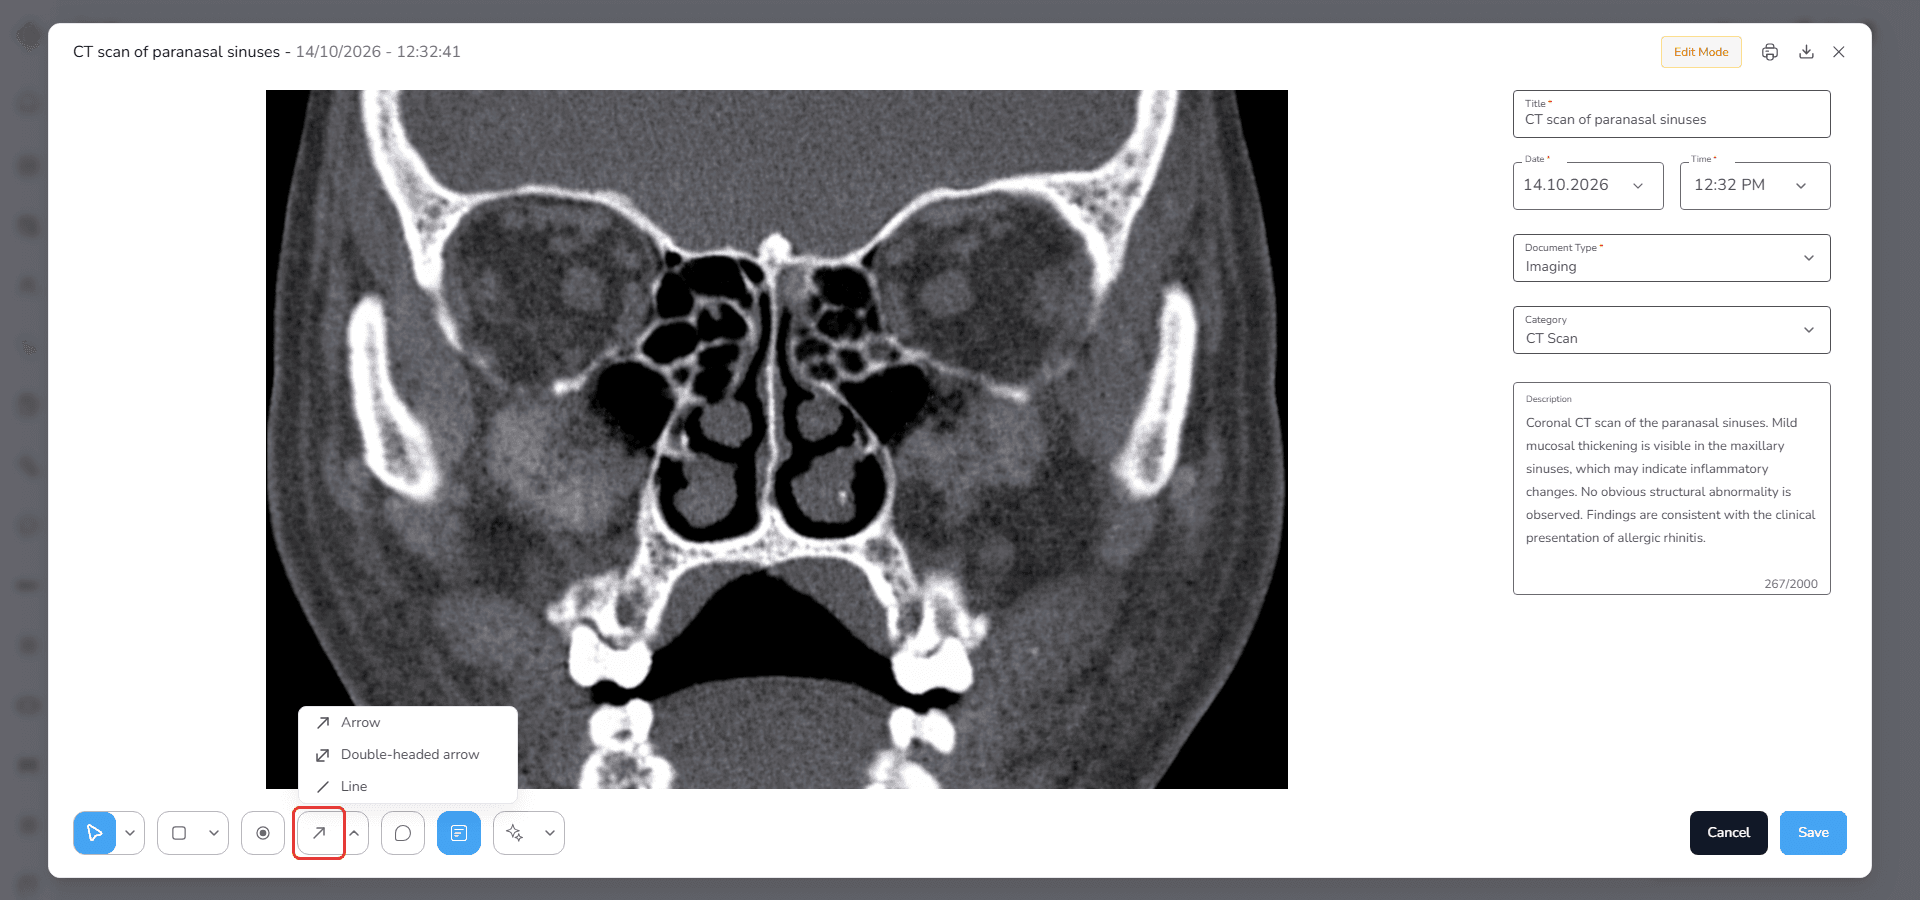
To draw a line
- Choose the line type from the menu
- Click the starting point on the image and hold the mouse button
- Drag to the ending point and release the mouse button
The system will draw the selected line style.
Available options include
Arrow
Single directional arrow.
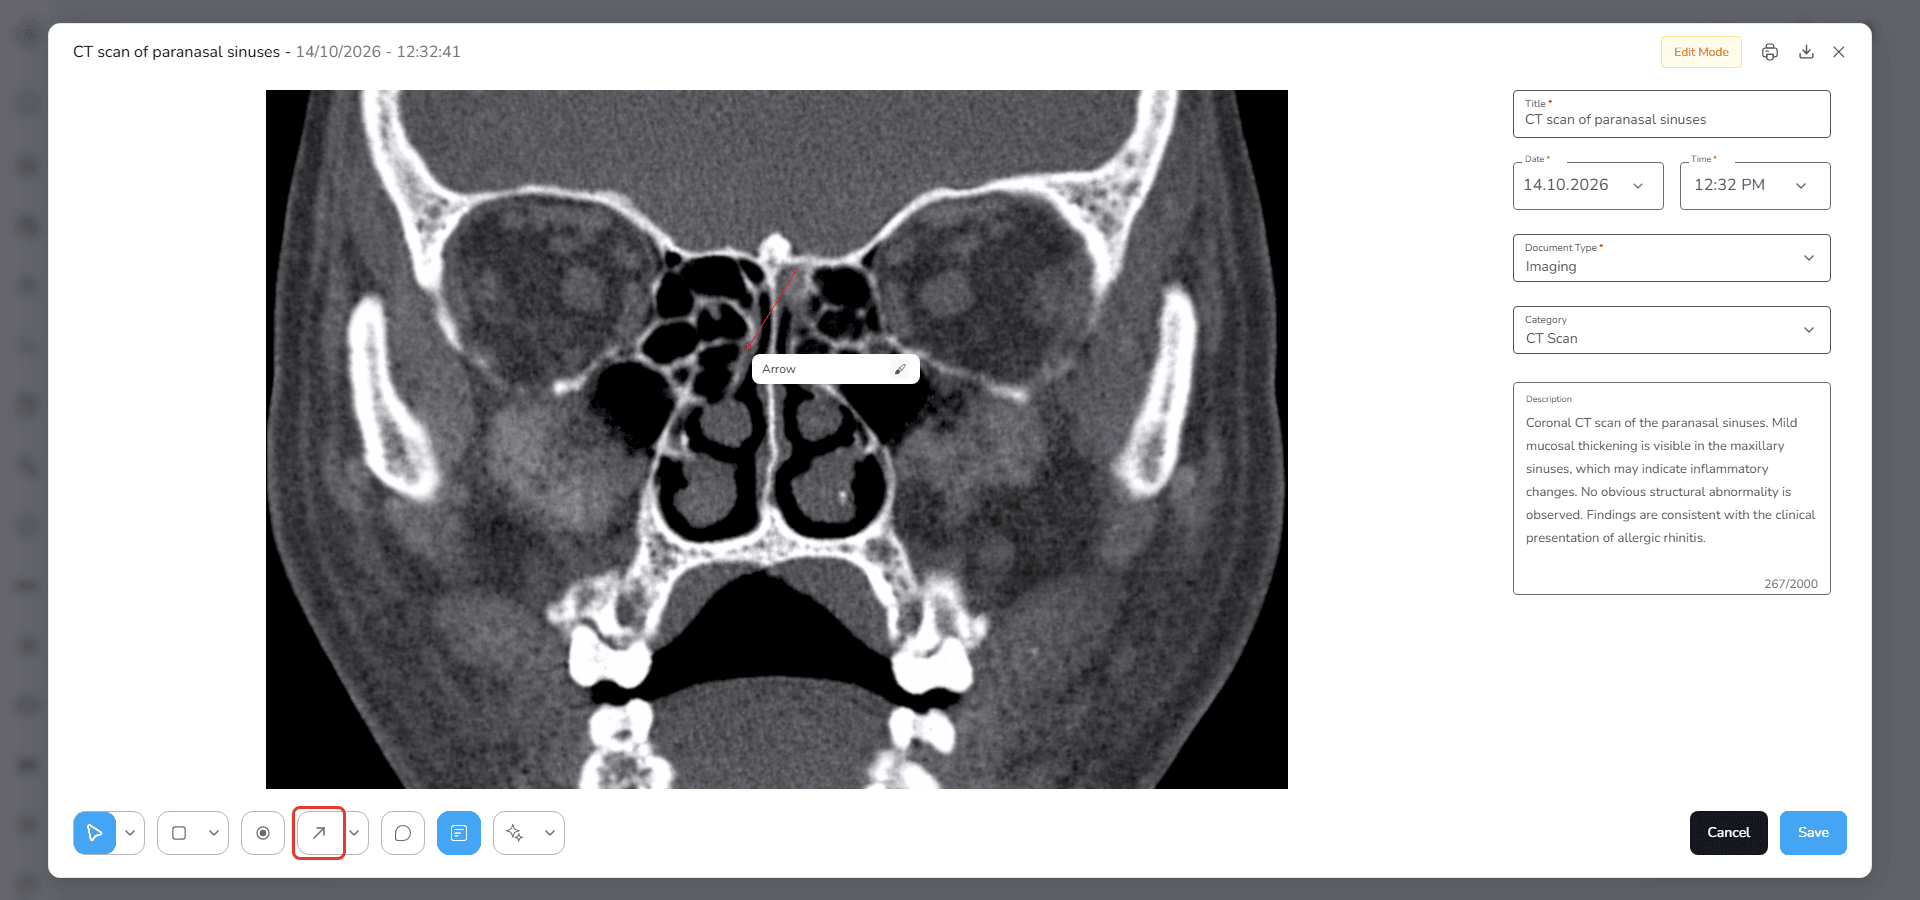
Double-headed arrow
Arrow with two directions.
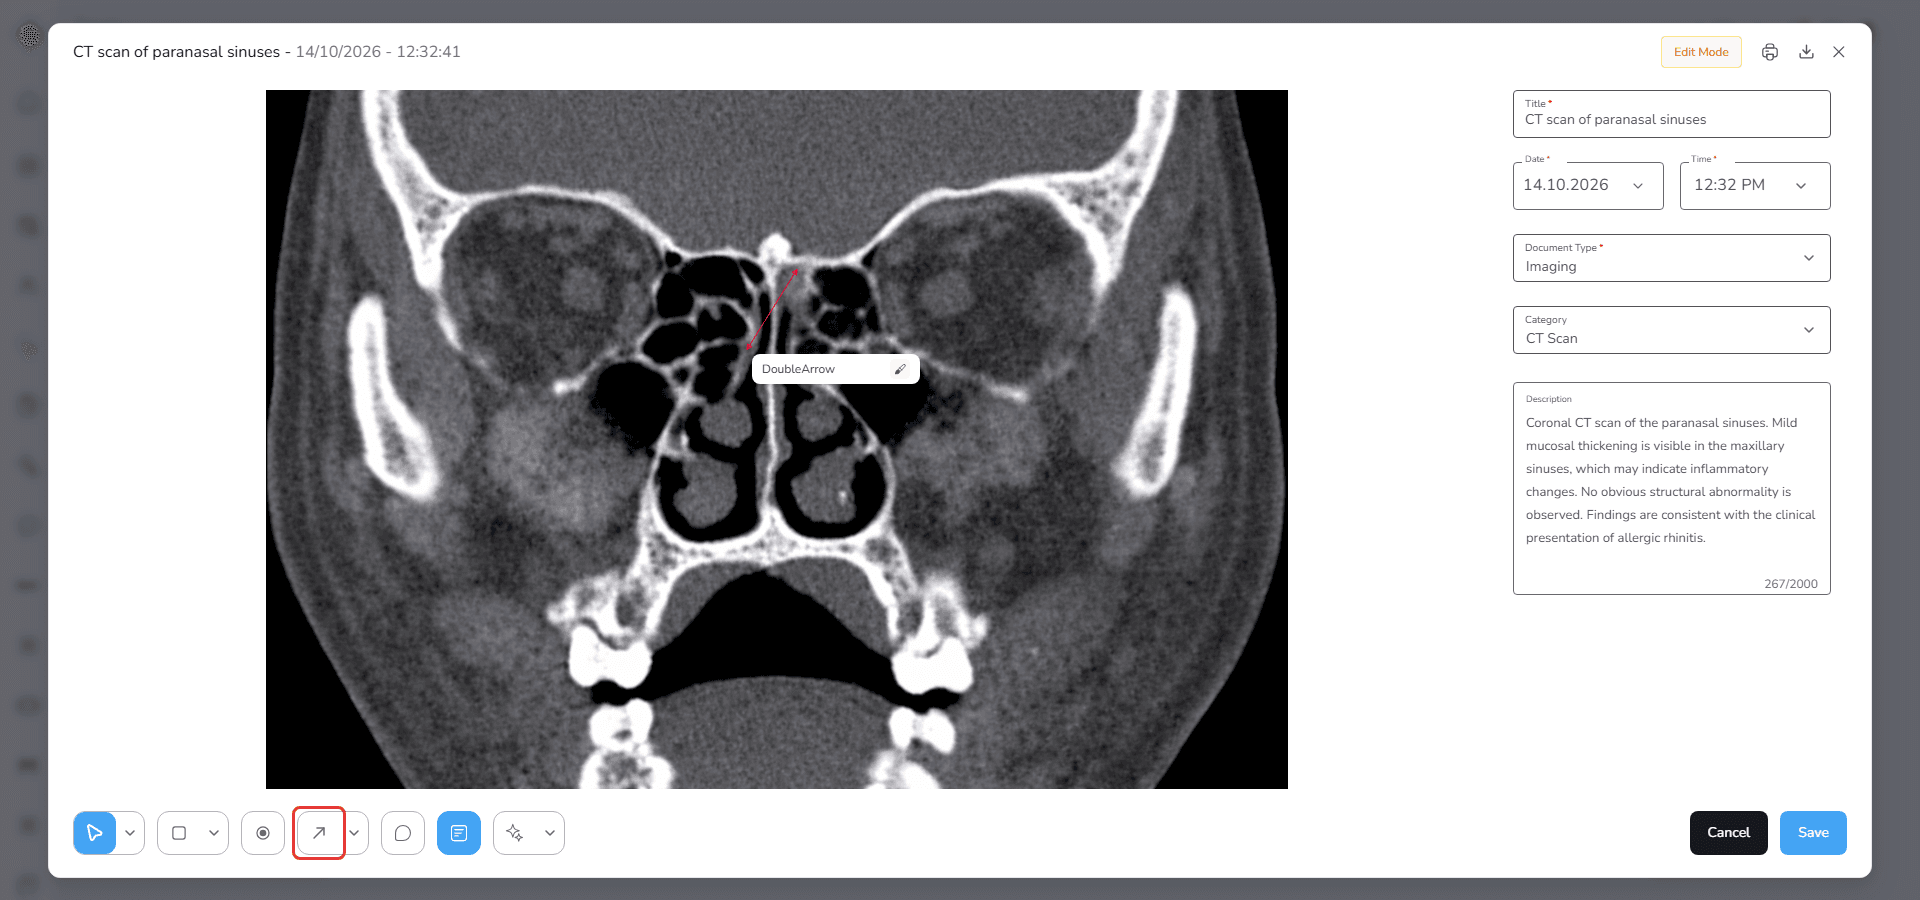
Line
A simple line without direction.
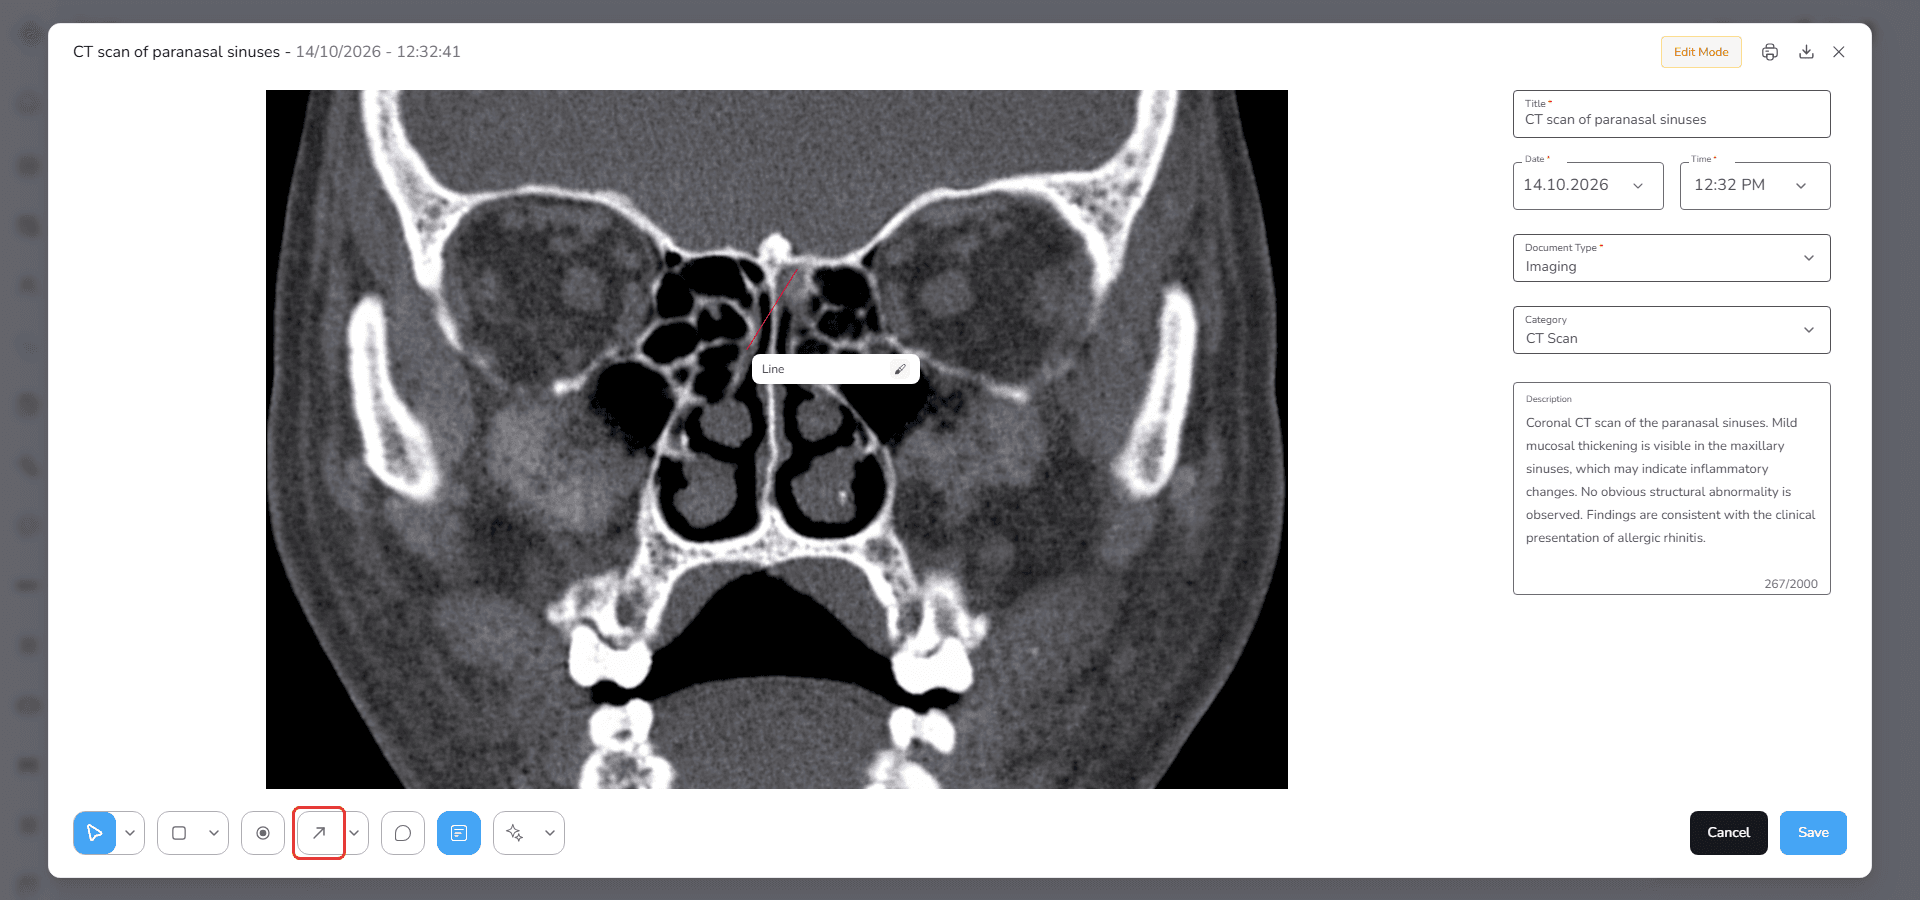
As with the shapes, you can also
- edit the label
- change the color
- resize the line
- delete the line
Comment Tool
The next tool allows you to add comments to the image.
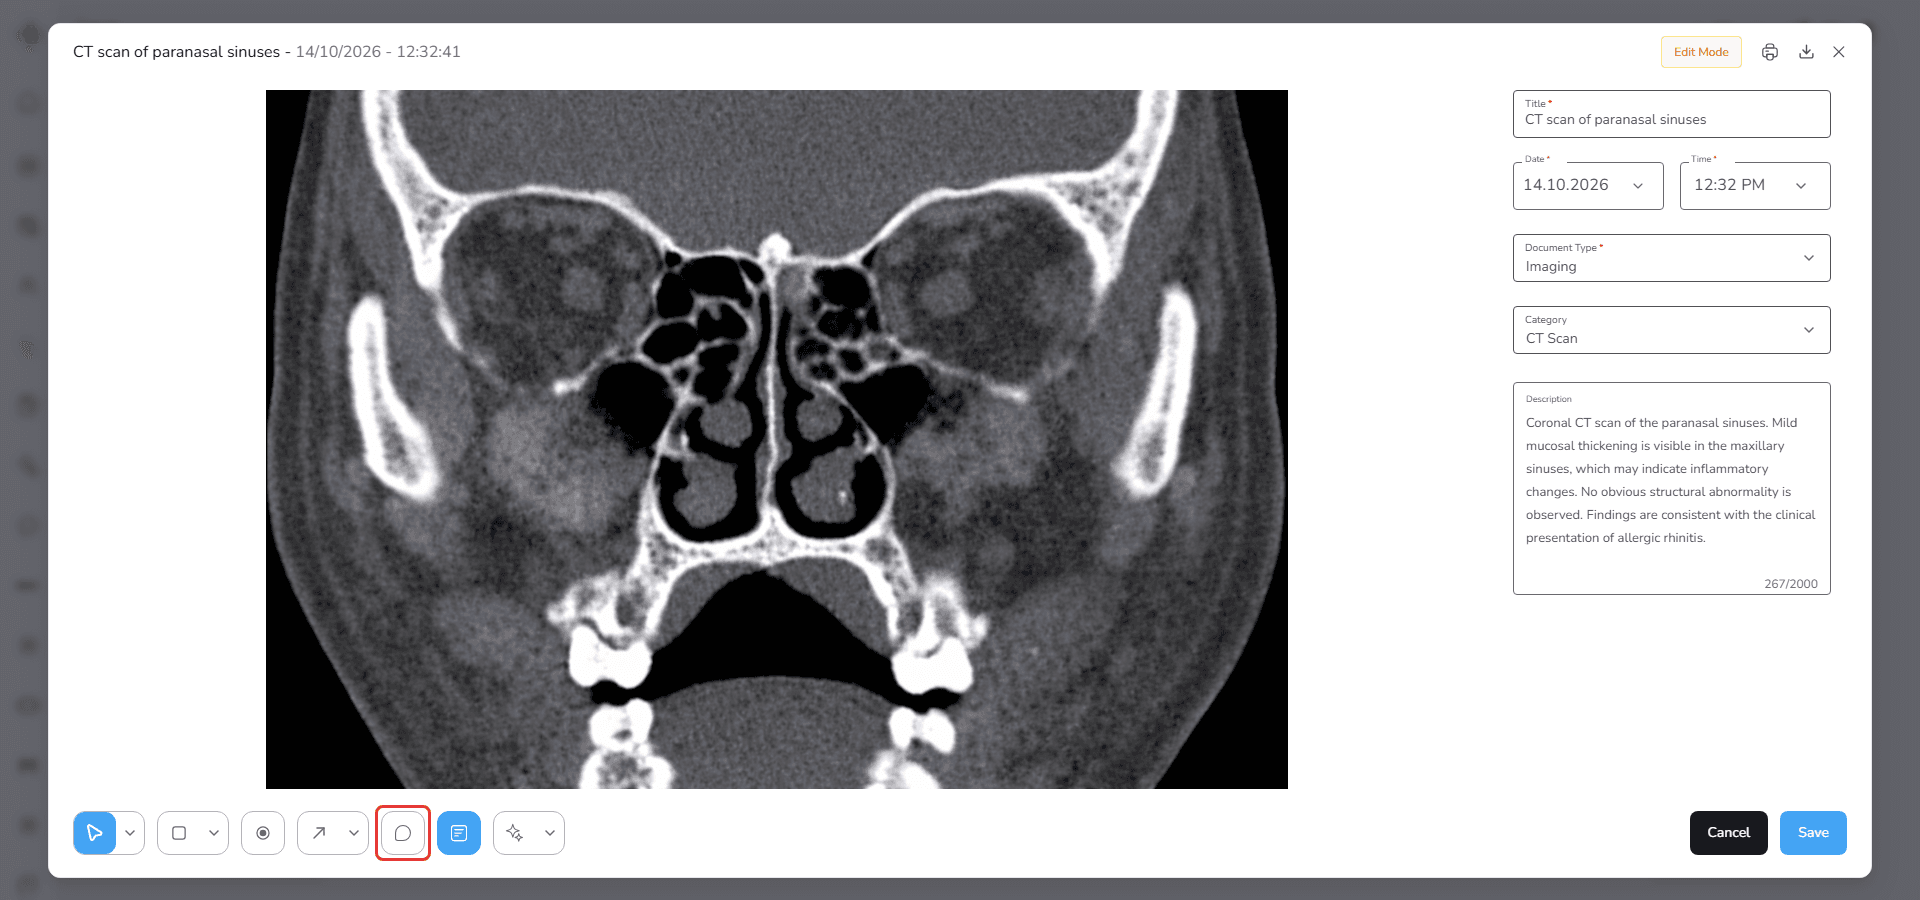
To add a comment
- Click the Comment tool
- Click anywhere on the image
A small comment input box will appear.
Inside this box you can
- type the comment text
- select a color using the color picker
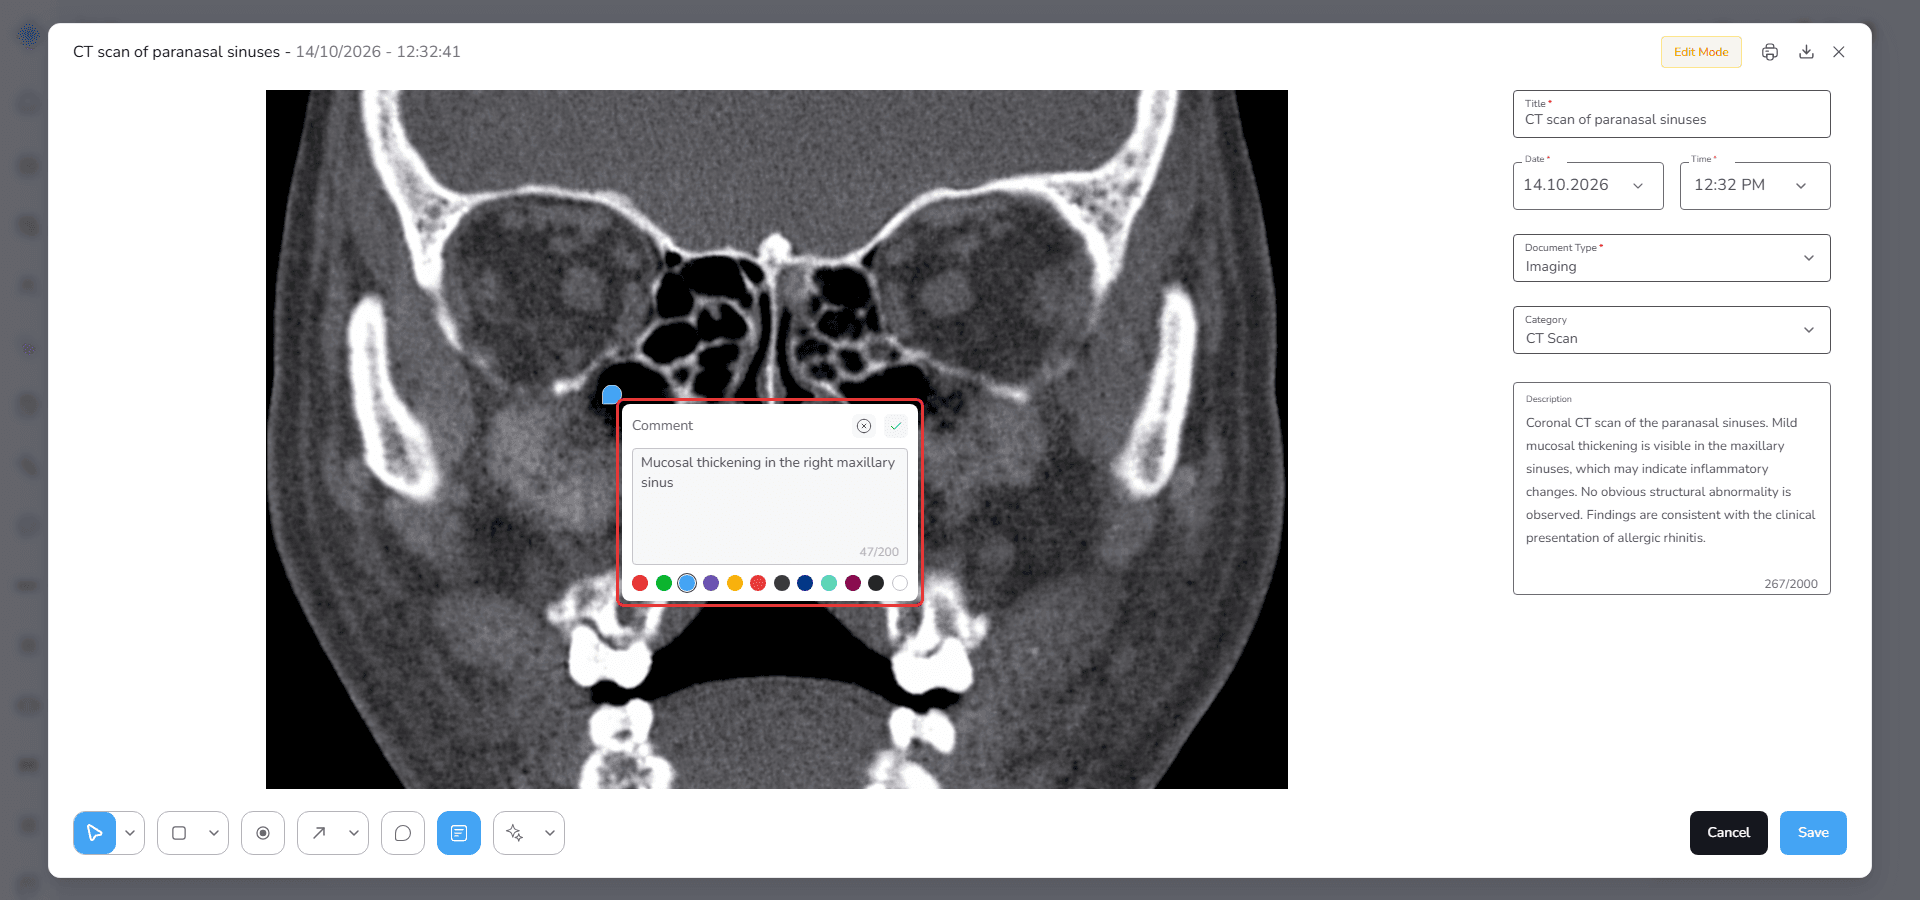
At the top of the comment box there are two buttons.
Confirm (✓)
Creates the comment on the image.
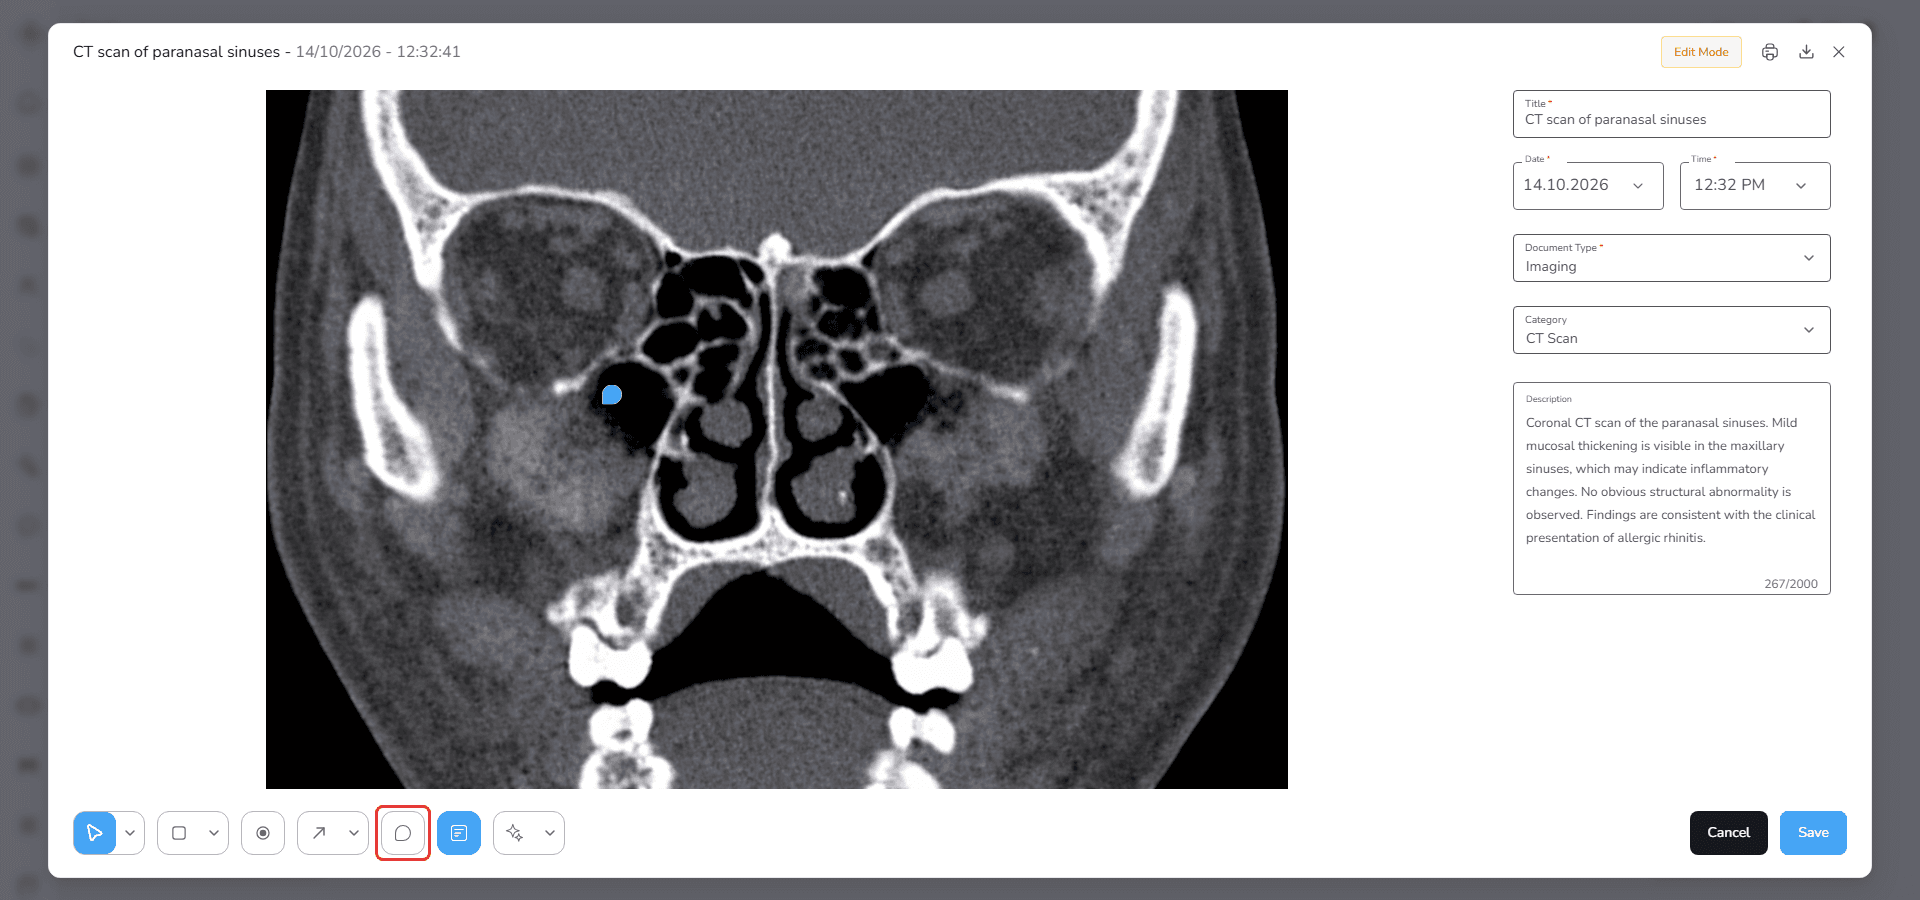
Cancel (×)
Closes the comment box without creating the comment.
Managing Comments
To open an existing comment, select Pointer from the Navigation tool menu and click the comment. A small panel will open showing the comment text, with two options below it.
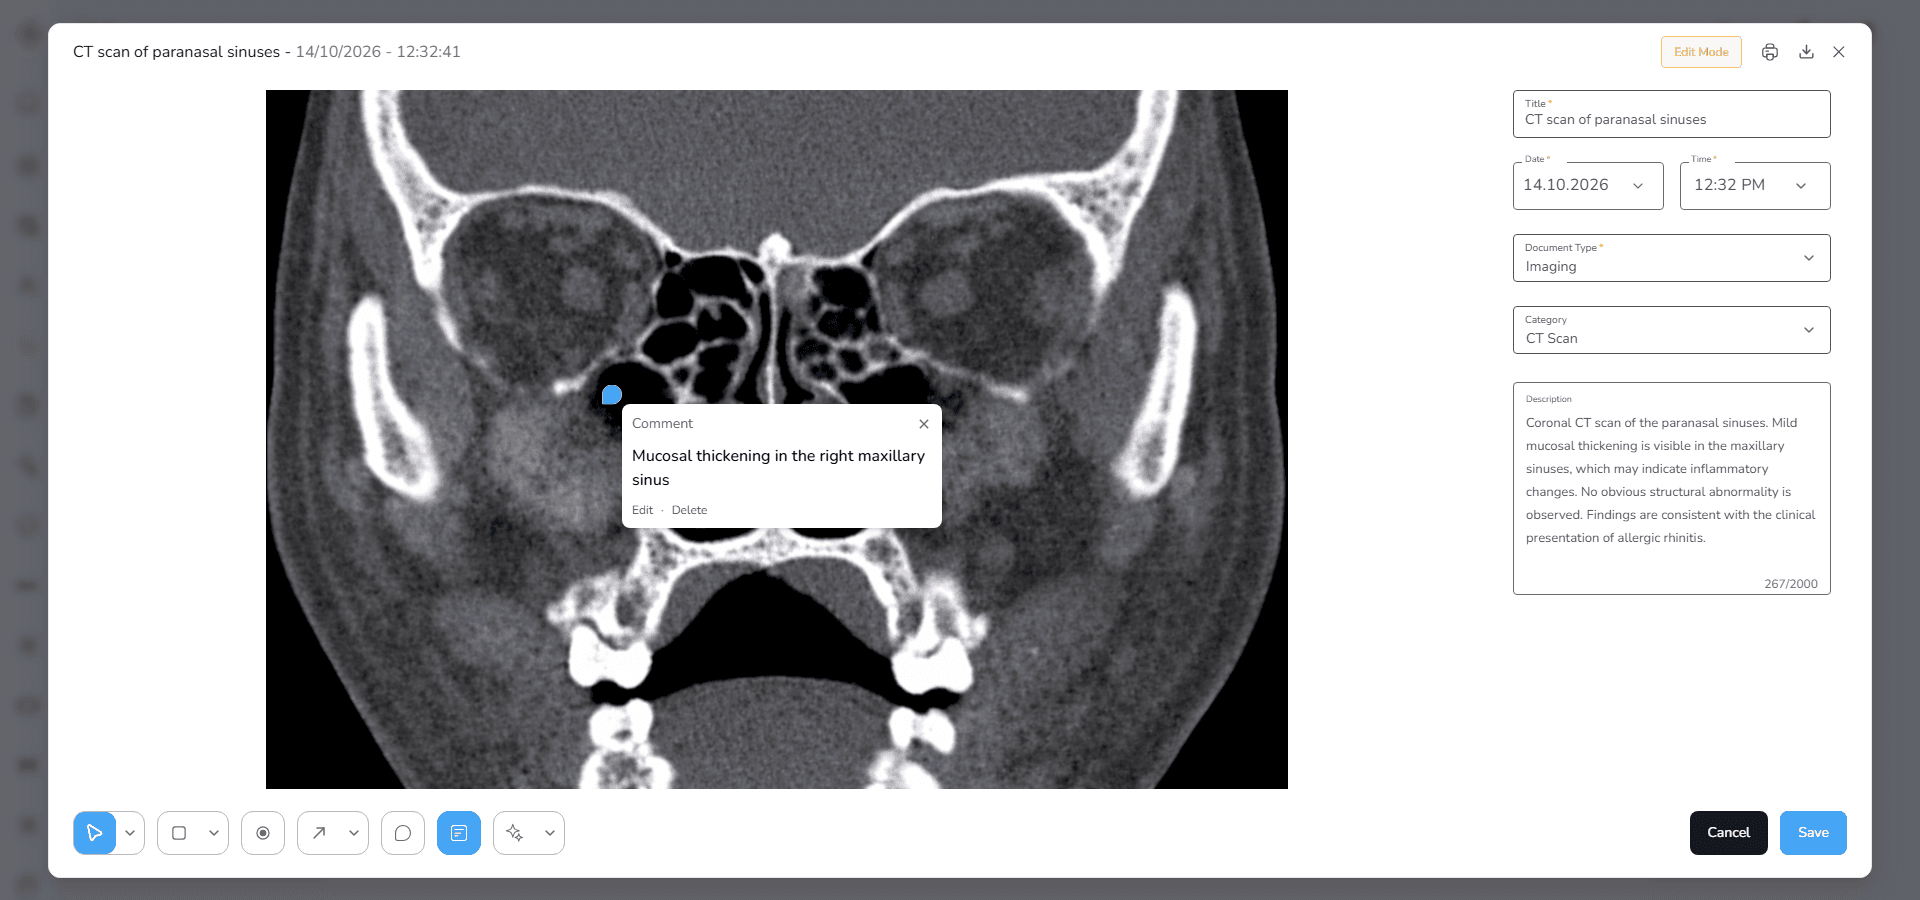
Edit
Allows you to modify the comment text or change the color.
Delete
Removes the comment.
When Delete is selected a confirmation dialog appears.
If you confirm the action the comment will be removed from the image.
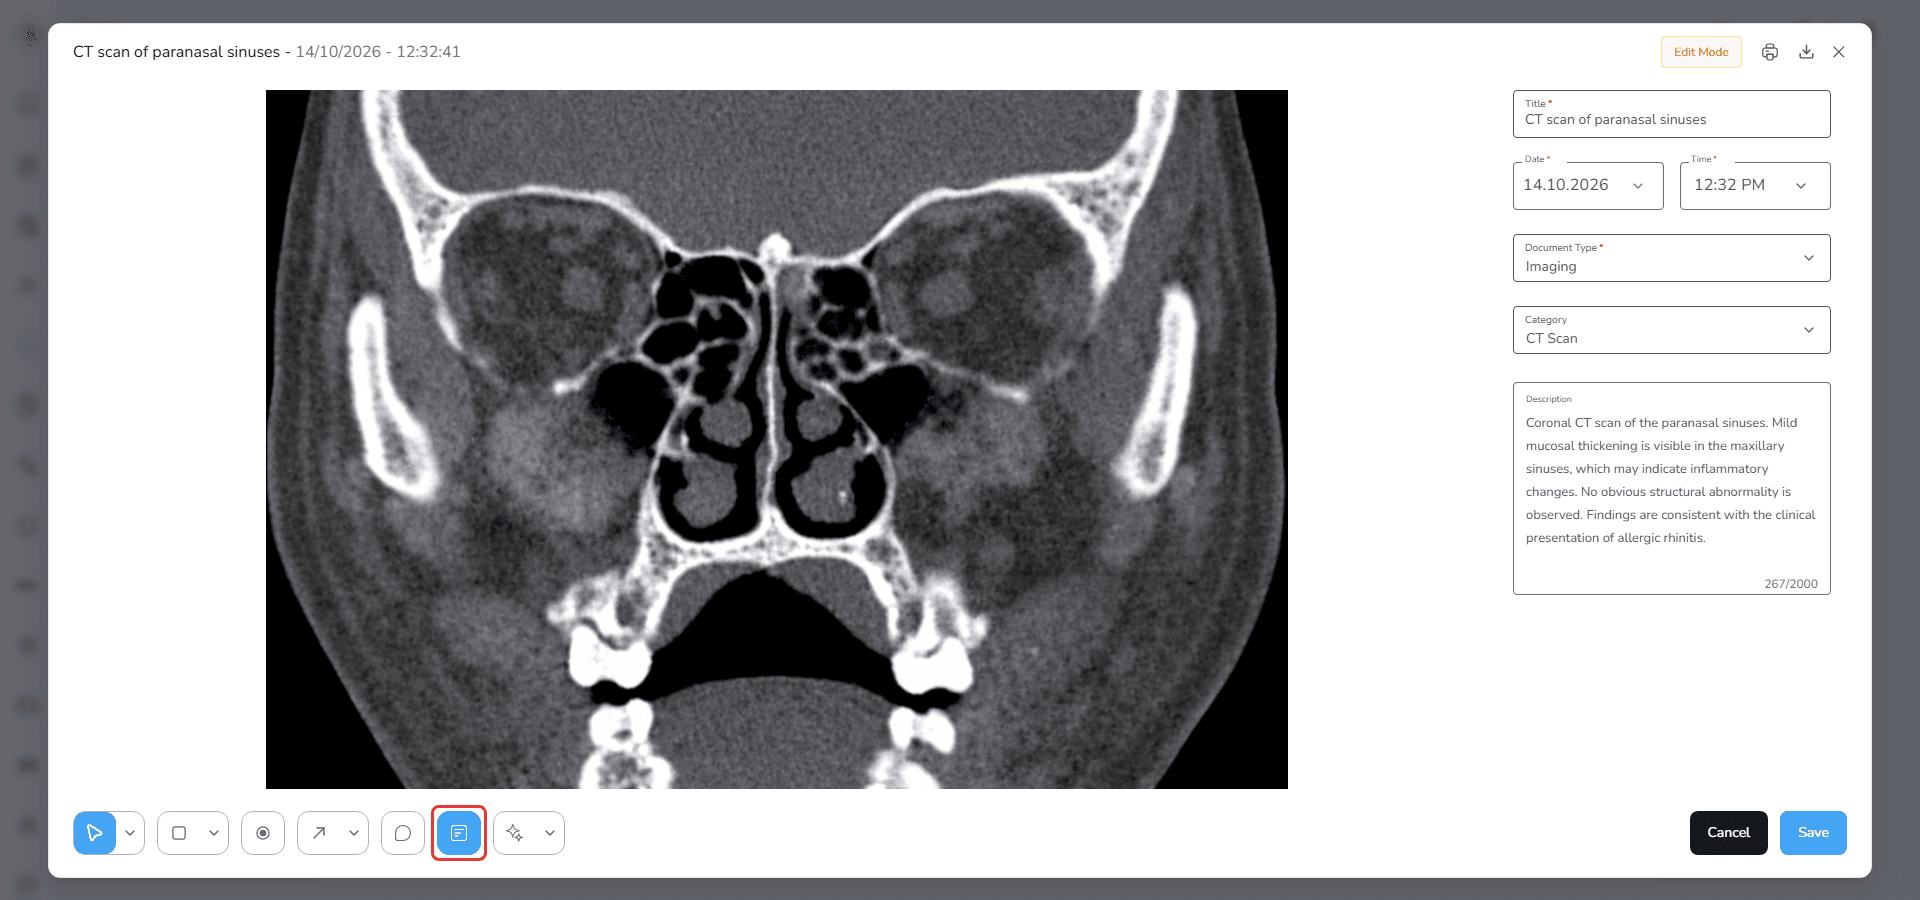
Description Panel Toggle
The Description tool allows you to show or hide the information panel on the right side of the viewer.
Clicking this button will
- open the document information panel
- or hide the panel to increase the image viewing area
Save and Cancel
At the bottom right corner of the viewer there are two buttons.
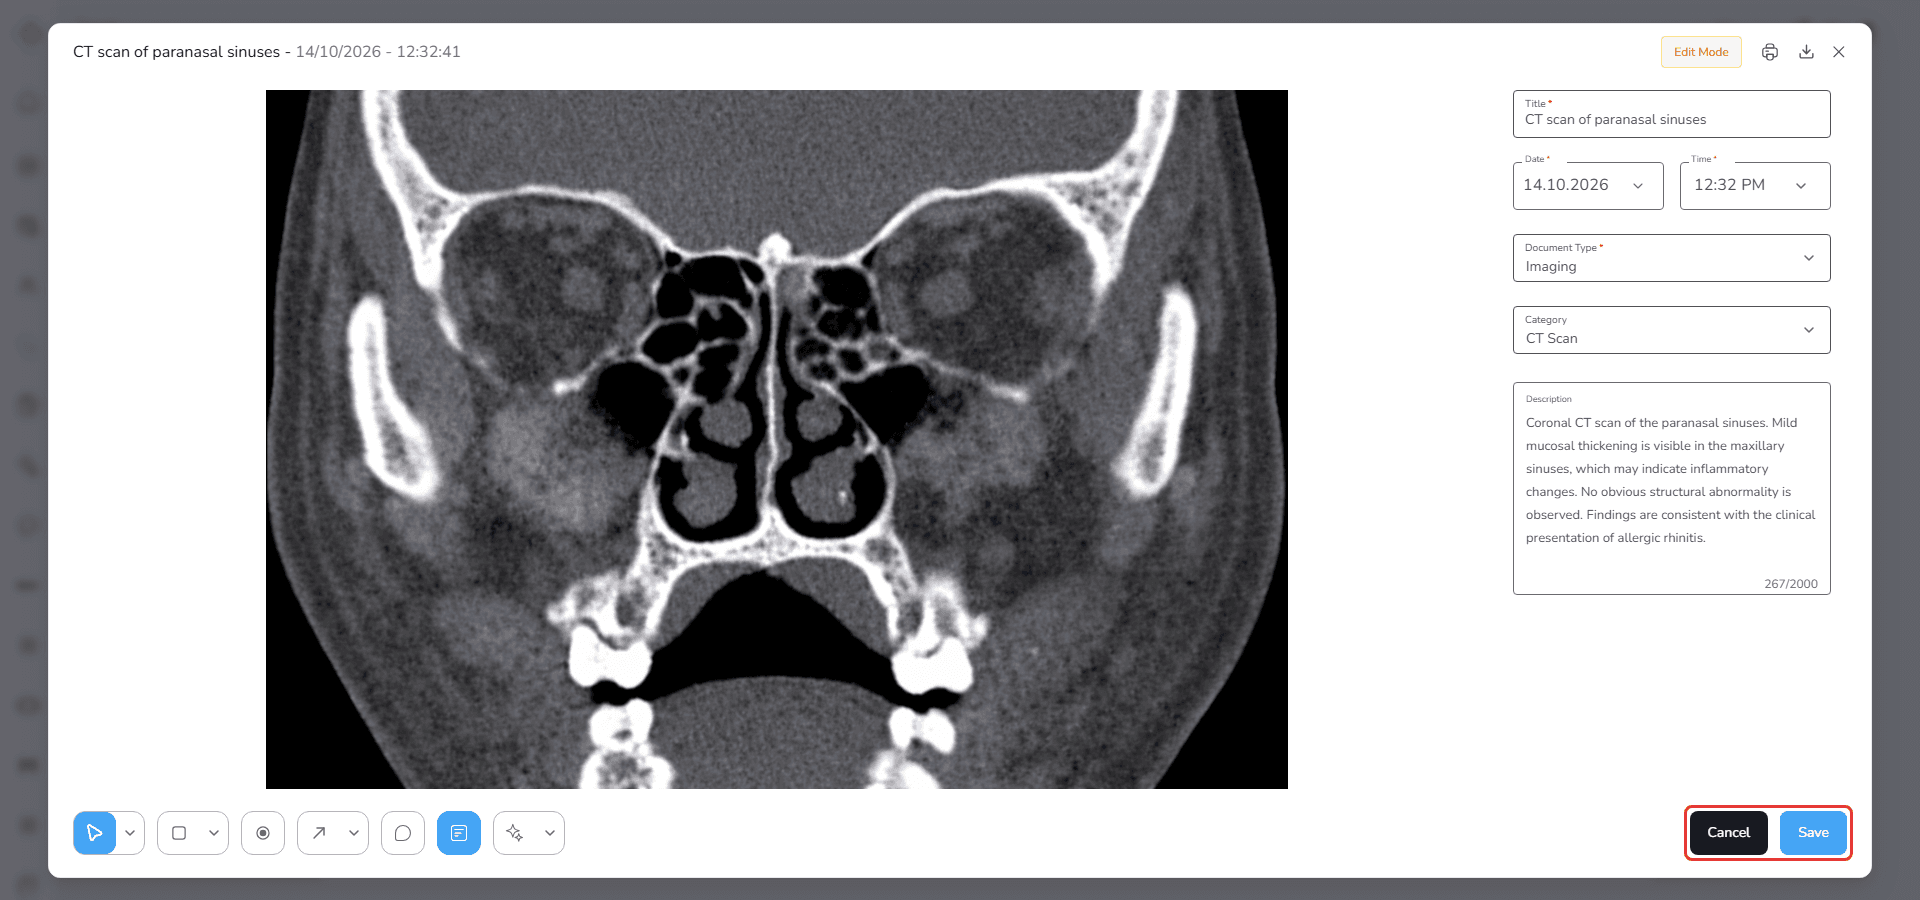
Save
Stores all changes including
- edited document information
- new annotations
- updated annotations
- comments added to the image
Cancel
Discards all changes made during the current editing session.
The image and information will return to their previous state.
Unsaved Changes Warning
If you attempt to close the Image Viewer while still in Edit Mode with unsaved changes, the Annotation Not Saved dialog will appear.
This message asks whether you want to save your changes before closing.
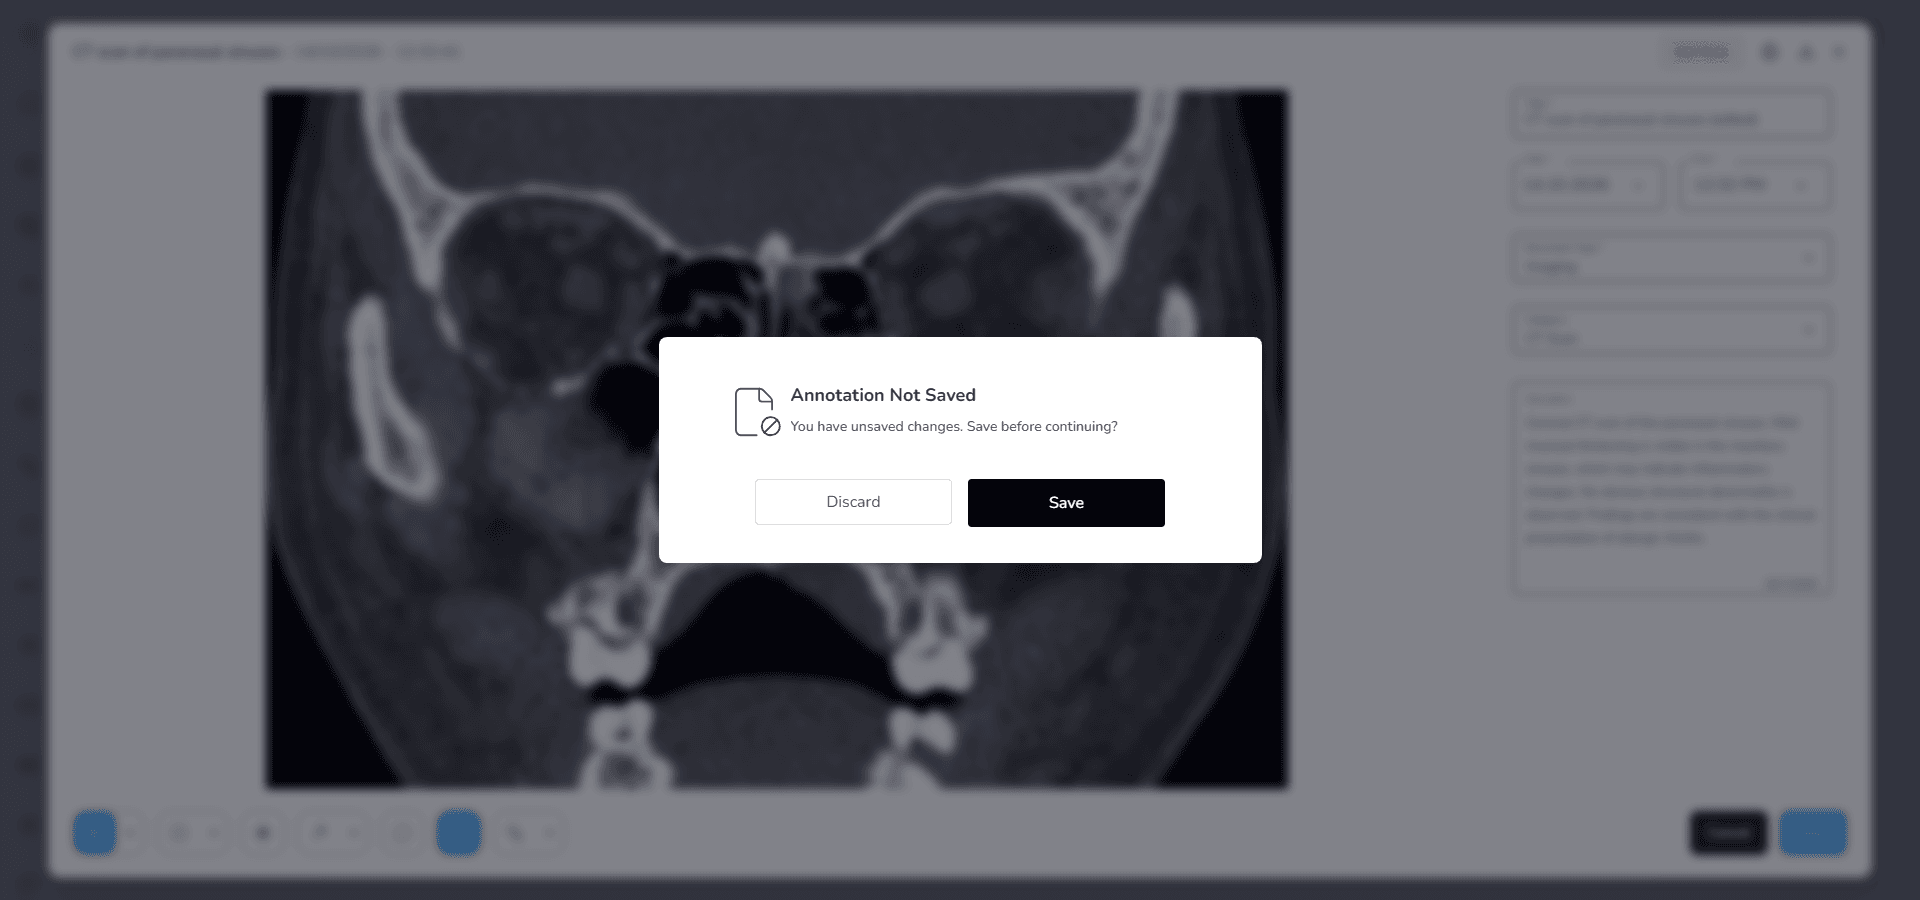
You can choose to
- Save the changes
- or Discard them and close the viewer without saving.
Fields (Field Descriptions)
| Field | Description | Limitations / Notes |
|---|---|---|
| Title* | A clear name for the document to help identify it later | Required |
| Date* | The date associated with the visit or document | Required |
| Time* | The time when the visit or document was recorded | Required |
| Document Type* | Defines the general category of the document such as Imaging or Laboratory | Required |
| Category | A more specific classification based on the selected document type | |
| Description | Optional field used to add additional notes or context | |
| Search Bar | Allows keyword or title-based search across documents. |
Behavior & Expected Outcome
Document Display
- Uploaded documents appear in the Documents tab
- Clicking a document opens it in the appropriate viewer
- The system automatically detects the file type and selects the correct viewer
Viewer Behavior
- PDF files open in the Document Viewer
- Image files open in the Image Viewer
- If a document has a description, it is displayed by default
- If no description exists, the document is shown in full view
Edit Mode in Viewer
- Clicking the Edit button activates Edit Mode
- In Edit Mode, document information can be updated
- For images, annotation tools become available
- An Edit Mode label appears in the header to indicate editing state
Annotation Behavior
- Annotations can only be created in Edit Mode
- Users can add shapes, points, arrows, comments and labels
- Each annotation can be edited, moved or deleted
- Changes are applied only after clicking Save
- If changes are not saved, they will be lost when exiting
Unsaved Changes Warning
- If you try to close the viewer while changes are not saved
- A warning message appears
You can choose to
- save the changes
- or discard them and exit
Document Editing
- Document information such as title, date, time, type, category and description can be updated
- Changes are reflected immediately after saving
Common Errors + Fixes
| Issue | Cause | Fix |
|---|---|---|
| “Document Type is required.” | User did not select a type. | Select one from the dropdown. |
| "File format not supported or file too large." | The uploaded file is not in the supported formats (JPEG, PNG, PDF) or exceeds the maximum size (10MB). | Re-upload the file in the correct format and ensure the file size does not exceed 10MB. |
| “Title and Document Date and Time are mandatory.” | Required metadata not filled. | Enter both before saving. |
| “You do not have permission to edit this document” | User lacks editing rights. | Request edit access from system admin. |
| “Document not found” | File was deleted or corrupted. | Refresh the page or re-upload the file. |
| “Download failed” | Network or system issue. | Retry download; check connection. |
| “AI Processing failed” | Two possible causes: ① Network/Request failure during processing, ② File is valid but no extractable medical data was found. | For case ①: retry once network is stable. For case ②: verify the file contains structured medical information (e.g., lab results, imaging reports). |
| “Processed data could not be saved” | System or connectivity issue during saving. | Retry saving. If error persists, Retry once network is stable. |