Patient Visit (In-person) Appointment
Overview
The Patient Visit (In-person) appointment type allows you to schedule a face-to-face visit with a patient.
After selecting this appointment type from the Appointment Type Selection Modal, a new page opens.
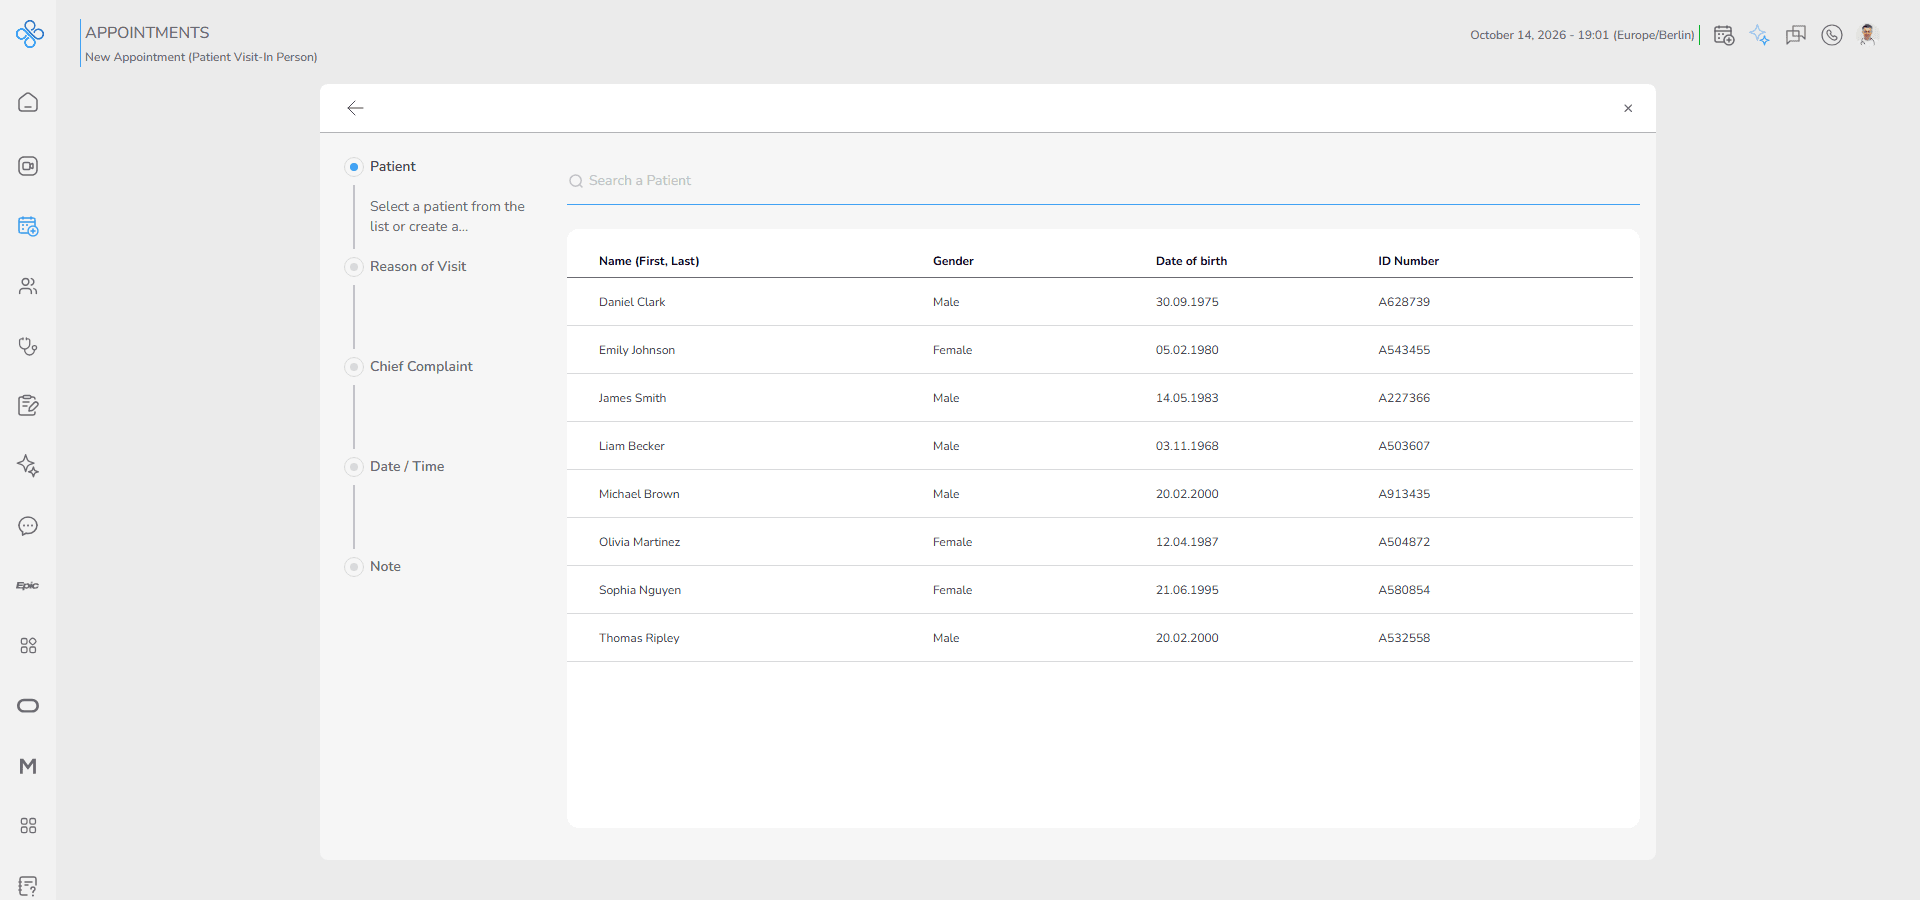
On the left side, you will see a progress bar that guides you step by step through the appointment creation process. Each step must be completed in order, and the progress bar helps you understand:
- Where you are in the process
- What information is required next
Following the steps below, you will first select a patient, then define the reason for the visit, choose a chief complaint (optional), select an available date and time, and finally add an optional note before submitting the appointment.
Steps
Step 1: Select Patient
In this step, you choose the patient for the in-person visit.
- Instruction text: “Select a patient from the list or create a New Patient”
How it works:
- A searchable list of patients is displayed, including your own patients and shared patients.
- You can scroll through the list or use the search bar to quickly find a patient by name, gender, date of birth, or ID number.
- Fields shown for each patient: Name (First, Last), Gender, Date of Birth, ID Number.
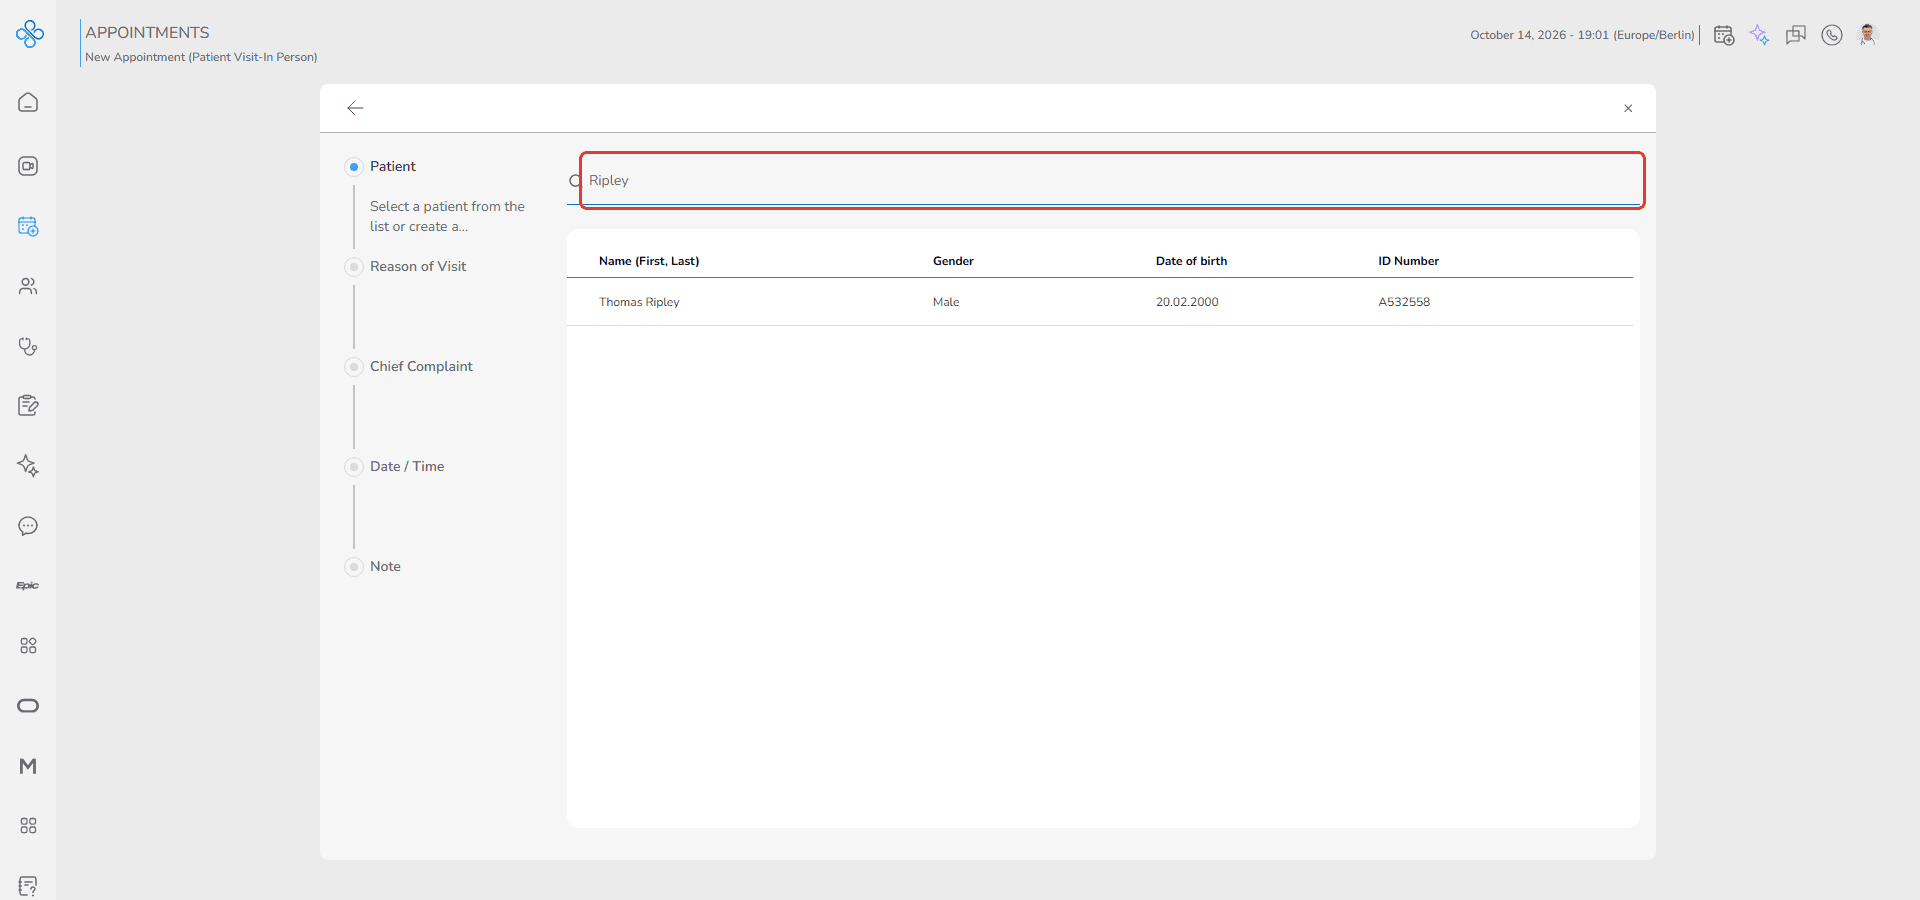
Selecting a patient:
- Once selected, you are automatically taken to the next step.
- Use Back if you want to change your selection or exit the flow.
Step 2: Reason of Visit
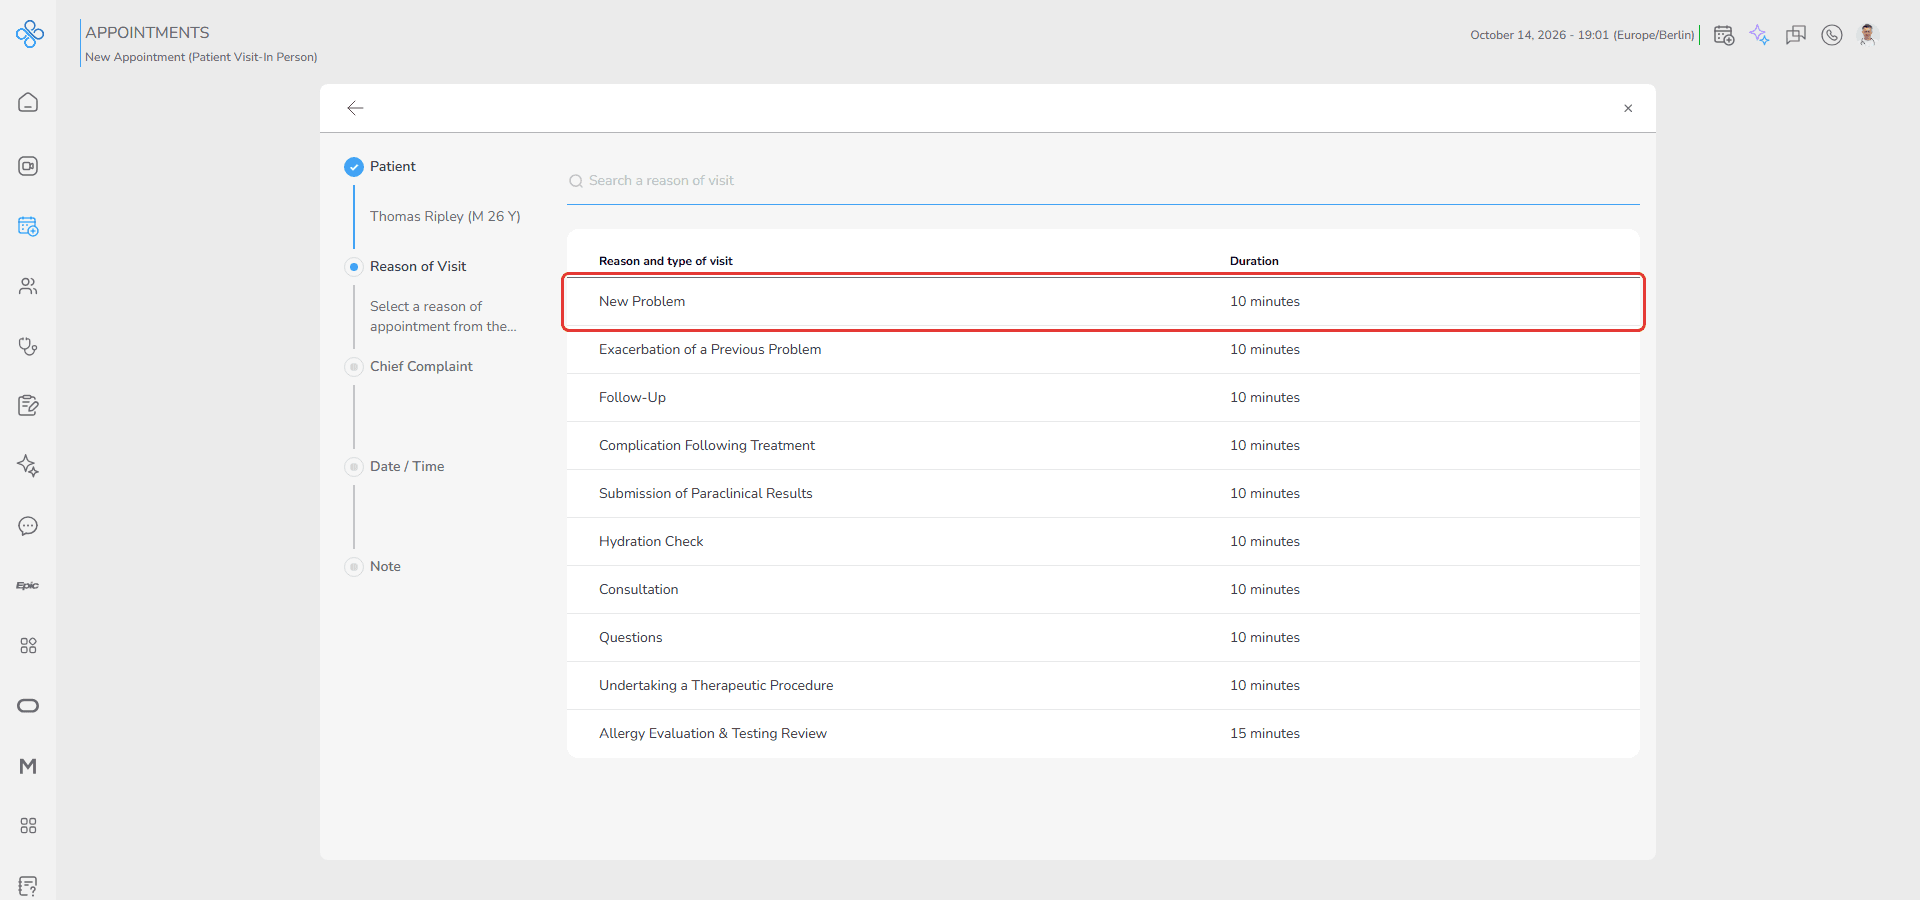
In this step, you select why the patient is coming for a visit.
- Instruction text: “Select a reason of appointment from the list.”
How it works:
- A list of visit reasons is displayed based on the services available to you.
- Once a reason is selected, you are automatically taken to the next step.
Note:
Special Case: If you select Exacerbation of a Previous Problem, Follow-Up, or Complication Following Treatment, an additional Related Visit step will appear. This allows you to link the new appointment to a previous visit. This step does not add a new stage to the progress bar.
Step 3: Chief Complaint
In this step, you can optionally add the patient’s chief complaints.
- Instruction text: “Select a chief complaint.”
How it works:
- Click +Add to open the Chief Complaint modal.
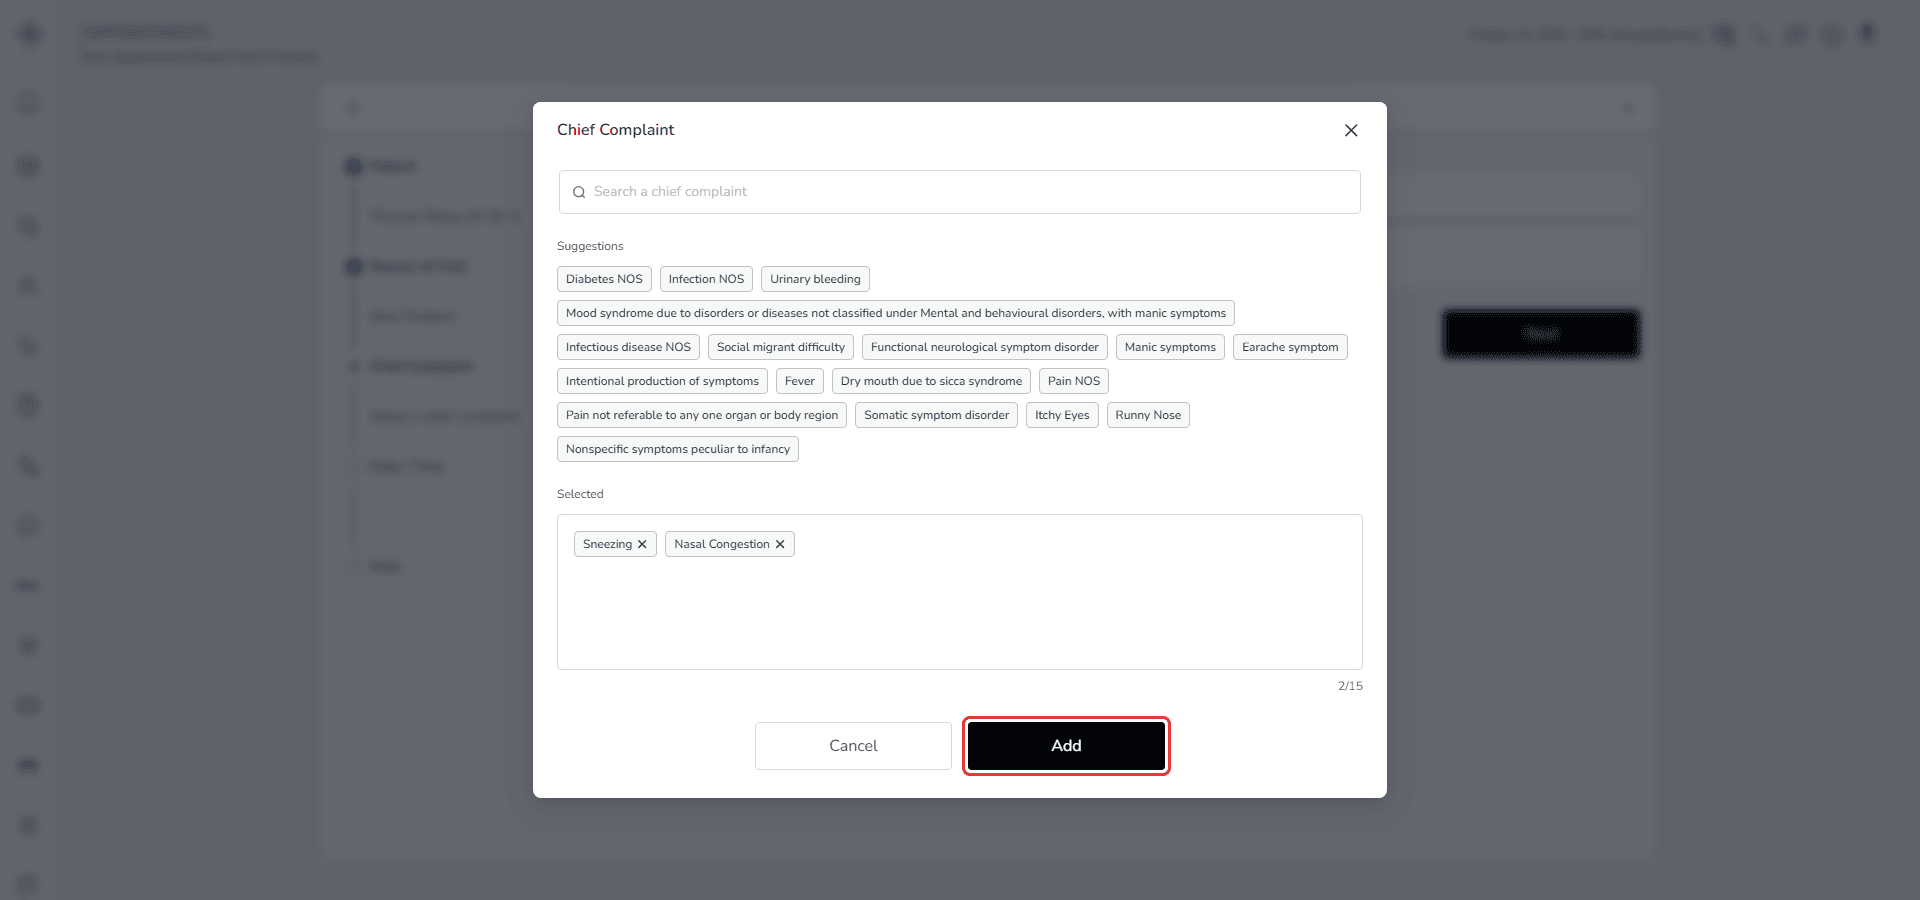
- Features include:
- Search: Quickly find complaints.
- Suggestions: Frequently used or AI-suggested complaints.
- Selected: Shows complaints added for this visit.
- Add to Step: After selecting complaints, click the Add button at the bottom of the modal.
- The complaints you added are now displayed directly in the current step.
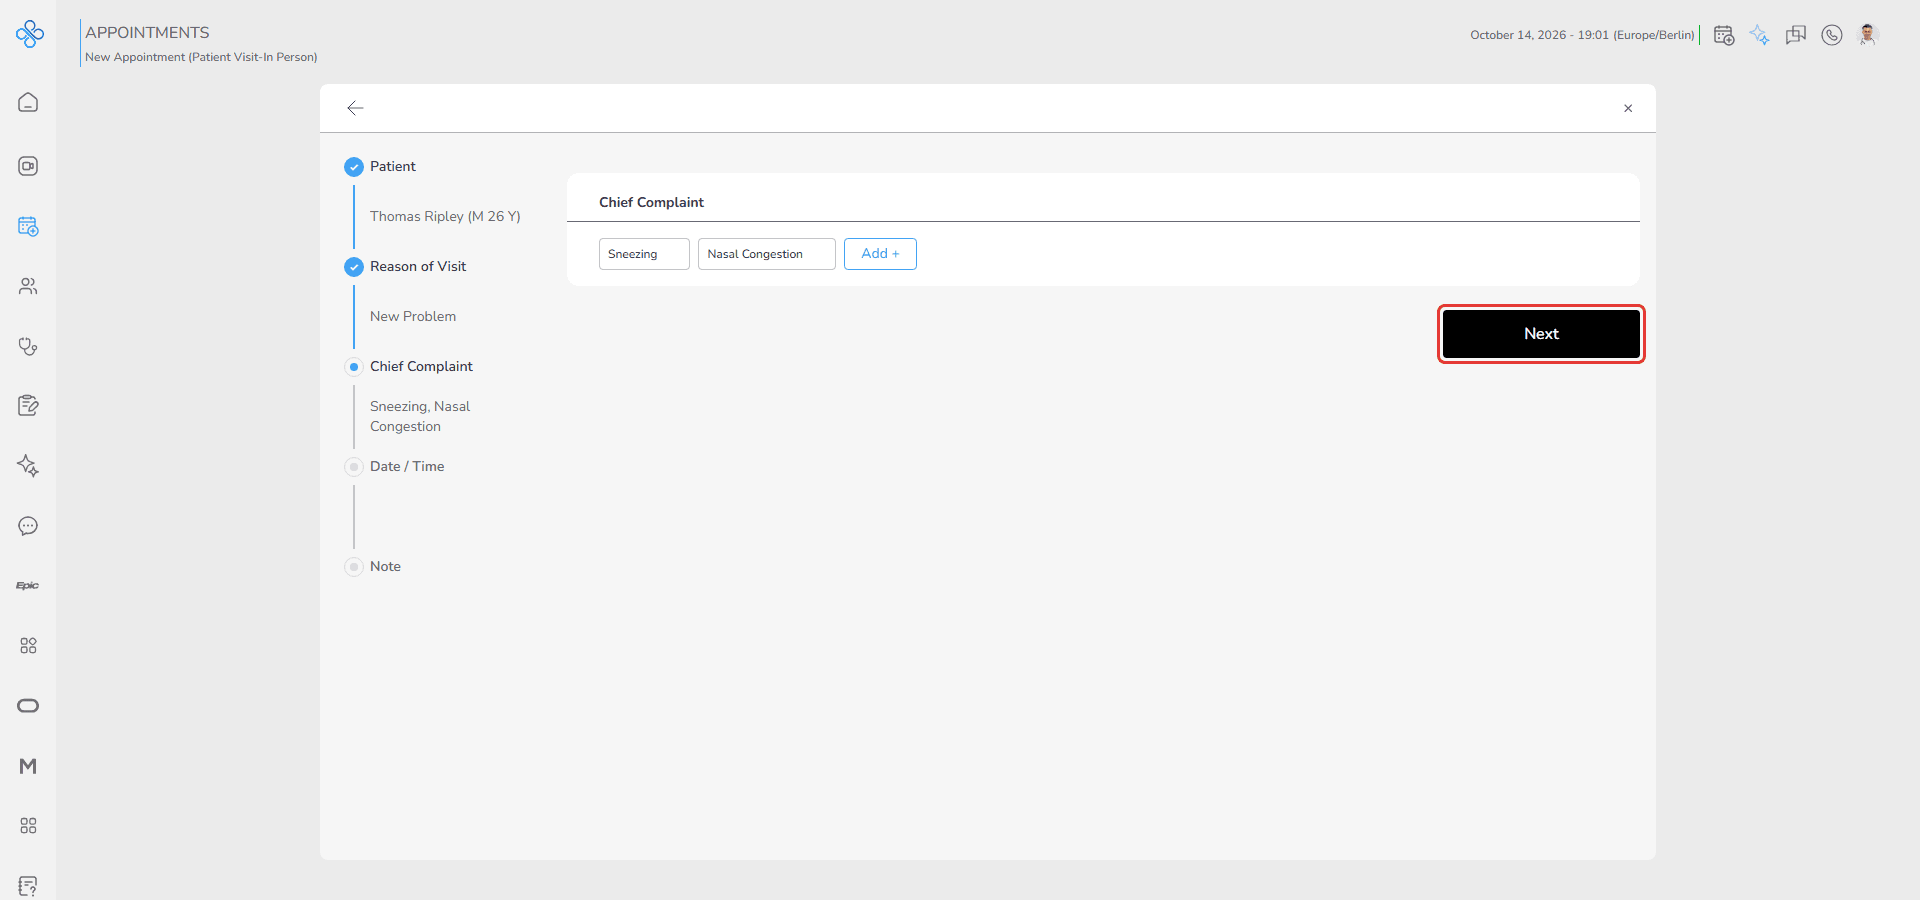
- You can review, remove, or adjust these complaints before moving on.
- Click Next to proceed to the Date / Time step.
Note:
If the Reason of Visit is one of the following: Exacerbation of a Previous Problem, Follow-Up, or Complication Following Treatment, then the Chief Complaints from the selected related visit will also be displayed. The user can choose to keep them, remove them, or add new complaints.
Step 4: Date / Time
In this step, you choose when the visit will take place.
- Instruction text: “Select an available time of remote Provider”
How it works:
- A calendar and a list of the provider’s available slots are displayed.
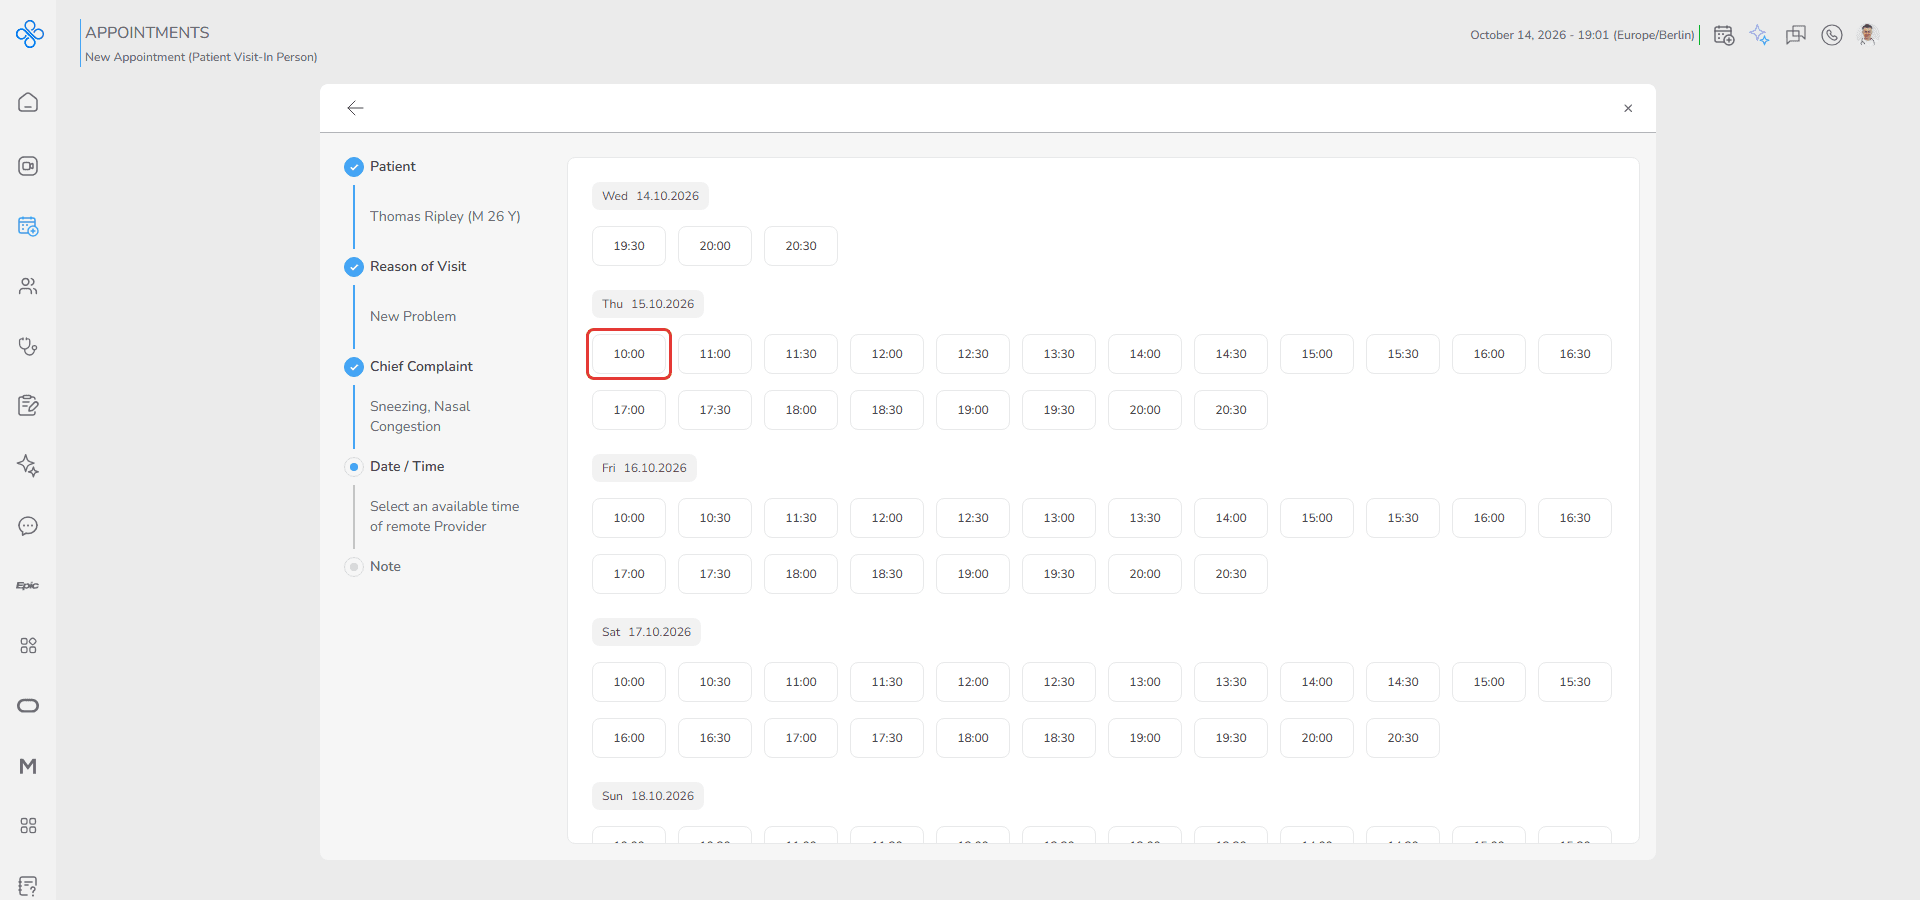
- Only free slots can be selected.
- Click on a slot to select it.
- Once a slot is selected, you are automatically taken to the Note step.
Step 5: Note
In this step, you can add extra information or context for the visit.
- Instruction text: “Write a note for this appointment.”
How it works:
- A text box allows free-text notes, up to 3000 characters.
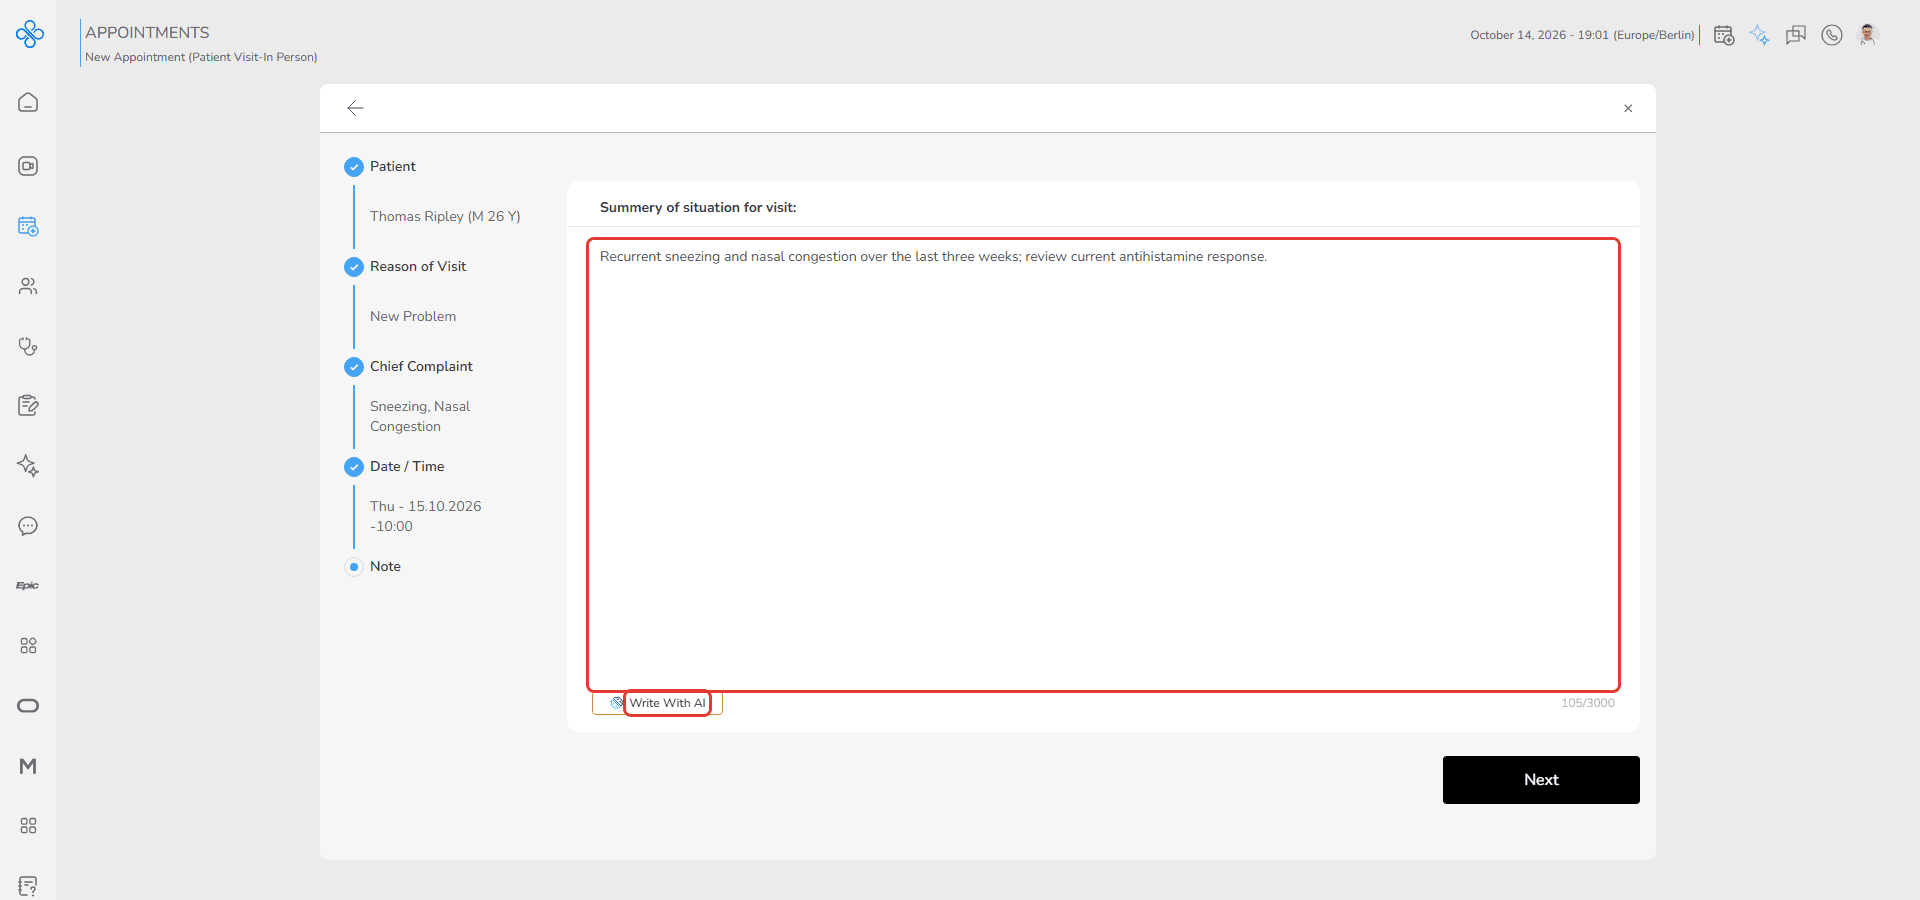
- Optional feature: Write with AI button, enabled only if a Patient Summary exists and a Chief Complaint has been selected. Otherwise, it is disabled with the message: “Please complete chief complaint and patient summary to use AI.”
- This step requires clicking Next to continue.
Final Step: Review & Submit
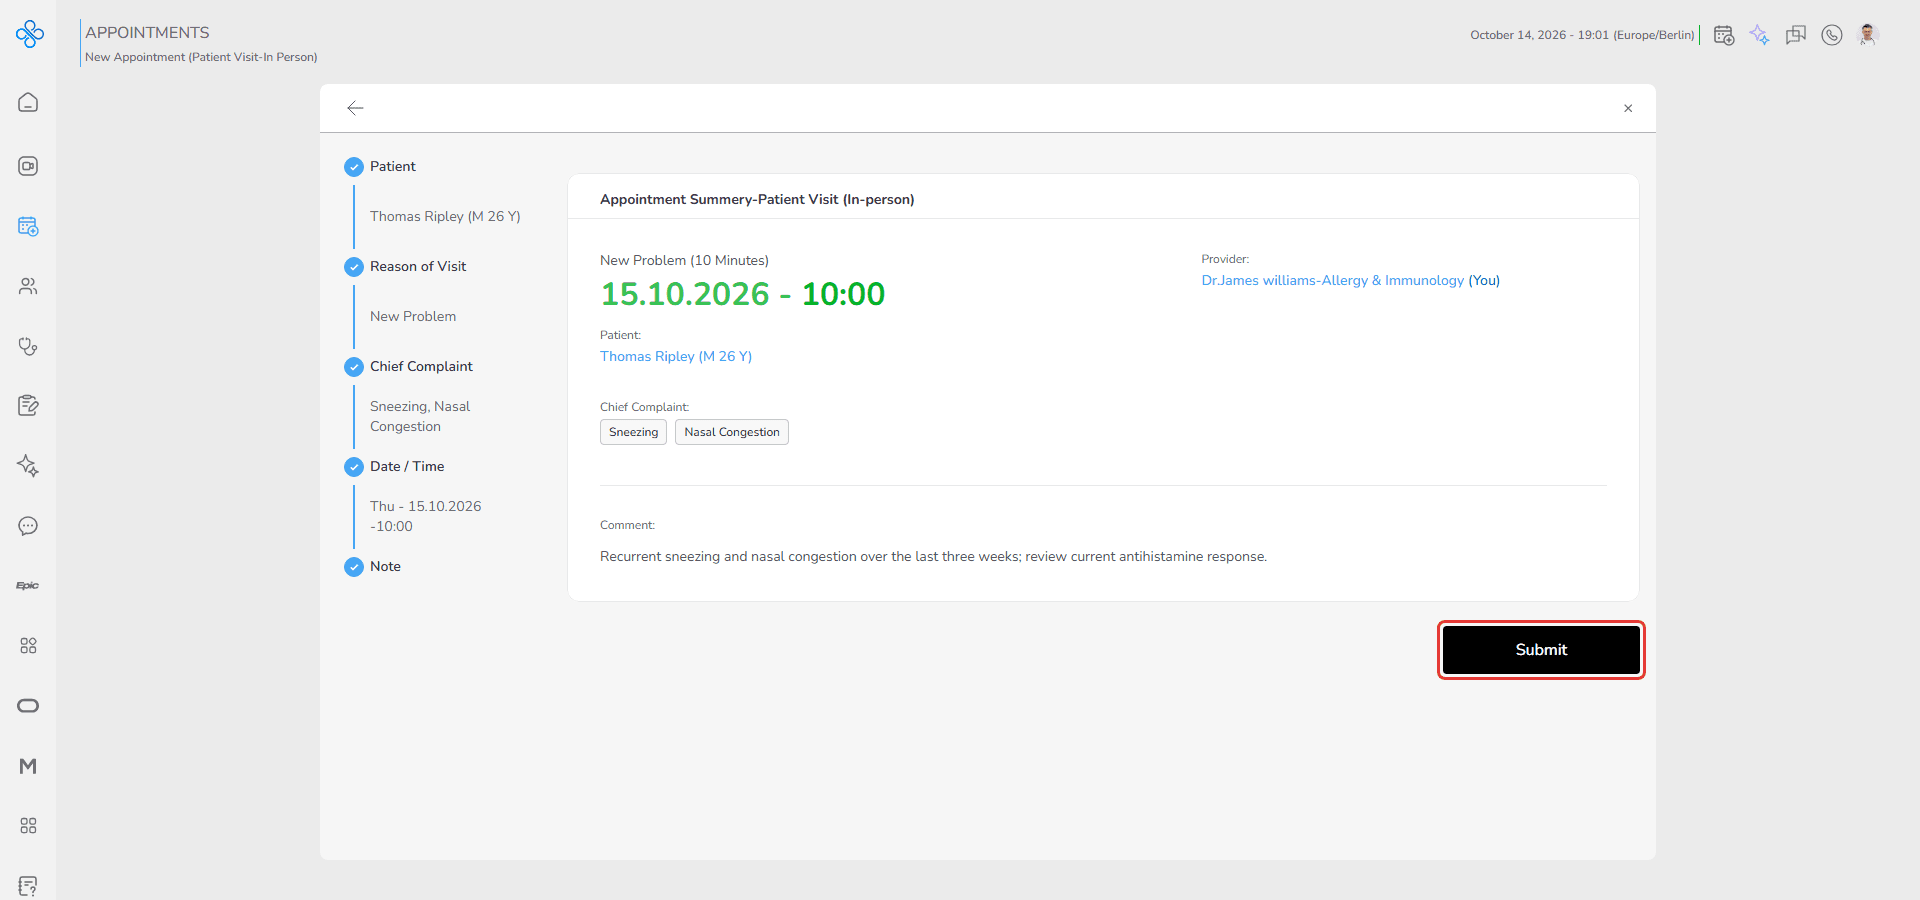
In this final step, review all the details before creating the appointment.
Displayed summary:
- Appointment Type
- Patient
- Reason of Visit
- Chief Complaint (if added)
- Date and Time
- Duration
- Note (manual or AI-generated, if provided)
Review all details carefully.
When everything looks correct:
- Click Submit to confirm the appointment.
After submission:
- The appointment is added to your schedule.
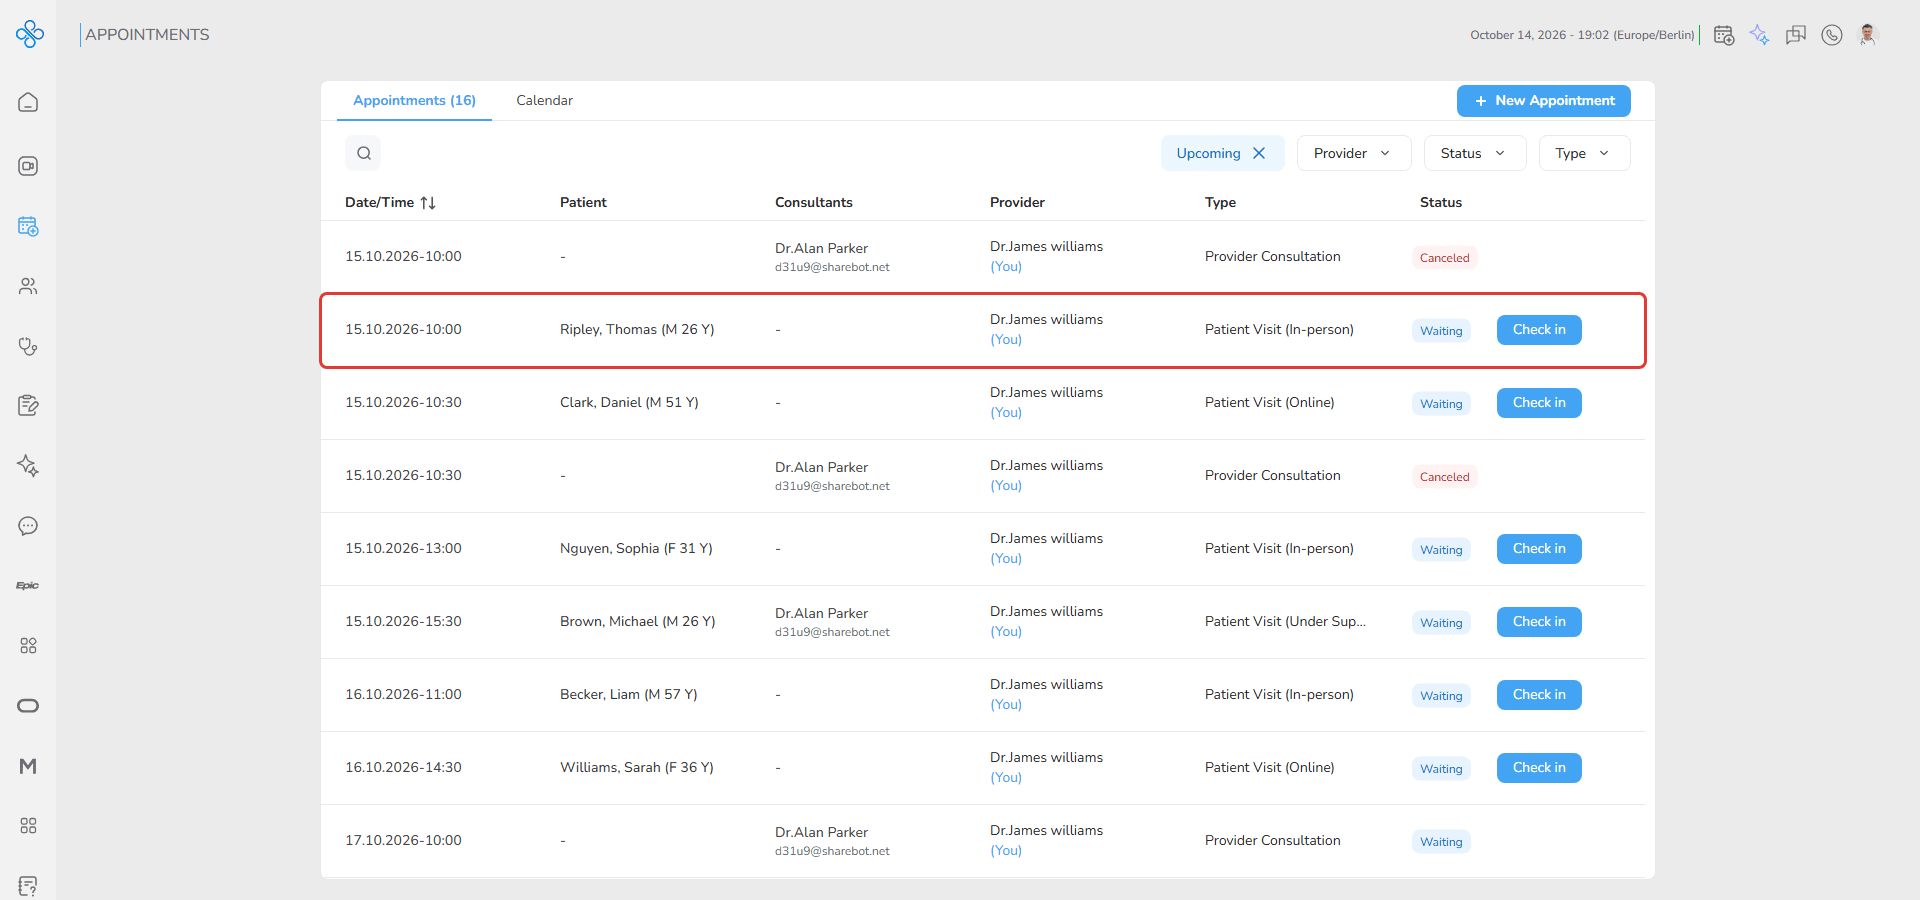
After creating this type of appointment, you can view and manage all your appointments in the Review & Manage Appointments section.
Fields (Field Descriptions)
| Step | Field | Description |
|---|---|---|
| Patient | Patient List | Displays all accessible patients (own + shared). |
| Patient | Search Bar | Allows filtering patients by name or ID. |
| Reason of Visit | Reason List | Shows visit reasons available for the provider. |
| Chief Complaint | +Add Button | Opens modal to manage complaints. |
| Chief Complaint | Modal: Search | Search complaints by keyword. |
| Chief Complaint | Modal: Suggestions | Common or suggested complaints. |
| Chief Complaint | Modal: Selected | List of chosen complaints. |
| Date / Time | Calendar & Slots | Provider’s available time slots. |
| Note | Text Field | Free-text note (up to 3000 characters). |
| Note | Write with AI | Generates note (enabled if requirements met). |
Behavior & Expected Outcome
- Progress bar updates dynamically with blue highlight and check mark after each step.
- Patient, Reason, and Date/Time are mandatory; Chief Complaint and Note are optional.
- Write with AI is only available if a Patient Summary exists and a Chief Complaint is selected.
- Appointment is confirmed only after pressing Submit.
Common Errors + Fixes
| Issue | Cause | Fix |
|---|---|---|
| No Patient Selected | User tries to proceed without choosing a patient. | Select a patient from the list. |
| No Reason Selected | Reason of visit not chosen. | Select a reason of visit. |
| No Time Selected | No date/time slot selected. | Pick an available slot. |
| Invalid Note Length | Note exceeds 3000 characters. | Shorten the note. |
| AI Note Disabled | Patient summary or chief complaint missing. | Add both to enable AI note. |
| Submission Failed | Network/server error. | Retry after checking connection or contact support. |